Table des Matières
Publicité
Liens rapides
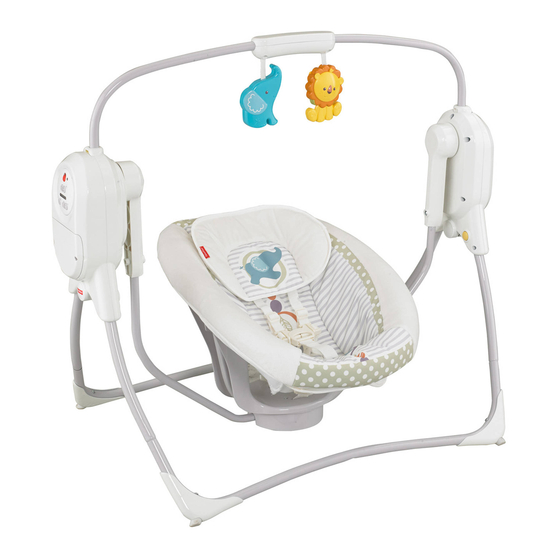
Head-to-toe
D'avant en arrière
IMPORTANT! Please keep these instructions
for future reference.
• Please read these instructions before
assembly and use of this product.
• Adult assembly is required.
• Tool needed for assembly: Phillips
screwdriver (not included).
• Requires four D (LR20) alkaline batteries
for operation (not included).
• Product features and decorations may
vary from photographs.
IMPORTANT! Conserver ce mode d'emploi
pour s'y référer en cas de besoin.
• Lire attentivement ce mode d'emploi avant
d'assembler et d'utiliser le produit.
• Doit être assemblé par un adulte.
• Outil requis pour l'assemblage : un
tournevis cruciforme (non fourni).
• Fonctionne avec quatre piles alcalines
D (LR20), non fournies.
• Les caractéristiques et les décorations du
produit peuvent varier par rapport
aux illustrations.
fisher-price.ca
1
Side-to-side
De gauche à droite
CCH25
Publicité
Table des Matières

Manuels Connexes pour Fisher-Price CCH25


Sommaire des Matières pour Fisher-Price CCH25
- Page 1 CCH25 Side-to-side De gauche à droite Head-to-toe D’avant en arrière IMPORTANT! Please keep these instructions IMPORTANT! Conserver ce mode d’emploi for future reference. pour s’y référer en cas de besoin. • Please read these instructions before • Lire attentivement ce mode d’emploi avant assembly and use of this product.
-
Page 2: Consumer Information Renseignements Pour Les Consommateurs
NE PAS utiliser le produit si des pièces manquent ou sont endommagées. Communiquer avec Fisher-Price pour obtenir des pièces de rechange et des instructions au besoin. N’utiliser que des pièces du fabricant. - Page 3 Parts Pièces Please remove all parts from the package and identify them before assembly. Some parts may be packed in the pad. Retirer tous les éléments de l’emballage et s’assurer d’avoir toutes les pièces avant de commencer l’assemblage. Certaines pièces peuvent avoir été placées dans le coussin. 2 Hubs Seat Pad Seat Base...
-
Page 4: Assembly Assemblage
Assembly Assemblage Hub Arms Bras des pivots Bases Bases • Fit the tubes on the hubs into the tubes on the bases. Hint: When assembled properly, the hub arms should face each other. • Insérer les tubes des pivots dans les tubes des bases. Remarque : Après l’assemblage, les bras des pivots doivent être face à... - Page 5 Assembly Assemblage Seat Back Dossier • Fit the seat back onto the seat base. Hint: The seat back is designed to fit onto the seat base one way. If it does not seem to fit, turn it around and try again. •...
- Page 6 Assembly Assemblage • Insert an M5 x 31 mm screw into each hub arm and tighten. • Insérer une vis M5 de 31 mm dans chaque bras de pivot et serrer. Handle Poignée • Fit the ends of the handle into the socket in each hub. •...
- Page 7 Assembly Assemblage LOWEST SLOTS FENTES INFÉRIEURES Waist Belts Courroies abdominales • Insert the waist belts through the lowest slots in the seat pad. Make sure the waist belts are not twisted. • Insérer les courroies abdominales dans les fentes inférieures du coussin. S’assurer que les courroies ne sont pas tortillées.
- Page 8 Assembly Assemblage UPPER SLOTS FENTES SUPÉRIEURES Shoulder Belts Upper Slots Fentes supérieures pour les courroies d’épaule Larger Baby • Insert the ends of the shoulder belts through the upper slots in the seat pad back. Make sure the shoulder belts are not twisted. Enfant plus grand •...
- Page 9 Assembly Assemblage • Fasten the buckles on the front of the seat pad to the buckles on the seat bottom. Make sure you hear a “click”. • Attacher les boucles à l’avant du coussin aux boucles du siège. S’assurer d’entendre un clic.
-
Page 10: Battery Installation Installation Des Piles
Battery Installation Installation des piles 1,5V x 4 D (LR20) Hint: We recommend using alkaline batteries for longer battery life. Remarque : Il est recommandé d’utiliser des piles alcalines car elles durent plus longtemps. • Loosen the screws in the battery compartment door with a Phillips screwdriver and remove the battery compartment door. -
Page 11: Battery Safety Information Mises En Garde Au Sujet Des Piles
Battery Safety Information Mises en garde au sujet des piles In exceptional circumstances, batteries may leak fluids that can cause a chemical burn injury or ruin your product. To avoid battery leakage: • Do not mix old and new batteries or batteries of different types: alkaline, standard (carbon-zinc) or rechargeable (nickel-cadmium). -
Page 12: Using The Restraint System Utilisation Du Système De Retenue
Using the Restraint System Utilisation du système de retenue WARNING Prevent serious injury or death from falls or strangling in the restraint system: • Never leave child unattended. • This product is not intended to replace a crib or bassinet for prolonged periods of sleep. - Page 13 Using the Restraint System Utilisation du système de retenue Shoulder Belt Shoulder Belt Courroie d’épaule Courroie d’épaule Waist Belt Waist Belt Courroie abdominale Courroie abdominale Crotch Belt Courroie d’entrejambe • Place your child in the seat. Position the crotch belt between your child’s legs. •...
- Page 14 Using the Restraint System Utilisation du système de retenue TIGHTEN LOOSEN SERRER DESSERRER • To tighten the waist belts: Feed the anchored end of the belt up through the buckle to form a loop . Pull the free end of the belt .
- Page 15 Using the Restraint System Utilisation du système de retenue Adjusters Boucles de réglage TIGHTEN LOOSEN SERRER DESSERRER • To tighten the shoulder belts: Hold the adjuster and pull the front shoulder strap down • To loosen the shoulder belts: Slide the adjuster down. Note: After adjusting the belts to fit your child, make sure you pull on them to be sure they are securely fastened.
- Page 16 2 Swinging Motions 2 modes de balancement Turn the seat for side-to-side swinging. Turn the seat for head-to-toe swinging. Tourner le siège pour un balancement de gauche Tourner le siège pour un balancement d’avant à droite. en arrière. • Adjust the seat for side-to-side or head-to-toe swinging. Rotate the seat to the desired position.
-
Page 17: Use Utilisation
Use Utilisation Power Switch Interrupteur Swing Speed Buttons Boutons de vitesse de balancement Volume Buttons Music/Sounds Button Boutons du volume Bouton musique/sons Swing • Slide the power switch ON. • Press the swing speed buttons to select any of six speed settings. •... -
Page 18: Storage & Care Rangement Et Entretien
Storage & Care Rangement et entretien IMPORTANT! Remove the batteries for long-term storage. IMPORTANT! Retirer les piles du produit s’il n’est pas utilisé pendant un certain temps. PRESS PRESS PRESS PRESS APPUYER APPUYER APPUYER APPUYER • Press the buttons on each hub and push the bases together for storage. •... - Page 19 Consumer Information Renseignements pour les consommateurs FCC Statement (United States Only) This equipment has been tested and found to comply with the limits for a Class B digital device, pursuant to Part 15 of the FCC Rules. These limits are designed to provide reasonable protection against harmful interference in a residential installation.
- Page 20 CANADA Mattel Canada Inc., 6155 Freemont Blvd., Mississauga, Ontario L5R 3W2. 1-800-432-5437 UNITED STATES 1-800-432-5437. Fisher-Price, Inc., 636 Girard Avenue, East Aurora, NY 14052. Hearing-impaired consumers: 1-800-382-7470. ©2014 Mattel. All Rights Reserved. Tous droits réservés. PRINTED IN CHINA/IMPRIMÉ EN CHINE...