Table des Matières
Publicité
Les langues disponibles
Les langues disponibles
Liens rapides
DIGIMON-SE
DIGIMON4
Installation and operating guide
Digital Manifold
Installations- und Bedienungsanleitung
Digitale Monteurhilfe
Guide d'installation et d'utilisation
By-pass électronique
Istruzioni per l'installzione e l'uso
Gruppo Manometrico digitale
Guía de instalación y funcionamiento
Analizador digital
Publicité
Chapitres
Table des Matières

Manuels Connexes pour Refco DIGIMON-SE


Sommaire des Matières pour Refco DIGIMON-SE
- Page 1 DIGIMON-SE DIGIMON4 Installation and operating guide Digital Manifold Installations- und Bedienungsanleitung Digitale Monteurhilfe Guide d’installation et d‘utilisation By-pass électronique Istruzioni per l’installzione e l’uso Gruppo Manometrico digitale Guía de instalación y funcionamiento Analizador digital...
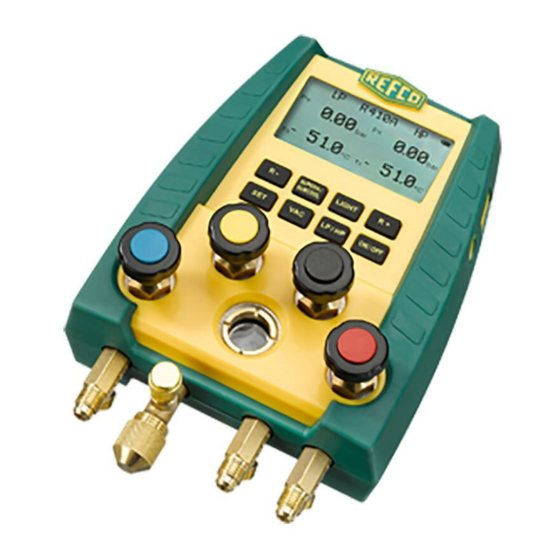
- Page 3 Instruction Manual DIGIMON-SE / DIGIMON4 English Instruction manual 2-way and 4-way digital manifolds DIGIMON-SE DIGIMON4 1. Low pressure anchor ¼“ SAE 2. High pressure anchor ¼“ SAE 3. Vacuum anchor ¼“ SAE or 3/8“ 4. Refrigerants anchor ¼“ SAE 5. Low pressure valve (blue) 6.
-
Page 4: Table Des Matières
English Instruction Manual DIGIMON-SE / DIGIMON4 Contents Important safety notice ....................3 Purpose and use ......................3 Scope of delivery ......................4 Transport ......................... 4 Important note ......................... 4 Technical description ..................... 4 Key functions ........................6 Battery charge level indicator ..................6 Application ........................ -
Page 5: Important Safety Notice
REFCO cannot be held liable or responsible for any accidents, injuries or deaths arising during use of the manifold. REFCO explicitly states that their products must only be sold to professionally trained experts. -
Page 6: Scope Of Delivery
English Instruction Manual DIGIMON-SE / DIGIMON4 Scope of delivery Information about the various models and variations of our products can be found in the REFCO catalogue or at www.refco.ch. Transport The manifolds are delivered from the factory in a plastic box, with or without filling hoses. - Page 7 Instruction Manual DIGIMON-SE / DIGIMON4 English Property Value Maximum working Low pressure: 60bar / 870psi / 6000kPa / 6MPa pressure: High pressure : 60bar / 870psi / 6000kPa / 6MPa Pressure 0.01 bar / 0.5psi / 1kPa / 0.001MPa resolution:...
-
Page 8: Key Functions
English Instruction Manual DIGIMON-SE / DIGIMON4 Vacuum display with external vacuum sensor Property Value Range: 0 to 10000 Microns Resolution: 0.1Pa / 1Micron / 0.001mbar / 0.001Torr / 1mTorr / 0.0001psi / 0.0001inHg Units: Pa / Micron / mbar / Torr / mTorr / psi / inHg... -
Page 9: Application
Instruction Manual DIGIMON-SE / DIGIMON4 English Application Set-up Insert 4 batteries in the battery compartment at the back of the device. Caution: Ensure the batteries are inserted observing the correct polarities. Do not leave empty batteries in the battery compartment. If you will not be using the DIGIMON for a longer period of time, remove the batteries from the battery compartment. - Page 10 English Instruction Manual DIGIMON-SE / DIGIMON4 Digital display Analogue display with memory function Select refrigerant Press the buttons to select the desired refrigerant from the list. During selection, you will see a flashing "R" on the display. Press the button to confirm selection of the desired refrigerant. The "R" no longer flashes on the display.
- Page 11 Instruction Manual DIGIMON-SE / DIGIMON4 English Select pressure unit Hold down the button. Use to select the desired unit. Release both buttons. Select temperature unit Hold down the button. Use to choose between °C and °F. Release both buttons. Important note: The device will save the last pressure and temperature units selected.
- Page 12 English Instruction Manual DIGIMON-SE / DIGIMON4 SUPERH SUBC00L displays the difference "K" (F) between the temperature according to the vapour pressure table (to, tc) and the measured temperature (t1, t2) of the external thermocouples (9) or the clamp thermocouples (10).
- Page 13 Instruction Manual DIGIMON-SE / DIGIMON4 English External vacuum sensor (optional) The external vacuum sensor should be used to measure exact vacuum values. The sensor should be connected to the system. Vacuum display Select pressure unit Hold down the button. Use the button to select the desired unit.
-
Page 14: Connecting The Manifold
English Instruction Manual DIGIMON-SE / DIGIMON4 Connecting the manifold a) with DIGIMON-SE Connect blue hose (1) to suction pressure side of system Connect red hose (2) to high pressure side of system Connect yellow hose (3) to vacuum pump ... -
Page 15: Filling The System
Instruction Manual DIGIMON-SE / DIGIMON4 English Filling the system a) with DIGIMON-SE manifold Disconnect the yellow hose from the vacuum pump and screw it onto the refrigerant bottle or cylinder. Open the valve on the refrigerant bottle or cylinder. -
Page 16: Measuring Using The Superheat / Subcool Modes
In case of leaky valves, the piston should be replaced (M4-6-04-R/4). The special REFCO M4-6-11-T tool should be used to change the sight glass on the manifold. The manifold should be checked after the replacement of seals to ensure there are no leaks. -
Page 17: Environmental Issues
Instruction Manual DIGIMON-SE / DIGIMON4 English Environmental issues The DIGIMON manifold has been developed for long term use. REFCO takes energy saving and environmental impact into consideration when procuring materials and manufacturing its products. REFCO Manufacturing Ltd feels responsible for all of its products throughout their entire lifespan and has therefore been certified in accordance with DIN EN ISO 14001 : 2004. -
Page 18: Resetting Pressure Sensors
English Instruction Manual DIGIMON-SE / DIGIMON4 Resetting pressure sensors LIGHT By pressing the buttons the DIGIMON pressure displays are reset to zero, in order to avoid incorrect measurement values. To obtain a correct measurement value on the display, the DIGIMON should not be reset when pressurised or under a vacuum. -
Page 19: Calibrating Pressure Sensors
Instruction Manual DIGIMON-SE / DIGIMON4 English Calibrating pressure sensors A correct calibration requires a certified monitor. (e.g. REF-CLASS-GAUGE P/N 4682293) 1. Switch off the DIGIMON LIGHT ON/OFF 2. Press down the button and switch on the device using the button. - Page 20 English Instruction Manual DIGIMON-SE / DIGIMON4 Calibrating the K-Type sensors (using room temperature) 1. Switch off the DIGIMON 2. Plug in the thermocouples (K-type). Room and measurement temperatures must remain constant at 25 +/-3°C and be stable for at least 20 minutes. The thermocouple cables must be straight (unwound).
- Page 21 Instruction Manual DIGIMON-SE / DIGIMON4 English Press the button to calibrate the high pressure side (HP) Repeat from Point 6 ON/OFF 10. Once both sensors are calibrated, press to exit the sensor calibration mode. Calibrating the temperature sensors / clamps (0°C / 32°F ice water) 1.
- Page 22 English Instruction Manual DIGIMON-SE / DIGIMON4 7. Put both K-Type thermocouples / clamps into (0°C /32°F ice water bath) Take your time, use lots of ice and stir water often. It can take up to 15 minutes for the ice water temperature to settle exactly at 0.0°C / 32.0°F Use separate accurate...
- Page 23 Bedienungsanleitung DIGIMON-SE / DIGIMON4 Deutsch Bedienungs- und Wartungsanleitung für die elektronische 2-Weg und 4-Weg Monteurhilfe DIGIMON-SE DIGIMON4 1. Niederdruck-Anschluss ¼“ SAE 2. Hochdruck-Anschluss ¼“ SAE 3. Anschluss Vakuum ¼“ SAE resp. 3/8“ 4. Anschluss Kältemittel ¼“ SAE 5. Niederdruck-Ventil (blau 6.
- Page 24 Deutsch Bedienungsanleitung DIGIMON-SE / DIGIMON4 Inhaltsverzeichnis Wichtige Sicherheits-Hinweise ................... 23 Verwendung / Einsatz ....................23 Lieferumfang ....................... 24 Transport ........................24 Beachten ........................24 Technische Beschreibung ................... 24 Tastenfunktionen ......................26 Batteriestandsanzeige ....................26 Anwendung ........................27 Anschliessen der Monteurhilfe ..................32 Evakuieren der Anlage ....................
-
Page 25: Wichtige Sicherheits-Hinweise
Frigoristen und Kälte-Techniker. Aufgrund der hohen Drücke sowie der chemischen und physikalischen Gase, die in Kältesystemen verwendet werden, lehnt REFCO jede Verantwortung und Haftung bei Unfällen, Verletzungen und Tod ab. REFCO weist ausdrücklich darauf hin, die Produkte ausschliesslich an professionell... -
Page 26: Lieferumfang
Deutsch Bedienungsanleitung DIGIMON-SE / DIGIMON4 Lieferumfang Der Lieferumfang für die verschiedenen Ausführungen und Variationen ist dem REFCO- Katalog zu entnehmen oder unter www.refco.ch Transport Die Monteurhilfen werden ab Werk in einem Kunststoffkoffer mit oder ohne Füllschläuche geliefert. Monteurhilfen sind hochwertige Messinstrumente und sollen immer im Koffer transportiert und aufbewahrt werden. - Page 27 Bedienungsanleitung DIGIMON-SE / DIGIMON4 Deutsch Eigenschaft Werte Arbeitsdruck Niederdruck maximal: 60bar / 870psi / 6000kPa / 6MPa Hochdruck 60bar / 870psi / 6000kPa / 6MPa Auflösung 0.01 bar / 0.5psi / 1kPa / 0.001MPa Druckanzeige: bar / psi / kPa / MPa...
-
Page 28: Tastenfunktionen
Deutsch Bedienungsanleitung DIGIMON-SE / DIGIMON4 Vakuumanzeige mit externem Vakuumsensor Eigenschaft Werte Bereich: 0 bis 10000 Mikron Auflösung: 0.1Pa / 1Mikron / 0.001mbar / 0.001Torr / 1mTorr / 0.0001psi / 0.0001inHg Einheiten: Pa / Mikron / mbar / Torr / mTorr / psi / inHg... -
Page 29: Anwendung
Bedienungsanleitung DIGIMON-SE / DIGIMON4 Deutsch Anwendung Vorbereitung 4 Batterien in das Batteriefach auf der Rückseite einlegen. Achtung: Beachten sie unbedingt die richtige Polarität der Batterien. Lassen sie aufgebrauchte Batterien nicht im Batteriefach. Falls sie die DIGIMON über längere Zeit nicht gebrauchen, entfernen sie die Batterien aus dem Batteriefach. - Page 30 Deutsch Bedienungsanleitung DIGIMON-SE / DIGIMON4 Digitale Anzeige Analoge Anzeige mit Speicherfunktion Kältemittel auswählen Durch Drücken der Tasten oder kann das gewünschte Kältemittel aus dem Verzeichnis abgerufen werden. Während der Auswahl blinkt das „R“ auf dem Display. Durch Drücken der -Taste wird das gewählte Kältemittel fixiert. Das „R“ im Display blinkt nun nicht mehr.
- Page 31 Bedienungsanleitung DIGIMON-SE / DIGIMON4 Deutsch Druck-Masseinheit auswählen -Taste gedrückt halten. Mit die gewünschte Einheit auswählen. Beide Tasten loslassen. Temperatur-Masseinheit auswählen -Taste gedrückt halten. Mit zwischen °C und °F wählen. Beide Tasten loslassen. Beachten: Die zuletzt ausgewählten Druck- und Temperatur-Masseinheiten bleiben gespeichert.
- Page 32 Deutsch Bedienungsanleitung DIGIMON-SE / DIGIMON4 SUPERH SUBC00L zeigt die Differenz „K“ (F) zwischen der Temperatur gemäss Dampfdrucktafel (to, tc) und der gemessenen Temperatur (t1, t2) der externen Temperatursonden(9) oder der Zangentemperatur-fühlern(10). Vakuum Anzeige - Taste drücken um in die Vakuum Anzeige zu gelangen.
- Page 33 Bedienungsanleitung DIGIMON-SE / DIGIMON4 Deutsch Externer Vakuumsensor (Optional) Für die Messung genauer Vakuumwerte ist mit dem externen Vakuumsensor zu arbeiten. Der Sensor ist an der Anlage anzuschliessen. Vakuumanzeige Masseinheit auswählen -Taste gedrückt halten. Mit die gewünschte Einheit auswählen. Beide Tasten loslassen.
-
Page 34: Anschliessen Der Monteurhilfe
Deutsch Bedienungsanleitung DIGIMON-SE / DIGIMON4 Anschliessen der Monteurhilfe a) mit DIGIMON-SE Blauer Schlauch anschliessen (1) Anlage Saugdruckseite anschliessen Roter Schlauch anschliessen (2) Anlage Hochdruckseite anschliessen Gelber Schlauch anschliessen (3) Vakuumpumpe anschliessen Beide Ventile (5+6) schliessen b) mit DIGIMON4 ... -
Page 35: Füllen Der Anlage
Bedienungsanleitung DIGIMON-SE / DIGIMON4 Deutsch Füllen der Anlage a) mit DIGIMON-SE Monteurhilfe Gelber Schlauch von Vakuumpumpe lösen und an Kältemittelflasche oder Kältemittelzylinder anschrauben. Ventil an Kältemittelflasche oder Kältemittelzylinder öffnen. Blaues Ventil (5) (Niederdruckseite) öffnen, die gewünschte Menge Kältemittel einströmen lassen. -
Page 36: Messen Im Überhitzung/Superheat - Unterkühlung /Subcool Modus
Ihre neue DIGIMON ist nach den neuesten arbeitsphysiologischen und ergonomischen Gesichtspunkten entwickelt worden und entspricht dem aktuellen Stand der Technik. Das Unternehmen REFCO Manufacturing Ltd wurde nach DIN EN ISO 9001 : 2008 zertifiziert. Ständige Qualitätskontrollen sowie eine sorgfältige Verarbeitung gewährleisten eine solide Funktionsfähigkeit und ermöglichen die REFCO-Garantie... -
Page 37: Zum Thema Umwelt
Materialbeschaffung und der Produktion wurde auf Energieersparnis und Umweltverträglichkeit geachtet. REFCO Manufacturing Ltd sieht sich „zeitlebens“ verantwortlich für seine Produkte. Aus diesem Grund hat sich REFCO Manufacturing nach der DIN EN ISO 14001 : 2004 zertifizieren lassen. Bei Ausserbetriebsetzung des Gerätes sollte der Anwender die geltenden Entsorgungsvorschriften seines Landes beachten. -
Page 38: Werkseinstellung
Deutsch Bedienungsanleitung DIGIMON-SE / DIGIMON4 Werkseinstellung 1. DIGIMON auf Bild „Digitale Anzeige“ einstellen LIGHT 2. Taste gleichzeitig während 5 Sekunden gedrückt halten 3. Auf Display erscheint - - - - - - - - 4. Taste drücken zum Quittieren Nullstellung externer Vakuumsensor 1. -
Page 39: Kalibration Drucksensoren
Bedienungsanleitung DIGIMON-SE / DIGIMON4 Deutsch Kalibration Drucksensoren Eine korrekte Kalibrierung benötigt ein zertifiziertes Kontrollgerät. (z.B. REF-CLASS-GAUGE Best-Nr. 4682293) 1. DIGIMON ausschalten LIGHT ON/Off 2. Taste gedrückt halten und Gerät mit einschalten. Auf Display erscheint „Password“ 000 3. Taste drücken zum Code 009 wählen. -
Page 40: Kalibration Temperaturanzeige
Deutsch Bedienungsanleitung DIGIMON-SE / DIGIMON4 Kalibration Temperaturanzeige bei Raumtemperatur 1. DIGIMON ausschalten 2. Temperatursensoren (K-Type) einstecken. Raum- und Messtemperatur muss konstant 25 +/-3°C betragen und mindestens während 20 Minuten stabil sein. Die Sensorkabel müssen gerade sein (abgerollt). Während der Kalibrierung dürfen sie Kabel und Stecker nicht berühren. - Page 41 Bedienungsanleitung DIGIMON-SE / DIGIMON4 Deutsch 8. Taste drücken zum Bestätigen. Auf Display erscheint 00xxx 27.0°C 9. Taste drücken zum Kalibrieren der Hochdruckseite (HP) Vorgang weiter bei Punkt 6 ON/Off 10. Wenn beide Sensoren kalibriert sind, drücken Sie , um den...
- Page 42 Deutsch Bedienungsanleitung DIGIMON-SE / DIGIMON4 Während der Kalibrierung sicherstellen, dass beide Temperatursensoren mit der DIGIMON verbunden sind. Auf Display erscheint (Niederdruckseite) Temperatur Code kann ändern 00xxx Aktuelle Raum-Temperatur (bleibt stabil) 24.4°C 7. Die Temperatursensoren in das Eiswasser 0°C eintauchen.
- Page 43 Bedienungsanleitung DIGIMON-SE / DIGIMON4 Deutsch ON/Off 10. Wenn beide Sensoren kalibriert sind, drücken Sie um den Sensorkalibrierungsmodus zu verlassen. 11. Prüfen Sie die Anzeige. Schalten Sie Digimon ein und drücken die Superheat/Subcool Taste. Lesen Sie die T1 und T2 Temperaturmesswerte mit Sensoren im gleichen Eisbad.
- Page 44 Français Mode d’emploi DIGIMON-SE / DIGIMON4 Manuel d’utilisation et d’entretien pour by-pass électronique à 2 et 4 voies DIGIMON-SE DIGIMON4 1. Raccord basse pression ¼“ SAE 2. Raccord haute pression ¼“ SAE 3. Raccord pour vide ¼“ SAE ou 3/8“...
- Page 45 Mode d’emploi DIGIMON-SE / DIGIMON4 Français Sommaire Recommandations de sécurité importantes ............. 44 Utilisation / mise en œuvre ..................44 Contenu de la livraison ....................45 Transport ........................45 Remarques ........................45 Description technique ....................45 Fonction des touches ....................47 Affichage du niveau de la batterie ................
-
Page 46: Recommandations De Sécurité Importantes
Lors de l'utilisation du by-pass, il est nécessaire de toujours porter des lunettes de protection et des gants. Les produits REFCO ont été spécialement conçus et fabriqués pour les spécialistes de la réfrigération et de la climatisation. En raison des pressions élevées et des gaz physicochimiques utilisés dans les systèmes de réfrigération, REFCO décline toute... -
Page 47: Contenu De La Livraison
Mode d’emploi DIGIMON-SE / DIGIMON4 Français Contenu de la livraison Le contenu de la livraison des différents types et versions est disponible dans le catalogue REFCO ou sur www.refco.ch. Transport Les by-pass sont livrés à partir de l’usine dans une valise en plastique avec ou sans les tuyaux de charge. - Page 48 Français Mode d’emploi DIGIMON-SE / DIGIMON4 Propriété Valeurs Pression de travail Basse pression maximale : 60 bar / 870 psi / 6000 kPa / 6 MPa Haute pression 60 bar / 870 psi / 6000 kPa / 6 MPa Résolution en pression : 0.01 bar / 0.5 psi / 1 kPa / 0.001 MPa...
-
Page 49: Fonction Des Touches
Mode d’emploi DIGIMON-SE / DIGIMON4 Français Affichage du vide avec capteur pour vide externe Propriété Valeurs Plage : 0 à 10 000 microns Résolution : 0.1Pa / 1 micron / 0.001 mbar / 0.001 torr / 1mtorr / 0.0001 psi / 0.0001 inHg... -
Page 50: Utilisation
Français Mode d’emploi DIGIMON-SE / DIGIMON4 Utilisation Préparation Installer quatre piles dans le compartiment prévu à cet effet à l’arrière de l’appareil. Attention : Veiller à bien respecter la polarité des piles. Ne pas laisser de piles déchargées dans le compartiment. En cas d’inutilisation prolongée du by-pass DIGIMON, retirer les piles du compartiment. - Page 51 Mode d’emploi DIGIMON-SE / DIGIMON4 Français Affichage numérique Affichage analogique avec fonction d’enregistrement Sélection du réfrigérant Les touches permettent de sélectionner le réfrigérant souhaité dans la liste. Pendant la sélection, le symbole « R » clignote sur l’écran. La touche permet d’enregistrer la sélection.
- Page 52 Français Mode d’emploi DIGIMON-SE / DIGIMON4 Sélection de l’unité de mesure de la pression Maintenir la touche appuyée. Sélectionner l’unité souhaitée avec la touche . Relâcher les deux touches. Sélection de l’unité de mesure de la température Maintenir la touche appuyée.
- Page 53 Mode d’emploi DIGIMON-SE / DIGIMON4 Français SUPERH SUBC00L indique la différence „K“ (F) entre la température théorique du tableau de pression de vapeur (to, tc) et la température mesurée (t1, t2) au niveau des sondes de température externes (9) ou à pince (10).
- Page 54 Français Mode d’emploi DIGIMON-SE / DIGIMON4 Remarque : Le by-pass DIGIMON doit être mis en marche avant de faire fonctionner la pompe à vide. Il doit être allumé pendant l’opération de tirage au vide. Capteur pour vide externe (en option) Pour obtenir des valeurs de mesure du vide précises, il est nécessaire d’utiliser le...
-
Page 55: Raccordement Du By-Pass
Mode d’emploi DIGIMON-SE / DIGIMON4 Français Raccordement du by-pass a) avec DIGIMON-SE Raccorder le tuyau bleu (1) côté basse pression de l’installation Raccorder le tuyau rouge (2) côté haute pression de l’installation Raccorder le tuyau jaune (3) à... -
Page 56: Remplissage De L'installation
Français Mode d’emploi DIGIMON-SE / DIGIMON4 Remplissage de l’installation a) avec le by-pass DIGIMON-SE Débrancher le tuyau jaune de la pompe à vide et le raccorder à la bouteille ou au cylindre de réfrigérant. Ouvrir la vanne de la bouteille ou du cylindre du réfrigérant. -
Page 57: Mesure En Modes Surchauffe (Superheat) Et Sous-Refroidissement (Subcool)
Votre nouveau by-pass DIGIMON a été développé dans le respect des dernières avancées ergonomiques, technologiques et en matière de physiologie du travail. L’entreprise REFCO Manufacturing a obtenu la certification DIN EN ISO 9001 : 2008. Des contrôles de qualité permanents et un traitement minutieux garantissent de solides capacités de fonctionnement et permettent l’application de la garantie REFCO valable... -
Page 58: Environnement
Le by-pass DIGIMON a été développé pour une utilisation à long terme. Lors de l’approvisionnement en matériaux et de la production, les économies d’énergie et le respect de l’environnement ont été pris en compte. REFCO Manufacturing Ltd se considère responsable pendant toute la durée de vie de ses produits. C’est pour cette raison que REFCO Manufacturing a souhaité... -
Page 59: Configuration Usine
Mode d’emploi DIGIMON-SE / DIGIMON4 Français Configuration usine Choisir « Affichage numérique » sur le DIGIMON. LIGHT Appuyer en même temps sur les touches pendant 5 secondes. L’écran indique - - - - - - - - ... -
Page 60: Calibrage Des Capteurs De Pression
Français Mode d’emploi DIGIMON-SE / DIGIMON4 Calibrage des capteurs de pression Un calibrage correct nécessite un appareil de contrôle certifié. (par ex. REF-CLASS-GAUGE Réf. 4682293) 1. Arrêter le DIGIMON LIGHT 2. Maintenir la touche enfoncée et mettre l’appareil en marche en... -
Page 61: Calibrage Des Capteurs De Type K À Température Ambiante
Mode d’emploi DIGIMON-SE / DIGIMON4 Français Calibrage des capteurs de type K à température ambiante 1. Arrêter le DIGIMON 2. Raccorder les capteurs de température (type K). Les températures ambiante et de mesure doivent en permanence s’élever à 25 +/-3°C et être stables pendant au moins 20 minutes. Les câbles des capteurs doivent être droits (déroulés). -
Page 62: Calibrage De L'affichage De Température Avec De L'eau Glacée
Français Mode d’emploi DIGIMON-SE / DIGIMON4 8. Appuyer sur la touche pour confirmer. L’écran indique 00xxx 27.0°C 9. Appuyer sur pour procéder au calibrage du côté haute pression (HP) continuer au point 6 ON/Off 10. Lorsque les deux capteurs sont calibrés, appuyer sur... - Page 63 Mode d’emploi DIGIMON-SE / DIGIMON4 Français 6. Appuyer sur la touche puis pour parvenir dans le mode calibrage. Pendant le calibrage, s’assurer que les deux capteurs de température sont bien reliés au DIGIMON. L’écran indique (côté basse pression) Le code température peut varier 011xx Température ambiante actuelle (reste stable)
- Page 64 Français Mode d’emploi DIGIMON-SE / DIGIMON4 9. Appuyer sur pour procéder au calibrage du côté haute pression (HP) continuer au point 6 ON/Off 10. Lorsque les deux capteurs sont calibrés, appuyer sur pour quitter le mode de calibrage des capteurs.
- Page 65 Istruzioni per l'uso DIGIMON-SE / DIGIMON4 Italiano Istruzioni per l’uso e la manutenzione per il gruppo manometrico elettronico a 2 e 4 vie DIGIMON-SE DIGIMON4 1. Raccordo a bassa pressione SAE da ¼“ 2. Raccordo ad alta pressione SAE da ¼“...
- Page 66 Italiano Istruzioni per l'uso DIGIMON-SE / DIGIMON4 Indice Importanti indicazioni di sicurezza ................65 Utilizzo/applicazione ..................... 65 Dotazione ........................66 Trasporto ........................66 Avvertenza ........................66 Dati tecnici ........................66 Funzione dei tasti ......................69 Indicatore dello stato di carica della batteria ............. 69 Utilizzo ..........................
-
Page 67: Importanti Indicazioni Di Sicurezza
Durante le operazioni con il gruppo manometrico è necessario indossare sempre gli occhiali di protezione e i guanti. I prodotti REFCO sono stati sviluppati e prodotti appositamente per l’utilizzo da parte di frigoristi specializzati. A causa della pressione elevata e dei gas chimici e fisici utilizzati negli impianti di refrigerazione, REFCO declina ogni responsabilità... -
Page 68: Dotazione
Italiano Istruzioni per l'uso DIGIMON-SE / DIGIMON4 Dotazione È possibile conoscere la dotazione dei diversi modelli e le varianti attraverso il catalogo REFCO o sul sito www.refco.ch Trasporto I gruppi manometrici vengono consegnati dalla fabbrica in una custodia di plastica con o senza tubi flessibili di carica. - Page 69 Istruzioni per l'uso DIGIMON-SE / DIGIMON4 Italiano Proprietà Valori Massima pressione di Bassa pressione esercizio: 60 bar / 870 psi / 6000 kPa / 6 MPa Alta pressione 60 bar / 870 psi / 6000 kPa / 6 MPa Risoluzione 0,01 bar / 0,5 psi / 1 kPa / 0,001 MPa dell’indicatore della...
- Page 70 Italiano Istruzioni per l'uso DIGIMON-SE / DIGIMON4 Indicazione del vuoto senza sensore di vuoto Proprietà Valori Indicazione del vuoto: Istogramma indicativo 1 barra ca. da 0 a -300 mbar 2 barre ca. da -300 a -380 mbar 3 barre ca. da -380 a -460 mbar 4 barre ca.
-
Page 71: Funzione Dei Tasti
Istruzioni per l'uso DIGIMON-SE / DIGIMON4 Italiano Funzione dei tasti LIGHT SUPERH SUBC00L LP/HP ON/Off Accensione/Spegnimento ON/Off Commutazione della funzione di indicazione della pressione LP/HP Commutazione della funzione di indicazione del vuoto Accensione/spegnimento dell’illuminazione dello schermo LCD LIGHT (spegnimento automatico dopo 1 minuto) Selezione del refrigerante, ricerca in avanti (selezione unità... -
Page 72: Utilizzo
Italiano Istruzioni per l'uso DIGIMON-SE / DIGIMON4 Utilizzo Preparazione Inserire 4 batterie nello scomparto porta-batterie nella parte posteriore. Attenzione: Prestare estrema attenzione alla corretta polarità delle batterie. Non lasciare le batterie esaurite nello scomparto porta-batterie. In caso il DIGIMON non venga utilizzato per lunghi periodi di tempo, rimuovere le batterie dallo scomparto porta-batterie. - Page 73 Istruzioni per l'uso DIGIMON-SE / DIGIMON4 Italiano Indicatore digitale Indicatore analogico con funzione di memoria Selezione del refrigerante Premendo i tasti è possibile selezionare il refrigerante desiderato dalla lista. Durante la selezione, la “R” lampeggia sul display. Premendo il tasto viene confermato il refrigerante selezionato.
- Page 74 Italiano Istruzioni per l'uso DIGIMON-SE / DIGIMON4 Selezione dell’unità di misura della pressione Tenere premuto il tasto . Selezionare l’unità desiderata attraverso il tasto . Rilasciare entrambi i tasti. Selezione dell’unità di misura della temperatura Tenere premuto il tasto . Attraverso il tasto scegliere tra °C e °F.
- Page 75 Istruzioni per l'uso DIGIMON-SE / DIGIMON4 Italiano SUPERH SUBC00L La modalità mostra la differenza “K” (F) tra la temperatura secondo la tavola della pressione di vapore (to, tc) e la temperatura rilevata (t1, t2) dalle sonde termiche esterne (9) o dalle sonde termiche a pinza (10).
- Page 76 Italiano Istruzioni per l'uso DIGIMON-SE / DIGIMON4 Attenzione: Il gruppo manometrico DIGIMON deve essere acceso prima che la pompa per il vuoto collegata entri in funzione. Il gruppo manometrico deve essere attivo durante lo svuotamento. Sensore di vuoto esterno (su richiesta) Per misurare con precisione il valore del vuoto è...
-
Page 77: Collegamento Del Gruppo Manometrico
Istruzioni per l'uso DIGIMON-SE / DIGIMON4 Italiano Collegamento del gruppo manometrico a) con DIGIMON-SE Collegare il tubo flessibile blu (1) al lato a bassa pressione dell’impianto Collegare il tubo flessibile rosso (2) al lato ad alta pressione dell’impianto ... -
Page 78: Riempimento Dell'impianto
Italiano Istruzioni per l'uso DIGIMON-SE / DIGIMON4 Riempimento dell’impianto a) con il gruppo manometrico DIGIMON-SE Scollegare il tubo flessibile giallo dalla pompa per il vuoto e avvitarlo alla bombola del refrigerante. Aprire la valvola della bombola del refrigerante. -
Page 79: Misurazione In Modalità Surriscaldamento/Superheat - Sottoraffreddamento/Subcool
Manufacturing Ltd è stata certificata secondo lo standard DIN EN ISO 9001:2008. I continui controlli di qualità e la lavorazione accurata garantiscono un’elevata funzionalità e rendono possibile la garanzia REFCO secondo le condizioni generali di vendita e di consegna vigenti il giorno della consegna. Sono esclusi i danni derivanti da un uso... -
Page 80: Questione Ambientale
è tenuto conto del risparmio energetico e dell’impatto ambientale. REFCO Manufacturing Ltd si ritiene responsabile “a vita” dei propri prodotti. Per questo motivo REFCO Manufacturing ha richiesto e ottenuto la certificazione DIN EN ISO 14001:2004. L’utente deve provvedere allo smaltimento dell’apparecchio secondo le normative vigenti nel proprio Paese. -
Page 81: Azzeramento Dei Sensori Di Pressione
Istruzioni per l'uso DIGIMON-SE / DIGIMON4 Italiano Azzeramento dei sensori di pressione LIGHT Premendo i tasti vengono azzerate le indicazioni di pressione del DIGIMON per evitare valori di misurazione errati. Per una corretta indicazione del valore di misurazione, l’azzeramento non deve essere eseguito sotto pressione o vuoto. -
Page 82: Taratura Dei Sensori Di Pressione
Italiano Istruzioni per l'uso DIGIMON-SE / DIGIMON4 Taratura dei sensori di pressione Per una corretta taratura è necessario uno strumento di controllo certificato. (ad es. REF-CLASS-GAUGE N. di ordin. 4682293) 1. Spegnere il DIGIMON LIGHT ON/Off 2. Tenere premuto il tasto e accendere l’apparecchio con il tasto... - Page 83 Istruzioni per l'uso DIGIMON-SE / DIGIMON4 Italiano Calibrazione dei sensori tipo K (con temperatura ambiente) 1. Spegnere il DIGIMON 2. Inserire le sonde termiche (tipo K). Temperatura dell’ambiente e temperatura di misurazione devono essere sempre pari a 25 +/-3 °C ed essere stabili per almeno 20 minuti. I cavi della sonda devono essere dritti (srotolati).
- Page 84 Italiano Istruzioni per l'uso DIGIMON-SE / DIGIMON4 8. Premere il tasto per confermare. Sul display compare 00xxx 27.0°C Premere il tasto per calibrare il lato di alta pressione (HP) Ripetere dal Punto 6 ON/OFF 10. Una volta che entrambi i sensori sono calibrati premere per uscire dalla modalità...
- Page 85 Istruzioni per l'uso DIGIMON-SE / DIGIMON4 Italiano Il display visualizza (lato di bassa pressione) Codice temperatura (cambia) 011xx La temperatura di lettura (non cambia) 24.4°C 7. Mettere entrambe le termocoppie tipo K / morsetti a bagno in acqua ghiacciata (0°C /32°F)
- Page 86 Italiano Istruzioni per l'uso DIGIMON-SE / DIGIMON4 Premere il pulsante per calibrare il lato alta pressione (HP) Ripetere dal Punto 6. ON/OFF 10. Una volta che entrambi i sensori sono calibrati premere per uscire dalla modalità di calibrazione del sensore.
- Page 87 Manual de instrucciones DIGIMON-SE / DIGIMON4 Español Instrucciones de uso y mantenimiento Analizador digital de 2 y 4 vías DIGIMON-SE DIGIMON4 1. Conexión de baja presión ¼“ SAE 2. Conexión de alta presión ¼“ SAE 3. Conexión para vacío ¼“ SAE, resp. 3/8“...
- Page 88 Español Manual de instrucciones DIGIMON-SE / DIGIMON4 Índice Advertencias de seguridad ..................87 Especificaciones de uso ....................87 Contenido del suministro ..................... 88 Transporte ........................88 Información importante ....................88 Descripción técnica ..................... 88 Funciones de los botones ................... 90 Indicación del nivel de carga de las pilas ..............
-
Page 89: Advertencias De Seguridad
Los productos REFCO han sido diseñados y fabricados específicamente para ser utilizados por técnicos frigoristas cualificados. Debido a las altas presiones y a los gases físicos y químicos que se utilizan en los sistemas de frío, REFCO descarta cualquier responsabilidad o indemnización en caso de accidente, lesiones o fallecimiento. -
Page 90: Contenido Del Suministro
Contenido del suministro El contenido incluido en el suministro de los distintos modelos y variantes se puede consultar en el catálogo de REFCO o en la página web www.refco.ch Transporte Los analizadores digitales se suministran de fábrica en un maletín de plástico con o sin mangueras de llenado y son instrumentos de medición de alta calidad que deben... - Page 91 Manual de instrucciones DIGIMON-SE / DIGIMON4 Español Características Valores Presión máx. de baja presión 60 bar / 870 psi / 6000 kPa / 6 MPa servicio: alta presión 60 bar / 870 psi / 6000 kPa / 6 MPa 0.01 bar / 0.5 psi / 1 kPa / 0.001 MPa Resolución de la...
-
Page 92: Funciones De Los Botones
Español Manual de instrucciones DIGIMON-SE / DIGIMON4 Indicación del vacío con sensor externo de vacío Características Valores Rango de medición: entre 0 y 10.000 micrones Resolución: 0.1 Pa / 1 micrón / 0.001 mbar / 0.001 Torr / 1m Torr / 0.0001 psi /... -
Page 93: Funcionamiento
Manual de instrucciones DIGIMON-SE / DIGIMON4 Español Funcionamiento Preparativos Inserte 4 pilas en el compartimento situado en la parte trasera. Atención: Cerciórese de que la polaridad de las pilas es la correcta. No deje nunca pilas gastadas en el compartimento y, si no va a utilizar el analizador digital durante un largo periodo de tiempo, saque las pilas del compartimento, independientemente de su nivel de carga. - Page 94 Español Manual de instrucciones DIGIMON-SE / DIGIMON4 Indicación digital Indicación analógica con función de memoria Seleccionar el refrigerante Con los botones de búsqueda se puede seleccionar el refrigerante deseado de la lista disponible. Durante la búsqueda, la letra “R” parpadea en la pantalla.
- Page 95 Manual de instrucciones DIGIMON-SE / DIGIMON4 Español Seleccionar la unidad de presión Mantenga pulsado el botón y seleccione la unidad de presión deseada con el botón . A continuación, deje de pulsar los dos botones. Seleccionar la unidad de temperatura Mantenga pulsado el botón...
- Page 96 Español Manual de instrucciones DIGIMON-SE / DIGIMON4 SUPERH SUBC00L El botón muestra la diferencia de temperatura “K” (F) que existe entre la tabla de presión del vapor (to, tc) y la temperatura medida (t1, t2) por los sensores externos de temperatura (9) o los sensores de temperatura de pinza (10).
- Page 97 Manual de instrucciones DIGIMON-SE / DIGIMON4 Español Sensor externo de vacío (opcional) Para obtener resultados más precisos en la medición del vacío, se recomienda trabajar con el sensor externo de vacío. Este sensor debe conectarse al equipo. Indicación del vacío Seleccionar la unidad de medición...
-
Page 98: Conexión Del Analizador Digital
Español Manual de instrucciones DIGIMON-SE / DIGIMON4 Conexión del analizador digital a) Con DIGIMON-SE Conecte la manguera azul (1) al lado de la presión de succión del equipo Conecte la manguera roja (2) al lado de la alta presión del equipo ... -
Page 99: Llenado Del Equipo
Manual de instrucciones DIGIMON-SE / DIGIMON4 Español Llenado del equipo a) Con DIGIMON-SE Desconecte la manguera amarilla de la bomba de vacío y conéctela a la botella o al cilindro de refrigerante. Abra la válvula de la botella o del cilindro de refrigerante. -
Page 100: Mediciones En El Modo "Superheat (Sobrecalentamiento)/Subcool (Subenfriamiento)
Español Manual de instrucciones DIGIMON-SE / DIGIMON4 Mediciones en el modo “Superheat (sobrecalentamiento)/Subcool (subenfriamiento)” Vea el epígrafe “Conexión del analizador digital”. Conecte el enchufe de tipo K del sensor de temperatura externo (9) o del sensor de temperatura de pinza (10) al analizador DIGIMON (en las tomas situadas a los lados derecho (t1) e izquierdo (t2) de la carcasa). -
Page 101: Garantía
La empresa REFCO Manufacturing Ltd. ha sido certificada según la norma DIN EN ISO 9001 : 2008. El cuidadoso proceso de fabricación y los continuos controles de calidad a los que se ha sometido el aparato garantizan su correcto funcionamiento. -
Page 102: Puesta A Cero De Los Sensores De Presión
Español Manual de instrucciones DIGIMON-SE / DIGIMON4 Puesta a cero de los sensores de presión LIGHT Pulsando los botones se pone a cero la indicación de presión de DIGIMON para evitar que se obtengan valores de medición incorrectos. Para que la indicación de los valores sea correcta, la puesta a cero no debe ser efectuada bajo presión o en vacío. -
Page 103: Calibración De Los Sensores De Presión
Manual de instrucciones DIGIMON-SE / DIGIMON4 Español Calibración de los sensores de presión Para efectuar una calibración correcta se precisa un aparato de control Certificado (p. ej. REF-CLASS-GAUGE, n.º art. 4682293). 1. Apague el analizador DIGIMON. LIGHT ON/Off 2. Mantenga pulsado el botón y encienda el aparato ... - Page 104 Español Manual de instrucciones DIGIMON-SE / DIGIMON4 Calibración de los sensores de tipo K (a temperatura ambiente) 1. Apague el analizador digital DIGIMON. 2. Conecte los sensores de temperatura externos (tipo K). La temperatura ambiental y de medición deben estar a unos valores constantes de 25 +/-3°C y mantenerse estables al menos durante 20 minutos.
- Page 105 Manual de instrucciones DIGIMON-SE / DIGIMON4 Español 8. Pulse el botón para confirmar la acción. En la pantalla aparece 00xxx 27.0°C Pulse el botón para calibrar el lado de alta presión (HP) Repita el mismo procedimiento desde el punto 6.
- Page 106 Español Manual de instrucciones DIGIMON-SE / DIGIMON4 Durante la calibración, cerciórese de que los dos sensores de temperatura están conectados con el analizador digital DIGIMON. En la pantalla aparece (lado de baja presión) Código de temperatura (puede cambiar) 011xx Temperatura ambiente (se mantiene estable) 24.4°C...
- Page 107 Manual de instrucciones DIGIMON-SE / DIGIMON4 Español Pulse el botón para calibrar el lado de alta presión (HP) Repita el mismo procedimiento desde el punto 6. ON/OFF 10. Una vez calibrados los sensores, pulse el botón para salir del modo de calibración.
- Page 108 REFCO Manufacturing Ltd. Industriestrasse 11 6285 Hitzkirch - Switzerland Telefon +41 41 919 72 82 Telefax +41 41 919 72 83 info@refco.ch www.refco.ch...