Table des Matières
Publicité
Les langues disponibles
Les langues disponibles
Liens rapides
Publicité
Table des Matières

Manuels Connexes pour Thinkcar THINKOBD 500

Sommaire des Matières pour Thinkcar THINKOBD 500
- Page 1 THINKOBD 500...
- Page 2 Safety Precautions and Warnings To avoid personal injury, property loss, or accidental damage to the product, read all of the information in this section before using the product. Data and Software Protection Do not delete unknown files or change the names of files or directories created by others, otherwise the device software may not run.
-
Page 3: Fcc Warning
FCC Requirement Changes or modifications not expressly approved by the party responsible for compliance could void the user’ s authority to operate the equipment. This device complies with Part 15 of the FCC Rules. Operation is subject to the following two conditions: (1) this device may not cause harmful interference, and (2) this device must accept any interference received, including interference that may... -
Page 4: Product Descriptions
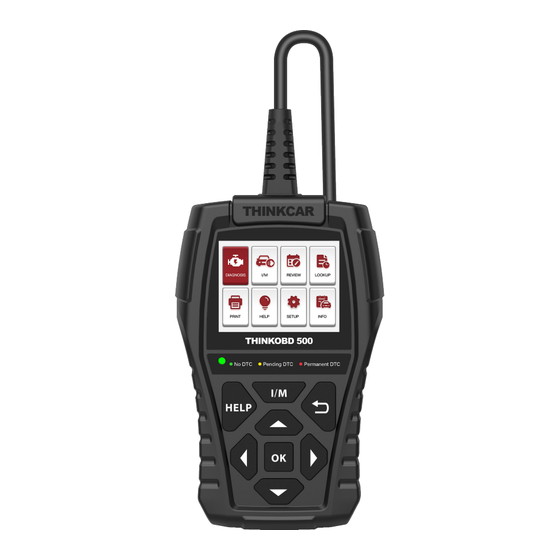
1. Product Descriptions (1) Diagnostic Cable: Standard OBDII diagnostic cable (2) LCD Display: 2.8 inch display (240*320) (3) Code severity alert: Three status indicators (4) I/M Button: Quickly enter "I/M READINESS" to view the data flow (5) Help: About OBD instructions, about data flow instructions, about printing instructions, about exhaust ready instructions (6) Up, down, left and right keys: used to select interactive functions (7) Return key: Return to previous function... -
Page 5: Technical Specifications
Technical Specifications 2.8 inch display Display: Working Environment: 0 to 50℃ (32 to 122℉ ) Storage Environment: -20 to 60℃ (-4 to 140℉ ) Power Supply: 9-18V vehicle power Supported Protocols: ISO9141, KWP2000 (ISO 14230), J1850PWM,J1850VPM and CAN OBDII protocol Function Description 1. -
Page 6: Application Overview
2.2 Application Overview When the code reader boots up, the Home screen opens. This screen shows all applications loaded on the unit. Following applications are preloaded into the code reader: ● Diagnostics: leads to OBDII screens for all 9 generic OBD system tests. ●... - Page 7 1.1.2 Select "READ CODE" and click "OK" to select vehicle type to view DTC diagnostic data.
- Page 8 1.2 Select "ERASE CODES" to clear the fault code Note: Erase Codes menu lets you to clear all current and stored DTCs from the control module. Also it erases all temporary ECU information, including freeze frame. So make sure that the selected system are completely checked and serviced by technicians and no vital information will be lost before clearing codes.
- Page 9 ● To review I/M Readiness status, make sure that the ignition key is switched to ON with the engine off. ● Not all monitors are supported by all vehicles. I/M Readiness is a useful function used to check if all monitors are OK or N/A. The vehicle’s computer performs tests on the emission system during normal driving conditions.
- Page 10 Freeze Frame menu displays freeze frame data, a snapshot of critical vehicle operating conditions automatically recorded by the on-board computer at the time of the DTC set. It is a good function to help determine what caused the fault. Select "O2 SENSOR TEST" and click "OK" to view O2 Sensor data Stream. OBD II regulations require certain vehicles monitor and test oxygen (O2) sensors to isolate fuel and emissions related faults.
- Page 11 Tips: Different car models have detected different numbers of oxygen sensors, please check according to the required sensors. 1.7 Select "ON-BOARD MONITORING" and click "OK" to view On-Board Monitor data streams. The On-Board Monitor Test function is useful after servicing or after clearing a vehicle ECU’s memory.
- Page 12 NOTE : ● Some manufacturers do not allow tools to control vehicle systems. ● The manufacturer sets the criteria to automatically stop test. Refer to appropriate vehicle service manual before using this function. Select” I/M READINESS” and click "OK" to view the I/M data flow. To retrieve I/M Readiness Status data by one-click I/M readiness key: 1.
- Page 13 4. Select "DTC LOOKUP" and click "OK" to query fault code analysis.
-
Page 14: Diagnostic Trouble Codes (Dtcs)
3. Diagnostic Trouble Codes (DTCs) OBDII Diagnostic Trouble Codes are codes that are stored by the on-board computer diagnostic system in response to a problem found in the vehicle. These codes identify a particular problem area and is intended to provide you with a guide as to where a fault might be occurring within a vehicle. - Page 15 5. Select "Print" and click "OK" to enter the "UPLOAD RECORD" interface to view the prompts, click "Help and I/M" to view the prompts and operate whether to delete the information. The fi rst step is to open the browser and enter the URL: https://mythinkcar.com/ to enter the offi cial website, click Download.
- Page 16 5.3 Click the OK button on the OBD500 device to enter the APP homepage, click PRINT to select the report you want to print, and select the print button to complete.
- Page 17 6. Select "Help" and click "OK". You will find the device OBD function and system instructions.
- Page 18 8.Select "info" and click "OK" to view local information Note: Thank you for choosing THINKOBD 500. Firstly, please go to http://www.mythinkcar.com to check if there is an updated software. If there’s a latest software released, please update the latest version before using.
-
Page 19: Warranty Terms
THINKCAR does not bear any indirect and incidental losses. THINKCAR will judge the nature of the equipment damage according to its prescribed inspection methods. No agents, employees or business representatives of THINKCAR are authorized to make any confirmation, notice or promise related to THINKCAR products. -
Page 20: Alerte De Gravité Du Code
1. Product Descriptions (1) Câble de diagnostic : câble de diagnostic OBDII standard (2) Écran LCD : écran de 2,8 pouces (240*320) (3) Alerte de gravité du code : trois indicateurs d'état (4) Bouton I/M : Entrez rapidement dans « PRÊT I/M » pour afficher le flux de données (5) Aide: À... -
Page 21: Spécifications Techniques
Spécifications techniques 2.8 inch display Display: Environnement de travail: 0 to 50℃ (32 to 122℉ ) Environnement de stockage: -20 to 60℃ (-4 to 140℉ ) Alimentation: 9-18V vehicle power Protocoles pris en charge: ISO9141, KWP2000 (ISO 14230), J1850PWM,J1850VPM and CAN OBDII protocol Description de la fonction 1. -
Page 22: Présentation De L'application
Remarque: mettez le contact du véhicule, la plage de tension de l'appareil doit être de 9 à 18 V et l'accélérateur doit être en position fermée. 2.2 Présentation de l'application Lorsque le lecteur de code démarre, l'écran d'accueil s'ouvre. Cet écran affiche toutes les applications chargées sur l'unité. - Page 23 affiché. Lorsque le lecteur de codes-barres est connecté au véhicule, il vérifie automatiquement l'état du moniteur I/M et donne un rapport récapitulatif sur l'écran, comme le montre la figure ci-dessous. 1.1.1 Sélectionnez « Diagnostic », cliquez sur « OK » pour accéder au diagnostic du système, sélectionnez le type de véhicule et accédez à...
-
Page 24: Sélectionnez " Effacer Les Codes " Pour Effacer Le Code D'erreur
1.2 Sélectionnez « EFFACER LES CODES » pour effacer le code d'erreur Remarque : le menu Effacer les codes vous permet d'effacer tous les DTC actuels et enregistrés du module de commande. Il efface également toutes les informations temporaires de l'ECU, y compris l'arrêt sur image. - Page 25 REMARQUE : ● Pour vérifier l'état de préparation I/M, assurez-vous que la clé de contact est sur ON avec le moteur éteint. ● Tous les moniteurs ne sont pas pris en charge par tous les véhicules. I/M Readiness est une fonction utile utilisée pour vérifier si tous les moniteurs sont OK ou N/ A.
- Page 26 Conseils : Utilisez la touche RETOUR pour revenir au menu de diagnostic. Sélectionnez "FREEZE FRAME" et cliquez sur "OK" pour afficher le flux de données d'arrêt sur image. Le menu d'arrêt sur image affiche les données d'arrêt sur image, un instantané des conditions de fonctionnement critiques du véhicule enregistrées automatiquement par l'ordinateur de bord au moment du réglage des DTC.
- Page 27 Les réglementations OBD II exigent que certains véhicules surveillent et testent les capteurs d'oxygène (O2) pour isoler les défauts liés au carburant et aux émissions. La fonction de test du moniteur d'O2 est utilisée pour récupérer les résultats des tests de moniteur des capteurs d'O2 terminés.
- Page 28 La fonction de test du moniteur embarqué est utile après l'entretien ou après avoir effacé la mémoire d'un calculateur de véhicule. Il reçoit les résultats des tests pour les composants et systèmes du groupe motopropulseur liés aux émissions qui ne sont pas surveillés en permanence pour les véhicules non-CAN.
- Page 29 REMARQUE : ● Certains fabricants n'autorisent pas les outils pour contrôler les systèmes du véhicule. ● Le fabricant définit les critères pour arrêter automatiquement le test. Reportez-vous au manuel d'entretien du véhicule approprié avant d'utiliser cette fonction. Sélectionnez « PRÊT I/M » et cliquez sur « OK » pour afficher le flux de données I/M. Pour récupérer les données d'état de préparation I/M en un clic sur la touche de préparation I/M: 1.
- Page 30 4. Sélectionnez "DTC LOOKUP" et cliquez sur "OK" pour interroger l'analyse du code d'erreur.
-
Page 31: Codes De Problème De Diagnostic (Dtcs)
3. Codes de problème de diagnostic (DTCs) Les codes de problème de diagnostics OBDII sont des codes qui sont stockés par le système de diagnostic de l'ordinateur de bord en réponse à un problème détecté dans le véhicule. Ces codes identifient une zone de problème particulière et sont destinés à vous fournir un guide pour savoir où... - Page 32 DTC Modèle P0201 Identifie la section du système qui ne fonctionne pas correctement Systèmes P= Groupe motopropulseur Sous-systèmes B= Corps Identifie le système où se situe le C= Châssis problème. Les systèmes de code U= Le réseau «P» sont répertoriés ci-dessous. Les systèmes de codes «B»...
- Page 33 La première étape consiste à ouvrir le navigateur et à saisir l'URL : https://mythinkcar.com/ pour accéder au site offi ciel, cliquez sur Télécharger. Une liste déroulante apparaîtra et sélectionnera l'outil de mise à jour THINKOBD de THINKOBD et téléchargera l'outil d'installation. 5.1 Lorsque l'outil de mise à...
- Page 34 5.3 Cliquez sur le bouton OK sur l'appareil OBD500 pour accéder à la page d'accueil de l'APP, cliquez sur IMPRIMER pour sélectionner le rapport que vous souhaitez imprimer et sélectionnez le bouton d'impression pour terminer.
- Page 35 6. Sélectionnez "Aide" et cliquez sur "OK". Vous trouverez la fonction OBD de l'appareil et les instructions du système.
- Page 36 7. Sélectionnez "Paramètres" et cliquez sur "OK" pour définir la langue maternelle, l'unité de mesure, le mode d'enregistrement et le son. 8. Sélectionnez « infos » et cliquez sur « OK » pour afficher les informations locales...
- Page 37 Remarque : merci d'avoir choisi THINKOBD 500. Tout d'abord, veuillez vous rendre sur http://www. mythinkcar.com pour vérifier s'il existe un logiciel mis à jour. S'il existe un dernier logiciel publié. veuillez mettre à jour la dernière version avant de l'utiliser.
- Page 38 THINKCAR does not bear any indirect and incidental losses. THINKCAR will judge the nature of the equipment damage according to its prescribed inspection methods. No agents, employees or business representatives of THINKCAR are authorized to make any confirmation, notice or promise related to THINKCAR products.
- Page 39 1. Product Descriptions (1) Diagnosekabel: Standard-OBDII-Diagnosekabel (2) LCD-Display: 2,8-Zoll-Display (240 * 320) (3) Code-Schweregrad-Alarm: Drei Statusanzeigen (4) I/M-Taste: Geben Sie schnell "I/M READINESS" ein, um den Datenfluss anzuzeigen (5) Hilfe: Über OBD-Anweisungen, über Datenflussanweisungen, über Druckanweisungen, über Anweisungen zur Auspuffvorbereitung (6) Aufwärts-, Abwärts-, Links- und Rechtstasten: zur Auswahl interaktiver Funktionen (7) Return-Taste: Zurück zur oberen Funktion (8) OK Zurück: Bestätigungstaste...
-
Page 40: Technische Spezifikationen
Technische Spezifikationen 2.8 inch display Anzeige: Arbeitsumgebung: 0 to 50℃ (32 to 122℉ ) Speicherumgebung: -20 to 60℃ (-4 to 140℉ ) Stromversorgung: 9-18V vehicle power Unterstützte Protokolle: ISO9141, KWP2000 (ISO 14230), J1850PWM,J1850VPM and CAN OBDII protocol Bedienungsanleitung 1. Kompatibel mit Fahrzeugen nach 1966 und Fahrzeugen mit aktualisiertem OBDII- Protokoll 2. - Page 41 Hinweis: Schalten Sie die Zündung des Fahrzeugs ein, der Spannungsbereich des Geräts sollte 9-18 V betragen und der Gashebel sollte sich in der geschlossenen Position befinden. 2.2 Anwendungsübersicht Beim Hochfahren des Codelesers öffnet sich der Startbildschirm. Dieser Bildschirm zeigt alle auf dem Gerät geladenen Anwendungen.
- Page 42 automatisch den Status des I/M-Monitors und gibt einen zusammenfassenden Bericht auf dem Display aus, wie in der Abbildung unten gezeigt 1.1.1 Wählen Sie "Diagnose", klicken Sie auf "OK", um die Systemdiagnose einzugeben, wählen Sie den Fahrzeugtyp aus und rufen Sie die Diagnosefunktionsliste auf. 1.1.2 Wählen Sie „CODE LESEN“...
- Page 43 1.2 Wählen Sie „CODES LÖSCHEN“, um den Fehlercode zu löschen Hinweis: Im Menü Codes löschen können Sie alle aktuellen und gespeicherten DTCs vom Steuergerät löschen. Es löscht auch alle temporären ECU-Informationen, einschließlich Standbild. Stellen Sie also sicher, dass das ausgewählte System vollständig von Technikern überprüft und gewartet wird und keine wichtigen Informationen verloren gehen, bevor Sie die Codes löschen.
- Page 44 HINWEIS : ● Um den I/M-Bereitschaftsstatus zu überprüfen, vergewissern Sie sich, dass der Zündschlüssel bei ausgeschaltetem Motor auf ON steht. ● Nicht alle Monitore werden von allen Fahrzeugen unterstützt. I/M Readiness ist eine nützliche Funktion, um zu überprüfen, ob alle Monitore OK oder N/ A sind.
- Page 45 Tipps: Verwenden Sie die BACK-Taste, um zum Diagnosemenü zurückzukehren. Wählen Sie "FREEZE FRAME" und klicken Sie auf "OK", um den Standbild- Datenstrom anzuzeigen. Das Freeze Frame-Menü zeigt Standbilddaten an, eine Momentaufnahme kritischer Fahrzeugbetriebsbedingungen, die zum Zeitpunkt des Setzens des DTC automatisch vom Bordcomputer aufgezeichnet wird.
- Page 46 Die OBDII-Vorschriften verlangen, dass bestimmte Fahrzeuge Sauerstoffsensoren (O2) überwachen und testen, um kraftstoff- und emissionsbezogene Fehler zu isolieren. Die Funktion O2-Monitor-Test wird verwendet, um abgeschlossene O2-Sensor-Monitor-Testergebnisse abzurufen. Der O2-Monitortest ist kein On-Demand-Test. O2-Sensoren werden nicht getestet, wenn sie über das Menü ausgewählt werden, aber getestet, wenn die Motorbetriebsbedingungen innerhalb der angegebenen Grenzen liegen.
- Page 47 Die On-Board-Monitor-Testfunktion ist nach Wartungsarbeiten oder nach dem Löschen des Speichers einer Fahrzeug-ECU nützlich. Es erhält Testergebnisse für emissionsrelevante Komponenten und Systeme des Antriebsstrangs, die bei Non-CAN-Fahrzeugen nicht kontinuierlich überwacht werden. Und für CAN-Fahrzeuge empfängt es Testdaten für emissionsrelevante Antriebsstrangkomponenten und -systeme, die kontinuierlich überwacht werden und nicht.
- Page 48 HINWEIS : ● Einige Hersteller erlauben keine Werkzeuge zur Steuerung von Fahrzeugsystemen. ● Der Hersteller legt die Kriterien fest, um den Test automatisch zu stoppen. Lesen Sie das entsprechende Fahrzeug-Servicehandbuch, bevor Sie diese Funktion verwenden. Wählen Sie „I/M READINESS“ und klicken Sie auf „OK“, um den I/M-Datenfluss anzuzeigen.
- Page 49 Datensätze zu löschen. 4. Wählen Sie „DTC LOOKUP“ und klicken Sie auf „OK“, um die Fehlercodeanalyse abzufragen.
- Page 50 3. Diagnose-Fehlercode (DTCs) OBDII-Diagnose-Fehlercodes sind Codes, die vom Diagnosesystem des Bordcomputer für im Fahrzeug festgestellte Probleme gespeichert werden. Diese Codes identifizieren einen bestimmten Problembereich und sollen Ihnen ein Fahrzeug zur Verfügung stellen. OBDII- Diagnose-Fehlercodes bestehen aus einem fünfstelligen alphanumerischen Code. Das erste Zeichen, ein Buchstabe, gibt an, welches Steuerungssystem den Code einstellt.
- Page 51 DTC Beispiel P0201 Identifiziert, welcher Teil des Systems fehlerhaft funktioniert Systeme P = Antriebsstrang Subsistemas B = Karosserie C = Fahrgestell Identifiziert das System, in dem sich U = Netzwerk das Problem befindet. „P“ Code- Systeme sind unten aufgelistet. Die Systeme der „B“-, „C“- und „U“- Codes sind unterschiedlich.
- Page 52 Der erste Schritt besteht darin, den Browser zu öff nen und die URL einzugeben: https:// mythinkcar.com/ Um die offi zielle Website aufzurufen, klicken Sie auf Download. Es erscheint ein Dropdown-Feld, in dem Sie das THINKOBD Update-Tool von THINKOBD auswählen und das Installationstool herunterladen.
- Page 53 5.3 Klicken Sie auf dem OBD500 Gerät auf die Schaltfläche OK, um die APP-Homepage aufzurufen, klicken Sie auf DRUCKEN, um den Bericht auszuwählen, den Sie drucken möchten, und wählen Sie die Schaltfläche Drucken, um den Vorgang abzuschließen.
- Page 54 6. Wählen Sie „Hilfe“ und klicken Sie auf „OK“. Sie finden die Geräte-OBD-Funktion und Systemanweisungen.
- Page 55 7. Wählen Sie „Einstellungen“ und klicken Sie auf „OK“, um die Muttersprache, Maßeinheit, Aufnahmemodus und Ton einzustellen. 8. Wählen Sie "Info" und klicken Sie auf "OK", um lokale Informationen anzuzeigen...
- Page 56 Hinweis: Vielen Dank, dass Sie sich für THINCAR OBD500 entschieden haben. Rufen Sie zunächst http://www.mythinkcar.com auf, um zu überprüfen, ob eine aktualisierte Software verfügbar ist. Wenn eine neueste Software veröffentlicht wurde, aktualisieren Sie bitte die neueste Version, bevor Sie sie verwenden. 9.
-
Page 57: Garantiebedingungen
Garantiebedingungen Diese Garantie gilt nur für Benutzer und Händler, die https://www.thinkcar.com/ THINKOBD 500 Produkte auf normale Weise erwerben. Geben Sie innerhalb eines Jahres kostenlose Garantie. THINKCAR Garantie einschließlich elektronischer Produkte für Schäden, die durch Material- oder Verarbeitungsfehler verursacht wurden. Schäden an Geräten oder Komponenten, die durch Missbrauch, nicht autorisierte Modifikation, Verwendung für nicht vorgesehene Zwecke,...