Table des Matières
Publicité
Les langues disponibles
Les langues disponibles
Liens rapides
FR
EN
IT
Imp. par/by : Ribimex S.A. –56 Route de Paris – FR‐77340 Pontault‐Combault
Imp. da : Ribimex Italia s.r.l. –Via Igna, 18 – IT‐36010 Carrè (Vi)
[v7‐2017‐12‐08]
P
S
OMPE
UBMERSIBLE
Manuel d'instructions et d'utilisation
S
UBMERSIBLE
User and maintenance manual
P
S
OMPA
OMMER
Manuale di istruzioni e di manutenzione
Réf. / Art. Nr. : PRPVC751/43F / 510941
Réf. / Art. Nr. : PRPVC1101/65F / 510976
P
UMP
SA
Page 1 / 33
Publicité
Table des Matières

Manuels Connexes pour Ribimex Ribiland PRPVC751/43F


Sommaire des Matières pour Ribimex Ribiland PRPVC751/43F
- Page 1 Manuel d’instructions et d’utilisation UBMERSIBLE User and maintenance manual OMPA OMMER Manuale di istruzioni e di manutenzione Réf. / Art. Nr. : PRPVC751/43F / 510941 Réf. / Art. Nr. : PRPVC1101/65F / 510976 Imp. par/by : Ribimex S.A. –56 Route de Paris – FR‐77340 Pontault‐Combault Imp. da : Ribimex Italia s.r.l. –Via Igna, 18 – IT‐36010 Carrè (Vi) [v7‐2017‐12‐08] Page 1 / 33...
- Page 2 AVERTISSEMENT : Lire et assimiler ce manuel avant d’assembler ou d’utiliser ce produit. Une utilisation incorrecte du produit pourrait causer de graves blessures et des dommages. Conserver ce manuel pour pouvoir le consulter ultérieurement. WARNING: Carefully read this instruction manual before operating this appliance. Incorrect operation may cause injury and/or damages.
-
Page 3: Lire Toutes Les Instructions Avant D'utiliser Ce Produit
FR - Traduction des instructions originales I. Nomenclature III. Consignes de sécurité V. Utilisation II. Caractéristiques techniques IV. Mise en route VI. Entretien et Entreposage I. NOMENCLATURE Voir Fig.1 II. CARACTERISTIQUES Voir tableau 1 III. CONSIGNES DE SÉCURITÉ Avant d’utiliser ce produit, veuillez lire et assimiler l’ensemble des consignes de sécurité. Il convient de toujours suivre les consignes de sécurité... - Page 4 travail et d'une manière plus sûre, s'il est uniquement utilisé pour l'usage auquel il a été destiné. 7. Utiliser le produit approprié Ne pas forcer des produits ou accessoires légers à effectuer des travaux normalement réalisés avec des produits plus lourds. 8.
- Page 5 d'illustrer d'une manière exhaustive toutes les conditions et les situations qui peuvent se produire. L’utilisateur et/ou l’opérateur doivent utiliser le produit avec bon sens et prudence notamment en ce qui concerne ce qui n’est pas indiqué dans ce manuel. 3.2- Consignes importantes sur l'utilisation de la pompe électrique 1.
-
Page 6: Mise En Route
6. Le fabricant décline toute responsabilité en cas d'accident ou de dommages dus à la négligence ou inobservation des instructions décrites dans ce manuel ou dans des conditions qui diffèrent de celles indiqués sur la plaque signalétique. Il décline également toute responsabilité pour les dommages causés par une mauvaise utilisation de la pompe à... - Page 7 4.2- Conditions d’installations dans le puits ou l’emplacement 1. Le puits, où vous avez l'intention d'installer la pompe, doit : - être un puits droit, - maintenir un certain espace entre le plus grand diamètre extérieur de la pompe et la paroi intérieure du puits.
- Page 8 5. Lors de la réalisation des connexions, assurez-vous qu'il existe un circuit de mise à la terre efficace. 6. Le fil de terre doit être plus long que le câble sous tension, et doit être le premier fil à être connecté lorsque la pompe se met en place et le dernier à...
- Page 9 4.6- Mise en route 1. Avant la mise en marche, vérifier : - le sens de rotation du moteur : faites tourner la pompe pendant un bref instant (inférieur à 1min) pour vérifier que le moteur tourne dans le sens contraire des aiguilles d’une montre (vue du dessus) ; - que le raccordement électrique est correctement réalisé...
-
Page 10: Utilisation
4.7.2- Utilisation avec flotteur bloqué (Fig.3) 1. La pompe doit être positionnée verticalement : s'assurer qu'elle est stable pendant le fonctionnement. S'assurer que le flotteur est bloqué verticalement au-dessus de la pompe (par ex. attachez-le au tuyau d’évacuation). Les trous d'aspirations ne devront jamais être obstrués. Il est donc préférable que la pompe ne soit pas posée directement sur le sol, le fond du puits, du bassin ou de la cuve. -
Page 11: Entretien Et Entreposage
5.3- Conseils d'utilisation 1. Si le refoulement s'arrête alors que la pompe continue de fonctionner, couper immédiatement l'alimentation. Débrancher la fiche de prise de courant et vérifier la cause du problème. Ne jamais chercher à dégager la turbine tant que la pompe est raccordée à l'alimentation. 2. - Page 12 6.3- Pannes et solutions possibles Panne Principale raison Solution possible Démarrage difficile 1. Courant trop faible 1. Utiliser un courant entre 0,9 et 2. Turbine bloquée 1,1 fois la tension assignée. 3. Perte de puissance 2. Libérer et nettoyer la turbine 3.
-
Page 13: Parts List
EN - Original instructions I. Parts List III. Safety instructions V. Operation II. Characteristics IV. Getting Started VI. Maintenance and Storage I. PARTS LIST See Fig.1 II. CHARACTERISTICS See table 1 III. SAFETY INSTRUCTIONS Before using this product, read and understand all safety instructions. Always follow the safety instructions to minimize risk of damage to property, and to minimize any risk of damages and injuries to persons and animals. - Page 14 8. Dress properly When installing, do not wear loose clothing or jewellery; they can be caught in moving parts. Wear protecting hair covering to contain long hair. 9. Use protective equipment When installing, wear protective equipment appropriate to working conditions and work environment Wear protective helmet, safety goggles, ear mufflers, face or dust mask, rubber gloves and non-skid footwear to reduce the risk of personal injury during products use or manipulation.
- Page 15 3.2- Special warnings when using the pump 1. Become familiar with the controls and the proper use of the equipment. 2. The use of this product by unsupervised children is forbidden. 3. This appliance can be used by children aged from 8 years and above and persons with reduced physical, sensory or mental capabilities or lack of experience and knowledge if they have been given supervision or instruction concerning use of the appliance in a safe way and understand the hazards involved.
-
Page 16: Getting Started
8. The content of solids in water should be below 0.1% (quality proportion) and diameter must be smaller than 0.2mm. 9. The submersible pump shall not be used in swimming pools. 10. NOTICE! Installation can be a fairly complex operation. It must therefore be carried out by competent and authorized persons. - Page 17 The well should provide with enough water quantity, to ensure max flow which is stipulated on the rating plate If the condition and structure of the well cannot ensure the stipulated quantity of water, the temperature of water in well may exceed 40°C (104F), you should reduce the load of motor or increase the gush quantity to prevent over heat of motor.
- Page 18 4.5- Pump/motor installation 1. If the pump is installed in an enclosed area with emission of noxious fumes, the installation must be carried out in compliance with local and/or national laws by qualified personnel so as to avoid danger. 2. The pump must be in a vertical position over 0.5m from the water bottom (ensure that it is stable during operation).
- Page 19 4.7- Floating switch 4.7.1- Active float switch (Fig.2) 1. The pump must be in a vertical position: ensure that it is stable during operation. 2. Ensure that the float switch can move freely. 3. The suction holes must never be obstructed. It is therefore preferable that the pump should never be placed directly on the ground or on the bottom of the well, pond or vessel.
-
Page 20: Maintenance And Storage
5.2- Operation 5.2.1- In automatic functioning mode (active floating switch) Connect pump control box to mains power. Press the On/Off switch to “ON” position. The pump will start and stop as soon as the float switch reaches the pre-set heights / angles. 5.2.2- In manual functioning mode (blocked floating switch) Connect pump control box to mains power a) For permanent installation... - Page 21 technicians or send the pump to the maintenance department your dealer, otherwise we decline responsibility. 9. You are advised to check the following periodically: The condition of the cables and grommets, especially at their attachment. 6.2- Breakdown Never attempt to dismantle the pump. If necessary, have it checked and repaired by an authorized centre (consult your dealer).
-
Page 22: Elenco Componenti
– Traduzione delle istruzioni originali I. Elenco componenti III. Istruzioni di sicurezza V. Funzionamento II. Caratteristiche IV. Per iniziare VI. Pulizia e Conservazione I. ELENCO COMPONENTI Ved. Fig.1 II. CARATTERISTICHE Ved. Tabella 1 III. ISTRUZIONI DI SICUREZZA Prima di utilizzare questo prodotto, leggere tutte le istruzioni di sicurezza e assicurarsi di averle comprese. - Page 23 Durante l’impianto, non indossare abiti ampi o gioielli (possono impigliarsi nelle parti in movimento). Se si hanno i capelli lunghi, indossare un casco. 9. Usare indumenti di sicurezza. Durante l’impianto, indossare indumenti adeguati dei fattori circostanti dall’area di lavoro. Usare casco, occhiali di sicurezza, protezione uditiva, maschera antipolvere, guanti e scarpe di protezione per ridurre il rischio di ferite in occasione dell'utilizzo o l'uso del prodotto.
- Page 24 devono utilizzare l'attrezzo con buon senso e prudenza in particolare riguardo ciò che non è indicato in questo manuale. 3.2- Istruzioni di sicurezza per la pompa 1. Imparare a conoscere i controlli e l'uso appropriato della pompa. 2. L'utilizzo di questo prodotto è vietato ai bambini ed adolescenti senza sorveglianza. 3.
-
Page 25: Per Iniziare
targhetta. Si declina inoltre ogni responsabilità per danni causati da un uso improprio della pompa. 7. La pompa deve essere utilizzata per il pompaggio di acqua pulita, cui temperatura deve essere inferiore a 35°C o di altri liquidi non corrosivi con le stesse caratteristiche fisiche e chimiche dell’ l'acqua, con un valore pH compreso tra 6,8 e 8. - Page 26 saldamente con delle fascette. Fissare la corda nell’anello di sospensione (7-anello) e prepararsi a appendere la pompa. NOTA: è vietato utilizzare il cavo di alimentazione come corda per appendere la pompa. La profondità della pompa sommersa non può superare più di 15 metri e la distanza dal fondo deve essere superiore a 50cm.
- Page 27 4.4- Scatola di Controllo 1. Ogni singola fase tre fili del motore deve essere collegato ad una scatola di controllo. 2. Verificare che i dati sull’etichetta corrispondano ai valori stipulati. 3. Secondo le norme, la scatola di controllo deve consistere nel condensatore che fornisce potenza monofase, nell’...
- Page 28 5. Dopo aver operato per almeno 15 minuti, controllare il rendimento della pompa , potenza del motore, il più basso livello di acqua e di altre caratteristiche. Tutte le condizioni devono essere costanti e in accordo con le caratteristiche assegnate. 6.
- Page 29 V. FUNZIONAMENTO 5.1- Uso destinato: 1. Questa pompa sommersa può essere utilizzata ad uso domestico, industriale o agricolo, per aspirare acque chiaea con particelle in sospensione inferiori a 0,2mm. 2. La pompa è totalmenle sommergibile: la profondità di immersione non deve superare i 15m (riferirsi alla tabella Dati Tecnici).
-
Page 30: Pulizia E Conservazione
VI. PULIZIA E CONSERVAZIONE Prima di qualsiasi intervento, accertarsi che il prodotto sia scollegato dall'alimentazione di rete 6.1- Pulizia 1. La pompa non richiede una manutenzione particolare. 2. Quando si rimuove la pompa, procedere al risciacquo con acqua chiara. compreso il circuito di aspirazione. - Page 31 6.4- Conservazione Pulire la pompa. Conservare in un luogo asciutto e ventilato, sotto chiave o fuori dalla portata dei bambini 6.5- Smaltimento Non gettare la pompa con i rifiuti domestici, non gettare nell’ambiente. Portare la pompa in un centro di rifiuti o di raccolta, o chiedere comsiglio al proprio ente locale. 6.6- Esempio di installazione Vedere Fig.4 Page 31 / 33...
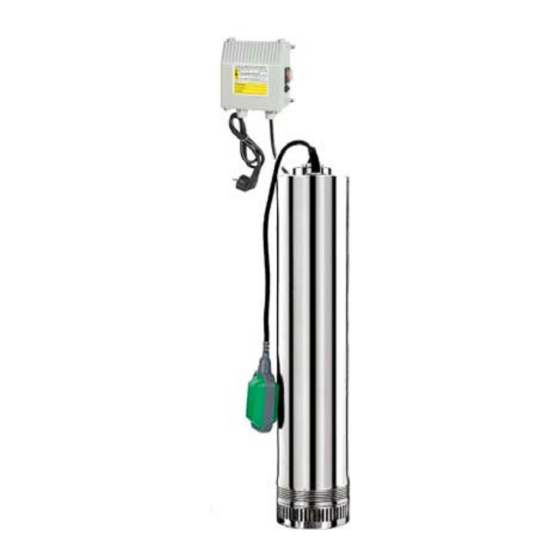
- Page 32 Figures / Figures / Figure Fig.1 Fig.2 Fig.3 Fig.2a Fig.3a Fig.2b Fig.3b FR –Fig.1– Nomenclature EN –Fig.1– Parts list IT –Fig.1- Elenco componenti 1. Câble d’alimentation 1. Power cord with plug 1. Cavo elettrico con spina 2. Câble électrique boitier-pompe 2.Control box to pump cable 2.
- Page 33 Fig.4 Fig.5 FR –Fig.4– Exemple d’installation EN –Fig.4– Set up example IT –Fig.4– Esempio di installazione 1. Alimentation principale 1- Main power 1. Spina elettrica 2. Boîtier de contrôle 2- control box 2. Scatola di controllo 3. Tuyau de refoulement 3- Discharge pipe 3.