Publicité
Les langues disponibles
Les langues disponibles
Liens rapides
Publicité
Chapitres

Manuels Connexes pour Enofrigo DOGE ISOLA

Sommaire des Matières pour Enofrigo DOGE ISOLA
- Page 1 Linea buffet refrigerati (RF)/Buffet line refrigerated (RF) “DOGE” IT-MANUALE ISTRUZIONI EN-INSTRUCTION MANUAL FR-NOTICE D’INSTRUCTION DE-BEDIENUNGSANLEITUNG SP-MANUAL DE INSTRUCCIONES РУ-РУКОВОДСТВО ПО ЭКСПЛУАТАЦИИ “ DOGE ISOLA” “DOGE SERVITO” “DOGE WALL” CT68900001_ Rev.00 07/13...
- Page 2 “DOGE ISOLA SVT FISSA” “DOGE ISOLA QUADRA” “DOGE LUXUS ISOLA” CT68900001_ Rev.00 07/13...
-
Page 3: Table Des Matières
- Italiano - INDICE PER ARGOMENTI Capitolo Pagina 1. Introduzione 2. Avvertenze 3. Precauzioni generali 4. Norme di garanzie 5. Targhetta di identificazione 6. Destinazione d’uso 7. Descrizione della macchina/Caratteristiche tecniche 8. Misure di prevenzione contro i rischi per la salute e la sicurezza 9. -
Page 4: Introduzione
Montaggio “DROP-IN” Montaggio piani perimetrali Schemi elettrici Dichiarazione di conformità CE 1. INTRODUZIONE Si raccomanda la lettura di questo manuale istruzioni prima di effettuare qualsiasi operazione sulla macchina. Questo manuale istruzioni è stato concepito e strutturato in modo da consentirne la rapida e agevole consultazione. -
Page 5: Precauzioni Generali
Questo manuale rispecchia lo stato della tecnica (o lo stato dell’arte) esistente al momento della commercializzazione della macchina e non può essere considerato inadeguato solo perché successivamente aggiornato sulla base di nuove esperienze. La casa costruttrice si riserva il diritto di apportare alla macchina e al manuale istruzioni eventuali aggiornamenti, senza che ciò... -
Page 6: Destinazione D'uso
• marchio CE di conformità; • classe climatica della macchina; • dati tecnici. I dati contenuti nella targhetta di identificazione dovranno essere comunicati per qualsiasi richiesta di intervento. La targhetta riportata in figura è da intendersi a puro titolo esemplificativo. Legenda 1 –... -
Page 7: Misure Di Prevenzione Contro I Rischi Per La Salute E La Sicurezza
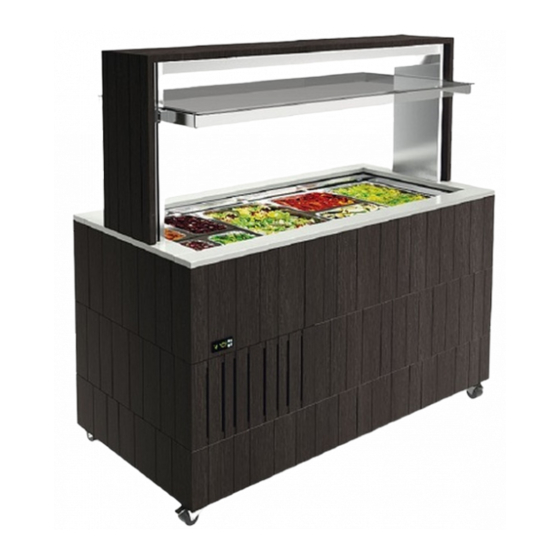
• sovrastruttura in vetro temperato, completa di illuminazione interna comandata da un interruttore; • maniglia per l’apertura e la chiusura della sovrastruttura, ove non fissa; • refrigerazione di tipo statico (o ventilato su VT RF) con condensatore ventilato ed evaporatore in serpentina di rame;... -
Page 8: Segnaletica E Simbologia
• A protezione contro i contatti INDIRETTI tutte le masse metalliche sono collegate a terra con apposito conduttore. Attraverso il collegamento spina- presa, tale conduttore dovrà garantire la continuità elettrica tra la macchina e l’impianto generale di terra; l’idoneità e l’efficienza dell’impianto generale e delle apparecchiature complementari necessarie per interrompere l’alimentazione elettrica in caso di guasto sono a totale carico dell’utilizzatore della macchina. -
Page 9: Predisposizione Locali E Installazione Della Macchina
La macchina è stata imballata in un cartone riportante i simboli e le indicazioni per la sua movimentazione. Successivamente è stata posta su un pallet e caricata su un container o un vagone con l’ausilio di un adeguato carrello elevatore. La macchina deve essere sempre movimentata con la massima cautela e prudenza. - Page 10 All’atto della rimozione dell’imballaggio, controllare la perfetta integrità della macchina e segnalare entro 48 ore dalla ricezione della merce gli eventuali danni rilevati alla casa costruttrice o al rivenditore autorizzato. Per l’installazione della macchina, tenere conto dei dati riportati sulla targa di identificazione e delle misure di ingombro.
- Page 11 Ai fini di una conservazione ottimale, non riempire le vaschette gastronomiche fino al bordo, ma lasciare liberi almeno 3 cm in altezza. Assemblaggio dei portali laterali e dei perimetrali 12.1. Pannello di comando Il pannello di comando è situato sul basamento e contiene un termoregolatore elettronico. A) Termoregolatore elettronico (A): consente la regolazione della temperatura della macchina, l'accensione e lo spegnimento dell'impianto refrigerante e dell'illuminazione (per l'uso del termoregolatore, vedi istruzioni seguenti).
-
Page 12: Regolazioni Frequenti
13. REGOLAZIONI FREQUENTI SBRINAMENTO MANUALE DELLA MACCHINA La quantità e la rapidità di accumulo varia a seconda delle condizioni ambientali e della frequenza di apertura . Gli sbrinamenti automatici sono impostati di default su tutti i mobili. Nel caso di intasamento eccessivo di ghiaccio sull'evaporatore, procedere come segue: Premere il tasto DEF ▼ per 3 secondi (in basso a destra) per effettuare o fermare uno sbrinamento manuale. -
Page 13: Regolazione Della Temperatura
3. Visualizzare il valore impostato premendo il tasto Set. 4. Per modificarlo, utilizzare i tasti ▲ e ▼. 5. Premere Set. 6. Confermare il nuovo valore premendo Prg per 5 secondi. Ripristino della programmazione di fabbrica del termoregolatore in caso di problemi. 1. -
Page 14: Manutenzione E Controlli
Lasciare aperta la calotta della macchina (ove apribile) per impedire la formazione di muffe, cattivi odori e ossidazioni; Coprire l’impianto onde evitare il deposito di polvere. 15.MANUTENZIONE E CONTROLLI Prima di eseguire qualsiasi operazione di manutenzione, disinserire il termoregolatore elettronico, l'interruttore generale e staccare la spina dalla presa di alimentazione elettrica interbloccata con interruttore. - Page 15 macchina è troppo corretta. indicato nel capitolo n° 13. fredda C’è presenza di La porta rimane troppo aperta oppure la Verificare la chiusura ermetica della ghiaccio temperatura della macchina è troppo bassa porta. sull’evaporatore Aumentare gli sbrinamenti automatici. Effettuare uno sbrinamento manuale. Regolare il termoregolatore come indicato nel capitolo n°...
-
Page 16: Servizio Assistenza Tecnica
SERVIZIO ASSISTENZA TECNICA Si consiglia di interpellare la casa costruttrice o il rivenditore autorizzato che provvederanno alla migliore e razionale esecuzione di qualsiasi lavoro di revisione e riparazione mediante personale specializzato e con attrezzature appositamente studiate per tale esercizio. Al servizio di assistenza tecnica devono sempre essere comunicati i dati riportati nella targhetta di identificazione (vedi capitolo n°... - Page 17 INFORMAZIONE EX ART. 13 del Decreto Legislativo n. 151 del 25 luglio 2005. (valido solo per Italia) a) E’ fatto obbligo di non smaltire i RAEE (Rifiuti di Apparecchiature Elettriche ed Elettroniche) come rifiuti urbani e di effettuare per detti rifiuti, una raccolta separata. b) La raccolta RAEE viene effettuato attraverso un Consorzio che svolge, a seguito di autorizzazione amministrativa, detto servizio.
-
Page 18: Ordinazione Ricambi
19.ORDINAZIONE RICAMBI Richiedere, presso il nostro servizio clienti, l’esploso della macchina ed individuare il codice del pezzo da sostituire. Nelle ordinazioni citare sempre quanto segue: Numero di matricola della macchina (da verificare sulla targhetta) Numero di riferimento del pezzo e relativo codice Quantità... -
Page 19: Wiring Diagrams
Wiring diagrams CE declaration of conformity 1. INTRODUCTION This instruction manual should be read before carrying out any operation on the machine. This instruction manual has been designed and organised to permit quick easy consultation. For all topics discussed, illustrations or tables are provided to facilitate comprehension. The instruction manual is divided into various chapters. -
Page 20: General Precautions
The manufacturer reserves the right to make any updates necessary to the machine and the instruction manual without this entailing the obligation to update machines and/or manuals pertaining to previous production. The manufacturer will nevertheless provide the customer with any further information requested and likewise will take due account of any proposals for improvement of this manual. -
Page 21: Application
• technical specifications. The data contained in the identification plate must be communicated when making any service requests. The plate shown in the figure is intended purely as an example. Legenda 1 – Name of manufacturer 2 – address of manufacturer 3 –... -
Page 22: Health And Safety Precautions
• Static (or ventilated VT RF) condensing sealed type unit with thermoregulator for automatic temperature control. • Condensation collection drainer and pull-out tray located at end of machine for condensation water and evaporation drainage • water drain system; • wheels on base of unit, “DROP-IN” models excluded; •... -
Page 23: Signs And Symbols
• To protect against INDIRECT contacts, all the metal parts are earthed by means of an appropriate lead. Via the plug-socket connection, this lead must ensure electrical continuity between the machine and the general earth system; the suitability and efficiency of the general system and the accessory equipment necessary for cutting off the power supply in the event of a fault are the responsibility of the machine user. -
Page 24: Preparation Of Premises And Machine Installation
Step 2 rest the machine gently on the ground Step 3 remove the packaging and gently raise the machine with the forklift truck, being careful not to damage it , until the pallet can be removed Step 4 rest the machine gently on a flat uniform surfaces as near as possible to its final position 11. -
Page 25: Start-Up, Operation And Adjustment
See enclosure “A” for “DROP IN”model installation instructions. 12. START-UP, OPERATION AND ADJUSTMENT To obtain the best performance from the refrigeration unit, the following conditions must obtain: • Ambient temperature = 25°C • Relative humidity R.H. = 60% Before starting the machine, follow the instructions below: 1) Check that the system and the electrical connections comply with the current local regulations. -
Page 26: Control Panel
Assembly of perimetral shelfs 12.1 Control panel The control panel is located on the base and contains the following commands: Electronic thermoregulator: permits regulation of the machine temperature, switch-on and switch-off of the refrigerating system and lighting (for use of the thermoregulator, see instructions below). You are advised to switch the light on only when the unit is actually being used. -
Page 27: Water Drainage
13.MACHINE DEFROSTING The formation of frost on the container walls is normal. The quantity and speed of accumulation vary according to ambient conditions and how often the doors are opened. Automatic defrosting is set by default on all the model types . In the event of the evaporator becoming clogged with ice, proceed as follows: Keep pushing DEF ▼... -
Page 28: Food Hygiene And Cleaning
For a proper operation of the machine and for a best preservation of food we suggest to set the "set point" of thermostat +2 °C. CLEANING OF THE MACHINE For cleaning the machine DO NOT USE ethyl alchohol, hydrocarbon (petrol), ammonia or derivative. We suggest to use neutral cleanser and water. -
Page 29: Faults And Possible Solutions
Once a day Check that the power supply cable is in perfect condition; if not replace it with another one of the same type. 16.FAULTS AND POSSIBLE SOLUTIONS For troubleshooting and related repairs, refer to the table below. FAULT POSSIBLE CAUSE POSSIBLE SOLUTION The refrigeration... -
Page 30: Technical Support Service
The lighting or The power supplì cable is damaged or Check the condition of the. ventilation do not interrupted. compressor. If necessari contact a work.. qualified technician to replace it with another one of the same type. The mains bipolar switch is off. Turn the mains bipolar switch on. -
Page 31: Scrapping The Machine
In the event of imminent danger, turn the main switch off, unplug the unit from the socket interlocked with switch and call the manufacturer or authorised dealer to request the services of a qualified technician. If current dispersion occurs in contact with metal parts of the machine, turn the main switch off, unplug the unit from the socket interlocked with switch and call the manufacturer or authorised dealer to request the services of an electrician. - Page 32 - Francais - TABLE DES MATIERES Chapitre Page 1. Introduction 2. Avertissements généraux 3. Précautions générales 4. Conditions de garantie 5. Plaquette d'identification 6. Usage 7. Description de la machine - Caracteristiques techniques 8. Mesures de prévention contre les risques pour la sécurité et la santé 9.
-
Page 33: Introduction
INTRODUCTION Avant d'effectuer n'importe quelle opération sur la machine, on recommande de lire cette notice d'instructions. Cette notice d'instructions a été conçue et structurée pour permettre une consultation rapide et facile. Tous les arguments traités sont documentés par des illustrations et des tableaux qui en facilitent la compréhension. La notice d'instructions est divisée en plusieurs chapitres. -
Page 34: Précautions Générales
c) installation incorrecte d) défauts d'alimentation électrique e) nettoyage et entretien insuffisants f) modifications ou interventions non autorisées g) utilisation de pièces de rechange non originales ou non spécifiques pour le modèle h) non respect total ou partiel des instructions contenues dans cette notice i) événements exceptionnels 3. -
Page 35: Caracteristiques Techniques
Légende 1 – nom de la Maison constructrice 2 – adresse de la Maison constructrice 3 – type de machine 4 – numéro de série 5 – modèle de machine 6. CARACTERISTIQUES TECHNIQUES Les caractéristiques techniques principales des différents modèles sont indiquées ci-dessous les suivantes: Tout autre usage n'est pas consenti, car considéré... -
Page 36: Mesures De Prévention Contre Les Risques Pour La Sécurité Et La Santé
8. MESURES DE PREVENTION CONTRE LES RISQUES POUR LA SECURITE ET LA SANTE La Maison constructrice a projeté et réalisé la machine en tenant compte le plus possible des résultats d'une étude minutieuse sur les risques pour la SECURITE et la SANTE liés à l'utilisation de la machine. Les protections et les dispositifs installés sur la machine représentent donc le résultat obtenu suite à... -
Page 37: Mesures De Preventions Pour L'hygiene
On rappelle que la prise, interbloquée par interrupteur, doit être placée à environ 130cm. du sol et dans une position qui ne l'expose pas aux chocs ou détériorations. 8.3 Mesures de preventions pour l’hygiene Le couvercle supérieur en verre trempé a été projeté et réalisé comme protection contre la poussière et les postillons selon la norme EN 60335. -
Page 38: Préparation Du Local Et Installation De La Machine
Phase 2: poser délicatement la machine sur le sol Phase 3: enlever l'emballage et extraire délicatement la machine avec le chariot élévateur, en ayant soin de ne pas l'endommager, jusqu'à extraire la palette inférieure Phase 4: poser délicatement la machine sur une surface plate, robuste et le plus prêt possible du lieu d'installation définitive. -
Page 39: Mise En Route, Utilisation Et Reglage
our l'installation des modèles “DROP-IN” voir l'annexe A. 12. MISE EN ROUTE, UTILISATION ET REGLAGE Pour que le fonctionnement du meuble réfrigérant soit optimal, vérifier les critères suivants: • Température ambiante = 25°C • Humidité relative H.R.. = 60 % •... - Page 40 Fixage des marbles avec supports En accouplant la numeration marquèe sur les pièces , assembler les marbles avec la suivante sèquence: 12.1Le panneau de contròle Le panneau de contrôle est placé sur le soubassement et contient un thermorégulateur électronique: il permet le réglage de la température de la machine, l'allumage et le coupage de l'installation chauffante et de l'éclairage (pour l'usage du thermorégulateur, voir instructions suivantes).
-
Page 41: Degivrage De La Machine
13. DEGIVRAGE DE LA MACHINE La formation de givre sur l'évaporateur est un phénomène normal. La quantité et la rapidité de l'accumulation varie selon les conditions environnantes et la fréquence d'ouverture des portes. Les dègivrages automatiques sont reglès par dèfaunt dans tous les meubles En cas d'excès de glace sur l'évaporateur, procéder comme suit: Appuyer sur la touche DEF (en base à... -
Page 42: Hygiène Alimentaire Et Nettoyage
1.Détacher la fiche d'alimentation du réseau 2. Presser et tenir pressé le bouton Prg 3. En pressant Prg, reconnecter la fiche d'alimentation au réseau et attendre quelques seconds jusqu'à l'apparition de bn0 4. Parcourir les paramètres du display avec les boutons ▲ et ▼jusqu'à la visualisation de bnx. La lettre X se rapporte au modèle du meuble (contacter l'assistance pour les modèles) 5. -
Page 43: Irrégularités Et Remèdes Possibles
Chaque jour Vérifier l'intégrité du cordon d'alimentation; dans le cas contraire le remplacer par un autre ayant les mêmes caractéristiques. 16. IRREGULARITES ET REMEDES POSSIBLES Pour rechercher des pannes et effectuer des réparations correspondantes, se référer au tableau ci-dessous. IRREGULARITES CAUSES POSSI BLES REMEDES POSSI BLES... -
Page 44: Service Apres-Vente
L’éclairage ne La fiche de la machine est débranchée de Introduire correctement la fiche dans fonctionne pas. la prise de courant. la prise de courant. Le cordon d'alimentation est endommagé Vérifier les conditions du cordon. Si ou interrompu. nécessaire, s'adresser à un technicien qualifié... -
Page 45: Situation De Danger
On conseille d'interpeller la Maison constructrice ou le revendeur autorisé qui procéderont à une exécution rationnelle et optimale de n'importe quelle opération de contrôle et réparation grâce à du personnel spécialisé et aux équipements spécifiques pour ces interventions. Quand on contacte le service Après-vente, il faut communiquer toutes les données de la plaquette d'identification (voir chapitre n°... - Page 46 rechange de la machine et le code de la pièce à substituer. En cas de commande, donner toujours les indications suivantes: - Numéro de matricule de la machine (à vérifier sur la plaquette) - Numéro de référence de la pièce et code correspondant - Quantité...
- Page 47 - Deutsch - INDEX NACH THEMEN Abschnitt Seite 1. Einleitung 2. Allgemeine Hinweise 3. Allgemeine Vorsichtsmaßnahmen 4. Garantievorschriften 5. Kennschild 6. Einsatz 7. Beschreibung des Geräts 8. Vorbeugungsmaßnahmen gegen Risiken für die Sicherheit und die Gesundheit 9. Signale und Symbole 10.Beförderung, Verschiebung und Lagerung 11.Vorbereitung der Räume und Installation des Geräts 12.Inbetriebsetzung, Bedienung und Einstellung –...
-
Page 48: Einleitung
1. EINLEITUNG Die vorliegende Anleitung sollte vor Arbeiten am Gerät gelesen werden. Die Anleitung wurde so entwickelt und aufgebaut, dass sie ein schnelles und leichtes Nachschlagen ermöglicht. Um das Ganze verständlicher zu machen, sind für jedes behandelte Argument Abbildungen und/oder Tabellen vorhanden. -
Page 49: Allgemeine Vorsichtsmaßnahmen
f) unberechtigten Änderungen oder Eingriffen g) Benutzung von Nicht-Originalersatzteilen oder von Ersatzteilen, die für das jeweilige Modell nicht vorgesehen sind h) ganzer oder teilweiser Nichtbeachtung der Anweisungen in diesem Handbuch i) außergewöhnlichen Ereignissen. 3. ALLGEMEINE VORSICHTSMAßNAHMEN • Das Gerät vor allem in Gegenwart von Kindern nie unbewacht lassen. •... -
Page 50: Beschreibung Des Geräts
Abbildung Nr.1 Legende 1 Name der Herstellerfirma 2 Adresse der Herstellerfirma 3 Gerätetyp 4 Fabrikationsnummer 5 Gerätemodell 6. EINSATZ Die Möbel für das Gaststättenwesen dienen zur Ausstellung und täglichen Aufbewahrung von Nahrungsmitteln für den sofortigen Verbrauch in öffentlichen Lokalen, wie Hotels,Restaurants, Gaststätten, Pizzerias, Feinkostgeschäfte und Supermärkte.. - Page 51 8. VORBEUGUNGSMAßNAHMEN GEGEN RISIKEN FÜR DIE SICHERHEIT UND DIE GESUNDHEIT Planung und Konstruktion des Geräts sind vom Hersteller unter genauester Berücksichtigung der Ergebnisse einer vorherigen, genauen Analyse der Risiken für die SICHERHEIT und die GESUNDHEIT, die mit dem Gebrauch Geräts zusammenhängen, durchgeführt worden.Die...
-
Page 52: Signale Und Symbole
Es wird daran erinnert, dass die mit Schalter verblockte Steckdose auf einer Höhe von ca.130 cm ab Boden und so angeordnet werden muss, dass sie keinen Stößen oder Beschädigungen ausgesetzt ist. Ein Kontakt des Kabels mit dem Wannenrand ist zu vermeiden. 8.3 Maßnahmen für die hygiene Die obere Haube aus Polycarbonat oder gehärtetem Glas wurde als Staub- und Spuckschutz gemäß... -
Page 53: Vorbereitung Der Räume Und Installation Des Geräts
4. Schritt: das Gerät behutsam auf eine ebene und feste Fläche stellen, die sich möglichst in der Nähe des endgültigen Installationsortes befindet.. 11. VORBEREITUNG DER RÄUME UND INSTALLATION DES GERÄTS Der Installationsraum des Geräts sowie die verschiedenen vorhandenen Anlagen müssen den örtlich gültigen technischen Vorschriften und Spezifikationen entsprechen. -
Page 54: Inbetriebsetzung, Bedienung Und Einstellung
12. INBETRIEBSETZUNG, BEDIENUNG UND EINSTELLUNG Um optimale Leistungen von der Kühltheke zu erhalten, müssen folgende Bedingungen vorhanden sein: • Umgebungstemperatur = 25°C • Relative Feuchtigkeit = 60% Um optimale Leistungen von der Kühltheke zu erhalten, müssen folgende Bedingungen vorhanden sein: •... -
Page 55: Manuelles Abtauen Des Geräts
Montage der Seitentüren und Umfang Die Nummerierung der Teile beachten und die Marmorleisten in der Reihenfolge unten 1 Die verzinkten Halterungen (Nr. 4) mit Schrauben an den vorgelochten Bohrungen der Holzseiten befestigen; 2 Die verzinkten Halterungen mit Aluminiumhalterung (Nr.3) zudecken; 3 Die Holzwinkel (Nr. -
Page 56: Einstellen Der Temperatur
HÄUFIGE ANPASSUNGEN Aenderung der inneren Haupttemperatur (set point) 1. Durch Betaetigung der SET Taste wird die Haupttemperatur geandert 2. Danach die gewuenschte Temperatur mit den kleinen Pfeilen einstellen ▲▼ 3. Set erneut druecken Manuelle Abtaugung 1. Die DEF Taste (rechts unten) druecken ▼ Aenderung der automatische Abtaugung (In Stunden oder Minuten) 1. -
Page 57: Instandhaltung Und Kontrollen
• Om de sensor met niet corrosieve antilimestonesubstanties schoon te maken Alle 15 Tage • Reinigen Sie den Kondensator der Kältemaschine mit Hilfe einer Bürste oder einem Staubsauger (Um den Kühler zu reinigen, entfernen Sie das vordere Gitter auf Holz). Im Falle längeren Stillstandes •... - Page 58 Gerät ist in der Nähe einer Gerät wie in Kapitel Nr.12 Wärmequelle installiert. angegeben von der Wärmequel le entfernen. Der Abstand zwi schen Gerät Das Gerät fern von anderen und ander en Hindernissen Hindernissen aufstellen, wie in Kapitel beträgt weniger als 15 cm. Nr .12 angegeben.
-
Page 59: Technischer Kundendienst
Aktiveirung Es fehlt Wasser in der Wanne. Wasser in der Wanne schuetten. Alarms d’A. Aktivierung Die Parameter sind nicht abgeglichen Den Regler wieder einstellen. Alarms EA. Den Kundendienst anrufen. VORSICHT om de badkuip te werken correct het van water moet worden opgevuld tot het overschrijden van de niveausensor TECHNISCHER KUNDENDIENST Es wird empfohlen, die Herstellerfirma oder den autorisierten Händler zu Rate zu ziehen. -
Page 60: Bestellung Von Ersatzteilen
mit dem entsprechenden Symbol gekennzeichnet sein. Die gesetzwidrige Beseitigung von Elektround Elektronik-Altgeräten zieht Sanktionen nach Maßgabe der gesetzlichen Bestimmungen in dem Mitgliedstaat nach sich, in dem die Zuwiderhandlung begangen wurde. Elektro- und Elektronik-Altgeräte können gefährliche Stoffe enthalten, die schädlich für die Gesundheit der Personen und für die Umwelt sein können. - Page 61 - Espanol - INDICE PARA LOS ARGUMENTOS Capitulo Pàgina 1. Introducción 2. Advertencias generales 3. Precauciones generales 4. Normas de garantía 5. Placa de identificación 6. Destinación de uso 7. Descripción de la máquina 8. Medidas de prevención contra los riesgos para la seguridad y la salud 9.
-
Page 62: Introducción
1. INTRODUCCION Se aconseja leer este manual de instrucciones antes de efectuar cualquier operación en la máquina. Este manual de instrucciones fué creado y estructurado con la finalidad de permitir una consultación rápida y fácil. Para cada argumenteo tratado, se han adjuntado dibujos y tablas para facilitar la comprensión. El manual de instrucciones está... -
Page 63: Precauciones Generales
g) utilización de piezas de repuesto no originales o no específicas para el modelo h) inobservancia total o parcial de las instrucciones de este manual i) acontecimientos excepcionales. 3. PRECAUCIONES GENERALES • No dejar la máquina sin vigilancia sobre todo cuando existe la presencia de niños. •... -
Page 64: Destinación De Uso
Legenda 1- nombre del fabricante 2- dirección del fabricante 3- tipo de macchina 4- n° de matricula 5- modelo de máquina 6. DESTINACION DE USO Los muebles refrigeradores para el suministro de comida CALIFORNIA LINE están destina dos para la exposición y la conservación de bebidas destinadas al consumo y venta en los comercios públicos como hoteles, restaurantes, posadas, pizzerias, gastronomías, supermercados. - Page 65 8. MEDIDAS DE PREVENCION CONTRA LOS RIESGOS PARA LA SEGURIDAD Y LA SALUD El fabricante ha diseñado y construído la máquina tomando en cuenta los resultados de un preventivo y preciso análisis de los riegos para la SEGURIDAD y la SALUD relacionados al uso de la máquina. Las protecciones y los dispositivos instalados en la máquina representan por lo tanto, los resultados obtenidos para alcanzar las finalidades de seguridad ratificadas en las específicas normas CEE.
-
Page 66: Señales Y Símbolos
Se debe recordar que el toma corriente, interbloqueado con el interruptor, va ubicado a una altura de aproximadamente 130 cm. del piso y está protegido de modo tal que no sea expuesto a golpes o daños. 8.3 Medidas de prevension para la higiene Gli elementi o parti della macchina destinati a venire a contatto con gli alimenti, ovvero ricadenti nella cosiddetta ZONA ALIMENTARE, sono in acciaio inox. - Page 67 Fase 4: apoyar delicadamente la máquina sobre una superficie plana, consistente y lo más cerca posible del lugar donde se la ubicará definitivamente. 11. PREDISPOSICION DE LOS LOCALES Y INSTALACION DE LA MAQUIN El local en el cual la máquina será instalada, como así también las distintas instalaciones existentes, deberán respetar las normas y las reglas específicas técnicas locales vigentes.
- Page 68 12. PUESTA EN MARCHA, USO Y REGULACION Antes de poner en funcionamiento la máquina, observar las siguientes instrucciones: 1) Verificar que la instalación y las conexiones eléctricas estén conformes a las normativas locales vigentes. 2) Verificar que el voltaje de la máquina indicado en la placa de identificación corresponda a la tensión de línea existente en el toma corriente que se utilizará.
-
Page 69: Cuadro De Mando
Montaje de las puertas laterales y el perímetro 12.1 Cuadro de mando El panel de mandos está situado sobre el basamento y contiene un termoregulador electrónico: consiente la regulación de la temperatura de l’agua el encendido y el apagado de la instalación de calefacción y de iluminación (para el uso del termoregulador, ver instrucciones siguientes). -
Page 70: Descongelación De La Máquina
13. DESCONGELACION DE LA MAQUINA La formación de la escarcha en el evaporador es un fenómemo normal. La cantidad y la rapidéz con la que se acumula cambia según las condiciones del ambiente y la frecuencia con la cual se abren las puertas. Las descongelaciones automàticas tienen su propia regulàcion hecha por la fàbrica en todos los muebles. -
Page 71: Higiene Alimenticia Y Limpieza
For cleaning the machine DO NOT USE ethyl alchohol, hydrocarbon (petrol), ammonia or derivative. We suggest to use neutral cleanser and water. 14. HIGIENE ALIMENTICIA Y LIMPIEZA Antes de efectuar cualquier operación de limpieza, desconectar el termoregulador electrónico y el interruptor general y quitar el enchufe de la alimentación eléctrica interbloqueada con interruptor. - Page 72 El cable de alimentación eléctrica está Verificar el estado del cable. Si es dañado o interrumpido. necesario, dirigirse a un técnico calificado para sustituirlo con otro de iguales características. El i nterruptor bipolar de red está Inserir correctamente el interruptor desinserido.
-
Page 73: Situaciónes De Emergencia
No llega la corriente a los mandos. Controlar el estado de los mandos. Si es necesario dirigirse a un técnico calificado para reactivar la corriente. El interruptor de la iluminación o de la Encender el interruptor de la ventilación está apagado. iluminación o de la ventilación. -
Page 74: Pedido De Los Repuestos
En el caso de extremo peligro desconectar el interruptor general, quitar el enchufe de alimentación eléctrica interbloqueada con interruptor y hacer intervenir un técnico calificado de la empresa constructora o del revendedor autorizado.. Si se encontrara una pérdida de corriente detectable al contacto con partes metálicas de la máquina, desconectar el interruptor general, quitar el enchufe del toma corriente de alimentación eléctrica interbloqueada con interruptor y hacer intervenir un técnico electricista de la empresa constructora o del revendedor autorizado.. - Page 75 СОДЕРЖАНИЕ Глава Страница 1.Общие положения 2. Предупреждения 3. Общие рекомендации 4. Гарантийные обязательства 5. Паспортная табличка 6. Область применения оборудования 7. Описание оборудования /Технические характеристики 8. Меры предосторожности 9. Условные обозначения и символы 10. Транспортировка, перемещение и хранение 11. Требования к помещению и установка оборудования 12.
-
Page 76: Общие Положения
1.ОБЩИЕ ПОЛОЖЕНИЯ Просим внимательно прочесть это руководство по эксплуатации перед выполнением каких-либо действий с оборудованием. Это руководство было разработано для быстрого и доступного получения необходимой информации. Каждый тематический блок снабжен иллюстрациями и таблицами, призванными облегчить восприятие информации. Руководство состоит из нескольких... -
Page 77: Общие Рекомендации
г) неисправности системы электроснабжения д) недостаточного ухода и технического обслуживания е) несанкционированной модификации ё) использования запчастей не предназначенных для данной модели ж) частичное или полное несоблюдение требований данного руководства з) чрезвычайных обстоятельств 3. ОБЩИЕ РЕКОМЕНДАЦИИ • • Не оставляйте оборудование без присмотра, особенно в присутствие детей. •... -
Page 78: Область Применения Оборудования
Легенда 1 - название производителя 2 - адрес производителя 3 - тип оборудования 4 - серийный номер машины 5 - модель машины 6. ОБЛАСТЬ ПРИМЕНЕНИЯ ОБОРУДОВАНИЯ Ресторанная мебель создана для ежедневной презентации и хранения продуктов питания, предназначенных для потребления в течение дня, в местах общепита таких, как гостиницы, рестораны, пиццерии, отделы... -
Page 79: Меры Предосторожности
“DROP-IN” – встраиваемое оборудование 8. МЕРЫ ПРЕДОСТОРОЖНОСТИ Производитель разработал и реализовал оборудование, учитывая результаты тщательного предварительного анализа возможного риска для БЕЗОПАСНОСТИ и ЗДОРОВЬЯ пользователей, связанного с его использованием. Защитные элементы и приборы, установленные на оборудовании, находятся в полном соответствии с нормами... -
Page 80: Условные Обозначения И Символы
Следует помнить, что электрическая розетка с выключателем должна быть расположена на высоте 130 см. над уровнем пола в месте, защищенном от механических и прочих повреждений, а электропровод не должен прикасаться к бортам ванны. 8.3 Меры по уходу и гигиене Надстраиваемая витрина из закаленного стекла была спроектирована и реализована в соответствии с нормой... -
Page 81: Требования К Помещению И Установка Оборудования
Для хранения оборудования необходимо использовать сухие и проветриваемые помещения, предварительно зачехлив его. Производитель не несет ответственности за ущерб, причиненный в следствие некачественно выполненных операций. 10.1 Операция по разгрузке оборудования при помощи вилочного погрузчика Шаг 1 Осторожно снимите упакованное оборудование с транспортного средства Шаг... - Page 82 Категорически запрещается использовать оборудование в местах, где существует опасность взрыва или возгорания из-за наличия или возможности появления газа, пороха, взрывчатых или легковоспламеняющихся веществ. Обратите внимание, что упаковочные материалы должны быть утилизированы в соответствии с местным законодательством в отношении промышленных и специальных отходов. Для...
-
Page 83: Панель Управления
Для обеспечения оптимального хранения, не заполняйте гастроемкости до краев, оставив 3 см до верхнего края. Монтаж боковых и периметральных панелей 12.1 Панель управления Панель управления расположена в основании конструкции и содержит следующие команды: А) Электронный терморегулятор (А): позволяет регулировать температуру аппарата, включение и выключение... -
Page 84: Периодическая Настройка
13. ПЕРИОДИЧЕСКАЯ НАСТРОЙКА РУЧНОЕ РАЗМОРАЖИВАНИЕ ХОЛОДИЛЬНОГО ОБОРУДОВАНИЯ Количество и скорость образования инея колеблются в зависимости от условий окружающей среды и частоты открытия дверцы. Автоматическое размораживание установлено по умолчанию на всех агрегатах. В случае чрезмерного накопления льда на испарителе, выполните следующие действия: нажмите... -
Page 85: Чистка И Уход
2. При помощи клавиш прокрутки ▲ и ▼ найдите функцию dl (интервал между размораживанием) или dP1 (продолжительность). 3. Отобразите установленное значение, нажав клавишу Set. 4. Чтобы изменить показание, используйте клавиши прокрутки ▲ и ▼. 5. Нажмите клавишу Set. 6. Подтвердите новое значение, нажав и удерживая Prg в течение 5 секунд. Восстановление... -
Page 86: Неполадки И Их Устранение
• Выключите агрегат; • Отключите агрегат от электросети; • Удалите все продукты питания; • Аккуратно очистите агрегат с использованием дезинфицирующих нейтральных средств для предохранения от окисления (см. главу № 14 - 15); • Оставьте открытой витрину (в моделях с опцией открытия), чтобы предотвратить появление плесени, запахов... - Page 87 Агрегат установлен на расстоянии Удалите агрегат от иных объектов, менее 15 см от других объектов. следуя инструкции, приведенной в главе № 12. Циркуляция воздуха сквозь Очистите вентиляционные вентиляционные отверстия затруднена. отверстия от засора. Сбои в холодильном контуре или Обратитесь к квалифицированному отсутствует...
-
Page 88: Техническая Поддержка
Подсветка повреждена или неисправна. Проверьте состояние подсветки. При необходимости обратитесь к квалифицированному специалисту и замените ее равнозначной. Температура, Датчик неправильно установлен. Произведите наладку датчика 1. отображаемая на дисплее, не соответствует реальной. Терморегулятор Отображаемые данные неверны. Переустановите терморегулятор. работает не надлежащим образом. -
Page 89: Утилизация Оборудования
В случае возникновения опасности, отключите основной выключатель, выньте вилку из электросети, затем обратитесь к специалистам производителя или авторизованного дилера. Если Вы заметили рассеивание электроэнергии, проявляющееся при контакте с металлическими элементами оборудования, отключите общий выключатель, выньте вилку из сети и обратитесь к специалистам... - Page 90 Необходимое количество единиц Год выпуска агрегата Наиболее подходящий способ доставки Адрес доставки Техническая информация, содержащаяся в данном руководстве, является ориентировочной. Производитель оставляет за собой право вносить изменения в любое время без предварительного уведомления. ALLEGATO A – MONTAGGIO “DROP-IN” ATTACHMENT A – “DROP-IN” MOUNTING ANNEXE A –...
- Page 91 Lasciare libera la parte anteriore per una eventuale manutenzione. Leave the front part free for maintenance and vent- ilation of the unit. Laisser libre la partie avant pour d’éventuelles opérations de maintenance et pour l’aération de l’unitè. Den Vorteil für eventuelle Wartung und die ...
- Page 92 Per il modello standard senza sovrastruttura, usare VENTOSE con portata minima 35 kg. For the standard model without upper part,use SUCTION CUPS with minimum capacity of 35 Pour le modèle standard sans superstructure, utiliser des VENTOUSES d’une portèe de minimum 35 Kg.
- Page 93 ADJUNTO B - MONTAJE PLANES DE PERÍMETRO ПРИЛОЖЕНИЕ Б УСТАНОВКА ПЕРИМЕТРАЛЬНЫХ ПОЛОЧЕК CT68900001_ Rev.00 07/13...
- Page 94 CT68900001_ Rev.00 07/13...
- Page 95 CT68900001_ Rev.00 07/13...
- Page 96 CT68900001_ Rev.00 07/13...
- Page 97 CT68900001_ Rev.00 07/13...
- Page 98 ALLEGATO C - SCHEMI ELETTRICI ATTACHMENT C - WIRING DIAGRAMS ANNEXE C - SCHEMAS ELECTRIQUES ANLAGE C - SCHALTPLÄNE ADJUNTO C - CUADRO ELECTRICOS ПРИЛОЖЕНИЕ В - ЭЛЕКТРИЧЕСКИЕ СХЕМЫ CT68900001_ Rev.00 07/13...
- Page 99 CT68900001_ Rev.00 07/13...
- Page 100 CT68900001_ Rev.00 07/13...
- Page 101 CT68900001_ Rev.00 07/13...
- Page 102 CT68900001_ Rev.00 07/13...
- Page 103 ALLEGATO D - DICHIARAZIONE DI CONFORMITÀ CE ATTACHMENT D - CE DECLARATION OF CONFORMITY ANNEXE D - DÉCLARATION DE CONFORMITÉ CE ANLAGE D - CE-KONFORMITÄTSERKLÄRUNG ADJUNTO D - DECLARACIÓN DE CONFORMIDAD CE ПРИЛОЖЕНИЕ Г - СООТВЕТСТВИЕ ТРЕБОВАНИЯМ ДИРЕКТИВ CE CT68900001_ Rev.00 07/13...
- Page 104 DICHIARAZIONE DI CONFORMITA’ GELIJKVORMIGHEIDS VERKLARING DECLARATION OF CONFORMITY OVERENSSTEMMELSESERKLÆRING KONFORMITÄTSERKLÄRUNG FÖRSÄKRAN OM ÖVERENSSTÄMMELSE DÉCLARATION DE CONFORMITÉ YHDENMUKAISUUSVAKUUTUS DECLARACION DE CONFORMIDAD DECLARACÃO DE CONFORMIDADE ЗАЯВЛЕНИЕ О СООТВЕТСТВИИ Rev 03 08/11 Il sottoscritto, designato a legale rappresentante della Ditta costruttrice, dichiara che i prodotti sottoelencati: GB-IE The undersigned, an authorised officer of the Manufacturer, hereby declares that the products listed hereunder: DE-AT...
- Page 105 Codice Fiscale Ditta/Manufacturer’s identify number/Identifizierungsnummer des Herstellers Numéro d’identification de la Société/Nùmero de idebtificaciòn de la Empresa / Идентификационный номер 00813890282 производителя www.enofrigo.it I - 35010 BORGORICCO (PD) Via dell’Industria, 9/a Tel. +39 049 5798041 Fax +39 049 5798806 info@enofrigo.com...
- Page 106 ASSISTENZA TECNICA TELEFONICA TELEPHONE TECHNICAL SERVICE service.enofrigo@enofrigo.com Tel. +39 049 9338084 CT68900001_ Rev.00 07/13...