
Manuels Connexes pour Leckey Everyday Activity


Sommaire des Matières pour Leckey Everyday Activity
- Page 1 Everyday Activity Seat User Instructions Manuel d’utilisation pour le Siège Everyday Activity...
-
Page 3: Table Des Matières
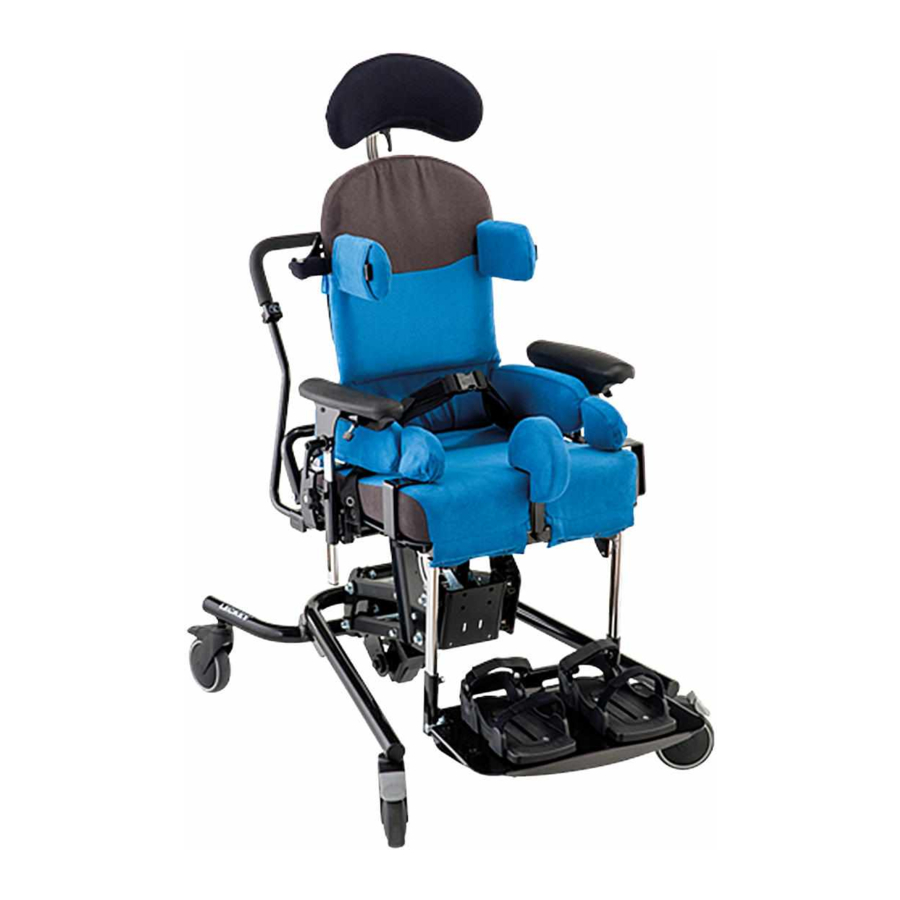
The Everyday Activity Seat is a moderate seating system designed for use in the home and classroom. It comes in 3 sizes with adjustable seat height, depth and width to accommodate users from ages 1 to adult. This manual shows you how you can quickly and easily make use of all of the functions. -
Page 4: Intended Use
1. Intended Use 5. Product Training Record (Clients & Carers) The Everyday Activity Seat comes in 3 sizes catering for the needs of children Your Leckey product is a prescribed Class with disabilities. Size 1 is for kids aged 1 Medical Device and as such Leckey... -
Page 5: Safety Information
6 Safety Information 6.1 Always read instructions fully before 6.9 The Everyday Activity Seat is not a use. wheelchair and although mobility is an important feature of the seat we do not recommend that users be moved over 6.2 Users should not be left unattended at uneven surfaces whilst in the equipment. - Page 6 6.17 The product is designed for indoor use and when not in use should be stored in a dry place that is not subjected to extremes of temperature. The safe operating temperature range of the product is +5° to +40° Celsius.
-
Page 7: How To Unpack And Assemble
How to unpack and assemble Check parts Congratulations on purchasing your Everyday Activity Seat. All of the parts ordered will be contained in polythene bags with each one clearly labelled. Carefully remove them from the boxes and check all of the parts you have ordered. - Page 8 7.1 Attaching the sandals 7.2 Attaching the armrests To attach the sandals simply unscrew the Insert the armrest into the receiving bracket knob and washers from the sandal. Place and secure at the desired height by the sandal onto the footplate positioning the tightening the knob (a).
- Page 9 7.3 Attaching the tray To attach the grey, clear or black tray, insert the tray tubes through the centre of the armrests (a). To insert the Wooden tray, insert the single tray tube into the centre of the right or left armrest depending on position required (b).
- Page 10 7.4 Attaching the 7.5 Attaching the standard hip laterals and flipaway chest lateral supports Unscrew the knob (a) from underneath the To attach the chest lateral supports, line seat base. Place the hip lateral bracket onto the bracket up with the slots in the metal the screw.
- Page 11 7.6 Attaching shoulder 7.7 Attaching the protraction pads pommel To attach the shoulder protraction pads, Insert the pommel bracket into the recess, align the 3 holes in the triangular plate with insert the knob (a) and tighten. the 3 holes in the backrest (rear). Align the protraction pad bracket with the 3 holes at the front of the backrest.
- Page 12 7.8 Attaching the footplate For size 1 and 2, slide the footplate over the calf angle tube (a) and tighten bolt (b). For size 3, slide the footplate tubes over the calf angle support tubes (c) and tighten bolts on each calf support (d).
- Page 13 7.9 Attaching the 7.10 Attaching the Pelvic Abduction Side Pads Harness Line up the abduction side pad bracket Open each Camlock (a). Attach each of with the slot at the front of the seat base the 4 straps through the Camlocks and when the seat is at maximum depth.
- Page 14 7.11 Attaching the Mygo headrest attachment bracket Thread screws through the Mygo Headrest Attachment Bracket and Spacer Block. Align the assembly with the holes in the back plate and push through. Secure each end with bolt - tighten to secure.
- Page 15 7.12 Attaching the Calf Strap Wrap the Calf Strap around the 2 Calf Support bars. Align the Poppers on the velcro strip and secure. Once secured, slide the poppers around the back of the calf support struts to protect the users legs.
-
Page 16: Fitting The Cushions
Fitting the Cushions... - Page 17 8.1 Backrest cushion The backrest cushion can be attached by simply setting it onto the backrest, then pressing down to locate the snap fasteners at the top. Secure it to the Velcro on the backrest and loop the elastic over the hook.
- Page 18 8.2 Seat base cushion 8.3 Chest lateral support covers The seat base cushion can be attached by To attach the chest lateral support covers, simply setting it in place, then pressing down simply slide the covers on the lateral support. to locate the snap fasteners (a) at the back of Feed the plastic buckle through the slot in the seat base, next fold the cover underneath...
- Page 19 8.4 Hip laterals 8.5 Hip lateral bracket cover Slide the covers over the hip lateral hardware Slide the cover around the bracket until it with the zip on the outside. Close the zip and covers the angle adjustment mechanism, pull the velcro.
- Page 20 8.6 Shoulder protraction 8.7 Head support cover pad covers Slide the cover over the shoulder protraction For Size 1 and 2, slide the cushion onto the assembly and secure using the zips. head support. Snap the central fastener and two side fasteners in place. Bring the lower flap under the head support and attach the velcro (a).
- Page 21 8.8 Chest harness 8.9 Attaching the trunk harness The chest harness can be attached by With your trunk harness you will receive clipping the male buckle (a) into the female two adjustable side straps, two adjustable buckle at either side of the lateral support. shoulder straps, four camlock attachment clips (two with webbing straps attached, two without), two countersunk bolts, two...
- Page 22 8.10 Abduction Side Pad Cover Place cover over abduction side pad, close zip to secure.
-
Page 23: Clinical Setup For Postural Management
The clinical setup of the product should be completed by a technically and clinically competent person who has been trained in the use of the product. Leckey recommend that a written record is maintained of all clinical setups for this product. - Page 24 9.1 Pelvic harness 9.2 Hip laterals For side adjustment, open the Camlocks and To adjust the width of the hip laterals loosen either pull the straps to tighten or feed the the knob (a) adjust to the required width and straps through to loosen, depending on fit retighten.
-
Page 25: Backrest Height
9.3 Backrest Height The overall height of the backrest can be adjusted by loosening the two knobs, then positioning to the shoulder height of the user. Once in position the knobs should be retightened securely. The height can be fine tuned when the user is in the seat. - Page 26 9.4 Backrest Angle The backrest can be angled by loosening the ratchet handle (a). Select the position you require the retighten the ratchet handle securely. Always ensure the back angle is secure to maintain the desired posture for the child. The backrest angle can be adjusted with the child in the seat, but always support the backrest with one hand.
-
Page 27: Seat Depth
9.5 Seat depth 9.6 Footplate Height To adjust the seat depth simply loosen the To set the height of size 1 and 2 footplate, knobs (a) on the underside of the seat base, loosen the bolt (a) on the front of the calf pull the seat base towards you until the support tube and slide the footplate to the required seat depth has been achieved and... - Page 28 9.7 Footplate angle 9.8 Sacral support To set the angle of the Size 1 and 2 To adjust the height, loosen the bolts on footplate, loosen the ratchet handle (a) either side with the multi tool provided. set to the required angle and retighten the Adjust the support to the correct height and handle.
- Page 29 9.9 Chest Lateral supports 9.10 Chest harness Loosen the allen bolts (a) to adjust the width, To change the width of the chest harness. height and angle of the lateral supports Lift the front cover, adjust the Velcro straps and retighten when you have achieved the to the desired width and replace the cover.
- Page 30 9.11 Trunk Harness 9.12 Sandals The trunk harness will be open but remain To position the sandals simply loosen the attached by side clip (a). When placing the knob under the footplate, select the position child in the seating system bring the trunk required and refasten the knob.
- Page 31 9.13 Attaching the ankle huggers Slide the webbing through the slot in the sandal. Loop the webbing back up and through the bottom of the triglide. Then pass the webbing through the top of the triglide. Finally to lock the webbing in place, pass it through the bottom of the triglide again.
-
Page 32: Head Support
9.14 Shoulder support 9.15 Head support To adjust the height of the shoulder support, To adjust the height and depth of the Size loosen the allen bolts, adjust to the required 1 & 2 head support, loosen the hand knobs height and retighten the bolts. -
Page 33: Armrest Adjustment
9.16 Armrest adjustment 9.17 Tray adjustment To adjust the height of the armrest loosen The height and angle of the tray are set by the hand knob (a), set to the desired height adjusting the armrests as detailed above. To and retighten. -
Page 34: Frequent Adjustments For Daily Use
Section 6 by a technically and clinically competent person who has been trained in the use of the product. Leckey recommend that a written record is maintained of all parent and carers who have been trained in the use of this product. - Page 35 Section 6 by a technically and clinically competent person who has been trained in the use of the product. Leckey recommend that a written record is maintained of all parent and carers who have been trained in the use of this product.
- Page 36 10.1 Transferring your child 10.2 Adjusting the pelvic into and out of the seat harness Before transferring the child into the seat For side adjustment, open the Camlocks carry out the daily product inspection as and either pull the straps to tighten or feed outlined in section 13 of this user manual.
- Page 37 10.3 Chest and Trunk Harness Adjustment If the child requires chest support as part If the child is active or has extensor spasms check the pelvic harness is secure of their postural support programme the seat will be fitted with rigid laterals or a after each spasm to ensure the child is safe and cannot slide forward in the seat.
- Page 38 10.4 Chassis 10.5 Height Adjustment – Hi-low chassis The Everyday Activity Seat is designed to You can carry out this adjustment with the fit onto several Chassis options. Size 1 fits user in the chair. To adjust the height of the onto a basic and hi-low gas spring chassis.
- Page 39 10.6 Height Adjustment – Basic chassis For children over the weight of 27kg The height of the Basic Chassis should be (60lbs), raising the Hi low chassis is a set before putting the child in the seat. To 2 person lift (UK lifting and handling adjust the height loosen the ratchet handle regulations).
- Page 40 10.7 Height Adjustment - 10.8 Height Adjustment - Hi-Low Hydraulic Chassis Hi-Low Powered Chassis You can carry out this adjustment with the You can carry out this adjustment with the user in the chair. To adjust the height of the user in the chair.
- Page 41 10.9 Tilt in Space Always check with your therapist that The tilt in space can be angled while the the use of tilt in space will not cause any user is in the seat. Before you adjust the tilt obstructions to the child’s airways. in space angle of the seat always ensure the pelvic harness is secured preventing the user from sliding forward in the seat.
- Page 42 10.10 Sandals 10.11 Tray adjustment To position the user’s feet in the sandals The tray can be used for a range of secure the Velcro straps provided so the foot functions and its position can be fine tuned is held in place. The straps should be placed to suit the user and the activity whether it is over the bridge of the foot and over the toes.
- Page 43 10.12 Armrest adjustment Do not place hot objects, greater than 40 To adjust the height of the armrest loosen degrees Celsius on the tray. the hand knob (a) set to the desired height and retighten. To adjust the angle rotate ratchet handle (b) until the desired position Please note that the tray is for the use of has been achieved.
- Page 44 10.13 Using the Flip-Up Footplate To raise the footplate, lift up from the front (a). When fully upright the pull pin will lock automatically. To lower the footplate pull the pullpin out (b) and push the footplate down. It is possible to keep the footplate unlocked by twisting the pullpin once you have pulled out.
-
Page 46: Cleaning And Care Information
11 Cleaning & Care Information How to Maintain 5. The pelvic and trunk harnesses can be When cleaning we recommend that you machine washed at 40 Deg C. Make sure use only warm water and a non-abrasive all bolts and fasteners are removed first as detergent. -
Page 47: Daily Product Inspection
6. Ensure the footplate is attached securely. If in any doubt to the continued safe use of your Leckey product or if any parts should fail, please cease using the product and contact our customer service department or your local dealer as soon as possible. -
Page 48: Annual Product Inspection
This inspection should 7. Leckey recommend that a written record is be carried out by a technically competent maintained of all annual product inspections. -
Page 49: Reissuing Leckey Products
Most Leckey products are assessed and If in any doubt to the continued safe use of ordered to meet the needs of an individual your Leckey product or if any parts should user. Before reissuing a product we fail, please cease using the product and... -
Page 50: Product Servicing
In the UK & ROI please contact the Leckey Service Centre on UK 0800 318265 or ROI 1800 626020 and our customer service department will be delighted to assist you with your servicing requirements. -
Page 51: Technical Information
30º supine 30º supine 10º prone 10º prone 10º prone All international service enquiries should be directed to the appropriate Leckey distributor who will be delighted to assist you. For further information on Leckey distributors please visit our website. www.leckey.com... -
Page 52: Accessories
Accessories 151-1741 Size 1 seat base, backrest and basic chassis with gas spring and 100mm castors 151-2742 Size 2 seat base, backrest and hi-low chassis with gas spring and 100mm castors 151-1742 Size 1 seat base, backrest, and hi-low chassis with gas spring and 100mm castors 151-2741 Size 2 seat base, backrest and basic chassis with gas spring and... - Page 53 151-3637-04 Size 3 Rigid PU chest laterals pair (pink cover included) 151-3637-05 Size 3 Rigid PU chest laterals pair (black cover included) 151-3637-15 Size 3 Rigid PU chest laterals pair (grey cover included) 151-1639-01 Size 1 flip away PU Chest laterals pair (green cover included) 151-1639-03 Size 1 flip away PU Chest laterals pair (blue cover included) 151-1639-04...
- Page 54 Size 3 Protraction Pad pair (pink cover included) 151-3748-15 Size 3 Protraction Pad pair (grey cover included) 155-H001-L600 H-Style Harness Small & Strap Kit (Leckey) 155-H001-L601 H-Style Harness Med & Strap Kit (Leckey) 155-H001-L602 H-Style Harness Large & Strap Kit (Leckey) 155-H001-L603 H-Style Harness Xlarge &...
- Page 55 151-1644 Size 1 tray plastic 151-2644 Size 2 tray plastic 151-1643 Size 1 tray wooden 151-2643 Size 2 tray wooden 151-3643 Size 3 tray wooden 133-2148 Tray assembly clear (Size 3 only) 133-2149 Tray assembly black (Size 3 only) 151-1747 Size 1 armrests 151-2747 Size 2 armrests...
- Page 56 151-2744-03VIN Size 2 incontinence seatbase cover - blue vinyl (with sacral foam spacer pads) 151-2744-04VIN Size 2 incontinence seatbase cover - pink vinyl (with sacral foam spacer pads) 151-2744-15VIN Size 2 incontinence seatbase cover - grey vinyl (with sacral foam spacer pads) 151-3744-01VIN Size 3 wipe clean cushions and covers - green vinyl (with sacral foam spacer pads) 151-3744-03VIN Size 3 wipe clean cushions and covers - blue vinyl...
- Page 58 Le Siège Everyday Activity est un système de siège conçu pour être utilisé à la maison et à l’école par des enfants affectés d’un handicape modéré. Le système est disponible en 3 grandeurs. La hauteur, profondeur et largeur du siège peuvent être ajustés et adaptés pour un utilisateur âgé...
-
Page 59: Usage Prévu
1 1 à 6 ans, la grandeur 2 pour les enfants et, en tant que tel Leckey suggère que les de 5 à 12 ans et la grandeur 3 pour les parents, éducateurs et personnel soignant enfants de 11 à... -
Page 60: Consignes De Sécurité
6.3 Utiliser exclusivement avec votre produit des composants approuvés par 6.9 Le Siège Everyday Activity n’est pas Leckey. Ne jamais tenter de modifier le un fauteuil roulant et bien que la mobilité produit. Le non respect des consignes soit une fonction importante du système,... - Page 61 6.16 Nettoyer régulièrement l’appareil. N’utilisez pas utiliser de nettoyants abrasifs. Effectuez quotidiennement des vérifications d’entretient afin de garder votre appareil Leckey en bon état de fonctionnement. 6.17 Cet appareil Leckey est conçu pour être utilisé à l’intérieur. Quand l’appareil n’est pas utilisé, rangez-le dans un endroit sec, éloigné...
-
Page 62: Comment Déballer Et Assembler
Vérification des pièces Félicitations sur l’achat de votre siège Everyday Activity de Leckey. Toutes les pièces sont emballées dans des sacs en polyéthylène clairement étiquetés. Déballez toutes les pièces avec précaution et assurez- vous que toutes les pièces que vous avez commandées soient incluent. -
Page 63: Installation Des Sandales
7.1 Installation des 7.2 Installation des appuis bras sandales Pour installer les sandales; Dévissez la Insérer l’appui bras sur le support récepteur poignée et retirez les rondelles de chaque et sécurisez-le à la hauteur désirée en sandale. Placez chaque sandale sur l’appui resserrant la poignée (a). -
Page 64: Fixation Du Plateau
7.3 Fixation du plateau Pour fixer le plateau en gris, noir ou transparent, faire passer les tubes du plateau dans le centre des accoudoirs (a). Pour fixer le plateau en bois, insérer le tube du plateau dans le centre de l’accoudoir droit ou gauche, en fonction de la position requise (b). -
Page 65: Installation Des Soutiens Latéraux Pour Les Hanches
7.4 Installation des 7.5 Installation des soutiens soutiens latéraux pour les latéraux thoraciques, modèle hanches escamotables ou standards Dévissez la poignée (a) située sous la base Pour installer les soutiens latéraux du siège. Placez le support du soutien thoraciques, aligner le support sur les fentes latéral pour la hanche sur la vis. -
Page 66: Fixation Des Cales Antépulsion De L'épaule
7.6 Fixation des cales 7.7 Installation du antépulsion de l’épaule pommeau Pour fixer les cales antépulsion de l’épaule, Insérer le support du pommeau dans le aligner les 3 trous de la plaque triangulaire sillon. Insérez ensuite la poignée (a) et bien la sur les 3 trous du dossier (au dos). -
Page 67: Fixation Du Reposepieds
7.8 Fixation du repose- pieds Pour les tailles 1 et 2, faire coulisser le repose-pieds sur le tube (a) coudé du mollet et serrer le boulon (b). Pour la taille 3, faire coulisser les tubes du repose-pieds sur les tubes (c) coudés du mollet et serrer les boulons de chaque support (d). -
Page 68: Fixation Des Cales Latérales D'abduction
7.9 Fixation des cales 7.10 Fixation du harnais latérales d’abduction pelvien Aligner le support de cale latérale Ouvrir chaque verrou à came (a). Attacher d’abduction sur la fente située à l’avant de les 4 sangles en faisant passer chacune l’assise quand la profondeur maximale du d’entre elles dans les verrous à... -
Page 69: Fixation De L'accessoire Support Du Repose-Tête Mygo
7.11 Fixation de 7.12 Fixation de la sangle l’accessoire support du appuie-mollets repose-tête Mygo Passer les vis dans l’accessoire support Enrouler la sangle autour des 2 barres et la pièce d’espacement du repose-tête d’appuie-mollets. Aligner les boutons- Mygo. Aligner l’assemblage sur les trous de pression sur la bande Velcro et fermer. - Page 70 Installation des coussins et recouvrements protectifs...
- Page 71 8.1 Coussin du dossier Pour installer le coussin du dossier, placez- le simplement contre le dossier et appuyez fermement afin d’engager les boutons à pression situés sur le haut. Attachez-le à la bande Velcro du dossier et faire passer l’élastique autour du crochet. Pour fixer les coussins du dossier ayant 4 rabats à...
-
Page 72: Coussin De L'assise Du Siège
8.2 Coussin de l’assise du siège Pour installer le coussin de l’assise du siège, déposez-le sur l’assise du siège, et appuyez pour engager les boutons à pression (a) situés à l’arrière de l’assise du siège, passer ensuite le rabat sous le devant de l’assise du siège et sécuriser avec les boutons à... -
Page 73: Housses Pour Les Soutiens Latéraux Thoraciques
8.3 Housses pour 8.4 Soutiens latéraux pour les les soutiens latéraux hanches thoraciques Pour installer les housses des soutiens Glissez les housses sur les supports des latéraux thoraciques, glissez-les le long soutiens latéraux pour les hanches en des soutiens thoraciques. Insérez la boucle vous assurant que la fermeture éclaire en plastique dans la fente de la housse, et soit orientée vers l’extérieur. -
Page 74: Housse Des Supports Latéraux Pour Les Hanches
8.5 Housse des supports 8.6 Housses du coussin de latéraux pour les hanches antépulsion de l’épaule Glissez la housse autour du support latéral Glisser la housse par-dessus l’assemblage jusqu’à ce qu’elle recouvre le mécanisme pour la antépulsion de l’épaule et sécurisez d’ajustement de l’angle d’inclinaison, tirer avec la fermeture éclaire. -
Page 75: Housse De L'appui Tête
8.7 Housse de l’appui tête 8.8 Harnais thoracique Pour les tailles 1 et 2, glisser le coussin Le harnais thoracique peut être attaché en sur l’appui-tête. Fermer le bouton-pression accrochant la boucle mâle (a) à la boucle central et les deux boutons-pression femelle, d’un côté... -
Page 76: Fixation Du Harnais De Torse
8.9 Fixation du harnais de torse Votre harnais de torse sera livré avec deux sangles latérales réglables, deux sangles d’épaule réglables, quatre clips de fixation de verrou à came (deux avec sangles en toile, deux sans), deux boulons à tête fraisée, deux boulons à... -
Page 77: Housse De Cale Latérale D'abduction
8.10 Housse de cale latérale d’abduction Placer la housse sur la cale latérale d’abduction et fermer la fermeture à glissière. -
Page 78: Ajustements Cliniques Pour Le Contrôle Du Positionnement
être effectué par une personne ayant les compétences techniques et cliniques nécessaires et ayant obtenue une formation spécifique à l’utilisation de cet appareil. Leckey suggère de garder à jour un carnet d’occurrences sur tous les ajustements de cet appareil. Ajustez la hauteur du dossier, la profondeur de l’assise et la hauteur de l’appui pied... - Page 79 9.1 Harnais pelvien 9.2 Soutiens latéraux pour les hanches Pour le réglage latéral, ouvrir les verrous à Pour ajuster la largeur des soutiens latéraux came et tendre les sangles pour resserrer pour les hanches, desserrer la poignée (a), ou les tirer pour desserrer, en fonction de l’ajuster à...
-
Page 80: Hauteur Du Dossier
9.3 Hauteur du dossier La hauteur du dossier peut se ajusté en desserrant les deux poignées, positionnez ensuite à la hauteur d’épaule requise pour l’enfant. Quand la position est telle que désiré, bien resserrer les poignées. La hauteur peut être ajustée à nouveau quand l’enfant est installé... -
Page 81: Inclinaison Du Dossier
9.4 Inclinaison du dossier Le dossier peut être incliné en desserrant la poignée à cliquet (a). Choisissez la position requise et resserrer fermement la poignée. Assurez-vous de toujours vérifier que l’inclinaison du dossier soit bien verrouillée afin de maintenir la position désirée pour l’enfant. -
Page 82: Profondeur De L'assise
9.5 Profondeur de l’assise 9.6 Hauteur de repose- pieds Pour ajuster la profondeur de l’assise du Pour régler la hauteur du repose-pieds taille siège, desserrer les boulons (a) situés en 1 et 2, desserrer le boulon (a) situé à l’avant dessous et tirez l’assise vers vous pour du tube de soutien mollet, puis faire coulisser obtenir la profondeur désirée Resserrez... -
Page 83: Angle D'inclinaison Du Repose-Pieds
9.7 Angle d’inclinaison 9.8 Soutien sacral-lombaire du repose-pieds Pour régler l’angle d’inclinaison du repose- Pour ajuster la hauteur, desserrer les boulons pieds taille 1 et 2, desserrer la poignée à d’un côté ou de l’autre à l’aide de l’outil cliquet (a), déplacer à la position requise, polyvalent fourni. -
Page 84: Soutiens Latéraux Thoracique
9.9 Soutiens latéraux 9.10 Harnais thoracique thoracique Desserrez les boulons Allen (a) pour ajuster Pour ajuster la largeur du harnais thoracique. la largeur, la hauteur et l’angle des soutiens Soulever la housse du devant, ajustez les latéraux et resserrer quand vous avez atteint courroies Velcro à... - Page 85 9.11 Harnais de poitrine 9.12 Sandales Le harnais de torse sera ouvert, mais restera Pour positionner les sandales, desserrez la attaché par un clip (a) sur le côté. Quand poignée (a) située sous l’appui pied, ajustez l’enfant est placé dans le système d’assise, à...
-
Page 86: Fixation Des Orthèses De Cheville
9.13 Fixation des orthèses de cheville Glissez la sangle dans la fente de la sandale. Ramenez la sangle en la faisant passer dans le bas du système d’attache Tri-Glide. Puis faites-la passer dans le haut du système d’attache Tri-Glide. Enfin, pour la maintenir en place, passez-la à... -
Page 87: Soutien Pour Les Épaules
9.14 Soutien pour les 9.15 Appui tête épaules Pour ajuster la hauteur du soutien pour les Pour régler la hauteur et la profondeur épaules, desserrer les boulons Allen, ajuster de l’appui-tête taille 1 et 2, desserrer les à la hauteur requise et resserrer les boulons. manettes (a) puis les resserrer dès que vous avez obtenu la position désirée. -
Page 88: Ajustement Des Appuis Bras
9.16 Ajustement des appuis bras Pour ajuster la hauteur des appuis bras, desserrer la poignée (a), ajuster à la position requise et resserrer. Pour ajuster l’angle, tourner la poignée à cliquet (b) jusqu’à la position requise. -
Page 89: Ajustement Du Plateau
9.17 Ajustement du plateau La hauteur et l’angle du plateau peuvent être ajustés par les appuis bras; pour retirer ou ajuster la profondeur du plateau, desserrer les poignées (a) situées sous les appuis bras, ajuster à la position requise, et resserrer fermement. -
Page 90: Ajustements Fréquents Pour L'utilisation Quotidienne
6. Leckey sug- gère de garder à jour une liste de tout le personnel soignant et de l’entourage familial qui auraient reçue une formation... -
Page 91: Transférer Votre Enfant Dans Et Hors Du Siège
10.1 Transférer votre 10.2 Ajustement du harnais enfant dans et hors du pelvien siège Avant de transférer l’enfant dans le siège, Pour le réglage latéral, ouvrir les verrous à effectuez l’inspection quotidienne de came et tendre les sangles pour resserrer l’appareil en suivant la procédure détaillée à... -
Page 92: Ajustement Du Harnais Pour Le Corps Et Le Harnais Thoracique
10.3 Ajustement du harnais pour le corps et le harnais thoracique Si l’enfant nécessite un soutien thoracique Pour assurer qu’il ne se produise aucun accident ou restriction respiratoire ; vérifier dans le cadre de son programme de maintien postural, le siège sera équipé de soutiens que le harnais et les soutiens latéraux soient bien sécuritaires, que l’enfant soit latéraux rigides ou d’une combinaison de... -
Page 93: Ajustement De La Hauteur - Châssis Hi-Low
10.4 Châssis 10.5 Ajustement de la hauteur - châssis Hi-Low Le siège d’activité quotidienne est conçu Vous pouvez réaliser ce réglage avec pour s’adapter sur plusieurs châssis. La taille l’utilisateur installé dans le fauteuil. Pour 1 s’adapte sur un châssis à vérin à gaz de régler la hauteur du châssis Hi-Low, appuyer base ou hi-low. -
Page 94: Ajustement En Hauteur - Châssis De Base
10.6 Ajustement en hauteur - châssis de base Le châssis Hi-Low doit être soulevé par L’ajustement de la hauteur du châssis de deux personnes s’il est occupé par un base doit être effectué avant d’installer enfant d’un poids plus élevé que 27 kg. l’enfant dans le siège. -
Page 95: Réglage En Hauteur - Châssis Hydraulique Hi-Low
10.7 Réglage en hauteur 10.8 Réglage en hauteur - - châssis hydraulique châssis électrique Hi-Low Hi-Low Vous pouvez réaliser ce réglage avec Vous pouvez réaliser ce réglage avec l’utilisateur installé dans le fauteuil. Pour l’utilisateur installé dans le fauteuil. Appuyer régler la hauteur du châssis Hi-Low, appuyer sur la flèche ascendante ou descendante de sur la pédale située à... - Page 96 10.9 Position bascule Vous pouvez placer le siège en position Utilisez les barres d’appui quand le siège est en position de bascule. basculé avec l’enfant déjà installé à l’intérieur. Avant d’ajuster l’angle d’inclinaison du dossier, assurez=vous Assurez-vous de vérifier avec votre toujours que le harnais pelvien soit bien sécuritaire pour éviter que l’utilisateur glisse thérapeute que l’utilisation de la...
- Page 97 10.10 Sandales 10.11 Ajustement du plateau Pour positionner les pieds de l’utilisateur Le plateau peut avoir diverses fonctions et dans les sandales, fermer les courroies il est possible de régler son positionnement Velcro fournies de façon à maintenir les en fonction de l’utilisateur et de l’activité pieds en place.
- Page 98 10.12 Ajustement des appuis bras N’utilisez jamais le plateau pour diriger ou Pour ajuster la hauteur des appuis bras, pousser le système de siège. desserrer la poignée (a), ajuster à la position requise et resserrer. Pour ajuster l’angle, tourner la poignée à cliquet (b) jusqu’à Ne posez jamais sur le plateau des objets l’obtention de la position requise.
-
Page 99: Utilisation Du Reposepieds Rabattable
10.13 Utilisation du repose- pieds rabattable Pour relever le repose-pieds, le soulever par le devant (a). Lorsqu’il est relevé à son maximum, la goupille se bloque automatiquement. Pour abaisser le repose- pieds, tirer sur la goupille pour la débloquer (b) et rabattre le repose-pieds. Il est possible de maintenir le repose-pieds non bloqué... -
Page 100: Information Pour Le Nettoyage Et L'entretien
11 Information pour le nettoyage et l’entretien Comment entretenir votre appareil Leckey utiliser des nettoyants antiseptiques tel Nous vous suggérons d’utiliser seulement de L’alcool isopropylique et l’alcool minéral. l’eau tiède et un détergent non abrasif pour Une demi-tasse de javellisant dans 5 litres nettoyer votre appareil Leckey. -
Page 101: Inspection Quotidienne De L'appareil
6. Assurez-vous que l’appui pied soit installé de façon sécuritaire. En cas de doute concernant l’utilisation sécuritaire de votre appareil Leckey ou de risque de pièces défaillantes, cessez immédiatement l’utilisation et communiquez avec notre département du service à la clientèle ou distributeur local... -
Page 102: Inspection Annuelle De L'appareil
> Vis de verrouillage de l’appui pied. >Boulons d’ajustement de l’angle 7. Leckey suggère de tenir à jour, un d’inclinaison et de la hauteur du dossier. carnet de toutes les inspections annuelles >Boulons d’ajustement de la profondeur du effectuées sur cet appareil. -
Page 103: Réutilisation Des Appareils Leckey
Assurez-vous qu’une copie du manuel d’utilisation soit fournie avec l’appareil. Vous pouvez télécharger le manuel d’utilisation de notre site Web: www.leckey.com Leckey suggère de garder à jour un carnet de toutes les inspections effectuées sur l’appareil pour la durée de la réutilisation. -
Page 104: Service Et Entretien De L'appareil
15 Service et entretien de l’appareil L’entretien de tout appareil Leckey doit être effectué exclusivement par une personne qualifié, ayant reçue une formation technique spécifique à l’utilisation de cet appareil. Au R.-U.et en République d’Irlande, communiquez avec notre centre de service Leckey au 0800 318265 (R.-U.) ou 1800... -
Page 105: Informations Techniques
16 Informations techniques Taille mm/kg pouces/lbs mm/kg pouces/lbs mm/kg pouces/lbs Charge maximale 30kgs 66lbs 50kg 110lbs 100Kgs 220lbs Poids total (siège et châssis de base) 27kg 29kg 22.5kg 50lbs 60lbs 64lbs Poids total (siège et châssis Hi-Low) 108lbs 29.5kg 65lbs 34kg 75lbs 49kg... -
Page 106: Accessoires
Accessoires 151-1741 Base du siège, grandeur 1, dossier et châssis standard avec ressort à gaz et roulettes de 100 mm 151-2742 Base du siège, grandeur 2, dossier et châssis Hi-Low avec ressort à gaz et roulettes de 100 mm 151-1742 Base du siège, grandeur 1, dossier et châssis Hi-Low avec ressort à... - Page 107 151-1637-01 Jeu de supports latéraux poitrine, PU rigide, taille 1 (housse verte incluse) 151-1637-03 Jeu de supports latérau 151-1637-04 Jeu de supports latéraux poitrine, PU rigide, taille 1 (housse rose incluse) 151-1637-15 Jeu de supports latéraux poitrine, PU rigide, taille 1 (housse gris incluse) 151-2637-01 Jeu de supports latéraux poitrine, PU rigide, taille 2 (housse verte incluse) 151-2637-03...
- Page 108 Coussin contre antépulsion grandeur 3 (housse gris incluse) 151-3748-05 Coussin contre antépulsion grandeur 3 (housse noir incluse) 155-H001-L600 Kit Petit Harnais Mh & Sangle (Leckey) 155-H001-L601 Kit Harnais Moyen Mh & Sangle (Leckey) 155-H001-L602 Kit Harnais Large Mh & Sangle (Leckey) 155-H001-L603 Kit Harnais Xlarge Mh &...
- Page 109 151-2750-04 Housse pour soutiens latéraux, grandeur 2 (rose) 151-2750-15 Housse pour soutiens latéraux, grandeur 2 (gris) 151-3750-01 Housse pour soutiens latéraux, grandeur 3 (verte) 151-3750-03 Housse pour soutiens latéraux, grandeur 3 (bleu) 151-3750-04 Housse pour soutiens latéraux, grandeur 3 (rose) 151-3750-15 Housse pour soutiens latéraux, grandeur 3 (gris) 151-3750-05...
- Page 110 151-3766 Ensemble plateau transparent, assise supplémentaire 20 mm (taille 3 uniquement) 151-3767 Ensemble plateau noir, assise supplémentaire 20 mm (taille 3 uniquement) 117-1781 Sandales grandeur 1, courroies incluses 117-2781 Sandales gandeur 2, courroie inclueses 117-3781 Sandales Grandeur 3, courroies inclueses 117-1760 Pièce d’élévation pour sandale, 1’’...
- Page 111 © 2020 Sunrise Medical Canada Inc. Phone: 800.263.3390 237 Romina Drive, Unit 3 Fax: 800.561.5834 Concord, ON E-mail: cscanada@sunmed.com Canada L4K 4V3 www.SunriseMedical.ca 24 hour postural care for babies, kids & adults. Sleeping, Sitting, Standing, Walking, Moving, Bathing, Toileting. 204067-CAN, Rev. 1...