
Manuels Connexes pour geo-FENNEL FL 245HV


Sommaire des Matières pour geo-FENNEL FL 245HV
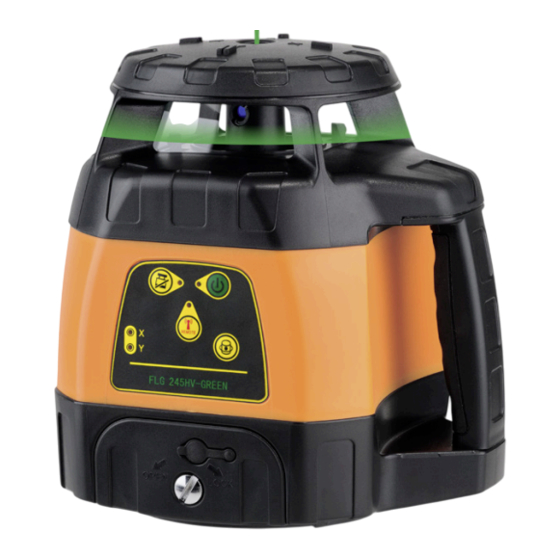
- Page 1 DE | EN | FR FL 245HV FLG 245HV-GREEN BEDIENUNGSANLEITUNG USER MANUAL MODE D‘EMPLOI www.geo-fennel.de www.geo-fennel.com www.geo-fennel.fr...
- Page 2 Sehr geehrter Kunde, vielen Dank für das Vertrauen, welches Sie uns beim Erwerb Ihres neuen geo-FENNEL-Gerätes ent- gegengebracht haben. Dieses hochwertige Qualitätsprodukt wurde mit größter Sorgfalt produziert und qualitätsgeprüft. Die beigefügte Anleitung wird Ihnen helfen, das Gerät sachgemäß zu bedienen. Bitte lesen Sie ins- besondere auch die Sicherheitshinweise vor der Inbetriebnahme aufmerksam durch.
- Page 3 FL 245HV (Laserklasse 2) mit Empfänger FR 45 Art.-Nr. 244021 FL 245HV (Laserklasse 3R) mit Empfänger FR 45 Art.-Nr. 244001 FLG 245HV-GREEN (Laserklasse 2) ohne Empfänger Art.-Nr. 244551 FLG 245HV-GREEN (Laserklasse 2) mit Empfänger FRG 45-GREEN Art.-Nr. 244501 FUNKTIONEN ·...
- Page 4 Technische Daten FL 245HV (Klasse 3R) Laserklasse Reichweite mit FR 45 Ø 700 m Rotierend ohne FR 45 Ø 60 m* Scanning ohne FR 45 60 m* Betriebsdauer / Stromversorgung 26h (NiMH) Technische Daten FLG 245HV-GREEN (Klasse 2) Laserklasse Reichweite mit FRG 45-GREEN Ø...
- Page 5 STROMVERSORGUNG Der Laser ist mit einem NiMH-Akkupack ausgestattet. Alternativ kann er mit handelsüblichen 4* C Alkalinebatterien betrieben werden. 1) 4* C Alkalinebatterien in das dafür vorgesehene Battriefach einlegen (auf Polarität achten) und das Fach ins Gerät einfügen. ODER 2) Wiederaufladbares NiMH-Akkufach ins Gerät einfügen. AKKU LADEN Ladegerät mit Ladebuchse am Gerät und Stromnetz verbinden.
- Page 6 HORIZONTALEINSATZ Das Gerät auf einer einigermaßen ebenen Fläche oder auf einem Stativ aufstellen. VERTIKALEINSATZ Gerät vertikal (auf der Seite mit dem Gewinde) aufstellen oder mit dem Vertikalgewinde auf einem Stativ befestigen. Direkt nach dem Einschalten beginnt das Gerät, sich selbst zu nivellieren (Laserpunkt blinkt). Wenn der Selbstnivellierungsvorgang abgeschlossen ist, beginnt sich der Rotorkopf zu drehen.
- Page 7 AN/AUS FERNBEDIENUNGSFUNKTION - NUR AM GERÄT (4) Mit der Taste kann die Fernbedienungsfunktion ausgeschaltet werden um zu vermeiden, dass sich meh- rere Geräte FL 245HV / FLG 245HV-GREEN auf einer Baustelle stören. Wenn die LED leuchtet, ist das Gerät für die Fernbedienungsfunktion empfangsbereit.
- Page 8 SCANFUNKTION (12) Im Rotationsmodus (d. h. nach dem Einschalten) Taste drücken, und das Gerät wechselt in die Scan- funktion. Taste 1 x drücken = Scanlinie lang, Taste 2 x drücken = Scanlinie kurz, Taste 3 x drücken = Punktfunktion. SCANNINGRICHTUNG (13) Scanlinie gegen den Uhrzeigersinn / mit dem Uhrzeigersinn drehen.
- Page 9 AWENDUNGSBEISPIELE...
- Page 10 EMPFÄNGER FR 45 / FRG 45-GREEN BEDIENELEMENTE 1. Libelle (2) 2. Display 3. Referenzmarke 4. Empfangsfenster 5. AN- / AUS-Schalter 6. Lautsprecher 7 . Batteriefach (Rückseite) 8. Ton an / aus 9. Genauigkeit grob / normal / fein 10. Beleuchtung an / aus 11.
- Page 11 GENAUIGKEITSEINSTELLUNG GROB/ NORMAL / FEIN Der FR 45 / FRG 45-GREEN ist mit drei Genauigkeitsstufen ausgestattet. Zur Auswahl Taste (9) drü- cken: Genauigkeit grob ± 10 mm Displaysymbol: leeres Feld Genauigkeit normal ± 4 mm Displaysymbol: Genauigkeit fein ± 2 mm Displaysymbol: EINLEGEN DER BATTERIE •...
- Page 12 SICHERHEITSHINWEISE UMSTÄNDE, DIE DAS MESSERGEBNIS VERFÄLSCHEN KÖNNEN Messungen durch Glas- oder Plastikscheiben; verschmutzte Laseraustrittsfenster; Sturz oder starker Stoß. Bitte Genauigkeit überprüfen. Große Temperaturveränderungen: Wenn das Gerät aus warmer Umgebung in eine kalte oder umgekehrt gebracht wird, vor Benutzung einige Minuten warten. UMGANG UND PFLEGE Messinstrumente generell sorgsam behandeln.
- Page 13 Das Gerät entspricht der Lasersicherheitsklasse 2 gemäß der Norm DIN IEC 60825-1:2014. Das Gerät darf ohne weitere Sicherheitsmaßnahmen eingesetzt werden. Das Auge ist bei zufälligem, kurzzeitigem Hineinsehen in den Laserstrahl durch den Lidschlussreflex geschützt. Laserwarnschilder der Klasse 2 sind gut sichtbar am Gerät angebracht. www.geo-fennel.de G ERMAN Y Laser IEC 60825-1:2014 P ≤...
- Page 14 Laserstrahl nicht ungewollt auf Flächen fällt, die wie ein Spiegel reflektieren und dass Personen nicht direkt in den Strahl blicken. Laserwarnschilder der Klasse 3R sind gut sichtbar am Gerät angebracht. www.geo-fennel.de G ERMAN Y Laser IEC 60825-1:2014...
-
Page 16: Table Des Matières
Dear customer, Thank you for your confidence in us having purchased a geo-FENNEL instrument. This manual will help you to operate the instrument appropriately. Please read the manual carefully - particularly the safety instructions. A proper use only guarantees a longtime and reliable operation. - Page 17 FL 245HV (laser class 2) with receiver FR 45 Art. no. 244021 FL 245HV (laser class 3R) with receiver FR 45 Art. no. 244001 FLG 245HV-GREEN (laser class 2) w/o receiver Art. no. 244551 FLG 245HV-GREEN (laser class 2) with receiver FRG 45-GREEN Art.
- Page 18 Varying Technical Data for FL 245HV (class 3R) Laser class Working range with FR 45 Ø 700 m Rotating w/o FR 45 Ø 60 m* Scanning w/o FR 45 60 m* Power supply / Operating time 26h (NiMH) Varying Technical Data for FLG 245HV-GREEN...
- Page 19 POWER SUPPLY Both the standard NiMH battery pack and 4* C alkaline batteries can be used. 1) Insert 4*C alkaline batteries into the alkaline battery box (ensure correct polarity) and fix the battery box into the instrument. 2) Fix the rechargeable battery box into the instrument. CHARGING THE BATTERY Connect the charger with the charging plug of the instrument and the power source.
- Page 20 HORIZONTAL USE Set up the instrument on an even surface or mount it onto a tripod. VERTICAL USE Set up the instrument vertically (on the side with the vertical 5/8“ hole) or mount it onto a tripod with its vertical 5/8“ thread. After switching on the unit a flashing laser diode indicates that the automatic self-levelling procedure is working.
- Page 21 ON / OFF BUTTON (2) Press this button to power on and off the unit. If the red LED (1) lights the instrument is powered on. After powering on the instrument the self-levelling procedure starts automatically. Thereafter, the laser will rotate with 800 rmp. If in normal use the LED (1) flashes the battery has to be recharged.
- Page 22 SCAN FUNCTION (12) Press button (12) to change from the rotation to the scan mode: Press button 1 x = long scan line Press button 2 x = short scan line Press button 3 x = dot mode SCAN DIRECTION (13) Change the direction of the scan mode with button (13).
- Page 23 APPLICATION...
-
Page 24: Supplied With
RECEIVER FR 45 / FRG 45-GREEN FEATURES 1. Vial (2) 2. Display 3. Reference indicator 4. Receiving window 5. ON / OFF switch 6. Loudspeaker 7 . Battery compartment (back side) 8. Sound on / off 9. Accuracy coarse / normal / fine 10. -
Page 25: Receiver
ACCURACY COARSE / NORMAL / FINE The FR 45 / FRG 45-GREEN is equipped with three precision modes. They can be chosen by pressing button (9): Accuracy coarse ± 10 mm Symbol on display: without symbol Accuracy normal ± 4 mm Symbol on display: Accuracy fine ±... -
Page 26: Safety Notes
SAFETY NOTES SPECIFIC REASONS FOR ERRONEOUS MEASURING RESULTS Measurements through glass or plastic windows; dirty laser emitting windows; after the instrument has been dropped or hit. Please check the accuracy. Large fluctuation of temperature: If the instrument will be used in cold areas after it has been stored in warm areas (or the other way round) please wait some minutes before carrying out measurements. - Page 27 It is allowed to use the unit without further safety precautions. The eye protection is normally secured by aversion responses and the blink reflex. The laser instrument is marked with class 2 warning labels. www.geo-fennel.de G ERMAN Y Laser IEC 60825-1:2014 P ≤...
- Page 28 The legal requirement for using class 3R laser product will vary from country to country. The user is responsible for compliance to national standards and regulations. · Non-observance may lead to injuries. www.geo-fennel.de G ERMAN Y Laser IEC 60825-1:2014 P ≤ 5 mW @ 635 - 670 nm...
- Page 30 3. Alimentation en courant 4. Tableau de commande et fonctions 5. Cellule de réception 6. Consignes de sécurité LIVRÉ COMME SUIT · Laser rotatif FL 245HV / FLG 245HV-GREEN · Cellule de réception avec son support · Télécommande · Accu et chargeur ·...
- Page 31 FL 245HV (classe de laser 2) avec cellule FR 45 réf. 244021 FL 245HV (classe de laser 3R) avec cellule FR 45 réf. 244001 FLG 245HV-GREEN (classe de laser 2) sans cellule réf. 244551 FLG 245HV-GREEN (classe de laser 2) avec cellule FRG 45-GREEN réf.
- Page 32 Données techniques FL 245HV (classe 3R) Classe de laser Portée avec FR 45 Ø 700 m Portée par rotation (sans FR 45) Ø Fonction de scan (sans FR 45) 60 m* Alimentation / autonomie 26h (NiMH) Données techniques FLG 245HV-GREEN (classe 2) Classe de laser Portée avec FRG 45-GREEN Ø...
- Page 33 ALIMENTATION EN COURANT L ’instrument laser est équipé d’une batterie d’accumulateurs. Comme solution de rechange, il peut fonctionner avec 4 piles alcalines type C d’usage courant. 1) Mettre en place 4 piles alcalines type C dans le logement prévu à cet effet (faire attention à la pola- rité...
- Page 34 EMPLOI AVEC FAISCEAU HORIZONTAL Placer l’instrument sur une surface à peu près horizontale ou sur un trépied. EMPLOI AVEC FAISCEAU VERTICAL Placer l’instrument avec faisceau à la verticale (filetage se trouvant sur le côté) ou fixer son filetage vertical sur un trépied. Après la mise en marche, l’instrument se met à...
- Page 35 Cette touche permet d’arrêter la fonction télécommande pour éviter que plusieurs instruments, tels que FL 245HV / FLG 245V-GREEN utilisés simultanément sur un chantier, ne puissent se perturber mutuellement. La télécommande est prête à recevoir dès que la diode (9) est allumé.
- Page 36 FONCTION SCANNING (12) En mode de rotation (c.à.d. après mise en marche de l’instrument), presser la touche (12) pour faire passer l’instrument sur la fonction de scanning. Presser 1 x la touche = ligne de scanning longue Presser 2 x la touche = ligne de scanning courte Presser 3 x la touche = fonction point DIRECTION DE SCANNING (13) Touche pour faire tourner la ligne de scanning dans le sens inverse des aiguilles d’une montre.
- Page 37 EXEMPLES D’UTILISATION...
- Page 38 CELLULE FR 45 / FR 45-GREEN DESCRIPTION 1. Nivelle (2) 2. Écran 3. Hauteur de référence 4. Fenêtre de réception 5. Bouton marche/arrêt 6. Haut-parleur 7 . Logement de piles 8. Son marche/arrêt 9. Précision fine / normale / grossière 10.
- Page 39 RÉGLAGE DE LA PRÉCISION FINE / NORMALE / GROSSIÈRE Le FR 45 / FRG 45-GREEN est équipé de trois niveaux de précision. Pour choisir, presser bouton (9): Précision grossière ± 10 mm Symbole sur l‘écran: champ vide Précision normale ± 4 mm Symbole sur l‘écran: Précision fine ±...
- Page 40 CONSIGNES DE SÉCURITÉ CIRCONSTANCES POUVANT FAUSSER LES RÉSULTATS DE MESURES Mesures effectuées à travers des plaques de verre ou de matière plastique; mesures effectuées à travers la fenêtre de sortie du faisceau laser lorsqu‘elle est sale. Mesures après que le niveau soit tombé ou ait subi un choc très fort. Mesures effectuées pendant de grandes différences de température - p.
- Page 41 être utilisé sans avoir recours à d’autres mesures de sécurité. Au cas où l’utilisateur a regardé un court instant le faisceau laser, les yeux sont tout de même protégés par le réflexe de fermeture des paupières. Les pictogrammes de danger de la classe 2 sont bien visibles sur le niveau. www.geo-fennel.de G ERMAN Y Laser IEC 60825-1:2014 P ≤...
- Page 42 Ne pas utiliser le niveau dans un milieu à risque d’explosions. Les pictogrammes de danger de la classe 3 sont bien visibles sur le niveau. www.geo-fennel.de G ERMAN Y Laser IEC 60825-1:2014 P ≤...
- Page 44 GmbH Technische Änderungen vorbehalten. Kupferstraße 6 All instruments subject to technical changes. D-34225 Baunatal Sous réserve de modifications techniques. Tel. +49 561 / 49 21 45 +49 561 / 49 72 34 info@geo-fennel.de 12/2016 www.geo-fennel.de Precision by tradition.