Publicité
Les langues disponibles
Les langues disponibles
Liens rapides
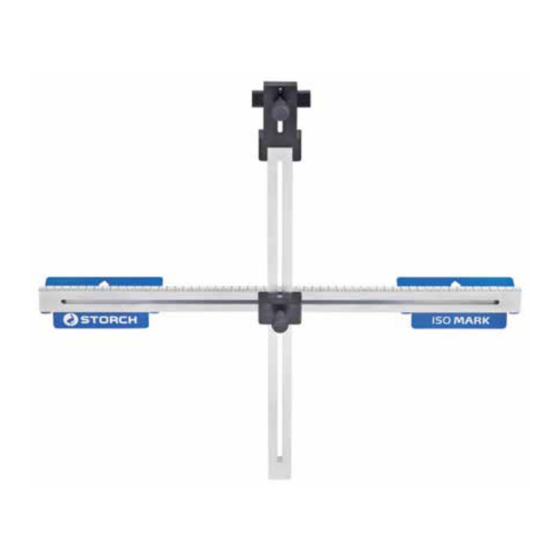
WDVS-Schablone „ISO MARK"
Sjabloon voor gevelisolatie „ISO MARK"
Calibre du système thermique composite ISO MARK
Modello per SCIT „ISO MARK"
WDVS rounding point „ISO MARK"
Šablona sdruženého tepelného systému „ISO MARK"
1
DE
NL
FR
IT
GB
CZ
Publicité

Manuels Connexes pour Storch ISO MARK


Sommaire des Matières pour Storch ISO MARK
- Page 1 WDVS-Schablone „ISO MARK“ Sjabloon voor gevelisolatie „ISO MARK“ Calibre du système thermique composite ISO MARK Modello per SCIT „ISO MARK“ WDVS rounding point „ISO MARK“ Šablona sdruženého tepelného systému „ISO MARK“...
- Page 2 Vielen Dank für Ihr Vertrauen zu STORCH. Mit dem Kauf haben Sie sich für ein Qualitäts-Produkt entschieden. Haben Sie trotzdem Anregungen zur Verbesserung oder aber vielleicht ein- mal ein Problem, so freuen wir uns sehr, von Ihnen zu hören. Bitte sprechen Sie mit Ihrem Außendienst-Mitarbeiter oder in dringenden Fällen auch mit uns direkt.
- Page 3 Schnitte an Fensterbänken vier Maße an der Fassade abnehmen, um die- se anschließend auf die einzupassende Platte zu übertragen. Höhe 1 Die STORCH WDVS-Schablone dient Höhe 2 dazu diese Maße schnell und sicher auf- Breite 1 zunehmen und zu übertragen.
- Page 4 Arbeitsschritt 1 Anlegen des horizontalen Anschlags (A) der Schablone auf die vorhergehende Dämmreihe unter Einhaltung des vorge- schriebenen Plattenversatzes. Arbeitsschritt 2 Verschiebung des vertikalen Anschlags (B) nach rechts bis zur Fensterbank und nach oben zur Festlegung der Fenster- bank-Unterkante. Arbeitsschritt 3 Verschiebung des Verstellschiebers (D) zur Festlegung der Fensterbank-Oberkan- te, sowie der Überlappung des Dämm-...
- Page 5 Arbeitsschritt 4 Schablone mit horizontalen Anschlag (A) bündig mit dem Plattenrand auf der Dämmstoffplatte anlegen und anschlie- ßendes Anzeichnen der Schnittmarken. Arbeitsschritt 5 Verlängerung der Schnittmarken bis zum Platten-Ende. Hilfsmittel: Wasserwaage / Dämmstoff- platte Rechtwinkligkeit muss eingehalten wer- den.
- Page 6 Gerät zusammen mit der Rechnung frei an unser Logistik Center in Berka oder an eine von uns autorisierte Service-Station eingeschickt wird. Bitte setzen Sie sich vorher mit der STORCH Service-Hotline in Verbindung: 08 00. 7 86 72 47 Gewährleistungs- bzw. Garantieanspruch Ansprüche bestehen ausschließlich an Werkstoff- oder Fertigungsfehler sowie aus-...
- Page 8 Hartelijk dank voor uw vertrouwen in STORCH. Met deze aankoop hebt u voor een kwaliteitsproduct gekozen. Als u desondanks een tip voor verbeteringen hebt of wellicht ooit een probleem ondervindt, dan horen wij graag van u. Neem contact op met de medewerker buitendienst of in dringende gevallen rechtstreeks met ons.
- Page 9 Hoogte 1 Met de STORCH sjabloon voor geveli- solatie kunnen deze maten snel en goed Hoogte 2 worden bepaald en gemarkeerd.
- Page 10 Werkstap 1 Plaatsen van de horizontale aanslag (A) van de sjabloon op het aanwezige isola- tiemateriaal met inachtneming van de voorgeschreven plaatruimte. Werkstap 2 Verschuiven de verticale aanslag (B) naar rechts tot de vensterbank en naar boven om de onderkant van de vensterbank te bepalen.
- Page 11 Werkstap 4 Sjabloon met horizontale aanslag (A) gelijk met de plaatrand op de isolatie- plaat leggen en vervolgens de snijdmar- keringen aanbrengen. Werkstap 5 Verlengen van de snijdmarkeringen tot rand van de de plaat. Hulpmiddel: waterpas / isolatieplaat Zorg ervoor dat de hoeken recht zijn.
- Page 12 Bij een garantieclaim vragen wij u het gehele apparaat samen met de rekening franco aan ons logistiekcentrum in Berka of naar een door ons geautoriseerd servicestation te verzenden. Neem eerst contact op met de STORCH Service-Hotline (hiervoor worden kosten in rekening gebracht): +49 (0)202 . 49 20 – 110. Garantieclaims Claims uitsluitend met betrekking tot materiaal- of productiefouten en uitsluitend bij gebruik van het apparaat conform de voorschriften.
- Page 14 Nous vous remercions de la confiance que vous témoignez à STORCH. Avec cet achat vous avez opté pour un produit de qualité. Si vous avez malgré tout des suggestions pour l'amélioration ou si vous deviez rencontrer un problème, nous sommes avec plaisir à...
- Page 15 Hauteur 1 ster. Hauteur 2 Les calibres de système thermique com- Largeur 1 posite de STORCH a pour fonction de Largeur 2 prendre ces cotes rapidement et de manière sûre puis de les transférer. Tête de mesure (C) avec coulisseau de réglage (D) Butée verticale (B)
- Page 16 Étape de travail 1 Pose de la butée horizontale (S) des calibres sur la rangée isolante précédente en respectant le décalage de panneau prescrit. Étape de travail 2 Décalage de la butée verticale (B) vers la droite jusqu'à la banquette de fenêtre et vers le haut pour la détermination de l'arête inférieure de la banquette de fen- être.
- Page 17 Étape de travail 4 Poser le calibre sur le panneau isolant avec la butée horizontale (A) affleurant avec le bord du panneau et traçage con- sécutif des marques de coupe. Étape de travail 5 Prolongement des marques de coupe jusqu'à la fin du panneau. Moyen auxiliaire : niveau à...
- Page 18 SAV agréée par nous. Veuillez contacter préalablement l‘assistance téléphonique payante de la société STORCH: +49 (0)202 . 49 20 – 110. Demande de prise en garantie Les demandes couvrent exclusivement les défauts de matériau ou d‘ouvrage et ne cou- vrent qu‘une utilisation conforme à...
- Page 20 Grazie per la Vostra fiducia nella STORCH. Con l‘acquisto avete scelto un prodotto di qualità. Nel caso abbiate dei suggerimenti per il perfezionamento oppure un problema, saremo lieti di assisterVi. Contattate il Vostro rappresentante oppure rivolgeteVi direttamente a noi in casi urgenti.
- Page 21 SCIT deve rilevare quattro dimensioni presso la fac- ciata per trasferirle dopo sul panello da montare. Altezza 1 Il modello per SCIT della STORCH serve Altezza 2 per rilevare e trasferire queste dimensioni Larghezza 1 in modo rapido e sicuro.
- Page 22 Fase di lavoro 1 Posizionamento dell'arresto orizzontale (A) del modello sulla fila precedente di panello isolanti, rispettando lo sposta- mento prescritto dei panelli. Fase di lavoro 2 Spostamento dell'arresto verticale (B) verso destra fino al davanzale e verso l'alto per determinare il bordo inferiore del davanzale.
- Page 23 Fase di lavoro 4 Posizionare il modello con l'arresto oriz- zontale (A) a livello con il panello isolante e apportare le marcature di taglio. Fase di lavoro 5 Allungamento delle marcature di taglio fino all'estremità del panello. Ausili: Livella a bolla / Panello isolante Attenersi alla rettangolarità.
- Page 24 Berka oppure ad una service-station da noi autorizzata. Si prega di consultare prima la Hotline di servizio STORCH a pagamento: 02 - 66 22 77 15 Diritto alla garanzia Il diritti si possono far valere solo per errori di materiale o di produzione nonché...
- Page 26 Thank you for purchasing a STORCH product. You have purchased a quality product. If you would like to suggest an improvement, or experience a problem with your product, please do not hesitate to contact us. Please contact your field sales representative or, in urgent cases, contact us directly.
- Page 27 WDVS systems must take four dimensions on the facade in order to then transfer them to the plate to be fit. Height 1 The STORCH WDVS templates are used to record and transfer these dimensions Height 2 quickly and safely.
- Page 28 Task 1 Place the horizontal stop (A) of the tem- plate on the previous insulation row when observing the prescribed plate offset. Task 2 Moving the vertical stop (B) to the right until the windowsill and then upwards to determine the lower edge of the window- sill.
- Page 29 Task 4 Place the template with the stop (A) flush with the edge of the plate on the insu- lating plate and then draw the cutting mark. Task 5 Extend the cut mark to the end of the plate. Aid: spirit level / insulating plate Ensure for perpendicularity.
- Page 30 Berka, postage paid, or send it to one of our authorised service centres. Please contact the chargeable STORCH service hotline first: +49 (0)202 . 49 20 – 110. Your rights under our warranty or guarantee: Claims can only be accepted for material defects or manufacturing errors, and only assu- ming intended use of the appliance.
- Page 32 Děkujeme Vám za důvěru ve firmu STORCH. S nákupem výrobku jste se rozhodli pro kvalitní produkt. Pokud přesto máte podněty na zlepšení nebo možná nějaký problém, tak bychom byli velmi rádi, kdybyste se nám ozvali. Promluvte si s příslušným externím spolupracovníkem naší firmy nebo se v naléhavých případech obracejte přímo na nás.
- Page 33 Výška 1 Šablona sdružených tepelných Výška 2 systémů STORCH slouží k rychlému Šířka 1 a bezpečnému zachycení a přenesení Šířka 2 těchto rozměrů. Měřicí hlava (C) s posuvným šoupátkem (D) Svislý...
- Page 34 Pracovní krok 1 Přiložte vodorovný doraz (A) šablony na předchozí řadu izolačních desek při dodržení předepsaného přesazení desek. Pracovní krok 2 Přesuňte svislý doraz (B) doprava až k parapetu a nahoru ke stanovení dolního okraje parapetu. Pracovní krok 3 Přesuňte přestavovací...
- Page 35 Pracovní krok 4 Šablonu s vodorovným dorazem (A) přiložte přesně k okraji desky na izolační desce a poté vyznačte značky řezu. Pracovní krok 5 Prodlužte značky řezu až ke konci desky. Pomůcky: vodováha / izolační deska Musí být dodrženy pravé úhly.
- Page 36 V případě záručního příp. garančního případu žádáme, aby bylo zasláno komplet- ní zařízení dohromady s fakturou do našeho střediska Logisitk Center v Berka nebo do námi autorizované servisní stanice. Kontaktujte prosím nejdříve placený hotline servis firmy STORCH: +49 (0)202 . 49 20 – 110. Nárok na záruku příp. garanci Nároky na záruku existují...
- Page 40 ART. No. Désignation 26 38 00 Calibre du système thermique composite „ISO MARK“ N. art. Descrizione 26 38 00 Modello per SCIT „ISO MARK“ Art. no. Description 26 38 00 WDVS template „ISO MARK“ Obj.č. označení 26 38 00 Šablona sdruženého tepelného systému „ISO MARK“...