Publicité
Les langues disponibles
Les langues disponibles
Liens rapides
1. Introduction
Thank you for buying the CAMD4 ! This very realistic dummy camera will fool almost anyone and is very user-
friendly. Simply plug the AC/DC adapter into a socket and, if necessary, you can add another 20m of cable (total :
40m).
The camera has a built-in flashing LED and rotating platform. The LED will flash as long as the device is powered via
the adapter. You can set a horizontal travel between 22.5 and 350° at 22.5° intervals. The camera rotates 30 sec.
every 3 minutes.
The camera can be used both indoors and outdoors and can protect your shop, home, office, etc.
2. Contents
• dummy camera
• rotating motor
• 20m of cable
• AC/DC adapter (12Vac/400mA) with cable (1.8m) en jack
• mounting set
Required tools : drill, drill bit (6mm for masonry / 2.5mm for timber), screwdriver, pencil.
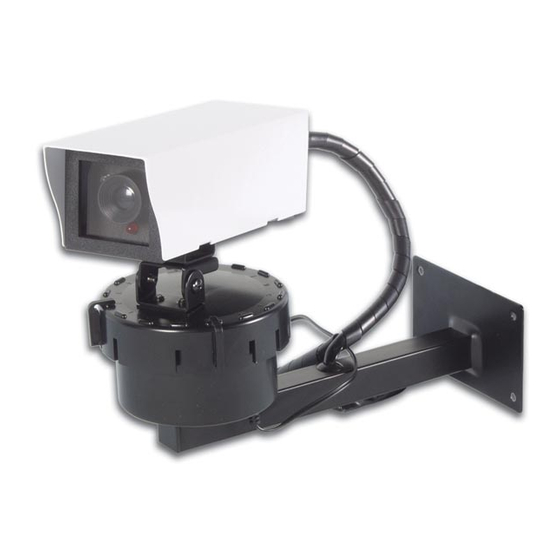
3. Connection Diagram
1. camera
2. hinges with fixing screws
3. rotating platform
4. travel stops
5. fixing bolt
6. motor cable
7. AC/DC adapter
8. 20m cable with female plug
4. Use
STEP 1 : Testing
a. Make sure the camera is operational prior to installation.
The two travel stops should be inserted in the available slots. The user can set a travel of 22.5 to 350°, at 22.5°
intervals :
both stops are in slots ...
remove both stops
CAMD4
CAMD4 – Rotating Dummy Camera
Fig. 1
1
2
3
4
5
6
7
1
travel
45°
90°
135°
180°
225°
270°
315°
350°
VELLEMAN
Publicité

Manuels Connexes pour Velleman CAMD4


Sommaire des Matières pour Velleman CAMD4
- Page 6 Het toestel mag doorlopend ingeschakeld zijn. Ontkoppel de netadapter of de kabel (20m) en de plug aan het uiteinde van het adaptersnoer. CAMD4 – Caméra factice rotative 1. Introduction Nous vous remercions de votre achat ! Cette caméra factice très fidèle attrapera presque tout le monde et elle est très agréable d'emploi.
-
Page 7: Schéma De Connexion
Le jack est pourvu d'une bague en caoutchouc pour garantir la résistance du câble aux intempéries. c. Connectez l'adaptateur secteur au câble (20m), branchez l'adaptateur (7 dans fig. 1) et mettez l'appareil en marche. CAMD4 VELLEMAN... - Page 8 à l'endroit choisi. N'oubliez pas de monter la caméra hors de portée des bras. ETAPE 2 Montez le support à l'endroit de votre choix. ETAPE 3 Ajustez l'angle vertical de la caméra et la plage de rotation. Laissez assez de jeu sur le câble. CAMD4 VELLEMAN...