
Manuels Connexes pour Rehan i-See HD


Sommaire des Matières pour Rehan i-See HD
- Page 1 HD GEBRUIKSAANWIJZING USER MANUAL GEBRAUCHSANLEITUNG ISTRUZIONI D’USO MANUAL DE INTRUCCIONES MANUEL DE L’UTILISATEUR...
- Page 3 Nederlands ....... English ........Deutsch ........Italiano ........Español ........Français ........i-See HD_Manual_INT_V2.2...
-
Page 5: Table Des Matières
5.1 Aan-/uitschakelaar ..........9 5.2 Beeldweergave ............10 5.3 Vergroten - verkleinen ..........10 5.4 Voorkeursvergroting ..........10 5.5 Autofocusblokkering ..........10 5.6 Helderheid ............10 5.7 Leeshulp .............10 5.8 Tableau ...............11 5.9 Remhendel ............11 Richtlijnen ............11 De i-See HD recyclen ..........11 8 Technische specificaties ..........12... -
Page 6: Introductie
HD beschikt. 2 Inhoud verpakking In de verpakking van de i-See HD treft u het volgende aan: • i-See HD onderstel • Monitor met bedieningspaneel • Stroomkabel •... -
Page 7: Scherm Kantelen
3.3 Scherm in hoogte verstelbaar Bij de i-See HD is het mogelijk om het scherm in hoogte te verstellen. U kunt dit doen door de hendel aan de rechter zijkant van het beeld- scherm naar u toe te trekken en het scherm vervolgens, met uw linkerhand onder de linker benedenhoek van het scherm geplaatst, omhoog of omlaag te schuiven. -
Page 8: Kabels Bevestigen
Gebruik in geen geval agressieve schoonmaakproducten zoals alcohol, aceton en andere chemi- sche middelen. • Gebruik de i-See HD niet als hulpmiddel om te lopen, zitten of op te staan. • Schakel het apparaat altijd uit als u er geen gebruik van maakt. -
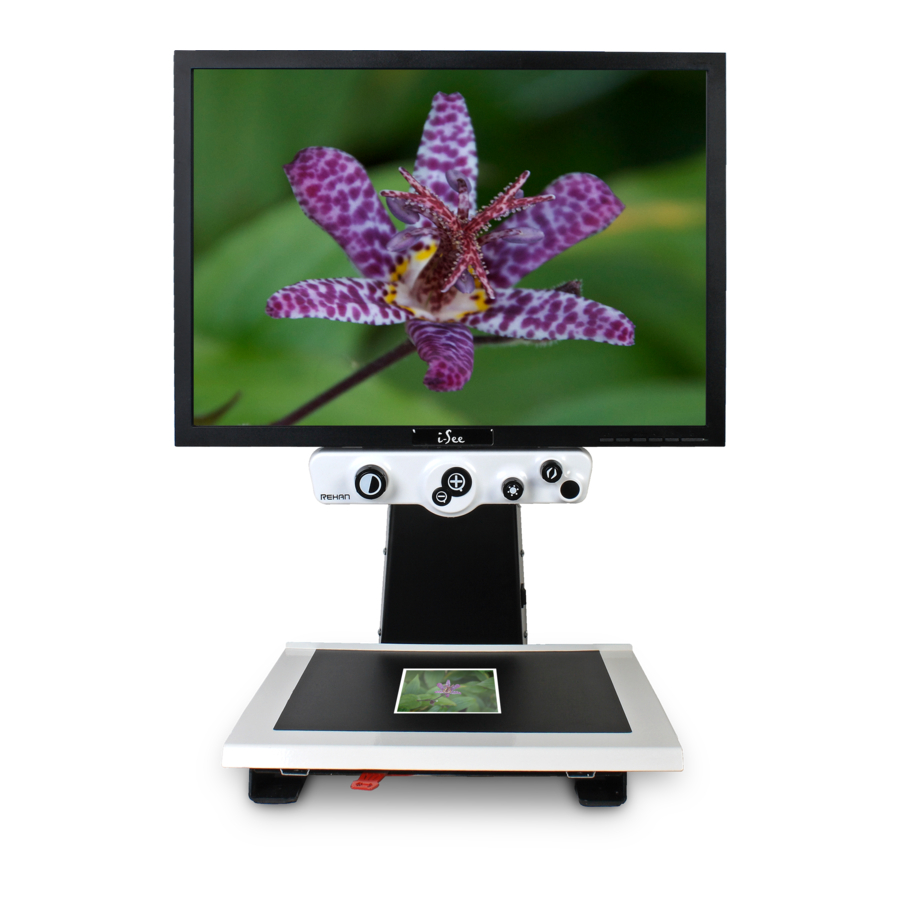
Page 9: Bediening
5 Bediening 5.1 Aan-/uitschakelaar De aan/uit schakelaar van de i-See HD bevindt zich aan de rechter zijkant van het apparaat. U kunt de bedieningsknoppen van de i-See HD vinden op het witte bedieningspaneel. 5.2 Beeldweergave Druk op de knop om te kiezen tussen het gebruik van de laatst gebruikte foto- of hoogcontraststanden. -
Page 10: Vergroten - Verkleinen
5.5 Autofocusblokkering De i-See HD zal altijd het beeld automatisch scherpstellen. In som- mige situaties (zoals tijdens het schrijven) kan het handig zijn om deze automatische focussering te blokkeren. Druk de vergrotings- knop in om de autofocus te blokkeren. -
Page 11: Tableau
5.8 Tableau De i-See HD is voorzien van een soepel bewegend X Y tableau. Hier- op legt u uw lees- of beeldmateriaal dat u op het scherm wilt ver- groten. Het tableau kan van links naar rechts (X-richting) en van voor naar achter (Y-richting) bewogen worden. -
Page 12: Technische Specificaties
F – +95 Luchtvochtigheid <70% (geen condensatie) Opslag- en transportomstandigheden Temperatuur C – +50 F – +122 Luchtvochtigheid <90% (geen condensatie) Heeft u nog vragen na het lezen van deze handleiding, neem dan contact op met uw leverancier. i-See HD... - Page 13 5.4 Zoom presets ............ 18 5.5 Blocking the autofocus ........18 5.6 Brightness ............18 5.7 Reading aid ............18 5.8 Tableau ............19 5.9 Brake handle ............ 19 Regulations ............20 Discarding the i-See HD ......... 20 Technical specifications ......... 21...
-
Page 14: Introduction
If you suspect the device is in need of service or repairs, please contact your supplier. The i-See HD will be delivered to you in a pre-assembled state. All you have to do is connect the TFT monitor to the base, attach the cables to the control interface and TFT monitor and connect the power cable to the base. -
Page 15: Tilt The Screen
3.3 Adjust the height of the screen With the i-See HD it is possible to adjust the height of the screen. Simply grab the lever at the right side of the TFT screen, pull it towards you and, while holding your left hand at the lower left cor- ner of the screen, slide the screen up or down. -
Page 16: Connecting The Cables
• Do not use the i-See HD as a support for walking, sitting down or getting up. • Switch off the device if you do not intend to use it. -
Page 17: Controls
5 Controls 5.1 On/off switch The on/off switch of the i-See HD is located on the right hand side of the pillar. The control interface contains all the controls of the i-See HD. 5.2 Display modes Push knob switch between photograph modes or high contrast modes. -
Page 18: Zooming In And Out
5.4 Zoom presets While reading texts and looking at images, you require a zoom setting that suits your needs. The i-See HD contains a function that memorizes these preferred zoom settings for you. This means that when you switch from the photograph mode to a text mode, the i-See HD will automatically switch to the last zoom setting you used in the text mode. -
Page 19: Tableau
5.8 Tableau The i-See HD contains a tableau on which you can place your read- ing material. The tableau can move from left to right (X-direction) and from front to back (Y-direction). 5.9 Brake handle Underneath the tableau of the i-See HD you will find a single brake handle with which you can control the movability of the tableau. -
Page 20: Technical Specifications
F – +95 humidity <70% (no condensation) Conditions of storage and transport Temperature C – +50 F – +122 Humidity <90% (no condensation) If you have any questions of queries after reading this manual, please contact your supplier. i-See HD... - Page 21 Inhaltsverzeichnis Einführung ............22 Verpackungsinhalt ..........22 Installation ............22 3.1 Befestigen des TFT-Monitors ........22 3.2 Neigen des Monitors ..........23 3.3 In der Höhe verstellbarer Monitor ......23 3.4 Befestigen des Kabels .......... 24 Verwendung ............24 Bedienung ............25 5.1 Ein- / Aus-Schalter ..........
-
Page 22: Einführung
Qualität, die zudem besonders benutzerfreundlich ist. Lesen Sie sich diese Anleitung bitte sorgfältig durch, bevor Sie i-See HD in Betrieb nehmen. In dieser Anleitung fi nden Sie nämlich eine Anleitung, wie das Gerät installiert werden muss, und eine Beschreibung aller Funktionen, über die i-See HD verfügt. -
Page 23: Neigen Des Monitors
Position, und drehen Sie die Knöpfe fest an. 3.3 In der Höhe verstellbarer Monitor Beim Modell i-See HD ist es möglich, den Bildschirm in der Höhe zu verstellen. Dazu ziehen Sie den Hebel an der rechten Seite des Mo-... -
Page 24: Befestigen Des Kabels
• Vermeiden Sie direktes Sonnenlicht am Bildschirm und dem Leseschirm. • Gehen Sie mit den beweglichen Teilen des Tabletts vorsichtig um. • Der i-See HD erfordert wenig oder keine Wartung. Zum Reinigen der Oberfl äche des Geräts verwenden Sie ausschließlich ein wei- ches trockenes Tuch. -
Page 25: Bedienung
5.1 Ein- / Aus-Schalter Der Ein- / Aus-Schalter des i-See HD befi ndet sich an der rechten Seite des Geräts. Die Knöpfe für die Bedienung des i-See HD fi nden Sie auf der weißen Bedienleiste. 5.2 Anzeige Um zwischen den Foto- oder Hochkontrastmodi zu wählen, drücken Sie auf die Anzeigetaste. -
Page 26: Vergrößern - Verkleinern
Sie aus einem Hochkontrastmodus in den Fotomodus umschalten. 5.5 Autofokus-Sperre i-See HD stellt das Bild immer automatisch scharf ein. In bestimm- ten Situationen – z. B. beim Schreiben – kann es zweckmäßig sein, diese automatische Scharfeinstellung (Autofokus) zu sperren. Um den Autofokus zu sperren, drücken Sie den Vergrößerungsknopf ein. -
Page 27: Tablett
5.8 Tablett i-See HD verfügt über ein flexibles Tablett. Darauf legen Sie ein Buch, Foto oder einen anderen Gegenstand, der am Bildschirm ver- größert dargestellt wird. Das Tablett kann von links nach rechts und von vorne nach hinten bewegt werden. -
Page 28: Technische Daten
Luftfeuchtigkeit <70%, keine Kondensbildung Lager- und Transportbedingungen Temperatur C – +50 F – +122 Luftfeuchtigkeit <90%, keine Kondensbildung Sollten Sie Probleme bei der Nutzung oder nach dem Lesen dieser Anleitung weitere Fragen haben, so wenden Sie sich bitte an Ihren Händler. i-See HD... - Page 29 Sommario Introduzione ............30 Contenuto della confezione ........30 Installazione ............30 3.1 Fissaggio dello schermo TFT ........30 3.2 Inclinazione dello schermo ........31 3.3 Schermo regolabile in altezza ........ 31 3.4 Fissaggio del cavi ..........32 Utilizzo ............32 Comandi ............
-
Page 30: Introduzione
In questi casi, rivolgersi al proprio fornitore. L’i-See HD viene consegnato già montato. Si deve solo fi ssare lo schermo sul supporto, collegare i cavi allo schermo e collegare il cavo di alimentazione al supporto. -
Page 31: Inclinazione Dello Schermo
3.3 Schermo regolabile in altezza Con il modello i-See HD è possibile regolare lo schermo in altezza. Per fare questo è suffi ciente tirare verso di sé la leva sul lato destro dello schermo e quindi alzare o abbassare lo schermo con la mano sinistra posizionata sotto l’angolo in basso a sinistra dello schermo. -
Page 32: Fissaggio Del Cavi
• Evitare di esporre lo schermo e la tavoletta di lettura alla luce solare diretta. • Prestare attenzione ai componenti mobili della tavoletta. • i-See HD richiede una manutenzione minima o nulla. Per pulire l’apparecchio sul lato esterno, utilizzare semplicemente un pan- no morbido asciutto. È vietato l’utilizzo di detergenti aggressivi come alcool, acetone o altre sostanze chimiche. -
Page 33: Comandi
5 Comandi 5.1 Interruttore di accensione L’interruttore di accensione di i-See HD si trova sul lato destro dell’apparecchio. Troverà i pulsanti di comando dell’i-See HD sul pannello di comando bianco. 5.2 Pulsante di accensione / spegnimento Premere la manopola per scegliere fra l’uso delle modalità... -
Page 34: Ingrandimento - Riduzione
5.5 Blocco autofocus L’i-See HD metterà sempre a fuoco l’immagine in automatico. In alcune situazioni (come durante la scrittura) potrebbe essere co- modo bloccare questa messa a fuoco automatica. Premere la ma- nopola per bloccare la messa a fuoco automatica. -
Page 35: Tavola
5.8 Tavola i-See HD è provvisto di una tavoletta X-Y flessibile. Su di essa è pos- sibile collocare un libro, una foto o un altro oggetto da ingrandire sullo schermo. La tavoletta si può muovere sia a sinistra e a destra (X) che avanti e indietro (Y). -
Page 36: Specifiche Tecniche
C – +50 Condizioni di stoccaggio e trasporto Temperatura F – +122 <90%, senza condensa Umidità dell’aria Qualora si riscontrassero difficoltà nell’utilizzo, o si avessero ancora dubbi dopo la lettura del presente manuale, si prega di contattare il proprio fornitore. i-See HD... - Page 37 Índice Introducción ............Contenido del embalaje ........Instalación ............3.1 Fijación de la pantalla TFT ........3.2 Ladear la pantalla ..........3.3 Pantalla regulable en altura ........3.4 Fijación del cables ..........Uso ..............Manejo ............. 5.1 Interruptor de encendido / apagado ......5.2 Selección de modo ..........
-
Page 38: Contenido Del Embalaje
1 Introducción Le felicitamos por la compra de i-See HD, una lupa para pantalla de primerísima calidad que es especialmente fácil de usar. Antes de empezar a usar i-See HD, lea atentamente este manual. Contiene instrucciones sobre cómo se debe instalar el aparato y describe todas las funciones de las que dispone i-See HD. -
Page 39: Ladear La Pantalla
3.3 Pantalla regulable en altura Con la i-See HD la pantalla se puede regular en altura. Lo podrá ha- cer tirando hacia Ud. de la palanca que hay en el lado derecho de la pantalla y desplazando a continuación la pantalla hacia arriba o... -
Page 40: Fijación Del Cables
Está prohibido el uso de productos de limpieza cor- rosivos como alcohol, acetona y otras sustancias químicas. • No utilice el i-See HD como apoyo para andar, sentarse o levan- tarse. • Apague siempre el aparato cuando no vaya a utilizarlo. -
Page 41: Manejo
5.1 Interruptor de encendido / apagado El interruptor de encendido / apagado del i-See HD está situado en el lado derecho del aparato. Los botones de manejo del i-See HD se encuentran en el panel de control blanco. 5.2 Selección de modo Pulse el botón para elegir ente el uso de estados de... -
Page 42: Ampliar - Reducir
5.4 Preferencia de aumento Al leer textos y ver imágenes Ud. hace uso de un ajuste de au- mento que será el que le vaya mejor. La i-See HD memoriza au- tomáticamente el ajuste utilizado cuando Ud. cambia entre el estado de foto y el de alumbrado de alto contraste, lo que im- plica que cuando Ud. -
Page 43: Bandeja
La bandeja se puede mover de izquierda a derecha (X) y adelante y atrás (Y). 5.9 Palanca de freno Debajo del panel de la i-See HD se encuentra una palanca de frena- do con la que podrá restringir el movimiento del panel. Esta palan- ca tiene 3 posiciones: Izquierda = la bandeja está... -
Page 44: Especificaciones Técnicas
C – +50 transporte F – +122 Humedad del aire <90%, sin condensación En caso de que se encuentre con dificultades durante el uso o si tiene dudas después de leer el manual, póngase en contacto con su proveedor. i-See HD... - Page 45 Sommaire Introduction ............46 Le package contient ..........46 Installation ............46 3.1 Montage de l’écran TFT ........46 3.2 Inclinaison de l’écran .......... 47 3.3 Réclage de l’écran en hauteur ....... 47 3.4 Raccordement des câbles ........47 Utilisation ............48 Commande ............
-
Page 46: Introduction
à la garantie. Dans pareil cas, veuillez contacter votre fournisseur L’i-See HD qui vous est livré a été monté au préalable en usine. Il vous suffi t de fi xer l’écran sur le support, de raccorder les câbles à... -
Page 47: Inclinaison De L'écran
3.3 Réglage de l’écran en hauteur Le modèle i-See HD permet également d’ajuster la hauteur de l’écran. Pour ce faire, tirez vers vous la manette située sur le côté droit de l’écran et, en plaçant la main gauche sous le coin inférieur gauche de l’écran, faites glisser l’écran vers le haut ou vers le bas. -
Page 48: Utilisation
• Utilisez uniquement votre vidéo-agrandisseur à l’intérieur. N’exposez pas l’appareil à des températures extrêmes ou rapide- ment variables ni à de l’humidité. Ne placez pas votre i-See HD à côté d’une source de chaleur ou directement exposé aux rayons du soleil. -
Page 49: Commande
5 Commandes 5.1 Interrupteur marche / arrêt L’interrupteur marche / arrêt du i-See HD se trouve sur le côté droit de l’appareil. Les boutons de commande de l’i-See HD se situent sur le panneau de commande blanc. 5.2 Affi chage Appuyez sur le bouton pour choisir entre les modes d’... -
Page 50: Agrandissement / Réduction
Pour lire un texte ou regarder des images, vous utilisez le réglage d’agrandissement qui vous convient le mieux. Ce réglage est auto- matiquement mémorisé par l’i-See HD pour l’affi chage photo et l’af- fi chage haut contraste. De cette manière, lorsque vous passez d’un mode photo vers un affi chage à... -
Page 51: Table
6 Directives Le produit i-See HD a été testé en ce qui concerne la sécurité et les interférences électromagnétiques et répond aux exigences de la directive basse tension et de la directive CEM publiées par le Parle- ment européen et le Conseil de l’Union européenne. -
Page 52: Spécifications Techniques
C – +50 C, +32 F – +122 Humidité de l’air <90%,pas de condensation Contactez votre fournisseur, si vous éprouvez des difficultés lors de l’emploi ou si vous avez encore des questions après la lecture de ce mode d’emploi. i-See HD... - Page 54 Rehan Electronics Ltd. Aughrim Road, Carnew County Wicklow Republic of Ireland +353 (0) 53 942 6742 sales@rehanelectronics.ie www.rehanelectronics.ie...