Publicité
Liens rapides
Publicité

Manuels Connexes pour argenta proslide


Sommaire des Matières pour argenta proslide
- Page 1 ® Handleiding Notice de montage User guide Anleitung...
- Page 2 ® Lees deze handleiding eerst aandachtig eer u van Lisez cette notice attentivement avant de com- start gaat. Het plaatsen van de argenta proslide mencer. Le montage de l’argenta proslide doit ® ® dient te gebeuren door een vakman.
- Page 3 ® Installatie met ESSI module: Instalation avec module ESSI ® ® In geval van 1 dubbele Slow-Stop. In geval van 2 enkele En cas de 1 double Slow-Stop. En cas de 2 Slow-Stop Slow-Stops is de minimum deurbreedte 930 mm.
- Page 4 ® Installatie met ESSI module: Installatie met ESSI module: ® ® In geval van 2 Standard-Stops of 1 Standard-Stop en 1 Slow- In geval van 1 dubbele Slow-Stop. In geval van 2 enkele Stop. Slow-Stops is de minimum deurbreedte 930 mm.
-
Page 5: Étape 2 : Possibilités De Montage Du Profil Supérieur
® Stap 2: Montagemogelijkheden Étape 2 : Possibilités de montage van het draagprofiel du profil supérieur 1. Montage van het draagprofiel aan de muur: 1. Montage du profil supérieur au mur: a. Muurprofiel: a. Le profil support mural: Het muurprofiel heeft dezelfde lengte als het Le profil a les mêmes dimensions que le profil... - Page 6 ® Stap 3: Voorbereiden van de Étape 3: Préparer le profil geleidende rail supérieur 1. Plaatsing van de Standard-Stop of Slow- 1. Montage du Standard-Stop ou de Stop activator l’activateur de l’amortisseur Slow-Stop a. Plaatsing van de Slow-Stop activator: a.
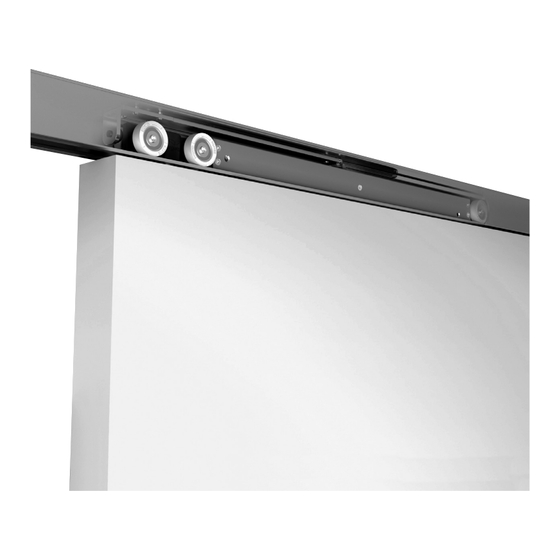
- Page 7 ® 2. Plaatsing van de rolstelsels: 2. Montage des roulements: a. Met Standard-Stop: a. Avec Standard-Stop : Schuif de rolstelsels in het bovenprofiel en klik ze Glisser les roulement dans le profil supérieur et vast in de Standard-Stop.
- Page 8 ® 3. Indien voorzien: 3. Si c’est prévu: plaatsing van de ESSI -module: le montage de la module “ESSI ”: ® ® Schuif de ESSI-module voorzien van een kop- Monte la module ESSI avec la plaque d’attelage pelplaatje in het draagprofiel en schroef het kop- et fixer le dans la chambre supérieure.
-
Page 9: Étape 5 : Montage De La Porte
® Stap 5: Ophangen van de deur Étape 5 : Montage de la porte 1. Standard-Fix: 1. Standard-Fix: a. Haak de bevestigingssystemen in de rolstel- a. Accrocher les systèmes de fixation sur les sels. roulements. b. Pas desgewenst de hoogte aan door aan de b. - Page 10 ® Opties: Options: 1. Kunststof eindkappen: 1. Couvercles en plastique pour le profil supérieur : Klik de kunstofeindkappen op het draagprofiel. Clique le couvercle sur le profil. 2. Afdekkap voor plafondmontage: 2. Le cache-rail pour montage au plafond :...
- Page 11 ® Read this guide carefully before you start. Lesen Sie diese Anleitung aufmerksam durch, The argenta proslide should be installed by a bevor Sie mit der Montage beginnen. Die Mon- ® professional. tage von argenta proslide muss durch einen ®...
- Page 12 ® Installation with ESSI module: Installation mit ESSI -Modul: ® ® In case of 1 double Slow-Stop. If there are 2 single Slow-Stops Im Fall von 1 Doppel Slow-Stop. Bei zwei einzelnen Slow- the minimum door width will be 930mm.
- Page 13 ® Installation with ESSI module: Installation with ESSI module: ® ® If there are 2 Standard-Stops or 1 Standard-Stop and 1 Slow- In case of 1 double Slow-Stop. If there are 2 single Slow-Stops Stop. the minimum door width will be 930mm.
- Page 14 ® Step 2: Mounting possibilities of the Schritt 2: Befestigungsmöglich support system keiten der Trägersprofils 1. Mounting the support system to the wall: 1. Montage des Trägerprofils an der Wand: a. Wall system: a. Wandprofil: The wall system is the same length as the sup- Das Wandprofil hat dieselbe Länge wie das...
- Page 15 ® Step 3: Preparing the conductive Schritt 3: Das Trägerprofil rail vorbereiten 1. Installing the Standard-Stop or Slow-Stop 1. Montage der Standard-Stop oder Slow- activator Stop Aktivator a. Installing the Slow-Stop activator: a. Montage der Slow-Stop Aktivator: Slide the activator into the top part and attach it...
- Page 16 ® 2. Installing the rolling bearings: 2. Montage der Rollsysteme: a. With Standard-Stop: a. Mit Standard-Stop: Slide the rolling bearing into the top part and click Schieben Sie die Rollsysteme in das obere Profil it into the Standard-Stop.
- Page 17 ® 3. If provided: Installing the ESSI module: 3. Wenn vorhanden: Montage des ESSI ® ® Moduls: Slide the ESSI module which includes a torque Schieben Sie das mit einer Verbindungsplatte plate into the support system and screw it tight.
- Page 18 ® Step 5: Hanging the door Schritt 5: Einhängen der Tür 1. Standard-Fix: 1. Standard-Fix: a. Hook the fixation systems to the rolling bea- a. Haken Sie die Befestigungssysteme in die rings. Rollsysteme. b. If needed, adjust the height of the door by b.
- Page 19 ® Options: Optionen: 1. Plastic end caps: 1. Kunststoff-Abschlusskappen: Click the plastic end caps to the support system. Klicken Sie die Kunststoffabschlusskappen auf das Trägerprofil. 2. Cover ceiling: 2. Abdeckprofile an der Decke: Click the cover profile for ceiling installation to the Klicken Sie das Abdeckprofil für Decke auf das...
- Page 20 Argent Alu se réserve le droit d’apporter des modifications techniques à ses produits sans avis préalable. Argenta Alu reserves the right to make technical changes to its products wit- hout prior notice. Argenta Alu behält sich das Recht vor, ohne vorherige Ankündigung technische Änderungen an seinen Produkten vorzunehmen.