Table des Matières
Publicité
Les langues disponibles
Les langues disponibles
Liens rapides
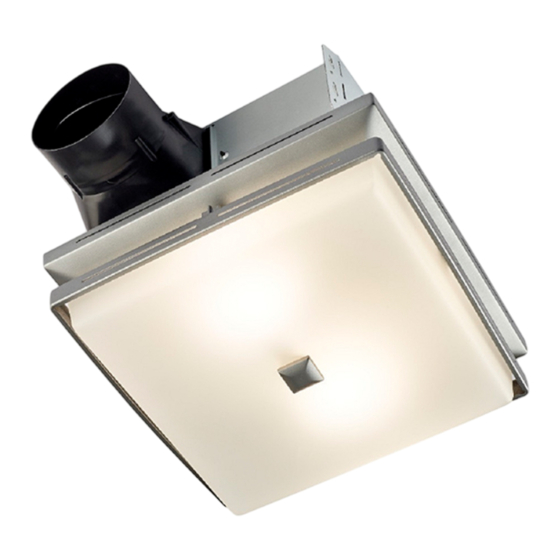
Ventilateur à éclairage décoratif
Ventilador-Luz de decorativo
INSTRUCCIONES PARA INSTALACIÓN
© 2019 Broan-NuTone
1101185B
ROOMSIDE
Decorative Fan-Light
Model numbers:
Numéros de modèle :
Números de modelo:
USE & CARE INSTRUCTIONS
DIRECTIVES D'INSTALLATION,
D'UTILISATION ET D'ENTRETIEN
Español - Consulte la página 12
AR110PS
AR110RB
INSTALLATION AND
Y USO Y CUIDADO
English - See page 2
Français - Voir page 7
Publicité
Table des Matières

Manuels Connexes pour Broan-NuTone AR110PS


Sommaire des Matières pour Broan-NuTone AR110PS
- Page 1 Números de modelo: INSTALLATION AND USE & CARE INSTRUCTIONS DIRECTIVES D’INSTALLATION, D’UTILISATION ET D’ENTRETIEN INSTRUCCIONES PARA INSTALACIÓN Y USO Y CUIDADO English - See page 2 Français - Voir page 7 Español - Consulte la página 12 © 2019 Broan-NuTone 1101185B...
-
Page 2: Cleaning & Maintenance
For Warranty Statement, Service Parts, Technical Support, or to Register your product, please visit our website or call: In the United States - Broan.com 800-637-1453. In Canada - Broan.ca 877-896-1119 Installer: Leave this manual with the homeowner. READ AND SAVE THESE INSTRUCTIONS WARNING CAUTION To reduce the risk of fire, electric... - Page 3 ALL INSTALLATIONS Start here. 2. Remove wiring panel from fan housing. 3. Attach grille brackets to IMPORTANT - The ducting from this fan to the outside housing. of the building has a strong effect on the air flow, noise and energy use of the fan.
- Page 4 7. Connect 4-in. round duct. NEW CONSTRUCTION For Retrofit Installation - Skip to Page 5. 5. Attach damper/duct connector to fan housing. Push connector through opening from inside of housing. Engage tabs and secure with screw from parts bag. 8. Connect wiring. Connect power cable to wiring plate (from parts bag) using UL approved connector.
- Page 5 10. Install blower. RETROFIT Re-install blower removed in Step 1. Secure blower 5. Remove old fan and with 2 screws from parts bag. Plug blower into black prepare ceiling. receptacle. Enlarge ceiling opening (if necessary) to 9¾” parallel to joist) by 10½” (perpendicular to joist). (Some models have a cut-out template on side of carton.) Existing fan housings are typically attached to the structure:...
-
Page 6: Wiring Diagram
7. Connect wiring. 9. Connect 4-in. round duct. Pull existing ducting through housing discharge Connect power ‚ ƒ opening and tape ducting to duct connector. Push cable to wiring plate connector/ducting back through opening. Engage tabs (from parts bag) „... -
Page 7: Lire Ces Directives Et Les Conserver
Pour obtenir un relevé de garantie, des pièces de rechange, un support technique ou pour enregistrer votre produit, veuillez visiter notre site Web ou appeler: Aux États-Unis - Broan.com 800-637-1453 ou NuTone.com 888-336-6151 Au Canada - Broan.ca ou NuTone.ca 877-896-1119 Installateur : Veuillez remettre ce manuel au propriétaire. -
Page 8: Tous Les Types De Pose
1. Retirez le ventilateur et tout le matériel d’emballage du boîtier du ventilateur. TOUS LES TYPES DE POSE Commencer ici. ZONE DE CUISSON Ne pas installer au-dessus ou à l'intérieur de cette zone. 2. Enlevez le panneau de NE PAS INSTALLER DANS Appareil UNE ZONE DE CUISSON. - Page 9 CONSTRUCTION NEUVE Pour une rénovation - passez à la page 10. 7. Connectez un conduit rond de 5. Fixez le clapet/raccord de 10 cm (4 po). conduit au boîtier de ventilateur. Poussez le raccord au travers de l’ouverture par l’intérieur du boîtier.
-
Page 10: Rénovation
10. Installez le ventilateur. RÉNOVATION Reposez le ventilateur. Fixez-le avec 2 vis du sachet de pièces et 5. Enlevez l’ancien ventilateur. branchez-le dans la prise noire. Agrandissez l’ouverture (si nécessaire) à 24,7 cm (9¾ po) (parallèle aux solives) par 26,7 cm (10½ po) (perpendiculaire aux solives). -
Page 11: Diagramme De Câblage
9. Connectez un conduit rond de 7. Branchez les fils. 10 cm (4 po). Repliez la languette pour exposer le trou d’accès voulu. Fixez le câble d’alimentation au boîtier à l’aide du connecteur Tirez le conduit existant au travers de l’ouverture de approprié... -
Page 12: Limpieza Y Mantenimiento
Si desea consultar la declaración de garantía, repuestos de servicio, apoyo técnico o para registrar su producto, visite nuestro sitio web o llame: En Estados Unidos: - Broan.com 800-637-1453 o NuTone.com 888-336-6151. En Canadá - Broan.ca o NuTone.ca 877-896-1119 Aviso al instalador: Deje este manual con el dueño de la casa. LEA Y CONSERVE ESTAS INSTRUCCIONES ADVERTENCIA PRECAUCIÓN... - Page 13 TODAS LAS INSTALACIONES Comience aquí. 1. Retire el soplador y todo el material de empaque de la ÁREA DE COCINA No instalar el producto sobre esta cubierta del ventilador. área ni dentro de ella. NO USAR EL PRODUCTO Equipo EN UN ÁREA DE COCINA. de cocina Piso 2.
- Page 14 CONSTRUCCIÓN NUEVA 7. Conecte el conducto redondo de 4 pulg. (10 cm). Para instalaciones de conversión: pase a la página 15. 5. Acople el conector del regulador de tiro/conducto a la cubierta del ventilador. Empuje el conector a través de la abertura desde el interior de la cubierta.
- Page 15 10. Instale el soplador. Vuelva a instalar el soplador. Fíjelo con 2 tornillos de la bolsa de piezas y conecte el soplador en el receptáculo negro. CONVERSIÓN 5. Quite el ventilador viejo. De ser necesario, agrande la abertura del cielo raso a 9 ¾...
-
Page 16: Diagrama De Cableado
7. Conecte el cableado. 9. Conecte el conducto redondo de Doble la lengüeta para exponer el orificio de acceso deseado. 4 pulg. (10 cm). Conecte el cable eléctrico a la cubierta con una conexión Jale el conducto existente a través de la abertura de apropiada aprobada por UL.