Table des Matières
Publicité
Les langues disponibles
Les langues disponibles
Liens rapides
Publicité
Table des Matières

Manuels Connexes pour Proline Cooky


Sommaire des Matières pour Proline Cooky
- Page 1 COOKY MINI OVEN FOUR POSABLE BAKOVEN FORNETTI TROUBA RÚRA MINI HORNO OPERATING INSTRUCTIONS MANUEL D'UTILISATION HANDLEIDING ISTRUZIONI OPERATIVE MANUAL DE INSTRUCCIONES NÁVOD K OBSLUZE NÁVOD NA OBSLUHU...
- Page 2 WARNINGS ™ This appliance is intended for domestic household use only and should not be used for any other purpose or in any other application, such as for non‐domestic use or in a commercial environment. ™ If the supply cord is damaged, it must be replaced by the manufacturer, its service agent or similarly qualified persons in order to avoid a hazard.
- Page 3 ™ Keep the appliance and its cord out of reach of children less than 8 years. ™ The appliance is not intended to be operated by means of an external timer or separate remote‐control system. ™ The surfaces are liable to get hot during use.
-
Page 4: Important Safety Instructions
IMPORTANT SAFETY INSTRUCTIONS ∗ Do not touch hot surfaces. Use handles. ∗ Unplug oven from the mains socket when not in use and before cleaning. Allow to cool before cleaning or handling. ∗ To avoid burns, use extreme caution when removing tray or disposing of hot grease. -
Page 5: Product Introduction
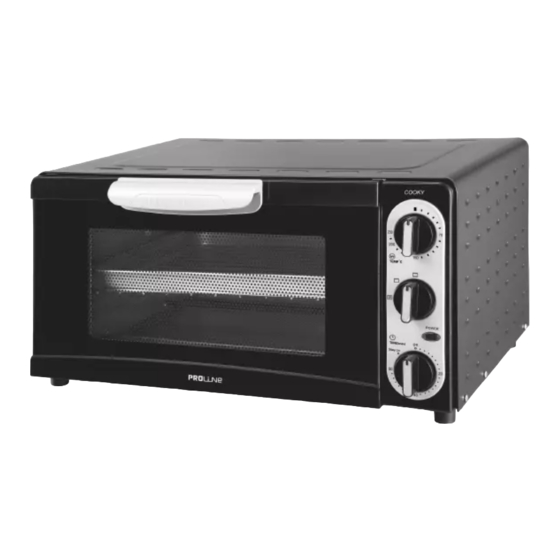
PRODUCT INTRODUCTION 1. Door handle 5. Time knob 2. Housing 6. Crumb tray 3. Thermostat 7. Baking tray 4. Function knob 8. Baking rack... -
Page 6: Control Settings
CONTROL SETTINGS TEMPERATURE SETTING Turn the thermostat clockwise to the desired temperature. The temperature can be set from 70 °C to 230 °C. FUNCTION SETTING The oven provides two functions for versatile cooking. • Broil ( ): The upper heating elements are working when the function is selected. -
Page 7: Before First Use
Adjusting Time Timer can be changed during cooking. Turn the timer knob to the required time. NOTE: When setting the timer knob for less than 5 minutes, always turn the timer knob to over 20 minutes and then rotate back to your selected time. This will ensure a safe and accurate timer setting. - Page 8 General Instructions 1. Place baking rack in position. • There are 3 slots in the oven and slide baking rack into the desired slot according to the height of food to be cooked. 2. Oil from food may drip when cooking, place the food on the baking tray, and then place baking tray on the baking rack.
- Page 9 Broiling Function The broiling function is ideal for fish, beef, steak, vegetables, etc. 1. Place the baking rack to the desired height. 2. Turn the function knob to 3. Turn the thermostat to desired temperature. 4. Turn the timer knob to the desired cooking time. Toasting Function Use the toasting function for foods such as corn, bread, cookies and heating food.
-
Page 10: Cleaning And Maintenance
CLEANING AND MAINTENANCE Unplug the appliance from the mains socket and allow it to cool completely before cleaning. Clean the outside of the appliance with a damp cloth. Never use abrasive or chemical cleaners. Wash all removable parts in warm soapy water. Rinse and dry them thoroughly before use. - Page 11 ATTENTION ™ Cet appareil est destiné à un usage domestique uniquement. Toute utilisation autre que celle prévue pour cet appareil, ou pour une autre application que celle prévue, par exemple une application commerciale, est interdite. ™ Si le câble d'alimentation est endommagé, il doit être remplacé...
- Page 12 l’appareil. Le nettoyage et la maintenance ne doivent pas être réalisés par les enfants sauf s’ils sont âgés de 8 ans et plus et s’ils sont supervisés. ™ Maintenir l’appareil et son cordon hors de portée des enfants de moins de 8 ans. ™...
-
Page 13: Mises En Garde Importantes
MISES EN GARDE IMPORTANTES ∗ Ne touchez pas les surfaces chaudes. Utilisez les poignées. ∗ Débranchez toujours le four après usage et avant de le nettoyer. Attendez qu'il ait refroidi avant de le nettoyer ou de le manipuler. ∗ Soyez extrêmement vigilant lorsque vous sortez le plat ou lorsque vous jetez le jus de cuisson, afin d'éviter de vous brûler. -
Page 14: Présentation Du Produit
PRÉSENTATION DU PRODUIT 1. Poignée de porte 5. Bouton de la minuterie 2. Boîtier 6. Ramasse‐miettes 3. Thermostat 7. Plat de cuisson 4. Bouton de fonction 8. Grille de cuisson... -
Page 15: Boutons De Contrôle
BOUTONS DE CONTRÔLE RÉGLAGE DE TEMPÉRATURE Mettez le thermostat sur la température requise en le tournant dans le sens des aiguilles d'une montre. La température est réglable de 70 °C à 230 °C. RÉGLAGE DE FONCTION Ce four comporte deux fonctions permettant des modes de cuisson différents. -
Page 16: Avant La Première Utilisation
REMARQUE : Si vous souhaitez régler la minuterie sur une durée inférieure à 5 minutes, commencez toujours par la mettre au‐delà de 20 minutes puis ramenez‐la ensuite sur la durée souhaitée. Le réglage sera ainsi plus sûr et plus précis. Allumage continu Si vous souhaitez utiliser le four sans minuterie, mettez le bouton de la minuterie sur Stay On (allumage continu). - Page 17 Généralités 1. Mettez la grille de cuisson en place. • Le four comporte 3 paires de rails; enfilez la grille de cuisson dans les rails situés à la hauteur qui convient pour l'aliment à cuire. 2. Certains aliments sont susceptibles de goutter pendant la cuisson; mettez ces aliments dans le plat de cuisson, que vous placerez ensuite sur la grille.
- Page 18 Fonction gril La fonction gril convient parfaitement pour le poisson, le bœuf, les steaks, les légumes etc. 1. Mettez la grille de cuisson à la hauteur qui convient. 2. Mettez le bouton de fonction sur 3. Mettez le thermostat sur la température requise. 4.
-
Page 19: Entretien Et Nettoyage
ENTRETIEN ET NETTOYAGE Débranchez l'appareil et attendez qu'il ait complètement refroidi avant de le nettoyer. Essuyez les surfaces extérieures avec un chiffon humide. N’utilisez en aucun cas des produits de nettoyage chimiques ou abrasifs. Toutes les parties amovibles peuvent se laver dans l'eau chaude savonneuse. - Page 20 WAARSCHUWINGEN ™ Dit apparaat is uitsluitend bedoeld voor huishoudelijk gebruik en mag niet worden gebruikt voor andere doeleinden of in andere toepassingen, zoals voor niet‐huishoudelijk gebruik of in een commerciële omgeving. ™ Om gevaren te voorkomen mag een beschadigd netsnoer uitsluitend worden vervangen door de fabrikant, zijn vertegenwoordiger of personen met vergelijkbare kwalificaties.
- Page 21 apparaat spelen. Reiniging en gewoon onderhoud mogen niet worden verricht door kinderen tenzij zij ouder zijn dan 8 jaar en onder toezicht staan. ™ Houd dit apparaat en het snoer buiten bereik van kinderen jonger dan 8 jaar. ™ Dit apparaat is niet geschikt om te worden bediend door middel van een externe timer of een aparte afstandsbediening.
-
Page 22: Belangrijke Veiligheidsvoorzorgen
BELANGRIJKE VEILIGHEIDSVOORZORGEN ∗ Raak de warme oppervlakken niet aan, maar gebruik de handgrepen. ∗ Haal de stekker van de oven uit het stopcontact wanneer deze niet wordt gebruikt en voor het reinigen. Laat afkoelen voor het reinigen of aanraken. ∗ Wees uiterst voorzichtig bij het uitnemen van een bakplaat of verwijderen van hete vetstoffen om brandwonden te voorkomen. -
Page 23: Overzicht Van Het Product
OVERZICHT VAN HET PRODUCT 1. Deurhendel 5. Tijdknop 2. Behuizing 6. Kruimellade 3. Thermostaat 7. Bakplaat 4. Functieknop 8. Grillrek... - Page 24 INSTELLINGEN EEN TEMPERATUUR INSTELLEN Draai de thermostaat met de klok mee tot op de gewenste temperatuur. De temperatuur kan worden ingesteld tussen 70 °C en 230 °C. EEN FUNCTIE INSTELLEN De oven biedt twee verschillende functies voor veelzijdige bereidingen. TEMP ºC •...
-
Page 25: Voor De Eerste Ingebruikname
De tijd instellen De timer kan tijdens de werking nog worden aangepast. Draai de timerknop naar de gewenste tijd. OPMERKING: om de timer op minder dan 5 minuten in te stellen moet u eerst de knop voorbij 20 minuten draaien en vervolgens terugdraaien tot op de gewenste tijd. - Page 26 Algemene instructies 1. Zet de bakplaat in één van de sleuven. • Er zijn 3 sleuven in de oven zodat u kunt kiezen naargelang de vereiste hoogte voor het te bereiden gerecht. 2. Vetstof kan tijdens de bereiding uit voedsel lekken. Leg daarom het voedsel op de bakplaat en zet de bakplaat op het grillrek neer.
- Page 27 De grillfunctie De grillfunctie is ideaal voor vis, rundsvlees, steak, groente enz. 1. Zet de bakplaat op de gewenste hoogte. 2. Draai de functieknop naar de stand 3. Draai de thermostaatknop naar de gewenste temperatuur. 4. Draai de timerknop naar de gewenste kooktijd. De bakfunctie Gebruik de bakfunctie voor voedsel zoals maïs, brood, koekjes en voor het opwarmen van gerechten.
-
Page 28: Technische Gegevens
REINIGEN EN ONDERHOUD Haal de stekker van het apparaat uit het stopcontact en laat het volledig afkoelen voordat u het schoonmaakt. Reinig de buitenkant van het apparaat met een vochtige doek. Gebruik geen geval schuurmiddelen chemische reinigingsproducten. Was alle verwijderbare onderdelen af in een warm sopje. Spoel en droog zorgvuldig voor gebruik. -
Page 29: Avvertenze
AVVERTENZE ™ Questo apparecchio è inteso solo per uso domestico e non va usato per altri scopi o in altre circostanze come per usi non domestici e in ambienti commerciali. ™ Se il cavo di collegamento è danneggiato va sostituito dal produttore, dal suo centro assistenza o da altra persona parimenti qualificata per evitare pericoli. - Page 30 ™ Tenere l'apparecchio e il cavo lontano dalla portata di bambini di età inferiore a 8 anni. ™ L'apparecchio non va fatto funzionare tramite timer esterni o sistemi a distanza separati. ™ Le superfici si riscaldano durante l'uso. ™ La temperatura delle superfici accessibili può...
- Page 31 IMPORTANTI ISTRUZIONI RELATIVE ALLA SICUREZZA ∗ Non toccare superfici bollenti. Usare le maniglie. ∗ Quando non è in funzione e per le operazioni di pulizia staccare il fornetto dalla presa. Far raffreddare prima di pulire o di maneggiare. ∗ Per evitare ustioni fare molta attenzione quando si toglie il piano o si elimina il grasso.
-
Page 32: Introduzione Al Prodotto
INTRODUZIONE AL PRODOTTO 1. Maniglia della porta 5. Timer 2. Contenitore 6. Vassoio di raccolta 3. Termostato 7. Vassoio di cottura 4. Manopola di funzione 8. Griglia di cottura... -
Page 33: Impostazione Della Temperatura
IMPOSTAZIONE DEI COMANDI IMPOSTAZIONE DELLA TEMPERATURA Ruotare la manopola del termostato in senso orario sulla temperatura desiderata. può impostare temperatura tra 70ºC e 230ºC. IMPOSTAZIONE DELLE FUNZIONI Il forno dispone di due funzioni per consentire una cottura versatile. • GRIGLIA( ): Quando si seleziona questa funzione entrano in funzione gli elementi riscaldanti superiori. -
Page 34: Prima Del Primo Utilizzo
Regolare la durata Durante la cottura si può cambiare l'impostazione del timer. Ruotare la manopola del timer sulla durata desiderata. NOTA: Quando si imposta la manopola del timer per meno di 5 minuti ruotare sempre la manopola oltre i 20 minuti e poi riportarla indietro sulla durata desiderata. -
Page 35: Istruzioni Generali
ISTRUZIONI GENERALI 1. Sistemare in posizione la griglia di cottura. • Nel forno ci sono 3 posizioni, sistemare la griglia in quella desiderata a seconda dell'altezza del cibo da cuocere. 2. Durante la cottura l'olio può colare, sistemare il cibo sul vassoio di cottura e poi sistemare quest'ultimo sulla griglia. -
Page 36: Funzione Grill
FUNZIONE GRILL: La funzione grill è ideale per il pesce, la carne, le bistecche, le verdure, ecc. 1. Sistemare la griglia all'altezza desiderata. 2. Ruotare la manopola di funzione su 3. Ruotare la manopola del termostato sulla temperatura desiderata. 4. Ruotare la manopola del timer sulla durata desiderata. FUNZIONE TOAST: Usare la funzione toast per il granturco, pane, biscotti e per scaldare il cibo. -
Page 37: Pulizia E Manutenzione
PULIZIA E MANUTENZIONE Staccare la spina e far raffreddare completamente prima di pulire.Pulire la parte esterna dell'apparecchio con un panno umido. Non usare mai prodotti chimici o abrasivi. Lavare tutte le parti lavabili in acqua calda saponata. Risciacquare e asciugare con cura. CARATTERISTICHE TECNICHE 220‐240 V~ 50/60Hz 1300 W... - Page 38 UPOZORNĚNÍ ™ Tento přístroj je navržen pouze pro domácí použití, nesmí být použit na žádné jiné účely a nesmí se tedy používat např. mimo domácnosti nebo pro komerční účely. ™ Pokud je napájecí kabel poškozen, musí být vyměněn výrobcem, servisním pracovníkem nebo obdobně kvalifikovanou osobou, aby se předešlo nebezpečí.
- Page 39 ™ Přístroj nepoužívejte s externím časovačem nebo samostatným dálkovým ovladačem. ™ Povrch se může během použití zahřívat. ™ Teplota dostupných ploch může být během provozu přístroje vysoká.
-
Page 40: Důležité Bezpečnostní Pokyny
DŮLEŽITÉ BEZPEČNOSTNÍ POKYNY ∗ Nedotýkejte se horkých povrchů. Používejte rukojeti. ∗ Pokud troubu nepoužíváte a před jejím čistěním ji odpojte z napájení. Před čistěním nebo manipulací ji nechejte vychladnout. ∗ Pokud odstraňujete přihrádku nebo horký tuk, buďte velmi opatrní, abyste předešli popálení. ∗... -
Page 41: Popis Výrobku
POPIS VÝROBKU 1. Rukojeť dvířek 5. Knoflík časovače 2. Základna 6. Přihrádka na drobky 3. Termostat 7. Přihrádka na pečení 4. Knoflík funkce 8. Polička na pečení... -
Page 42: Nastavení Teploty
NASTAVENÍ OVLÁDÁNÍ NASTAVENÍ TEPLOTY Termostat otočte doprava na požadovanou teplotu. Teplota může být nastavena od 70 °C do 230 °C. NASTAVENÍ FUNKCÍ Trouba nabízí duě funkce pro všestranné pečení. • Gril ( ):Po zvolení této funkce pracují horní ohřívací tělesa. •... -
Page 43: Před Prvním Použitím
Funkce „Stay On" (nevypínat) Pokud chcete použít troubu bez nastavení časovače, otočte knoflíkem časovače do polohy Stay on (nevypínat). Trouba bude pracovat, dokud se knoflík časovače nenastaví do polohy Off (vypnuto). PŘED PRVNÍM POUŽITÍM 1. Odstraňte veškeré obalové materiály a vnější část spotřebiče otřete vlhkým hadříkem. - Page 44 Obecné instrukce 1. Poličku na pečení vložte na místo. • Trouba má 3 nastavení výšky. Poličku na pečení zasuňte do příslušného otvoru podle výšky jídla, které budete péct. 2. Během pečení může z jídla kapat olej. Jídlo položte na přihrádku na pečení a přihrádku poté položte na poličku na pečení.
- Page 45 Funkce grilování Funkce grilování je ideální pro přípravu ryby, hovězího masa, steaků, zeleniny atd. 1. Poličku na pečení zasuňte do požadované polohy. 2. Knoflík funkce nastavte na 3. Termostat nastavte na požadovanou teplotu. 4. Knoflík časovače nastavte na požadovaný čas. Funkce toastování...
-
Page 46: Čistění A Údržba
ČISTĚNÍ A ÚDRŽBA Před čištěním spotřebič odpojte ze zásuvky a nechejte jej zcela vychladnout. Vnější část spotřebiče očistěte vlhkým hadříkem. Nepoužívejte abrazivní nebo chemické čisticí prostředky. Všechny odnímatelné části umyjte ve vodě s čisticím prostředkem. Před použitím je řádně opláchněte a vysušte. TECHNICKÉ... - Page 47 VAROVANIA ™ Toto zariadenie bolo navrhnuté iba na používanie v domácnosti a nesmie byť používané na žiadny iný účel ani aplikáciu, ako napríklad na iné než domáce používanie alebo používanie v obchodnom prostredí. ™ Ak je napájací kábel poškodený, musí byť...
- Page 48 Deti sa nesmú hrať so zariadením. Čistenie používateľskú údržbu nesmú vykonávať deti, ktoré sú mladšie ako 8 rokov a sú bez dozoru. ™ Zariadenie a napájací kábel udržiavajte mimo dosahu detí mladších ako 8 rokov. ™ Zariadenie nie je určené na používanie s externým časovačom alebo diaľkovo ovládaným systémom.
-
Page 49: Dôležité Bezpečnostné Pokyny
DÔLEŽITÉ BEZPEČNOSTNÉ POKYNY ∗ Nedotýkajte sa horúcich povrchov. Vždy používajte rukoväti. ∗ Ak rúru nebudete používať a pred čistením ju odpojte od elektrickej siete. Pred čistením alebo manipuláciou nechajte zariadenie vychladnúť. ∗ Pri vyberaní podnosu alebo likvidácii horúceho tuku buďte veľmi opatrní, aby nedošlo k popáleniu. -
Page 50: Popis Zariadenia
POPIS ZARIADENIA 1. Rukoväť dvierok 5. Ovládač času 2. Teleso 6. Podnos na omrvinky 3. Termostat 7. Podnos na pečenie 4. Ovládač funkcií 8. Polička na pečenie... -
Page 51: Nastavenie Teploty
OVLÁDAČE PRE NASTAVENIE NASTAVENIE TEPLOTY Otočte termostat v smere hodinových ručičiek na požadované nastavenie teploty. Teplotu je možné nastaviť na 70 °C až 230 °C. NASTAVENIE FUNKCIE Rúra obsahuje dve rôzne funkcie pre všestranné pečenie. • Opekanie ( ): Keď je zvolená táto funkcia, pracuje horné... -
Page 52: Pred Prvým Použitím
POZNÁMKA: Ak chcete nastaviť ovládač časovača na menej ako 5 minút, najskôr otočte ovládač časovača na viac ako 20 minút, potom otočte ovládač nazad na želaný čas. Zaistí sa tým bezpečné a presné nastavenie časovača. Stay On (Stále zap.) Ak chcete používať rúru bez ovládania času, otočte ovládač časovača do polohy Stay on (Stále zap.). - Page 53 Všeobecné pokyny 1. Umiestnite poličku na pečenie do príslušnej pozície. • V rúre sú 3 otvory. Poličku na pečenie nasuňte do želaného otvoru podľa výšky pokrmu, ktorý budete pripravovať. 2. Počas pečenia môže z jedla kvapkať olej, umiestnite jedlo na plech na pečenie a potom umiestnite plech na pečenie na poličku na pečenie.
- Page 54 Funkcia Broiling (Grilovanie) Funkcia grilovanie je ideálna na prípravu rýb, hovädziny, steakov, zeleniny, atď. 1. Umiestnite poličku na pečenie do želanej výšky. 2. Nastavte ovládač funkcie na 3. Otočte termostat na požadované nastavenie teploty. 4. Otočte ovládač časovača na želaný čas pečenia. Funkcia Toasting (Hriankovač) Funkciu hriankovač...
-
Page 55: Čistenie A Údržba
ČISTENIE A ÚDRŽBA Pred čistením zariadenie odpojte od elektrickej zásuvky a nechajte ho úplne vychladnúť. Vonkajšok zariadenia čistite pomocou navlhčenej handričky. Nikdy nepoužívajte abrazívne alebo chemické čistiace prípravky. Umyte všetky vyberateľné časti v teplej mydlovej vode. Pred používaním ich dôkladne opláchnite a nechajte uschnúť. TECHNICKÉ... - Page 56 ADVERTENCIAS ™ Este aparato ha sido concebido para el uso exclusivamente doméstico y no se debe utilizar con ningún otro objetivo o aplicación, como por ejemplo fuera del entorno doméstico o con fines comerciales. ™ Si el cable de suministro eléctrico está dañado, deberá...
- Page 57 mantenimiento no deben ser realizados por niños a menos que sean mayores de 8 años y estén supervisados por un adulto. ™ Mantenga el aparato y su cable de suministro eléctrico fuera del alcance de los niños menores de 8 años. ™...
-
Page 58: Instrucciones Importantes De Seguridad
INSTRUCCIONES IMPORTANTES DE SEGURIDAD ∗ No toque ninguna superficie caliente. Utilice los mangos/tiradores. ∗ Desenchufe el horno de la toma de corriente cuando no esté siendo utilizado y antes de su limpieza. Espere hasta que se haya enfriado antes de proceder a su limpieza o manipulación. ∗... -
Page 59: Presentación Del Producto
PRESENTACIÓN DEL PRODUCTO 1. Tirador de la puerta 5. Botón de tiempo 2. Carcasa 6. Bandeja recoge‐gotas 3. Termostato 7. Bandeja 4. Botón de funciones 8. Rejilla... -
Page 60: Ajuste De La Temperatura
AJUSTE DE LOS MANDOS AJUSTE DE LA TEMPERATURA Gire el termostato en el sentido de las agujas del reloj hasta seleccionar la temperatura deseada. La temperatura se puede ajustar de 70 °C a 230 °C. AJUSTE DE LA FUNCIÓN El horno incluye dos funciones diferentes para disfrutar de una cocción más versátil. -
Page 61: Antes De La Primera Utilización
Ajustar el Tiempo El ajuste del temporizador se puede modificar durante el proceso de cocción. Gire el botón del temporizador hasta la posición deseada. NOTA: Si desea ajustar el botón del temporizador a menos de 5 minutos, siempre deberá girar el botón del temporizador a un valor superior a 20 minutos y después girar el botón hasta el tiempo seleccionado. - Page 62 Instrucciones Generales 1. Introduzca la rejilla en el horno. • Existen 3 ranuras en el horno para poder colocar la rejilla en la ranura deseada y seleccionar la altura a la que desea cocinar los alimentos. 2. La grasa de los alimentos podría gotear durante el proceso de cocción, coloque los alimentos en la bandeja, y después coloque la bandeja sobre la rejilla.
- Page 63 Función para Asar La función para asar es ideal para preparar pescado, ternera, filetes, verdura, etc. 1. Coloque la rejilla a la altura deseada. 2. Gire el botón de función hasta la posición 3. Gire el termostato hasta seleccionar la temperatura deseada. 4.
-
Page 64: Limpieza Y Mantenimiento
LIMPIEZA Y MANTENIMIENTO Antes de limpiar el aparato, desenchúfelo de la toma de alimentación eléctrica y espere hasta que se haya enfriado por completo Limpie el exterior del aparato con un paño húmedo . No utilice sustancias de limpieza abrasivas ni químicas. Lave todas las piezas desmontables en agua templada con jabón.