Table des Matières
Publicité
Les langues disponibles
Les langues disponibles
Liens rapides
Publicité
Table des Matières

Manuels Connexes pour Alto Professional RMX2408DFX

Sommaire des Matières pour Alto Professional RMX2408DFX
- Page 1 RMX2408DFX QUICKSTART GUIDE ENGLISH ( 3- 11 ) MANUAL DE INICIO RÁPIDO ESPAÑOL ( 12 - 20 ) GUIDE D’UTILISATION RAPIDE FRANÇAIS ( 21 – 29 ) GUIDA RAPIDA ITALIANO ( 30 – 38 ) KURZANLEITUNG DEUTSCH ( 39 – 47 ) SNELSTARTGIDS NEDERLANDS ( 48 –...
-
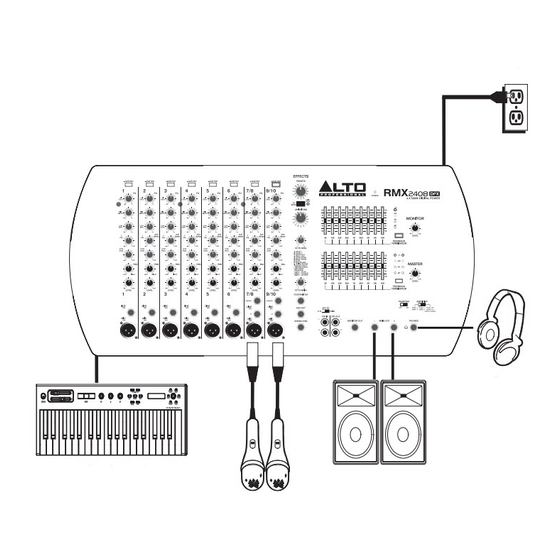
Page 3: Connection Diagram
BOX CONTENTS RMX2408DFX Power cable Quickstart Guide Safety Instructions & Warranty Information booklet CONNECTION DIAGRAM Power Headphones Monitors Keyboard Microphones QUICK SETUP Follow the procedure below to have a signal processed for each channel: Set all channel levels to zero, set pan to the middle, set output to zero, and set EQ’s flat. -
Page 4: Front Panel
FRONT PANEL MIC/LINE MONO INPUTS – Connect a microphone or line level instrument LEVEL LEVEL LEVEL LEVEL to these inputs using standard XLR or ¼” cable. MIC/LINE STEREO INPUTS- These XLR and ¼” TRS connections are organized in stereo pairs. If you connect only the left jack, the input will operate in mono mode, (the mono signal will appear on both input LINE LINE... - Page 5 MAIN MIX LEVEL LED Display – This LED display will show you the Main mix output level. Make sure that the +10 LED only lights up occasionally. The optimal level is between -10 and 0 on the LED. If only the -30 LED lights up or does not come on your S/N ratio will be degraded.
-
Page 6: Rear Panel
Units bought in the US are available in your country and how the voltage for your preset to US voltage. Units purchased in RMX2408DFX is configured before attempting to connect EU/UK are preset to 220/240 voltage. your RMX2408DFX to the main AC. - Page 7 EFFECTS TO HEAR THE EFFECTS ON A CHANNEL: Use the Effects Selector to choose one of the effects below, adjust the parameter with the Variations Selector, then turn up the Aux 2/FX Post knob for that channel. PRESET DESCRIPTION PARAMETER RANGE Decay time 0.8~1.1s...
-
Page 8: Connection Diagrams
CONNECTION DIAGRAMS AMPLIFER MODE Main Speaker- 4 ohm minimum load per speaker Main Speaker- 4 ohm minimum load per speaker Speaker- 4 ohm minimum load per speaker Use either the Speaker- 4 ohm minimum Speakon™ jacks or load per speaker phone jacks The RMX 2408 is equipped with NL4 type Speakon™... - Page 9 Main Speaker (8 ohms) AMPLIFER MODE Monitor Speaker (8 ohms) AMP (R) SPEAKER Right Speakon Connector to Mono Speaker ™ AMP (L) Speakon SPEAKER ™ Jack Left Speakon Connector to Mono Speaker ™ Note: ¼” Jacks are not used in this configuration. When bridging outputs, NL4 Speakon connectors attached to 4 conductor speaker cables are required.
- Page 10 AMPLIFER MODE 500 W 1000 W 500 W 4 Ohm 8 Ohm 4 Ohm AMP (R) AMP (L) Speaker Speaker Speakon™ Jack Speakon™ Jack Left Speakon™ Connector to Left Speaker Right Speakon™ Connector to Right Speaker Speaker AMP (Mono) Speakon™ Jack Mono Speakon™...
- Page 11 BRIDGE MONO OUTPUT WIRING Speaker Pinout Configuration...
-
Page 12: Contenido De La Caja
CONTENIDO DE LA CAJA RMX2408DFX Cable de alimentación Guía de inicio rápido Folleto de instrucciones de seguridad e información sobre la garantía DIAGRAMA DE CONEXIÓN Suministro eléctrico Auriculares Teclado Altavoces del auditorio Micrófonos INSTALACIÓN RÁPIDA Siga el procedimiento indicado a continuación para procesar una señal por cada canal: Ajuste los niveles de todos los canales a cero, el paneo (pan) al centro, la salida a cero y la ecualización plana. -
Page 13: Panel Frontal
PANEL FRONTAL ENTRADAS MONO DE MICRÓFONO/LÍNEA – Conecte a estas entradas un LEVEL LEVEL LEVEL LEVEL micrófono o un instrumento de nivel de línea usando cable XLR o de ¼” estándar. ENTRADAS ESTÉREO DE MICRÓFONO/LÍNEA- Estas conexiones XLR y ¼” LINE LINE TRS están organizadas en pares estéreo. - Page 14 Pantalla de LED DE NIVEL DE MONITOR – Esta pantalla de LED muestra el nivel de salida de monitor. Asegúrese de que el LED de +10 sólo se encienda ocasionalmente. El nivel óptimo está entre -10 y 0 en los LED.
-
Page 15: Panel Trasero
DSP (PROCESADOR DE SEÑALES DIGITALES) SELECTOR DE EFECTOS – Selecciona el efecto que el procesador de efectos interno del mezclador aplica a los diversos canales. Cada canal puede enviar al procesador niveles diferentes de audio ajustando sus perillas Aux 2/FX Post. SILENCIAMIENTO DE EFECTOS –... - Page 16 EFECTOS PARA OÍR LOS EFECTOS EN UN CANAL: Use el SELECTOR DE EFECTOS para elegir uno de los efectos siguientes, ajuste el parámetro con el SELECTOR DE VARIACIONES y luego aumente el ajuste de la perilla Aux 2/FX Post de ese canal. PRESET DESCRIPCIÓN PARÁMETRO...
-
Page 17: Diagramas De Conexión
DIAGRAMAS DE CONEXIÓN MODO DEL AMPLIFICADOR Altavoz principal - 4 ohmios de carga mínima por altavoz Altavoz principal - 4 ohmios de carga mínima por Altavoz - 4 ohmios de carga altavoz mínima por altavoz Use jacks Speakon™ Altavoz - 4 ohmios de o fonográficos carga mínima por altavoz El RMX 2408 está... - Page 18 Altavoz principal (8 ohmios) MODO DEL AMPLIFICADOR Altavoz monitor (8 ohmios) AMP (R) ALTAVOZ Conector Speakon derecho al altavoz mono ™ ALTAVOZ Jack AMP (L) Speakon ™ Conector Speakon izquierdo al altavoz mono ™ Nota: No se usan los jacks de ¼” en esta configuración. Cuando se puentean salidas, se requieren conectores NL4 Speakon conectados a los cables de altavoz de 4 conductores.
- Page 19 MODO DEL AMPLIFICADOR 500 W 1000 W 500 W Jack AMP (R) Jack AMP (L) Altavoz Altavoz Speakon™ Speakon™ Conector Speakon™ izquierdo al altavoz izquierdo Conector Speakon™ derecho al altavoz derecho Altavoz Jack AMP (Mono) Speakon™ Conector Speakon™ mono al altavoz mono Nota: El jack Speakon mono se usa sólo en esta configuración.
- Page 20 CABLEADO DE LA SALIDA MONO PUENTE Configuración de pines del altavoz...
-
Page 21: Contenu De La Boîte
Branchez le microphone et activez l’alimentation fantôme si le type de microphone le requiert. Réglez les niveaux de sortie Master du RMX2408DFX à moins de 75 % et ceux de la sortie Monitor à moins de 50 %. Augmenter les niveaux du signal audio du canal. -
Page 22: Panneau Avant
PANNEAU AVANT ENTRÉES MIC/LINE MONO – Ces entrées permettent de brancher un microphone LEVEL LEVEL LEVEL LEVEL ou un instrument à niveau ligne à l’aide d’un câble XLR ou ¼ po (6,35 mm). ENTRÉES MIC/LINE STÉRÉO – Ces entrées XLR et ¼ po (6,35 mm) TRS fonctionnent en couple stéréo. -
Page 23: Entrées Et Sorties Générales (Master)
FEEDBACK TERMINATOR (MAIN) – Ce bouton permet d’activer la fonction de détection de rétroaction du trajet du signal général. La rétroaction est détectée à une fréquence donnée lorsque la DEL du potentiomètre correspondant s’allume. La rétroaction produit un son de ronflement ou sifflement. Afin d’éliminer la rétroaction, diminuez graduellement le potentiomètre correspondant jusqu’à... -
Page 24: Panneau Arrière
TRAITEMENT DSP (DIGITAL SIGNAL PROCESSING) SÉLECTEUR D’EFFET – Ce bouton permet de sélectionner l'effet que le processeur d’effet interne ajoutera aux différents canaux. Chaque canal peut envoyer différents niveaux d’audio au processeur en ajustant leurs boutons Aux 2/FX Post. FX MUTE – Cette touche permet de mettre en sourdine/réactiver les effets. VARIATIONS –... - Page 25 EFFETS POUR ENTENDRE LES EFFETS SUR UN CANAL : Utilisez le sélecteur d’effet afin de sélectionner un des effets ci- dessous, ajustez le paramètre à l’aide du variateur d’effet, puis augmentez le réglage du bouton Aux 2/FX Post du canal correspondant. PRÉRÉGLAGE DESCRIPTION PARAMÈTRE...
- Page 26 SCHÉMA DE CONNEXION MODE AMPLIFICATEUR Haut-parleur principal – charge minimale de 4 ohms Haut-parleur principal – charge minimale de 4 ohms Haut-parleur – charge minimale de 4 ohms Utilisez soit les Haut-parleur – charge connecteurs Speakon™ minimale de 4 ohms ou casque d’écoute Le RMX 2408 est équipé...
- Page 27 Haut-parleur principal (8 ohms) MODE AMPLIFICATEUR Haut-parleur de contrôle (8 ohms) AMP (D) Haut-parleur Connecteur Speakon droit vers haut-parleur ™ Connecteur Speakon Haut-parleur ™ pour ampli (G) Connecteur Speakon gauche vers haut-parleur mono ™ Remarque : Les connecteurs ¼ po ne sont pas utilisés dans cette configuration.
- Page 28 MODE AMPLIFICATEUR 500 W 1 000 W 500 W 8 ohms 4 ohms 4 ohms Connecteur Connecteur Haut-parleur Speakon™ pour Haut-parleur Speakon™ pour ampli (G) ampli (D) Connecteur Speakon™ gauche vers haut-parleur gauche Connecteur Speakon™ droit vers haut-parleur droit Connecteur Speakon™ pour ampli (mono) Haut-parleur Connecteur Speakon™...
-
Page 29: Schéma De Câblage De Sortie Mono Ponté
SCHÉMA DE CÂBLAGE DE SORTIE MONO PONTÉ Configuration du brochage haut-parleur... -
Page 30: Contenuti Della Confezione
CONTENUTI DELLA CONFEZIONE RMX2408DFX Cavo di alimentazione Guida rapida Istruzioni di sicurezza e garanzia SCHEMA DEI COLLEGAMENTI Alimentazione Cuffie Tastiera Monitor Microfoni IMPOSTAZIONE RAPIDA Affinché venga elaborato un segnale per ciascun canale, procedere come segue: Impostare tutti i livelli di canale su zero, pan al centro, le uscite su zero e l'EQ piatto. -
Page 31: Pannello Anteriore
PANNELLO ANTERIORE INGRESSI MONO MIC/LINEA – Collegare un microfono o uno strumento a livello di linea a questi ingressi servendosi di un cavo standard XLR o da ¼”. LEVEL LEVEL LEVEL LEVEL INGRESSI STEREO MIC/LINEA – Questi collegamenti XLR e TRS da ¼” sono organizzati in coppie stereo. - Page 32 Display a LED del LIVELLO del mix principale (MAIN) – Questo display a LED mostra il livello di uscita del mix principale (Main). Assicurarsi che il LED +10 LED si accenda solo occasionalmente. Il livello ottimale si trova tra -10 e 0 sul LED. Se solo il LED -30 si accende o non si accende, il rapporto segnale-rumore sarà degradato.
-
Page 33: Pannello Posteriore
DSP (PROCESSORE DI SEGNALI DIGITALI) SELETTORE DI EFFETTI – Seleziona gli effetti che il processore di effetti interno del mixer applicherà ai vari canali. Ciascun canale può inviare diversi livelli di audio al processore regolando le relative monopole Aux 2/FX Post. FX MUTE –... - Page 34 EFFETTI PER SENTIRE GLI EFFETTI SU UN CANALE: servirsi del selettore di effetti per scegliere uno degli effetti, regolare il parametro con il selettore di variazioni, quindi alzare la manopola Aux 2/FX Post per quel canale. PRESET DESCRIZIONE PARAMETRO GAMMA Tempo di Riverbero, che simula una sala con un piccolo tempo di 0,8~1,1 s...
-
Page 35: Schemi Dei Collegamenti
SCHEMI DEI COLLEGAMENTI MODALITÀ AMPLIFICATORE Altoparlante principale: carico minimo 4 ohm per altoparlante Altoparlante principale: carico minimo 4 ohm per Altoparlante: carico minimo 4 altoparlante ohm per altoparlante Servirsi dei jack Altoparlante: carico Speakon™ o phone minimo 4 ohm per altoparlante L'RMX 2408 di jack di uscita di tipo NL4 Speakon™. - Page 36 MODALITÀ Altoparlante principale (8 ohm) AMPLIFICATORE Altoparlante monitor (8 ohm) ALTOPARLANTE AMP (R) Connettore destro Speakon ad altoparlante mono ™ ALTOPARLANTE Jack AMP(L) Speakon ™ Connettore sinistro Speakon ad altoparlante mono ™ Nota bene: i jack da ¼” non vengono utilizzati in questa configurazione. Quando si uniscono le uscite con ponte, sono richiesti connettori NL4 Speakon fissati a 4 cavi conduttori per altoparlanti.
- Page 37 MODALITÀ AMPLIFICATORE 500 W 1000 W 500 W 4 Ohm 8 Ohm 4 Ohm Jack AMP(R) Jack AMP(L) Altoparlante Altoparlante Speakon™ Speakon™ Connettore sinistro Speakon™ ad altoparlante sinistro Connettore destro Speakon™ ad altoparlante destro Jack AMP (Mono) Speakon™ Altoparlante Connettore mono Speakon™ ad altoparlante mono Nota bene: il jack Mono Speakon viene utilizzato unicamente con questa configurazione.
- Page 38 CABLAGGIO PONTE USCITA MONO Configurazione della piedinatura degli altoparlanti...
-
Page 39: Lieferumfang
LIEFERUMFANG RMX2408DFX Netzkabel Schnellstart-Anleitung Sicherheitshinweise und Garantieinformationen ANSCHLUSSÜBERSICHT Stromversorgung HiFi-Anlage Keyboard Kopfhörer Mikrofone SCHNELLES EINRICHTEN Befolgen Sie die unten angeführten Anweisungen, um für jeden Kanal ein Signal zu verarbeiten: Bringen Sie alle Kanalpegel auf Null, alle Panning-Werte in die Mittelposition, den Ausgang auf Null und alle EQ-Werte in die mittlere Position. - Page 40 VORDERSEITE MIC/LINE MONO-EINGÄNGE - Schließen Sie ein Mikrofon oder Line-Level- LEVEL LEVEL LEVEL LEVEL Instrument mit einem handelsüblichen XLR- oder ¼"-Kabel an diese Eingänge an. MIC/LINE STEREO-EINGÄNGE - Diese XLR- und ¼" TRS-Verbindungen sind als Stereo-Paare organisiert. Wenn Sie nur die linke Buchse anschließen, wird der LINE LINE Eingang...
- Page 41 FEEDBACK TERMINATOR Taste (HAUPTMIX) – Diese Taste aktiviert die Feedback-Erkennungsfunktion im Hauptmix-Signalweg. Feedback wird bei einer bestimmten Frequenz identifiziert, wenn die entsprechende Fader-LED aufleuchtet. Feedback erzeugt einen unangenehmen "heulenden" oder "pfeifenden" Ton der Lautsprecher. Um diesen Effekt zu eliminieren, drehen Sie den entsprechenden Fader herunter, bis kein Feedback mehr auftritt.
- Page 42 DSP (DIGITALER SIGNALPROZESSOR) EFFEKTWAHLSCHALTER – Wählt den Effekt aus, den der interne Effektprozessor des Mixers an die verschiedenen Kanäle sendet. Jeder Kanal kann unterschiedliche Anteile an den Prozessor senden, indem die jeweiligen Aux 2/FX Post-Regler justiert werden. FX MUTE –Drücken Sie diese Taste, um die Effekte stumm zu schalten. VARIATIONSWAHLSCHALTER –...
- Page 43 EFFEKTE SO HÖREN SIE DIE EFFEKTE EINES KANALS: Mit dem Effektwahlschalter wählen Sie einen der folgenden Effekte aus. Passen Sie die Parameter mit dem Variationswahlschalter an und drehen anschließend Aux 2/FX Post für diesen Kanal auf. PRESET BESCHREIBUNG PARAMETER BEREICH Reverb, der einen Raum mit einer kurzen Abklingzeit 0,8~1,1s...
- Page 44 ANSCHLUSSÜBERSICHT VERSTÄRKERMODUS Hauptlautsprecher-4 Ohm Mindestlast pro Lautsprecher Hauptlautsprecher-4 Ohm Mindestlast pro Lautsprecher Lautsprecher-4 Ohm Mindestlast pro Lautsprecher Verwenden Sie entweder Lautsprecher-4 Ohm die Speakon™-Buchsen Mindestlast pro oder die Klinkenbuchsen Lautsprecher Der RMX 2408 ist mit Speakon™-Ausgangsbuchsen vom Typ NL4 ausgestattet. Beim Anschluss an ein 4- Leiter-Lautsprecherkabel können 2 Audiokanäle in einem Kabel geführt werden.
- Page 45 Hauptlautsprecher (8 Ohm) VERSTÄRKERMODUS Monitor-Lautsprecher (8 Ohm) AMP (R) LAUTSPRECHER Rechter Speakon - Anschluss für Mono-Lautsprecher ™ LAUTSPRECHER AMP(L) Speakon -Buchse ™ Linker Speakon -Anschluss für Mono-Lautsprecher ™ Hinweis: ¼"-Buchsen werden in dieser Konfiguration nicht verwendet. Beim Brücken von Ausgängen benötigen Sie NL4 Speakon -Anschlüsse, mit 4-Leiter-Lautsprecherkabel verbunden sind.
- Page 46 VERSTÄRKERMODUS 500 W 1000 W 500 W 4 Ohm 8 Ohm 4 Ohm AMP(R) AMP(L) Speakon™- Lautsprecher Lautsprecher Speakon™- Buchse Buchse Linker Speakon™-Anschluss für linken Lautsprecher Rechter Speakon™-Anschluss für rechten Lautsprecher Lautsprecher AMP (Mono) Speakon™-Buchse Mono Speakon™-Anschluss für Mono-Lautsprecher Hinweis: Die Mono Speakon -Buchse wird nur in dieser Konfiguration genutzt.
- Page 47 VERKABELUNG FÜR DIE GEBRÜCKTE MONO-AUSGABE Anschlussbelegung des Lautsprechers...
- Page 48 DOOSINHOUD RMX2408DFX Stroomkabel Snelstartgids Veiligheidsinstructies & Garantie informatieboekje VERBINDINGSDIAGRAM Stroom Hoofdtelefoons Keyboard Monitors Microfoons SNELLE SETUP Volg de procedure hieronder om een signaalprocessor te hebben voor elk kanaal: Zet alle kanalen op nul, zet de pan-functie naar het midden, zet de output op nul, zet de EQ’s tevens op de beginstand.
-
Page 49: Frontpaneel
FRONTPANEEL LEVEL LEVEL LEVEL LEVEL MIC/LINE MONO INPUTS – Verbind een microfoon of line level instrument met deze inputs door middel van een standaard XLR or ¼” kabel. MIC/LINE STEREO INPUTS- Deze XLR en ¼” TRS verbindingen zijn gegroepeerd in stereoparen. Wanneer je alleen de linker jack verbindt, zal de input in mono LINE LINE mode opereren, (het mono-signaal zal verschijnen op beide inputkanalen). - Page 50 MAIN mix LEVEL LED Display – Dit LED display geeft het Main-mix outputniveau weer. Zorg ervoor dat het +10 LED maar zelden oplicht. Het optimale niveau is tussen -10 en 0 op het LED. Wanneer alleen het -30 LED oplicht of niet aangaat, zal je S/N ratio verlaagd worden.
- Page 51 DSP (DIGITAL SIGNAL PROCESSOR) EFFECTS SELECTOR – Selecteert het effect dat de mixer’s interne effectenprocessor zal toepassen op de verscheidene kanalen. Elk kanaal kan verschillende audioniveaus naar de processor sturen door middel van het aanpassen van hun Aux 2/FX Post regelaars.
- Page 52 EFFECTEN OM DE EFFECTEN TE HOREN OP EEN KANAAL: Gebruik de effectenkiezer om een van de onderstaande effecten te gebruiken, pas de parameter aan met de Variations Selector, draai vervolgens de Aux 2/FX Post regelaar omhoog voor dat betreffende kanaal. PRESET OMSCHRIJVING PARAMETER...
- Page 53 VERBINDINGSSCHEMA'S VERSTERKERMODUS Hoofdspeaker: 4 Ohm minimale belasting per speaker Hoofdspeaker: 4 Ohm minimale belasting per speaker Speaker: 4 Ohm minimale belasting per speaker Speaker: 4 Ohm minimale Gebruik de Speakon™- belasting per speaker aansluitingen of koptelefoonaansluitingen De RMX 2408 is uitgerust met NL4 Speakon™-uitgangen. Wanneer verbonden met een 4-polige luidsprekerkabel, kunnen 2 audiokanalen over één kabel worden verstuurd.
- Page 54 Hoofdspeaker (8 ohm) VERSTERKERMODUS Monitorspeaker (8 ohm) SPEAKER VERSTERKER (R) Rechter Speakon -connector naar monospeaker ™ Versterker (L) SPEAKER Speakon -uitgang ™ Linker Speakon -connector naar monospeaker ™ Opmerking: ¼” -uitgangen worden in deze configuratie niet gebruikt. Bij het overbruggen van uitgangen zijn NL4 Speakon -connectoren vereist, verbonden met 4-polige luidsprekerkabels.
- Page 55 VERSTERKERMODUS 500 W 1000 W 500 W 4 Ohm 8 Ohm 4 Ohm Versterker (R) Versterker (L) Speaker Speaker Speakon™-uitgang Speakon™-uitgang Linker Speakon™-connector naar linkerspeaker Rechter Speakon™-connector naar rechterspeaker Versterker (Mono) Speakon™-uitgang Speaker Mono Speakon™-connector naar monospeaker Opmerking: de mono Speakon -uitgang wordt enkel met deze configuratie gebruikt.
- Page 56 OVERBRUGGEN VAN MONO UITGANGBEDRADING Configuratie pintoewijzing speaker...
- Page 58 AUDIO LINE/MIC CONNECTIONS You can connect unbalanced equipment to balanced inputs and outputs. Simply follow these schematics. Caution: Do not connect the rear panel speaker level ¼” outputs to anything other than a passive loudspeaker. Connecting this output to a line line/Mic level input may damage your equipment.
-
Page 59: Technical Specifications
TECHNICAL SPECIFICATIONS MONO INPUT CHANNELS • Microphone input: Electronically balanced, discrete input configuration • Frequency response: 10Hz to 55kHz, +/–3dB • Distortion: (THD+N) 0.006% at +4dBu, 1kHz • Gain: 50dB (MIC) • SNR: (Signal to Noise Ratio) >90dB • Line input: Electronically balanced •... - Page 60 www.altoprofessional.com MANUAL VERSION 1.2...