
Sommaire des Matières pour Seg one CH116
- Page 1 All manuals and user guides at all-guides.com CH116 Design-Weckradio Bedienungsanleitung Instruction Manual Manual d’utilisation Manuale de Istruzioni...
- Page 2 All manuals and user guides at all-guides.com BEDIENUNGSANLEITUNG R0043-DCF RADIOWECKER MIT WETTERVORHERSAGE UND ROJEKTIONSFUNKTION Sicherheitshinweise und wichtige Hinweise zur bestimmungsgemäßen Verwendung Bitte lesen Sie diese Hinweise, insbesondere die Sicherheitshinweise vor der Inbetriebnahme des Gerätes sorgfältig durch! Bestimmungsgemäße Verwendung: dieses Gerät ist zum Empfang und zur Wiedergabe von Radiosendungen, und zur Uhrzeitanzeige geeignet.
- Page 3 All manuals and user guides at all-guides.com vermischen!). Batterien dürfen nicht kurzgeschlossen werden. Stellen Sie sicher dass Batterien nicht übermäßiger Wärme wie direkter Sonneneinstrahlung, Feuer oder dergleichen ausgesetzt werden. Bei unsachgemäßem Gebrauch von Batterien besteht Explosionsgefahr! Stellen Sie keine Gegenstände auf das Gerät, üben Sie auch keinen Druck auf Gehäuse oder Display ...
- Page 4 All manuals and user guides at all-guides.com DE. 3...
- Page 5 All manuals and user guides at all-guides.com UMGEBUNGSEINFLÜSSE AUF DEN FUNKEMPFANG Ihr Radiowecker empfängt die präzise Uhrzeit per Funksignal. Wie bei allen Funkgeräten, wird der Empfang u.a. durch folgende Faktoren beeinflusst: Lange Übertragungswege Nahegelegene Gebirge und Täler Standort zwischen hohen Gebäuden ...
- Page 6 All manuals and user guides at all-guides.com Anmerkungen: 1. Bedenken Sie, dass der Außensensor eine Reichweite von 30 m im freien Raum (ohne Hindernisse) besitzt. Die tatsächliche Reichweite hängt von der Umgebungsbeschaffenheit ab. Hindernisse (Dächer, Wände, Etagen, Decken, hohe Bäume usw.) verringern die Reichweite. 2.
- Page 7 All manuals and user guides at all-guides.com WARTEZEIT DER NACHWECKFUNKTION PROGRAMMIEREN 1. Drücken Sie die Taste SET erneut. Daraufhin erscheint die Anzeige Zz, und die Anzeige „05“ blinkt. 2. Drücken Sie die Tasten + bzw. -, und stellen Sie die gewünschte Wartezeit für die Nachweckfunktion zwischen 5 und 60 Minuten ein.
- Page 8 All manuals and user guides at all-guides.com DIMMER HI-LO Dieser Radiowecker besitzt eine einstell- bzw. dimmbare Hintergrundbeleuchtung (Hi-Lo-Aus). Um einen Helligkeitswert für die Hintergrundbeleuchtung auszuwählen, drücken Sie die Taste SNOOZE/DIMMER, bis der gewünschte Wert eingestellt ist. Diese Funktion kann nur angewählt werden, während das Radio ausgeschaltet ist.
- Page 9 All manuals and user guides at all-guides.com 4. Wiederholen Sie Schritt 4, um bis zu 10 UKW-Sender abzuspeichern. 5. So rufen Sie einen abgespeicherten Sender auf: schalten Sie das Radio ein, und drücken Sie bei eingeschaltetem Radio einmal die Taste SET / MEMORY, um einen abgespeicherten Sender auszuwählen.
- Page 10 All manuals and user guides at all-guides.com WENN DIE AUSSENTEMPERATURANZEIGE VERLOREN GEHT Wenn die Anzeige der Außentemperatur und –feuchtigkeit „---„ anzeigt, ist die Funkverbindung unterbrochen. Halten Sie die Taste + / IN-OUT gedrückt. Falls die Temperaturanzeige immer wieder verlorengeht, stellen Sie den Sender anderswo auf, wo eine bessere Übertragung der Temperaturdaten gewährleistet ist.
- Page 11 All manuals and user guides at all-guides.com PRODUKTPFLEGE 1. Stellen Sie Ihren Radiowecker auf einer stabilen Oberfläche und von direkter Sonneneinstrahlung sowie Hitzequellen und Feuchtigkeit entfernt auf. 2. Schützen Sie Ihre Möbel. Wenn Sie Geräte auf Naturholzmöbel stellen, legen Sie möglichst ein Tuch oder eine Schutzfolie zwischen Gerät und Möbel.
- Page 12 All manuals and user guides at all-guides.com ENGLISH GERMAN FRONT VIEW Vorderseitige Ansicht PROJECTOR PROJEKTOR SIDE VIEW Seitenansicht VOLUME LAUTSTÄRKE BOTTOM VIEW Unterseite FOCUS KNOB Fokusregler RESET RESET FM ANTENNA UKW-ANTENNE BATTERY DOOR ABDECKUNG FÜR BATTERIEFACH TOP VIEW Oberseite SET / MEMORY SET / MEMORY - (°C / °F) / WAVE - (°C / °F) / WAVE...
- Page 13 All manuals and user guides at all-guides.com INSTRUCTION MANUAL OF R0043-DCF WEATHER FORECAST ALARM CLOCK RADIO WITH PROJECTION Safety Instructions and Important Information About Intended Use Please read the following instructions and safety notes thoroughly before starting to use your product! ...
- Page 14 All manuals and user guides at all-guides.com Do not place any objects on the device and never apply any pressure onto the housing or the display. Do not place any recipients containing liquids (beverages, vases, etc.) onto or next to the device.
- Page 15 All manuals and user guides at all-guides.com EN. 3...
- Page 16 All manuals and user guides at all-guides.com ENVIRONMENTAL RECEPTION EFFECTS Your radio controlled clock obtains the accurate time with wireless technology. Same as all wireless devices, the receiving ability maybe affected by, but not limited to, the following circumstances: Long transmitting distance ...
- Page 17 All manuals and user guides at all-guides.com 2. During reception of the DCF time signal, your weather clock radio does not take temperature measurement. After first time installation, the temperature reading will get stable and become more accurate in around 30 minutes. 3.
- Page 18 All manuals and user guides at all-guides.com TO SET TIME ZONE 1. Press SET again, the clock display shows “00” and flashes. 2. Press +/- to select time zone “00” = GMT +1 hour (e.g. Germany) “01” = GMT +2 hours (e.g. Finland) “-01”...
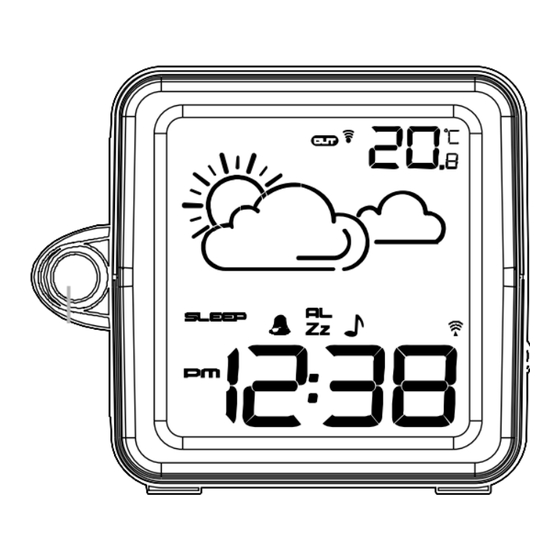
- Page 19 All manuals and user guides at all-guides.com TO SELECT INDOOR OR OUTDOOR TEMPERATURE READOUT Single press + / IN-OUT to display indoor or outdoor temperature readout. TO TUNE AND PLAY THE RADIO 1. Press SLEEP/RADIO once to turn on the radio, the clock display will show “ON” and flashes. 2.
- Page 20 All manuals and user guides at all-guides.com WEATHER FORECASTER ICON AND PRESSURE TREND INDICATOR Your weather station has a built-in barometric sensor which measures the change of the air pressure over time. Your weather station takes around 24 hours to gather and average air- pressure readings to provide a weather forecast for next 12-24 hours.
- Page 21 All manuals and user guides at all-guides.com Problem Solution LCD is blank Press RESET on the main unit. Check if AC/DC adaptor or DC jack is loose or unplugged. No Outdoor Temperature is Press and hold + / IN-OUT displayed Press and hold + / IN-OUT, then press RESET on the outdoor sensor.
- Page 22 All manuals and user guides at all-guides.com MANUEL D’UTILISATION DU R0043-DCF RADIO RÉVEIL AVEC PRÉVISIONS MÉTÉO ET PROJECTEUR FR. 1...
- Page 23 All manuals and user guides at all-guides.com EFFETS DE L’ENVIRONNEMENT SUR LA CAPACITÉ DE RÉCEPTION Votre radio réveil radiocommandé utilise une technologie sans fil pour se régler automatiquement à l’heure exacte. Comme tous les appareils sans fil, sa capacité de réception peut être affectée, entre autres, par les circonstances suivantes : ...
- Page 24 All manuals and user guides at all-guides.com Remarques : 1. Gardez à l’esprit le fait que votre capteur extérieur possède une portée de 30 mètres en plein air et sans obstructions. La portée de transmission réelle dépend de ce qui se trouve sur le chemin du signal.
- Page 25 All manuals and user guides at all-guides.com RÉGLAGE DE LA DURÉE DE RÉPÉTITION 1. Appuyez de nouveau sur SET. L’écran affiche Zz et « 05 » clignote. 2. Appuyez sur + ou - pour régler la durée de répétition de 5 à 60 minutes. RÉGLAGE DU FUSEAU HORAIRE 1.
- Page 26 All manuals and user guides at all-guides.com UTILISATION DU VARIATEUR Ce radio réveil est doté d’un rétroéclairage de l’écran ajustable grâce à un variateur (éclairage puissant, faible ou désactivé). Pour sélectionner un réglage du rétroéclairage, appuyez sur la touche SNOOZE/DIMMER jusqu’à la luminosité de votre choix. Ce réglage ne peut être sélectionné que lorsque la radio n’est pas en marche.
- Page 27 All manuals and user guides at all-guides.com 5. Pour écouter une station de radio en mémoire à n’importe quel moment : allumez d’abord la radio et appuyez plusieurs fois sur SET / MEMORY pour sélectionner une station en mémoire. 6. Pour modifier une station préréglée, sélectionnez une autre station et répétez les étapes 2 à 4. Le réglage initial sera remplacé.
- Page 28 All manuals and user guides at all-guides.com SI VOUS PERDEZ LA TEMPÉRATURE EXTÉRIEURE Lorsque les chiffres indiquant la température extérieure et l’humidité sont remplacés par « --- », cela signifie que la transmission sans fil a été interrompue ou perdue. Appuyez une fois sur la touche + / IN-OUT et maintenez-la enfoncée.
- Page 29 All manuals and user guides at all-guides.com ENTRETIEN DE VOTRE APPAREIL 1. Placez votre radio réveil sur une surface stable, éloigné des rayons du soleil ou de toute source de chaleur ou humidité excessives. 2. Protégez vos meubles lorsque vous placez vos appareils sur du bois naturel ou une finition laquée en utilisant un tissu ou un matériau de protection positionné...
- Page 30 All manuals and user guides at all-guides.com ENGLISH FRENCH FRONT VIEW VUE AVANT PROJECTOR PROJECTEUR SIDE VIEW VUE LATÉRALE VOLUME VOLUME BOTTOM VIEW VUE DU DESSOUS FOCUS KNOB MOLETTE DE MISE AU POINT RESET RÉINITIALISATION FM ANTENNA ANTENNE FM BATTERY DOOR COUVERCLE DU COMPARTIMENT DES PILES TOP VIEW VUE DU DESSUS...
- Page 31 All manuals and user guides at all-guides.com MANUALE D’ ISTRUZIONI DEL R0043-DCF RADIOSVEGLIA A PROIEZIONE CON PREVISIONI METEOROLOGICHE IT. 1...
- Page 32 All manuals and user guides at all-guides.com EFFETTI DELLA RICEZIONE AMBIENTALE Grazie alla tecnologia wireless questa radiosveglia è in grado di offrire un orario sempre preciso. Come tutti i dispositivi wireless, la capacità di ricezione può essere influenzata, ma non limitata, dalle seguenti circostanze: ...
- Page 33 All manuals and user guides at all-guides.com Nota: 1. ricordare che il sensore esterno consente una ricezione fino a 30 m all’aperto in un luogo privo di ostacoli. La distanza di trasmissione reale varia in base al percorso del segnale. Qualunque ostacolo (tetti, pareti, pavimenti, alberi, ecc.) dimezzerà...
- Page 34 All manuals and user guides at all-guides.com IMPOSTAZIONE DELLA DURATA DELL’ALLARME ACUSTICO 1. Premere nuovamente SET: sul display apparirà la scritta Zz e “05” lampeggerà. 2. Premere + o – per impostare la durata desiderata dell’allarme acustico da 5 a 60 min. IMPOSTAZIONE DEL FUSO ORARIO 1.
- Page 35 All manuals and user guides at all-guides.com VISUALIZZAZIONE DELLA TEMPERATURA IN GRADI CENTIGRADI (C) O FAHRENHEIT (F) Premere una volta – (°C/°F) per visualizzare la temperatura in gradi Centigradi (C) o Fahrenheit (F) SELEZIONARE IL RILEVAMENTO DELLA TEMPERATURA ESTERNA O INTERNA Premere una volta + / IN-OUT per visualizzare la temperatura esterna o interna.
- Page 36 All manuals and user guides at all-guides.com 3. Per spegnere la radio prima del periodo di tempo impostato, premere una volta SNOOZE/DIMMER. ICONA DELLE PREVISIONI METEOROLOGICHE E INDICATORE DELLA PRESSIONE La stazione meteo possiede un sensore barometrico incorporato, che misura le variazioni della pressione atmosferica nel tempo.
- Page 37 All manuals and user guides at all-guides.com Problema Soluzione LCD vuoto Premere RESET sul dispositivo principale. Controllare che l’alimentatore o lo spinotto CC non siano scollegati o collegati male. La temperatura esterna non Tenere premuto + / IN-OUT viene visualizzata Tenere premuto + / IN-OUT e poi premere RESET sul sensore esterno.
- Page 38 All manuals and user guides at all-guides.com ENGLISH ITALIAN FRONT VIEW VISIONE ANTERIORE PROJECTOR PROIETTORE SIDE VIEW VISIONE LATERALE VOLUME VOLUME BOTTOM VIEW VISIONE POSTERIORE FOCUS KNOB MANOPOLA DI MESSA A FUOCO RESET RESET FM ANTENNA ANTENNA FM BATTERY DOOR COPERCHIO DELL’ALLOGGIAMENTO BATTERIE TOP VIEW VISIONE SUPERIORE...
- Page 39 All manuals and user guides at all-guides.com Herstellergarantie Wir freuen uns, dass Sie sich für den Kauf eines modernen Gerätes unseres Hauses ent- schieden haben und wünschen Ihnen viel Spaß mit diesem Produkt. Die Fertigung von solchen Geräten ist ein komplexer Vorgang, den wir durch ständige Qualitätskontrollen begleiten.
- Page 40 All manuals and user guides at all-guides.com geben Sie bitte einem Paketzusteller „Deutsche Post“ bzw. einer Abgabestelle „Deutsche Post“. Um das Produkt auf dem Transport optimal zu schützen, sollten Sie möglichst die Originalverpackung nutzen. Erkennbar nicht transportsicher verpackte Geräte können wir leider nicht annehmen.
- Page 41 All manuals and user guides at all-guides.com Herstellergarantie Wir freuen uns, dass Sie sich für den Kauf eines modernen Gerätes unseres Hauses ent- schieden haben und wünschen Ihnen viel Spaß mit diesem Produkt. Die Fertigung von solchen Geräten ist ein komplexer Vorgang, den wir durch ständige Qualitätskontrollen begleiten.
- Page 42 All manuals and user guides at all-guides.com der keine kostenlosen Garantieleistungen erbringen. Geht uns ein Gerät ohne Kaufnach- weis zu, erhalten Sie von uns einen Kostenvoranschlag für die Reparatur. Entscheiden Sie sich gegen eine Reparatur, so liefern wir das Gerät an Sie zurück. Für den Transport und die Ausarbeitung des Kostenvoranschlags müssen wir Ihnen in diesem Falle eine Pau- schale in Rechnung stellen.
- Page 43 All manuals and user guides at all-guides.com Herstellergarantie Wir freuen uns, dass Sie sich für den Kauf eines modernen Gerätes unseres Hauses ent- schieden haben und wünschen Ihnen viel Spass mit diesem Produkt. Die Fertigung von solchen Geräten ist ein komplexer Vorgang, den wir durch ständige Qualitätskontrollen begleiten.
- Page 44 All manuals and user guides at all-guides.com der keine kostenlosen Garantieleistungen erbringen. Geht uns ein Gerät ohne Kaufnach- weis zu, erhalten Sie von uns einen Kostenvoranschlag für die Reparatur. Entscheiden Sie sich gegen eine Reparatur, so liefern wir das Gerät an Sie zurück. Für den Transport und die Ausarbeitung des Kostenvoranschlags müssen wir Ihnen in diesem Falle eine Pau- schale in Rechnung stellen.
- Page 45 All manuals and user guides at all-guides.com Garantie du fabricant nous vous remercions d’avoir choisi un appareil de notre marque et espérons qu’il vous apportera entière satisfaction. La fabrication de ce type d’appareils est un processus complexe que nous complétons par des contrôles qualité continus – une démarche qui nous permet de garantir la qualité...
- Page 46 All manuals and user guides at all-guides.com pas faire réparer l’appareil, il vous sera retourné. Les frais de devis ainsi que les frais de transport (tarif forfaitaire) de l’appareil seront alors à votre charge. 7. Les pièces remplacées seront conservées par notre centre de services et détruites à son entière discrétion.
- Page 47 All manuals and user guides at all-guides.com Garanzia del produttore La ringraziamo per aver acquistato uno dei nostri moderni apparecchi e Le auguriamo un piacevole utilizzo di questo prodotto. La produzione di tali apparecchi è un processo comp- lesso, sottoposto a costanti controlli qualitativi. Per questo possiamo garantire che i nostri prodotti sono conformi a elevati standard di qualità.
- Page 48 All manuals and user guides at all-guides.com sitivo venga spedito senza questa prova, la riparazione avverrà a pagamento. In questo caso, se si dovesse decidere di non far riparare il dispositivo, l’apparecchio verrà restituito al mittente. Inoltre, verrà richiesto il pagamento di una tariffa fissa per il trasporto e il preventivo.
- Page 49 All manuals and user guides at all-guides.com CH116 Design-Weckradio Product of: Schmid Electronics GmbH D-66780 Rehlingen-Siersburg www.one-products.de...