Publicité
Les langues disponibles
Les langues disponibles
Liens rapides
All manuals and user guides at all-guides.com
International Assembly Instructions for model VMFL1
Sanus Systems 2221 Hwy 36 West, Saint Paul, MN 55113 7.05.05
Customer Service: (800) 359-5520 • (651) 484-7988 • fax (651) 636-0367
Customer Service Europe: 31 (0)20 5708938 • fax 31 (0)20 5708989
See complementary Sanus products at www.sanus.com
Publicité

Manuels Connexes pour Sanus Systems VMFL1


Sommaire des Matières pour Sanus Systems VMFL1
- Page 1 All manuals and user guides at all-guides.com International Assembly Instructions for model VMFL1 Sanus Systems 2221 Hwy 36 West, Saint Paul, MN 55113 7.05.05 Customer Service: (800) 359-5520 • (651) 484-7988 • fax (651) 636-0367 Customer Service Europe: 31 (0)20 5708938 • fax 31 (0)20 5708989...
- Page 2 All manuals and user guides at all-guides.com...
- Page 3 Assembly Instructions for Model: VMFL1 Thank you for choosing a Sanus Systems Vision Mount wall mount. The VMFL1 is designed to mount up to 30” LCD flat panel televi- sions weighing up to 40 lb to a vertical wall. It will allow the television to be just .5” from of the wall.
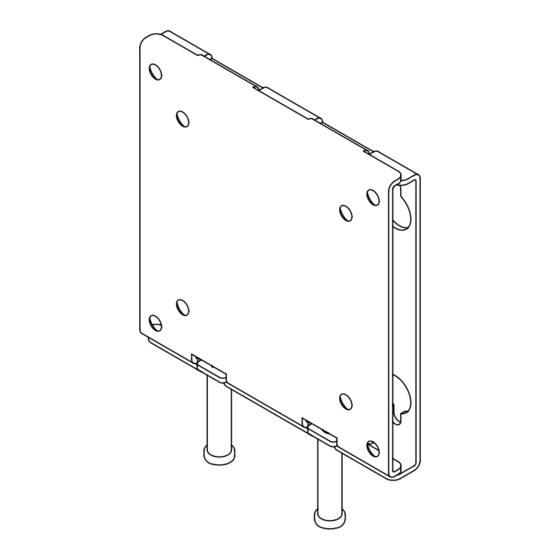
- Page 4 All manuals and user guides at all-guides.com Step 1: Hang Wall Plate Wood Stud Mounting: First, determine the location of the Wall Plate (a) prior to installation. Use a high quality stud sensor to locate a stud. Using the Wall Plate as a template and mark two holes in the apporpriate location. Make sure the hole is in the center area of the stud.
- Page 5 All manuals and user guides at all-guides.com Step 3: Attach Monitor Bracket to flat back TV To attach the Monitor Bracket (b) to the TV, simply insert a M4 x 10 mm Bolt (e) through the countersunk hole in the Monitor Bracket, the M4 Washer (i) and thread it into the TV.
- Page 6 All manuals and user guides at all-guides.com Step 6: Attach Monitor Bracket to Wall Plate Lift the TV up so the two hooks on the Monitor Bracket (b) align with the slits on the top of the Wall Plate (a). See the Detailed View of Diagram 6 for assistance.
- Page 7 Sanus Systems. Sanus Systems no se hace responsable de los daños ni de las lesiones causadas por el montaje, armado o uso incorrectos. Sírvase llamar a Sanus Systems antes de devolver los productos al punto de compra.
- Page 8 All manuals and user guides at all-guides.com Paso 1: Colgar la placa de pared Montaje sobre pie derecho de madera: Primero, determinar la ubicación de la placa de pared (a) antes de la instalación. Utilizar un detector de vigas de alta calidad para localizar el pie derecho. Utilizar la placa de pared como una plantilla y marcar dos agujeros en la ubicación correcta.
- Page 9 All manuals and user guides at all-guides.com Paso 3: Conectar el soporte de monitor al televisor con la parte trasera plana Para conectar el soporte de monitor (b) en el televisor, simplemente pasar un perno M4 x 10 mm (e) a través del agujero contrataladrado del soporte de monitor, la arandela M4 (i) e insertarlo en el televisor.
- Page 10 All manuals and user guides at all-guides.com Paso 6: Conectar el soporte de monitor a la placa de pared Levantar el televisor de manera que los dos ganchos que se encuentran en el soporte de monitor (b) se alineen con las aberturas en la parte superior de la placa de pared (a).
- Page 11 Verwenden Sie niemals beschädigte Teile! Unsachgemäße Montage kann Schäden am Gerät und schwere Verletzungen hervorrufen! Verwenden Sie das Produkt nicht für andere als von Sanus Systems explizit genannte Zwecke. Sanus Systems haftet nicht für Schäden oder Verletzungen, die durch unsachgemäße Montage, fehlerhaften Zusammenbau oder unsachgemäße Nutzung entstehen. Bitte rufen Sie Sanus Systems an, bevor Sie Produkte beim Händler reklamieren.
- Page 12 All manuals and user guides at all-guides.com Schritt 1: Anhängen der Wandplatte Montage an einem Holzbalkenträger: Zunächst die Lage der Wandplatte (a) vor der Montage ermitteln. Mit einem hochwertigen Sensor einen Träger suchen. Die Wandplatte als Schablone verwenden und die Positionen der beiden Bohrungen markieren. Die Bohrung muss sich in der Mitte des Holzbalkenträgers befinden.
- Page 13 All manuals and user guides at all-guides.com Schritt 3: Montage der Monitorklammer an einem Fernseher mit flacher Rückseite Zum Anbau der Monitorklammer (b) am Fernsehgerät eine Schraube M4 × 10 mm (e) durch die versenkte Bohrung in der Monitorklammer und die Unterlegscheibe M4 (i) stecken und in den Fernseher eindrehen. Die Arbeitsschritte wiederholen, bis alle 4 Schrauben im Fernseher sitzen.
- Page 14 All manuals and user guides at all-guides.com Schritt 6: Montage der Monitorklammer an der Wandplatte Den Fernseher bis zu den beiden Haken der Monitorklammer (b) anheben und auf die Schlitze an der Oberseite der Wandplatte (a) ausrichten. Siehe dazu Detailansicht in Abbildung 6. Die Monitorklammer und die Wandplatte müssen durch die beiden oberen Haken gesichert sein. Hinweis: Die Sicherungsschrauben (h) jetzt noch nicht festziehen! Abbildung 6 Detailansicht...
- Page 15 N’utilisez jamais de pièces défectueuses. Une installation incorrecte peut entraîner des dommages ou des blessures graves. Ce produit ne doit être utilisé que pour des usages explicitement spécifiés par Sanus Systems. Sanus Systems ne pourra être tenu responsable de dommages ou de blessures dus à...
- Page 16 All manuals and user guides at all-guides.com Etape 1 : Suspension de la plaque murale Montage sur ossature de bois : Commencez par déterminer l’emplacement de la plaque murale (a) avant l’installation. Servez-vous d’un détecteur de montants de haute qualité pour repérer un montant. Servez-vous de la plaque murale comme modèle afin de marquer deux emplacements de trous à...
- Page 17 All manuals and user guides at all-guides.com Etape 3 : Fixation du support du moniteur sur un téléviseur à panneau arrière plat Pour fixer le support du moniteur (b) au téléviseur, il vous suffit d’insérer un boulon M4 x 10 mm (e) dans le trou fraisé du support du moniteur et la rondelle M4 (i), et de le visser dans le téléviseur.
- Page 18 All manuals and user guides at all-guides.com Etape 6 : Fixation du support du moniteur à la plaque murale Soulevez le téléviseur de façon à ce que les deux crochets sur le support du moniteur (b) soient alignés avec les fentes sur la partie supérieure de la plaque murale (a).
- Page 19 L’installazione errata può causare danni o lesioni gravi. Non utilizzare questo prodotto per scopi diversi da quelli specificamente indicati dalla Sanus Systems. La Sanus Systems non è responsabile di danni o lesioni causati da montaggio o utilizzo non corretti. Chiamare la Sanus Systems prima di riportare i prodotti al punto vendita.
- Page 20 All manuals and user guides at all-guides.com Fase 1: appendere la piastra a parete Montaggio per travi di legno: innanzitutto, determinare la posizione della piastra per parete (a) prima dell’installazione. Usare un rilevatore di travi di legno di alta qualità per individuare la trave di legno nella parete. Utilizzare la piastra a parete come maschera per contrassegnare i due fori nella posizione appropriata.
- Page 21 All manuals and user guides at all-guides.com Fase 3: installare la staffa per monitor a TV con retro piatto Per collegare la staffa del monitor (b) alla TV, è sufficiente inserire un bullone M4 da 10 mm (e) attraverso il foro conico nella staffa del monitor, la rondella M4 (i) e avvitare nella TV.
- Page 22 All manuals and user guides at all-guides.com Fase 6: installare la staffa per monitor alla piastra per parete Sollevare la TV verso l’alto in modo che i due ganci sulla staffa del monitor (b) siano allineati con la parte superiore della piastra per parete (a).
- Page 23 привести к травмированию людей и порче имущества. Это изделие может применяться исключительно в целях, прямо указанных производителем. Компания Sanus Systems не несет ответственности за вред здоровью или материальный ущерб, причиненный вследствие неправильной сборки, монтажа и эксплуатации устройства. Решив вернуть изделие в магазин, где Вы его приобрели, обратитесь, пожалуйста, сначала...
- Page 24 All manuals and user guides at all-guides.com Шаг 1. Прикрепление настенной крепежной пластины Монтаж на деревянной стойке каркасной стены: Перед установкой определите местонахождение настенной пластины (a). Для определения местонахождения деревянной стойки следует использовать высокочувствительный датчик. Используя настенную крепежную пластину как шаблон, отметьте соответствующие места для двух отверстий. Убедитесь, что отверстие сделано по центру...
- Page 25 All manuals and user guides at all-guides.com Шаг 3. Установка скобы для монитора на телевизоре с плоской задней панелью Присоедините крепежную скобу (b) к телевизору посредством винта M4 x 10 мм (e) с шайбой М4 (i), ввинченного через скрытое отверстие в скобе. Аналогично ввинтите все четыре винта чтобы зафиксировать телевизор. Как это сделать, показано на увеличенном...
- Page 26 All manuals and user guides at all-guides.com Шаг 6. Установка скобы для монитора на настенной крепежной пластине Поднимите телевизор так, чтобы два крюка на крепежной скобе для монитора (b) находились напротив прорезей в верхней части настенной крепежной пластины (a). Как это сделать, показано на увеличенном изображении к рисунку 6. Крепежная скоба для монитора...
- Page 27 All manuals and user guides at all-guides.com VMFL1 モデルの組み立て説明書 Sanus Systems VisionMount 壁掛け製品をお買い上げいただきありがとうございます。 VMFL1 は、 最大 30 インチ、 ™ 18.2 kg までの液晶フラットパネルテレビを垂直な壁面に取り付けるよう設計されています。 当製品のご利用により、 テレビを壁か らわずか 1.3 cm のところに設置することができます。 安全性に関する警告 : ここに記載されている説明ではよくわからない場合、 もしくは設置上の安全性について疑問がある場合は、 有資格の契約業者にお電話いただくか、 Sanus (米国: 800-359-5520 もしくは、 ヨーロッパ: 31-(0)-20-5708938) までご連...
- Page 28 All manuals and user guides at all-guides.com 手順 1 : 壁面プレートを掛ける 木製の間柱に取り付ける : 設置する前に、 まず壁面プレート (a) の位置を決めておきます。 高性能の間柱探知機を使って、 間柱の 位置を調べます。 壁面プレートをテンプレートにして、 適切な位置に 2 つの穴の印を付けます。 穴が間柱の中心にあることを確認 します。 2 本のラグボルト (c) を使って、 壁面プレートを壁に取り付けます。 図 1a のように、 プレート中央の平らな面が壁に接する ように壁面プレートの向きを確認します。 壁面プレートの鍵穴をラグボルトに載せて取り付けます。 各ラグボルトをしっかりと固定 します。 ドライウォールに設置する : 壁面プレートを取り付ける位置を決めます。 壁面プレートをテンプレートにして、 4隅の取り付け穴の位 置に印を付けます。...
- Page 29 All manuals and user guides at all-guides.com 手順 3 : 背面が平らなテレビにモニター取り付け金具を取り付ける このようなテレビにモニター取り付け金具 (b) を取り付ける場合は、 M4 x 10 mm ボルト (e) を、 モニター取り付け金具の皿穴 と M4 ワッシャー (i) に通し、 テレビに差し込みます。 この作業を繰り返して、 ボルトを 4 本ともテレビにしっかりと固定します。 詳し くは、 図 3 の詳細図をご覧ください。 各ボルトをプラスドライバーで締め付けます。 注意 : テレビの背面の奥まったところにある穴に設置する場合は、 手順 3 または手順 4 をご覧ください。 ...
- Page 30 All manuals and user guides at all-guides.com 手順 6 : 壁面プレートにモニター取り付け金具を取り付ける モニター取り付け金具 (b) の 2 つのフックが、 壁面プレート (a) の上部にあるスリットと同じ高さになるようにテレビを持ち上げ ます。 詳しくは、 図 6 の詳細図をご覧ください。 モニター取り付け金具と壁面プレートが、 上部の 2 つのフックによってしっかりと接 合されていることを確認します。 注意 : この時点では締め付けボルト (h) を締めないでください。 図 6 詳細図 フック 壁面 ...
- Page 31 All manuals and user guides at all-guides.com VMFL1 型号装配说明 感谢您选用 Sanus Systems VisionMount 墙架。VMFL1 设计用于将 30 英寸的平板液晶电视机安装至垂直的墙面上,承重 ™ 可达 18.2 公斤。使用此产品可将电视机移离墙面 1.3 厘米。 安全警告:如果您不理解这些说明或对安装的安全性有任何疑问,请致电有资格的承包商或与 Sanus 联系,联系电话: 800.359.5520(美国)或 31 (0) 20 5708938(欧洲)。您也可以访问我们的网站 www.sanus.com。请仔细检查以确保零件无缺少 或缺陷。我们的客户服务代表会迅速为您的安装问题提供协助,以及解决零件缺少或缺陷的问题。通过授权经销商所购产 品的替换零件将直接送货上门。切勿使用有缺陷的零件。安装不正确可能会导致损坏或严重受伤。切勿将本品用于 Sanus Systems 未明示的任何其它目的。Sanus Systems 对由于安装不正确、装配不正确或使用不当引起的损坏或受伤不承担任何 责任。退货至购买点前请先致电 Sanus Systems。...
- Page 32 All manuals and user guides at all-guides.com 步骤 1:安装墙板 木立筋安装:安装前先确定墙板 (a) 的安装位置。使用高质的墙筋传感器找到墙筋。请先将墙板作为样板在适当的地方标出 两个孔的位置。请确保钻孔位于墙筋的中心。用两个方头螺栓 (c) 将墙板安装到墙面上。 请确保墙板方向正确,即墙板中央 的平面如图 1a 所示紧贴墙面。以锁孔式将墙板安装到每个方头螺栓上。最后旋紧每个方头螺栓。 清水墙安装:确定墙板安装在墙面上的适当位置。以墙板为样板,标出四个外侧安装孔的位置。用 3/8 英寸钻头在每个标 记的位置钻出 1 厘米深的导向孔。在其中一个导向孔中安装清水墙膨胀螺丝 (d),然后旋紧锚定螺栓直到完全就位。 请参见 图 1b。 将该锚定螺栓松出大约 0.6 厘米并在其它三个导向孔中重复以上的步骤。按锁孔方式将墙板安装到墙面上后,旋紧 四个锚定螺栓。 注意:在清水墙安装中,请确保垫圈位于锚定螺栓头和墙板中间。 图 1a 图 1b 钻出 1 厘米的 导向孔...
- Page 33 All manuals and user guides at all-guides.com 步骤 3:将显示器架安装到平背面电视机上。 要将显示器架 (b) 安装到电视机上,只要将 M4 x 10 mm 螺钉 (e) 穿过显示器架上的埋头孔和 M4 垫圈 (i),最后旋入电视 机。 重复以上步骤直到四个螺钉都完全插入电视机中。请参考图 3 的详细视图可获得帮助。最后使用飞利浦螺丝刀旋紧每 个螺钉。 注意:对于孔框架凹入电视机背部的安装,请参见步骤 3 或步骤 4。 图 3 详细视图 步骤 4:将显示器架安装到凹入式孔框架的电视机上 要将显示器架 (b) 安装到电视机上,只要将 M4 x 20 mm 螺钉 (f) 穿过显示器架上的埋头孔和 M4 小间隔块 (j),最后旋入电 视机。重复以上步骤直到四个螺钉都完全插入电视机中。请参考图...
- Page 34 All manuals and user guides at all-guides.com 步骤 6:将显示器架安装到墙板上 抬起电视机使显示器架 (b) 上的两个钩子与墙板 (a) 顶部的两条狭缝对齐。请参考图 6 的详细视图可获得帮助。请确保显示 器架通过顶部的两个钩子与墙板完全契合在一起。 注意:此时切勿旋紧防松螺栓 (h)。 图 6 详细视图 钩子 墙面 突起 步骤 7:用钩子钩住缆线并将显示器架锁定在墙板上 要使墙面和显示器之间存在更大的空间以便安装线缆,您可以使用显示器架 (b) 顶部的两个钩子将显示器挂起,但是不固定 底部的突起(如图 7a 所示)。所有的线缆都安装完毕后,请确保顶部的两个钩子和底部的两个突起均与墙板连接。请参见 图 7b 的详细视图。最后旋紧 M5 防松螺栓 (h) 使显示器架牢牢固定在墙板上。 图...