Table des Matières
Dépannage

Manuels Connexes pour Samsung HW-Q600B


Sommaire des Matières pour Samsung HW-Q600B
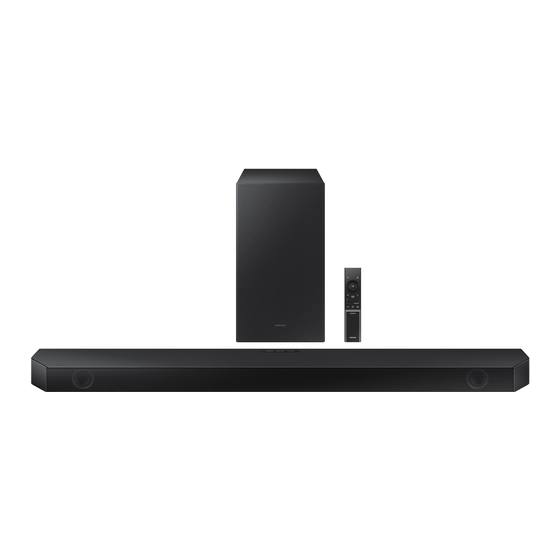
- Page 1 FULL MANUAL HW-Q600B Imagine the possibilities Thank you for purchasing this Samsung product. To receive more complete service, please register your product at www.samsung.com/register...
-
Page 2: Safety Information
• This apparatus shall always be connected to a Refer to the table below for an explanation of AC outlet with a protective grounding symbols which may be on your Samsung product. connection. • To disconnect the apparatus from the mains,... - Page 3 PRECAUTIONS 5. The battery used with this product contains chemicals that are harmful to the environment. Do not dispose of the battery 1. Ensure that the AC power supply in your in the general household trash. Do not house complies with the power expose the battery to excess heat, direct requirements listed on the identification sunlight, or fire.
-
Page 4: Table Des Matières
CONTENTS Checking the Components Product Overview Front Panel / Top Panel of the Soundbar ------------------------- Bottom Panel of the Soundbar ------------------------- Using the Remote Control Inserting Batteries before using the Remote Control (AAA batteries X 2) ------------------------- How to Use the Remote Control ------------------------- Using the Hidden Buttons (Buttons with more than one function) -------------------------... - Page 5 Connecting a USB drive Connecting a Mobile Device Connecting via Bluetooth ------------------------- Using Tap Sound ------------------------- Installing the Wall Mount Installation Precautions ------------------------- Wallmount Components ------------------------- Installing the Soundbar in front of TV Software Update USB Update ------------------------- Reset ------------------------- Troubleshooting Licence Open Source Licence Notice...
-
Page 6: Checking The Components
• For more information about the power supply and power consumption, refer to the label attached to the product. (Label: Bottom of the Soundbar Main Unit) • To purchase additional components or optional cables, contact a Samsung Service Centre or Samsung Customer Care. -
Page 7: Product Overview
02 PRODUCT OVERVIEW Front Panel / Top Panel of the Soundbar Top Panel Display Displays the product’s status and current mode. (Power) Button Turns the power on and off. • Auto Power Down Function The unit turns off automatically in the following situations: –... -
Page 8: Bottom Panel Of The Soundbar
• When you turn on this unit, there will be a 4 to 5 second delay before it produces sound. • If you hear sounds from both the TV and Soundbar, go to the Settings menu for the TV audio and change the TV speaker to External Speaker. -
Page 9: Using The Remote Control
03 USING THE REMOTE CONTROL Inserting Batteries before using the Remote Control (AAA batteries X 2) Slide the back cover in the direction of the arrow until it is completely removed. Insert 2 AAA batteries (1.5V) oriented so that their polarity is correct. -
Page 10: Audio Sync
WOOFER By pressing the button, you can adjust the volume of the each speaker. TONE SOUND CH LEVEL • Press the button to select CENTER LEVEL or TOP LEVEL and then adjust the volume CONTROL MODE between -6~+6 by using the Up/Down buttons. CH LEVEL •... - Page 11 Press the indicated areas to select Up/Down/Left/Right. Up/Down/ PAIR Left/Right Press Up/Down/Left/Right on the button to select or set functions. SOUND MODE • Repeat To use the Repeat function in “USB” mode, press the Up button. • Music Skip WOOFER Press the Right button to select the next music file.
- Page 12 SOUND MODE WOOFER SOUND WOOFER MODE TONE CH LEVEL CONTROL (BASS) LEVEL Push the button up or down to adjust the level of the woofer (bass) to -12 or between -6 to +6. To set the woofer (bass) volume level to 0 (Default), press the button. WOOFER By pressing the button, you can adjust the volume of the treble or bass sound.
-
Page 13: Using The Hidden Buttons (Buttons With More Than One Function)
3.1.2 ch 5.1.2 ch • The Samsung Wireless Rear Speaker Kit can be purchased separately. To purchase a Kit, contact the vendor you purchased the Soundbar from. • When the input source is Dolby Atmos®, DTS:X, the Subwoofer-only setup provides 3.1.2 channel audio, while the Subwoofer &... -
Page 14: Adjusting The Soundbar Volume With A Tv Remote Control
• Set the TV speaker to External Speaker to use this function. • Manufacturers supporting this function: Samsung, VIZIO, LG, Sony, Sharp, PHILIPS, PANASONIC, TOSHIBA, Hisense, RCA 1. Turn Off the Soundbar. 2. Push up and hold the WOOFER button for 5 seconds. -
Page 15: Connecting The Soundbar
04 CONNECTING THE SOUNDBAR Connecting Electrical Power Use the power components to connect the Subwoofer and Soundbar to an electrical outlet in the following order: • For more information about the required electrical power and power consumption, refer to the label attached to the product. -
Page 16: Manually Connecting The Subwoofer If Automatic Connection Fails
• The Soundbar will automatically power on when ID SET is complete. ID SET SAMSUNG logo is on the top 5 Sec 3. Check if the LINK LED is solid blue (connection complete). The LINK LED indicator stops blinking and... - Page 17 Red and blue See the contact information Blinking Malfunction for the Samsung Service Centre in this manual. NOTES • Do not connect the power cord of this product or your TV to a wall outlet until all connections between components are complete.
- Page 18 CAUTION • Wireless receiving antennas are built into the wireless subwoofer. Keep the unit away from water and moisture. • For optimal listening performance, make sure that the area around the wireless subwoofer and the Wireless Receiver Module (sold separately) is clear of any obstructions. ENG - 18...
-
Page 19: Connecting An Swa-9100S (Sold Separately) To Your Soundbar
Connecting an SWA-9100S (Sold Separately) to your Soundbar Expand to true wireless surround sound by connecting the Samsung Wireless Rear Speaker Kit (SWA-9100S, sold separately) to your Soundbar. 1. Connect the Wireless Receiver Module to 2 Surround Speakers. – When connecting the speaker cable, connect the core wire to the speaker. - Page 20 • The Soundbar will automatically power on when ID SET is complete. ID SET SAMSUNG logo is on the top 5 Sec CAUTION • If your Soundbar was playing music when it connects to the SWA-9100S, you may hear some stuttering from the woofer as the connection finalises.
-
Page 21: Using A Wired Connection To The Tv
05 USING A WIRED CONNECTION TO THE TV Method 1. Connecting with HDMI Connecting the TV that supports HDMI ARC/eARC (Audio Return Channel/ Enhanced Audio Return Channel) CAUTION • When both the HDMI cable and optical cable are connected, the HDMI signal is received first. •... - Page 22 • To connect with eARC, the eARC function in the TV menu should be set to On. Refer to the TV user manual for details on setting. (e.g. Samsung TV : Home ( ) → Menu → Settings ( ) →...
-
Page 23: Method 2. Connecting Using An Optical Cable
Method 2. Connecting using an Optical Cable Pre-connection Checklist • When both the HDMI cable and optical cable are connected, the HDMI signal is received first. • When you use an optical cable and the terminals have covers, be sure to remove the covers. Bottom of the Soundbar Optical Cable (not supplied) - Page 24 Using the Q-Symphony Function For Q-Symphony, the Soundbar syncs with a Samsung TV to output sound through two devices for optimum surround effect. When the Soundbar is connected, the menu, “TV+Soundbar” appears under the Sound Output menu of the TV. Select the corresponding menu.
-
Page 25: Using A Wireless Connection To The Tv
• After you have connected the Soundbar to your TV the first time, use the “BT READY” mode to reconnect. If the device fails to connect • If a previously connected Soundbar listing (e.g. “[AV] Samsung Soundbar Q6B-Series”) appears in the list, delete it. • Then repeat steps 1 through 3. - Page 26 Disconnecting the Soundbar from the TV Press the (Source) button on the top panel or on the remote control and switch to any mode but “BT”. • Disconnecting takes time because the TV must receive a response from the Soundbar. (The time required may differ, depending on the TV model.) •...
-
Page 27: Connecting An External Device
07 CONNECTING AN EXTERNAL DEVICE Method 1. Connecting using an HDMI Cable (Capable of Dolby Atmos® decoding and playback) Pre-connection Checklist • If the Audio Output options include Secondary Audio, make sure Secondary Audio is set to Off. • Make sure that the content supports Dolby Atmos®. •... -
Page 28: Method 2. Connecting Using An Optical Cable
Open the audio output options on the settings menu of your BD player or other device and make sure that “No Encoding” is selected for Bitstream. For example, on a Samsung BD Player, go to Home Menu → Sound → Digital Output and then select Bitstream (unprocessed). -
Page 29: Connecting A Usb Drive
08 CONNECTING A USB DRIVE You can play music files located on USB drive through the Soundbar. USB port HDMI USB (5V 0.5A) HDMI TO TV (eARC/ARC) DC 24V DIGITAL AUDIO IN (OPTICAL) USB (5V 0.5A) 1. Connect the USB drive to the USB port on the bottom of the product. 2. -
Page 30: Connecting A Mobile Device
Soundbar for more than 5 seconds to display “BT PAIRING”. 2. On your device, select “[AV] Samsung Soundbar Q6B-Series” from the list that appears. • When the Soundbar is connected to the Mobile device, [Mobile Device Name] → “BT” appears in the front display. - Page 31 If the device fails to connect • If you have an existing Soundbar (e.g., “[AV] Samsung Soundbar Q6B-Series”) on the list of speakers on the Mobile device, delete it. • Then repeat steps 1 and 2. What is the difference between BT READY and BT PAIRING? •...
- Page 32 • A Bluetooth device may experience noise or malfunction under in the following conditions: – When the body is in contact with the signal transceiver on the Bluetooth device or Soundbar – In corners or when there is an obstacle in proximity, such as a wall or partition, where electrical changes may occur.
- Page 33 (A device that is not currently playing will be disconnected.) • Only one Samsung TV, or 2 Bluetooth devices can be connected at the same time. • The Soundbar will be disconnected from Bluetooth devices when it receives a connection request from a Samsung TV.
-
Page 34: Using Tap Sound
Tap the Soundbar with your mobile device to play audio from the mobile device through the Soundbar. • This function may not be supported, depending on the mobile device. • This function is only compatible with Samsung mobile devices with Android 8.1 or later. SmartThings App Top of the Soundbar TAP ... -
Page 35: Installing The Wall Mount
10 INSTALLING THE Wallmount Components WALL MOUNT Wall Mount Guide Installation Precautions • Install on a vertical wall only. (M4 x L10) • Do not install in a place with high Holder-Screw Screw temperature or humidity. • Verify whether the wall is strong enough to support the product’s weight. - Page 36 2. Align the Wall Mount Guide’s Centre Line 5. Push a screw (not supplied) through each with the centre of your TV (if you are Holder-Screw, and then screw each screw mounting the Soundbar below your TV), and firmly into a support screw hole. then fix the Wall Mount Guide to the wall using tape.
-
Page 37: Installing The Soundbar In Front Of Tv
11 INSTALLING THE 7. Install the Soundbar with the attached Bracket-Wall Mounts by hanging the SOUNDBAR IN Bracket-Wall Mounts on the Holder-Screws on the wall. FRONT OF TV Wall Place the Soundbar on a TV stand. 8. Slide the Soundbar down as shown below so that the Bracket-Wall Mounts rest securely on the Holder-Screws. -
Page 38: Software Update
UPDATE USB port on the Soundbar. 5. Turn on the Soundbar and press the (Source) button to select USB source. Samsung may offer updates for the Soundbar’s “UPDATE” will be displayed, this may take up system firmware in the future. to 3 minutes. USB port UPDATE ... -
Page 39: Reset
Reset Top of the Soundbar INIT OK With the Soundbar on, press the (Volume) buttons on the body at the same time for at least 5 seconds. “INIT OK” appears on the display and then the Soundbar is reset. CAUTION •... -
Page 40: Troubleshooting
; HDMI-CEC may not be activated on the TV. Menu → Settings ( ) → All Settings ( → Sound → Sound Output → Select Turn on the CEC on the TV menu. (Samsung Soundbar) TV: Home ( ) → Menu → Settings ( ) →... - Page 41 Change the TV’s audio output to if they are located too close to the PCM or Dolby Digital. Soundbar. e. g. microwaves, wireless (For a Samsung TV: Home ( ) → Menu → routers, etc. Settings ( ) → All Settings ( ) →...
-
Page 42: Licence
The Bluetooth® word mark and logos are ENERGY STAR qualified model only (The other registered trademarks owned by Bluetooth SIG, models) Inc. and any use of such marks by Samsung – As an ENERGY STAR Partner, Samsung has Electronics Co., Ltd. is under license. Other determined that this product or product... -
Page 43: Open Source Licence Notice
15 OPEN SOURCE LICENCE NOTICE To send inquiries and requests for questions regarding open sources, contact Samsung Open Source (http://opensource.samsung.com) 16 IMPORTANT NOTES ABOUT SERVICE Figures and illustrations in this User Manual are provided for reference only and may differ from actual product appearance. -
Page 44: Specifications And Guide
Dimensions (W x H x D) 184.0 x 343.0 x 295.0 mm AMPLIFIER 160W Rated Output power NOTES • Samsung Electronics Co., Ltd reserves the right to change the specifications without notice. • Weight and dimensions are approximate. ENG - 44... -
Page 45: Informations Relatives À La Sécurité
Reportez-vous au tableau ci-dessous pour une BRANCHEZ LA FICHE AU FOND, EN explication des symboles pouvant figurer sur PRENANT SOIN D’INSÉRER LA TIGE LARGE votre produit Samsung. DANS LA FENTE LARGE. • Cet appareil doit toujours être branché à une ATTENTION prise terre. - Page 46 PRÉCAUTIONS 5. Les piles utilisées dans ce produit peuvent contenir des produits ch miques dangereux pour l’environnement. Ne jetez pas les piles 1. Vérifiez que l’alimentation électrique CA de dans votre poubelle habituelle. Ne vous votre domicile respecte les conditions en débarrassez pas des piles en les faisant matière d’alimentation répertoriées sur brûler.
- Page 47 SOMMAIRE Contrôle des Composants Présentation du Produit Panneau frontal/supérieur de la Soundbar ------------------------- Panneau inférieur de la Soundbar ------------------------- Utilisation de la télécommande Insertion des piles avant l’utilisation de la télécommande (Piles AAA X 2) ------------------------- Comment utiliser la télécommande ------------------------- Utilisation des touches dissimulées (Touches avec plus d’une fonction) -------------------------...
- Page 48 Connexion d’un lecteur USB Connexion à un Appareil Mobile Connexion via Bluetooth ------------------------- Utilisation de la fonction Tap Sound ------------------------- Installation du Support Mural Précautions d’installation ------------------------- Composants de fixation au mur ------------------------- Installation de la soundbar devant le Téléviseur Mise à jour du Logiciel Mise à jour par USB ------------------------- Réinitialisation -------------------------...
-
Page 49: Contrôle Des Composants
(Étiquette : Bas de l’Unité Principale Soundbar) • Pour acheter des composants supplémentaires ou des câbles optionnels, contactez un Centre de service Samsung ou le Service client de Samsung. • Pour plus d’informations au sujet de la fixation murale, consultez la page 35. -
Page 50: Présentation Du Produit
02 PRÉSENTATION DU PRODUIT Panneau frontal/supérieur de la Soundbar Panneau supérieur Affichage Affiche l'état et le mode actuel du produit. Touche (Alimentation) Allume et éteint l'appareil. • Fonction Auto Power Down L’appareil s’éteint automatiquement dans les situations suivantes. – Mode D.IN / HDMI / BT / USB : S’il n’y a pas de signal audio pendant 18 minutes. Touche (Volume) Règle le volume. -
Page 51: Panneau Inférieur De La Soundbar
• Lorsque vous mettez l’unité sous tension, il faut compter 4 ou 5 secondes de retard avant le déclenchement du son. • Si vous entendez du son provenant du téléviseur et de la Soundbar, allez dans le menu Paramètres pour l’audio du téléviseur et réglez l’enceinte du téléviseur sur Hautparleur ext. HDMI Panneau inférieur de la Soundbar USB (5V 0.5A) -
Page 52: Utilisation De La Télécommande
03 UTILISATION DE LA TÉLÉCOMMANDE Insertion des piles avant l’utilisation de la télécommande (Piles AAA X 2) Faites glisser le couvercle arrière dans la direction de la flèche jusqu’à ce qu’il soit complètement retiré. Insérez 2 piles AAA (1,5 V) orientées de sorte que la polarité soit correcte. Remettez le couvercle arrière en le faisant glisser dans sa position. -
Page 53: Audio Sync
WOOFER Appuyer sur cette touche permet de régler le volume de chaque enceinte. TONE SOUND CH LEVEL • Appuyez sur cette touche pour sélectionner CENTER LEVEL ou TOP LEVEL, puis réglez CONTROL MODE le volume entre -6~ et +6 à l’aide des touches Haut/Bas. CH LEVEL •... - Page 54 Appuyez sur les zones indiquées pour sélectionner Haut/Bas/ Gauche/Droite. Haut/Bas/ PAIR Gauche/ Appuyez sur Haut/Bas/Gauche/Droite sur la touche pour sélectionner ou paramétrer les Droite SOUND MODE fonctions. • Répétition Pour utiliser la fonction de répétition en mode «USB», appuyez sur la touche Haut. •...
- Page 55 SOUND MODE WOOFER NIVEAU DU TONE SOUND CH LEVEL CONTROL MODE WOOFER (GRAVES) Appuyez sur les touches haut ou bas pour régler le niveau du woofer (graves) sur -12 ou de -6 à +6. Pour définir le niveau de volume du woofer (graves) sur 0 (Défaut), appuyez sur la touche.
-
Page 56: Utilisation Des Touches Dissimulées (Touches Avec Plus D'une Fonction)
3.1.2 canaux 5.1.2 canaux • Le kit d’enceintes arrière sans fil Samsung peut être acheté séparément. Pour acheter un kit, contactez le vendeur chez qui vous avez acheté la Soundbar. • Lorsque la source d’entrée est Dolby Atmos®, DTS:X, la configuration subwoofer uniquement offre un canal audio 3.1.2, alors que la configuration subwoofer et kit d’enceintes arrière sans fil offre un canal audio 5.1.2. -
Page 57: Réglage Du Volume De La Soundbar Avec Une Télécommande De Téléviseur
2. Appuyez et maintenez enfoncée la touche WOOFER pendant 5 secondes. Chaque fois que vous appuyez sur la touche WOOFER et la maintenez pendant 5 secondes, le mode change dans l’ordre suivant : «OFF-TV REMOTE» (Mode par défaut), «SAMSUNG-TV REMOTE», «ALL-TV REMOTE». -
Page 58: Connexion De La Soundbar
04 CONNEXION DE LA SOUNDBAR Connexion de l’alimentation électrique Utilisez les composants d’alimentation pour connecter le Caisson de basse et la Soundbar à une prise électrique dans l’ordre suivant : • Pour plus d’informations sur l’alimentation et la consommation électriques, reportez-vous à l’étiquette collée sur le produit. (Étiquette : Bas de l’Unité Principale Soundbar) 1. -
Page 59: Connexion Manuelle Du Caisson De Basse Si La Connexion Automatique Échoue
• Le message ID SET s’affiche un moment sur l’écran de la Soundbar, avant de disparaître. • La Soundbar est automatiquement mise sous tension lorsque ID SET est terminé. ID SET Le logo SAMSUNG est sur le dessus 5 Sec 3. Vérifiez que le voyant LED LINK s’éclaire en bleu en continu (connexion établie). -
Page 60: Remarques
Rouge et bleu informations de contact du Clignotement Dysfonctionnement Centre de service Samsung dans le manuel. REMARQUES • Ne branchez pas le cordon d’alimentation de ce produit ou votre téléviseur à une prise de courant murale tant que toutes les connexions entre les composants ne sont pas terminées. - Page 61 ATTENTION • Les antennes de réception sans fil sont intégrées au subwoofer sans fil. Gardez les unités à l’abri de l’eau et de l’humidité. • Pour des performances d’écoute optimales, assurez-vous que la zone autour de l’emplacement du subwoofer sans fil et du module de réception sans fil (vendu séparément) ne présente pas d’obstacles.
-
Page 62: Connexion Du Swa-9100S (Vendue Séparément) À Une Soundbar
Connexion du SWA-9100S (Vendue séparément) à une Soundbar Passez au vrai son surround sans fil en connectant votre kit d’enceintes arrière sans fil Samsung (SWA-9100S, vendu séparément) à votre Soundbar. 1. Connectez le module de réception sans fil à 2 enceintes surround. - Page 63 • Le message ID SET s’affiche un moment sur l’écran de la Soundbar, avant de disparaître. • La Soundbar est automatiquement mise sous tension lorsque ID SET est terminé. ID SET Le logo SAMSUNG est sur le dessus 5 Sec ATTENTION • Si votre Soundbar diffuse de la musique au moment où elle est connectée au SWA-9100S, vous pourriez entendre du bruit provenant du woofer une fois la connexion terminée.
-
Page 64: Connexion Filaire Avec Le Téléviseur
05 CONNEXION FILAIRE AVEC LE TÉLÉVISEUR Méthode 1. Connexion par HDMI Connexion à un téléviseur qui prend en charge HDMI ARC/eARC (canal de retour audio/canal de retour audio amélioré) ATTENTION • Lorsqu’un câble HDMI et un câble optique sont connectés simultanément, le signal HDMI est reçu en priorité. • Pour raccorder le téléviseur et la Soundbar à l’aide du câble HDMI, veillez à utiliser les bornes marquées ARC ou eARC. - Page 65 • Pour se connecter à eARC, la fonction eARC doit être réglée sur «On» dans le menu de la télévision. Consultez le guide d’utilisateur de la télévision pour plus de détails concernant ce réglage. (p. ex. Téléviseur Samsung : Accueil ( ) → Menu → Paramètres ( ) →...
-
Page 66: Méthode 2. Connexion À L'aide D'un Câble Optique
Méthode 2. Connexion à l’aide d’un câble optique Liste de vérifications préalables à la connexion • Lorsqu’un câble HDMI et un câble optique sont connectés simultanément, le signal HDMI est reçu en priorité. • Lorsque vous utilisez un câble optique et que les bornes sont dotées d’un cache, veillez à retirer les caches. Partie inférieure de la Soundbar Câble optique (non fourni) -
Page 67: Utilisation De La Fonction Q-Symphony
Utilisation de la fonction Q-Symphony Pour Q-Symphony, la Soundbar se synchronise avec un téléviseur Samsung pour diffuser le son via deux périphériques pour un effet surround optimal. Quand la Soundbar est connectée, le menu «TV+Soundbar» apparaît dans le menu Sortie son du téléviseur. Sélectionnez le menu correspondant. -
Page 68: Connexion Sans Fil Avec Le Téléviseur
• Après avoir connecté la Soundbar au téléviseur pour la première fois, utilisez le mode «BT READY» pour la reconnexion. Si la connexion de l’appareil échoue • Si la liste de Soundbar connectées précédemment (par ex. «[AV] Samsung Soundbar Q6B-Series» apparaît dans la liste, supprimez-la. • Ensuite, répétez les étapes 1 à 3. -
Page 69: Déconnexion De La Soundbar À Partir Du Téléviseur
Déconnexion de la Soundbar à partir du téléviseur Appuyez sur le bouton (Source) du panneau supérieur ou de la télécommande et activez l’un des modes, à l’exception du mode «BT». • La déconnexion prend du temps parce que le téléviseur doit recevoir une réponse de la Soundbar. (Le temps requis peut varier selon le modèle de téléviseur.) •... -
Page 70: Connexion À Un Appareil Externe
07 CONNEXION À UN APPAREIL EXTERNE Méthode 1. Connexion à l’aide d’un câble HDMI (prise en charge du décodage et de la lecture Dolby Atmos®) Liste de vérifications préalables à la connexion • Si les options de sortie audio comprennent un flux audio secondaire, assurez-vous qu’il est réglé sur Off. • Assurez-vous que le contenu prend en charge Dolby Atmos®. • Le port TV peut être marqué eARC selon le téléviseur. Partie inférieure de la Soundbar HDMI HDMI OUT... -
Page 71: Méthode 2. Connexion À L'aide D'un Câble Optique
«Aucun encodage» est sélectionné pour Bitstream. Par exemple, sur un lecteur BD Samsung, allez dans Accueil → Son → Sortie numérique, puis sélectionnez flux binaire (non traité). • Avec la fonction HDMI Pass-Through, la Soundbar lit le son de la source dans ses propres haut- parleurs et envoie le signal vidéo non modifié... -
Page 72: Connexion D'un Lecteur Usb
08 CONNEXION D’UN LECTEUR USB Vous pouvez lire les fichiers musicaux qui se trouvent sur le lecteur USB via la Soundbar. Port USB HDMI USB (5V 0.5A) HDMI TO TV (eARC/ARC) DC 24V DIGITAL AUDIO IN (OPTICAL) USB (5V 0.5A) 1. Connectez le lecteur USB au port USB situé sur la partie inférieure du produit. 2. -
Page 73: Connexion À Un Appareil Mobile
(Source) enfoncé sur le panneau supérieur de la Soundbar pendant plus de 5 secondes pour afficher «BT PAIRING». 2. Sélectionnez «[AV] Samsung Soundbar Q6B-Series» dans la liste. • Lorsque la Soundbar est connectée à l’appareil mobile, [Nom de l’appareil mobile] → «BT»... -
Page 74: Si La Connexion De L'appareil Échoue
Si la connexion de l’appareil échoue • S’il y a déjà une Soundbar (p. ex. «[AV] Samsung Soundbar Q6B-Series») dans la liste des enceintes affichée à l’écran de l’appareil mobile, supprimez-la. • Ensuite, répétez les étapes 1 et 2. Quelle est la différence entre BT READY et BT PAIRING ? • BT READY : Dans ce mode, vous pouvez reconnecter un téléviseur ou un appareil mobile qui a déjà... -
Page 75: Déconnexion De L'appareil Bluetooth D'une Soundbar
• Un appareil Bluetooth peut subir du bruit ou un dysfonctionnement dans les conditions suivantes : – Quand le corps est en contact avec l’émetteur-récepteur de signaux de l’appareil Bluetooth ou de la Soundbar. – Dans les coins ou lorsqu’il y a un obstacle à proximité, tel qu’un mur ou une cloison, où des changements électriques peuvent se produire. -
Page 76: Connexion Multi-Bluetooth
(L’appareil qui n’est pas en cours de lecture sera déconnecté.) • Un seul téléviseur Samsung, ou 2 appareils Bluetooth peuvent être connectés en même temps. • La Soundbar sera déconnecté des appareils Bluetooth si elle reçoit une demande de connexion d’un téléviseur Samsung TV. -
Page 77: Utilisation De La Fonction Tap Sound
Appuyez sur la Soundbar avec votre appareil mobile pour lire l’audio contenu dans celui-ci via la Soundbar. • Il se peut que cette fonction ne soit pas prise en charge, selon l’appareil mobile. • Cette fonction est uniquement compatible avec les appareils mobiles Samsung sous Android 8.1 ou supérieur. -
Page 78: Installation Du Support Mural
10 INSTALLATION Composants de fixation au mur DU SUPPORT MURAL Guide de fixation murale Précautions d’installation (M4 x L10) • Installez sur un mur vertical uniquement. Vis de fixation • N’installez pas dans un endroit à température élevée ou humide. • Vérifiez si le mur est suffisamment robuste pour supporter le poids du produit. Support de fixation murale Sinon, renforcez le mur ou choisissez un autre point d’installation. - Page 79 2. Alignez la Ligne centrale du Guide de 5. Enfoncez une vis (non fournie) dans chaque fixation murale avec le centre de votre Vis de fixation, puis vissez fermement téléviseur (si vous fixez la Soundbar sous chaque vis dans un trou pour vis portante. votre téléviseur), puis fixez le Guide de fixation murale au mur avec du ruban adhésif.
-
Page 80: Téléviseur
11 INSTALLATION 7. Installez la Soundbar, sur laquelle sont fixés les Supports de fixation murale, en DE LA accrochant les Supports de fixation murale sur les Vis de fixation sur le mur. SOUNDBAR DEVANT LE TÉLÉVISEUR Placez la Soundbar sur un socle de téléviseur. 8. Faites glisser la Soundbar vers le bas, comme indiqué... -
Page 81: Mise À Jour Du Logiciel
5. Allumez la Soundbar et appuyez sur la touche (Source) pour sélectionner la source USB. «UPDATE» s’affiche, ce Samsung peut proposer des mises à jour pour le processus peut prendre jusqu’à 3 minutes. microprogramme du système de la Soundbar prochainement. Port USB UPDATE ... -
Page 82: Réinitialisation
Réinitialisation Partie supérieure de la Soundbar INIT OK Alors que la Soundbar est allumée, appuyez simultanément sur les boutons (Volume) situés sur le boîtier pendant au moins 5 secondes. «INIT OK» s’affiche à l’écran, puis la Soundbar est réinitialisée. ATTENTION • Tous les réglages de la Soundbar sont réinitialisés. -
Page 83: Dépannage
; Pour se connecter à eARC, la fonction eARC d’alimentation, reconnectez-le, puis doit être réglée sur «On» dans le menu de allumez l’alimentation. la télévision. (Téléviseur Samsung : Accueil ; Initialisez l’appareil et réessayez. ) → Menu → Paramètres ( ) → Tous (Voir page 39.) - Page 84 PCM ou Dolby Digital. proches de la Soundbar (p. ex. les micro- (Pour un téléviseur Samsung : Accueil ( ondes, les routeurs sans fil, etc.). → Menu → Paramètres ( ) → Tous les ;...
-
Page 85: Licence
The Bluetooth® word mark and logos are ENERGY STAR qualified model only (The other registered trademarks owned by Bluetooth SIG, models) Inc. and any use of such marks by Samsung – As an ENERGY STAR Partner, Samsung has Electronics Co., Ltd. is under license. Other determined that this product or product... -
Page 86: Avis De Licence Libre
15 AVIS DE LICENCE LIBRE Pour envoyer des questions et des demandes concernant des logiciels libres, contactez Samsung Open Source (http://opensource.samsung.com) 16 REMARQUE IMPORTANTE À PROPOS DU SERVICE Les figures et les illustrations du présent Manuel d’utilisation sont fournies à titre de référence uniquement et peuvent différer de l’apparence du... -
Page 87: Spécifications Et Guide
Dimensions (L x H x P) 184,0 x 343,0 x 295,0 mm AMPLIFICATEUR 160W Puissance de sortie nominale REMARQUES • Samsung Electronics Co., Ltd se réserve le droit de modifier les caractéristiques sans préavis. • Le poids et les dimensions sont approximatifs. FRA - 44... -
Page 88: Informações De Segurança
à terra. Consulte a tabela abaixo para uma explicação dos • Para desligar o aparelho da corrente, tem de símbolos que poderão estar no seu produto Samsung. retirar a ficha da tomada eléctrica, pelo que a CUIDADO ficha tem de estar facilmente acessível. - Page 89 PRECAUÇÕES 5. As pilhas utilizadas neste produto contêm químicos nocivos para o ambiente. Não deite as pilhas no lixo doméstico. Não elimine as 1. Certifique-se de que a fonte de alimentação pilhas através de fogo. Não provoque curto- CA da sua residência está em conformidade circuito, não desmonte nem sobreaqueça as com os requisitos elétricos indicados no pilhas.
- Page 90 CONTEÚDOS Verificação dos Componentes Descrição geral do Produto Painel Frontal/Painel Superior do Soundbar ------------------------- Painel inferior do Soundbar ------------------------- Utilização do Controlo Remoto Inserção das pilhas antes de utilizar o controlo remoto (2 pilhas AAA) ------------------------- Como utilizar o controlo remoto ------------------------- Utilizar os botões escondidos (botões com mais de uma função) ------------------------- Especificações de saída para diferentes modos de efeitos sonoros -------------------------...
- Page 91 Ligar uma unidade USB Ligar um Dispositivo Móvel Ligar através de Bluetooth ------------------------- Utilizar o Tap Sound ------------------------- Instalação do Suporte de Parede Precauções para a instalação ------------------------- Componentes do suporte de parede ------------------------- Instalar o soundbar em frente à TV Atualização do Software Atualização por USB ------------------------- Reposição ------------------------- Resolução de Problemas Licenças Aviso de Licença de Open Source Nota Importante sobre o Serviço Especificações e Guia Especificações ------------------------- POR - 5...
-
Page 92: Verificação Dos Componentes
(Etiqueta : Parte inferior da unidade principal do Soundbar) • Para adquirir componentes adicionais ou cabos opcionais, entre em contacto com o centro de assistência técnica ou o atendimento ao cliente da Samsung. • Para mais informações sobre o suporte de parede, consulte a página 35. -
Page 93: Descrição Geral Do Produto
02 DESCRIÇÃO GERAL DO PRODUTO Painel Frontal/Painel Superior do Soundbar Painel Superior Ecrã Exibe o estado e o modo atual do produto. Botão (Ligar/Desligar) Permite ligar e desligar o Soundbar. • Função Auto Power Down Esta unidade desliga-se automaticamente nas situações seguintes: – Modo D.IN / HDMI / BT / USB: Se não existir sinal de áudio durante 18 minutos. Botão (Volume) Permite ajustar o volume. -
Page 94: Painel Inferior Do Soundbar
• Sempre que liga esta unidade, terá de aguardar 4 a 5 segundos até que seja possível reproduzir som. • Se ouvir sons provenientes da TV e do Soundbar, aceda ao menu Definições para o áudio da TV e mude o altifalante da TV para Altifalante Exter. HDMI Painel inferior do Soundbar USB (5V 0.5A) -
Page 95: Utilização Do Controlo Remoto
03 UTILIZAÇÃO DO CONTROLO REMOTO Inserção das pilhas antes de utilizar o controlo remoto (2 pilhas AAA) Deslize a tampa traseira na direção da seta até ser totalmente removida. Insira 2 pilhas AAA (1,5 V) orientadas corretamente em função da polaridade. Coloque novamente a tampa traseira deslizando-a. Como utilizar o controlo remoto Permite ligar e desligar o Soundbar. Ligar/Desligar Prima este botão para selecionar uma fonte ligada ao Soundbar. -
Page 96: Audio Sync
WOOFER Ao premir o botão, pode ajustar o volume de cada altifalante. TONE SOUND CH LEVEL • Prima o botão para selecionar CENTER LEVEL ou TOP LEVEL e ajuste o volume entre CONTROL MODE -6 e +6 com os botões Cima/Baixo. CH LEVEL •... - Page 97 Prima as áreas indicadas para selecionar Cima/Baixo/ Esquerda/Direita. Cima/Baixo/ PAIR Esquerda/ Prima Cima/Baixo/Esquerda/Direita no botão para selecionar ou definir funções. Direita SOUND MODE • Repetir Para utilizar a função Repetir no modo “USB”, prima o botão Cima. • Saltar Música Prima o botão Direita para selecionar o próximo ficheiro de música. Prima o botão WOOFER Esquerda para selecionar o ficheiro de música anterior.
- Page 98 SOUND MODE WOOFER SOUND NIVELACAO MODE TONE CH LEVEL CONTROL DE WOOFER (GRAVES) Prima o botão para cima ou para baixo para ajustar o volume do woofer (graves) para -12 ou entre -6 e +6. Para definir o volume do woofer (graves) para 0 (padrão), prima o botão. WOOFER Ao premir o botão, pode ajustar o volume de sons agudos ou graves.
-
Page 99: Utilizar Os Botões Escondidos (Botões Com Mais De Uma Função)
3.1.2 canais 5.1.2 canais • O Kit de colunas traseiras sem fios da Samsung pode ser comprado em separado. Para comprar o Kit, contacte o fornecedor onde comprou o Soundbar. • Se a fonte de entrada for Dolby Atmos®, DTS:X, a configuração Apenas Subwoofer fornece um áudio de 3.1.2 canais, enquanto a configuração Subwoofer e kit de colunas traseiras sem fios fornece... -
Page 100: Ajuste Do Volume Do Soundbar Com O Controlo Remoto De Um Televisor
• Defina o altifalante do televisor para Altifalante Exter. para utilizar esta função. • Fabricantes que suportam esta função: Samsung, VIZIO, LG, Sony, Sharp, PHILIPS, PANASONIC, TOSHIBA, Hisense, RCA 1. Desligue o Soundbar. 2. Mantenha premido o botão WOOFER durante 5 segundos. -
Page 101: Ligar O Soundbar
04 LIGAR O SOUNDBAR Ligar à corrente elétrica Utilize os componentes elétricos para ligar o Subwoofer e o Soundbar a uma tomada elétrica pela seguinte ordem: • Para obter mais informação sobre a fonte de alimentação e o consumo de energia, consulte a etiqueta no produto. -
Page 102: Ligação Manual Do Subwoofer Em Caso De Falha Da Ligação Automática
• A mensagem ID SET surge no ecrã do Soundbar brevemente e depois desaparece. • O Soundbar liga-se automaticamente quando ID SET estiver concluído. ID SET Logótipo SAMSUNG está para cima 5 Sec 3. Verifique se o LED LINK está aceso continuamente a azul (ligação concluída). - Page 103 Vermelho e azul contacto do centro de assistência A piscar Ocorreu uma avaria técnica da Samsung contidas no manual. NOTAS • Não ligue o cabo de alimentação deste produto ou do seu televisor a uma tomada elétrica até que todas as ligações entre os componentes estejam concluídas.
- Page 104 CUIDADO • Estão integradas antenas recetoras sem fios no subwoofer sem fios. Mantenha as unidades protegidas de água e de humidade. • Para um desempenho de audição otimizado, certifique-se de que a área em torno do subwoofer sem fios e do módulo de recetor sem fios (vendido em separado) está livre de quaisquer obstáculos. POR - 18...
-
Page 105: Ligar O Swa-9100S (Vendido Em Separado) A Um Soundbar
Ligar o SWA-9100S (vendido em separado) a um Soundbar Obtenha um verdadeiro som surround sem fios ligando o Kit de colunas traseiras sem fios (SWA-9100S, vendido em separado) ao Soundbar. 1. Ligue o módulo de recetor sem fios às 2 colunas surround. – Quando ligar o cabo do altifalante, ligue o cabo principal ao altifalante. SURROUND-RIGHT SURROUND-RIGHT –... - Page 106 • A mensagem ID SET surge no ecrã do Soundbar brevemente e depois desaparece. • O Soundbar liga-se automaticamente quando ID SET estiver concluído. ID SET Logótipo SAMSUNG está para cima 5 Sec CUIDADO • Se o seu Soundbar estiver a reproduzir música quando o ligar ao SWA-9100S, poderá ouvir interrupções no som do woofer enquanto a ligação é...
-
Page 107: Utilizar Uma Ligação Com Fios À Tv
05 UTILIZAR UMA LIGAÇÃO COM FIOS À TV Método 1. Ligar com HDMI Ligar uma TV compatível com HDMI ARC/eARC (canal de retorno de áudio/canal de retorno de áudio melhorado) CUIDADO • Quando o cabo HDMI e o cabo ótico estão ambos ligados, o sinal HDMI é recebido primeiro. • Para ligar o cabo HDMI entre a TV e o Soundbar, certifique-se de que liga os terminais assinalados com ARC ou eARC. - Page 108 • Para ligar com eARC, a função eARC no menu de TV deve estar definido como Ativa. Consulte o manual do utilizador da TV para obter mais detalhes sobre como definir. (por exemplo, Televisor Samsung : Página Principal ( ) → Menu → Definições ( ) →...
-
Page 109: Método 2. Ligar Através De Um Cabo Ótico
Método 2. Ligar através de um cabo ótico Lista de verificação pré-ligação • Quando o cabo HDMI e o cabo ótico estão ambos ligados, o sinal HDMI é recebido primeiro. • Quando utilizar um cabo ótico e os terminais estiverem tapados, certifique-se de que remove as tampas. Parte inferior do Soundbar Cabo ótico (não fornecido) DIGITAL AUDIO IN (OPTICAL) OPTICAL OUT Parte superior do Soundbar... - Page 110 Utilizar a função Q-Symphony Para a Q-Symphony, o Soundbar sincroniza com o televisor Samsung para a saída de som através de dois dispositivos para um ótimo efeito surround. Quando o Soundbar está ligado, o menu, “TV+Soundbar” aparece por baixo do menu Saída de Som da TV. Selecione o menu correspondente.
-
Page 111: Utilizar Uma Ligação Sem Fios À Tv
2. Selecione o modo Bluetooth no televisor. (Para obter mais informações, consulte o manual do televisor.) 3. Selecione “[AV] Samsung Soundbar Q6B-Series” na lista exibida no ecrã do televisor. Os Soundbars disponíveis são identificados pela mensagem “Need Pairing” ou “Paired” na lista de dispositivos Bluetooth do televisor. Para ligar ao Soundbar, selecione a mensagem e estabeleça uma ligação. - Page 112 Desligar o Soundbar do televisor Prima o botão (Origem) no painel superior ou no controlo remoto e mude para qualquer modo exceto “BT”. • Desligar o Soundbar do televisor demora algum tempo porque o televisor tem de receber uma resposta do Soundbar. (O tempo necessário para tal poderá variar em função do modelo do televisor.) •...
-
Page 113: Ligar Um Dispositivo Externo
07 LIGAR UM DISPOSITIVO EXTERNO Método 1. Ligar através de um cabo HDMI (compatível com descodificação e reprodução Dolby Atmos®) Lista de verificação pré-ligação • Se as opções de Saída de Áudio incluírem Áudio Secundário, certifique-se de que o Áudio Secundário está desligado. • Certifique-se de que o conteúdo suporta Dolby Atmos®. • A porta da TV pode ter a marcação eARC, consoante a TV. Parte inferior do Soundbar HDMI HDMI OUT... -
Page 114: Método 2. Ligar Através De Um Cabo Ótico
“Sem Codificação” está selecionado para o fluxo de bits. Por exemplo, num leitor Blu-Ray Samsung, vá até Menu inicial → Áudio → Saída digital e selecione Fluxo de Bits (não processado). • O HDMI Pass-Through significa que o Soundbar reproduz o áudio da fonte através dos seus próprios altifalantes e envia o sinal de vídeo não alterado para a TV através de um segundo cabo HDMI. - Page 115 08 LIGAR UMA UNIDADE USB Pode reproduzir os ficheiros de música da unidade USB através do Soundbar. Porta USB HDMI USB (5V 0.5A) HDMI TO TV (eARC/ARC) DC 24V DIGITAL AUDIO IN (OPTICAL) USB (5V 0.5A) 1. Ligue a unidade USB à porta USB na parte inferior do produto. 2.
-
Page 116: Ligar Um Dispositivo Móvel
(Origem) no painel superior do Soundbar durante mais de 5 segundos, para que seja exibida a mensagem “BT PAIRING”. 2. Selecione”[AV] Samsung Soundbar Q6B-Series” na lista. • Quando o Soundbar estiver ligado ao dispositivo móvel, aparecerá [Nome do dispositivo móvel] → “BT” no ecrã frontal. - Page 117 Se ocorrer uma falha ao ligar o dispositivo • Se já tiver um Soundbar (p. ex., “[AV] Samsung Soundbar Q6B-Series”) na lista de altifalantes do dispositivo móvel, remova-o. • Em seguida, repita os passos 1 e 2. Qual é a diferença entre BT READY e BT PAIRING? • BT READY : neste modo, pode voltar a ligar uma TV ou um dispositivo móvel que tenha sido ligado antes.
- Page 118 • Um dispositivo Bluetooth poderá experienciar ruído ou uma avaria sob as seguintes condições: – Quando o corpo está em contacto com o transmissor de sinal no dispositivo Bluetooth ou Soundbar. – Em cantos ou quando existe um obstáculo nas proximidades, tais como uma parede ou uma divisória, onde possam ocorrer alterações elétricas.
- Page 119 (Um dispositivo que não esteja a reproduzir na altura desliga-se.) • Apenas podem ser ligados 2 dispositivos Bluetooth ou um televisor Samsung ao mesmo tempo. • O Soundbar será desligado dos dispositivos Bluetooth quando receber um pedido de ligação de um televisor Samsung.
-
Page 120: Utilizar O Tap Sound
Toque no Soundbar com o seu dispositivo móvel para reproduzir áudio do dispositivo móvel através do Soundbar. • Dependendo do dispositivo móvel utilizado, esta função poderá não ser suportada. • Esta função só é compatível com dispositivos móveis Samsung com Android 8.1 ou posterior. Aplicação SmartThings Parte superior do Soundbar TAP ... -
Page 121: Instalação Do Suporte De Parede
10 INSTALAÇÃO DO Componentes do suporte de parede SUPORTE DE PAREDE Guia de suporte de parede Precauções para a instalação (M4 x L10) • Instale apenas em paredes verticais. Parafuso de fixação Parafuso • Não instale em locais expostos a altas temperaturas ou a uma elevada percentagem de humidade. • Verifique se a parede é suficientemente resistente para suportar o peso do produto. - Page 122 2. Alinhe a Linha central do Guia de suporte de 5. Coloque um parafuso (não fornecido) em parede com o centro do televisor (se estiver cada Parafuso de fixação e aperte cada um a montar o Soundbar por baixo do televisor) firmemente nos orifícios de parafuso de e, em seguida, fixe o Guia de suporte de suporte.
-
Page 123: Instalar Osoundbar Em Frente À Tv
11 INSTALAR O 7. Depois de fixar os Suportes de parede ao Soundbar, instale os Suportes de parede nos SOUNDBAR EM Parafusos de suporte. FRENTE À TV Parede Coloque o Soundbar sobre o suporte do televisor. 8. Deslize o Soundbar para baixo, tal como mostrado abaixo, para que os Suporte de parede fiquem firmemente apoiados nos Parafuso de fixação. -
Page 124: Atualização Do Software
USB. Isto pode ligar o cabo de alimentação do Soundbar. provocar a falha da atualização de firmware. • Se estiver instalada a versão mais recente, 2. Aceda a (samsung.com) Selecione o tipo de não é realizada nenhuma atualização. -
Page 125: Reposição
Reposição Parte superior do Soundbar INIT OK Com o Soundbar ligado, prima os botões (Volume) no corpo ao mesmo tempo durante, pelo menos, 5 segundos. A mensagem “INIT OK” aparece no ecrã e, em seguida, o Soundbar é reposto. CUIDADO • Todas as definições do Soundbar são repostas. -
Page 126: Resolução De Problemas
; Para ligar com eARC, a função eARC no menu alimentação. de TV deve estar definido como Ativa. ; Inicie o produto e tente novamente. (Televisor Samsung : Página Principal ( ) → (Consulte a página 39.) Menu → Definições ( ) →... - Page 127 Altere a saída de áudio do demasiado perto da Soundbar, como televisor para PCM ou Dolby Digital. (Para um acontece com micro-ondas, routers sem televisor Samsung: Página Principal ( ) → fios, etc. Menu → Definições ( ) →...
-
Page 128: Licenças
The Bluetooth® word mark and logos are ENERGY STAR qualified model only (The other registered trademarks owned by Bluetooth SIG, models) Inc. and any use of such marks by Samsung – As an ENERGY STAR Partner, Samsung has Electronics Co., Ltd. is under license. Other determined that this product or product... -
Page 129: Aviso De Licença De Open Source
15 AVISO DE LICENÇA DE OPEN SOURCE Para enviar perguntas e pedidos de esclarecimento relativamente a fontes abertas, contacte a Samsung Open Source por e-mail (http://opensource.samsung.com) 16 NOTA IMPORTANTE SOBRE O SERVIÇO As imagens e ilustrações neste Manual do Utilizador são fornecidas apenas para referência, podendo ser diferentes do produto real. -
Page 130: Especificações E Guia
184,0 x 343,0 x 295,0 mm AMPLIFICADOR 160W Potência nominal de saída NOTAS • A Samsung Electronics Co., Ltd reserva-se ao direito de alterar as especificações sem aviso prévio. • O peso e as dimensões indicados são aproximados. POR - 44... - Page 131 للحيلولة دون وقوع الصدمات الكهربية، قم • راجع الجدول الموضح أدناه لتوضيح الرموز التي قد تكون بمطابقة الشفرة العريضة للقابس مع الفتحة .Samsung موجودة عىل منتجك من .العريضة ثم أحكم إدخالها ينبغي أن يكون هذا الجهاز متص ال ً دوم ً ا بمأخذ التيار •...
- Page 132 االحتياطات تحتوي البطاريات المستخدمة مع هذا المنتج عىل مواد كيميائية مضرة بالبيئة. ال تتخلص من البطاريات بإلقائها في سلة المهمالت المنزلية تأكد أن مصدر طاقة التيار المتردد في منزلك العادية. يحظر التخلص من البطاريات عن طريق يتوافق مع متطلبات الطاقة الم ُ درجة بملصق حرقها.
- Page 133 المحتويات التحقق من المكونات نظرة عامة حول المنتج ------------------------- Soundbar اللوحة األمامية / اللوحة العلوية لجهاز ------------------------- Soundbar اللوح السفلي من استخدام التحكم في ب ُ عد ------------------------- )AAA إدخال البطاريات قبل استخدام وحدة التحكم عن ب ُ عد (بطاريتان بحجم كيفية...
- Page 134 USB توصيل محرك أقراص التوصيل بجهاز محمول Bluetooth التوصيل عبر تقنية ------------------------- Tap Sound استخدام ------------------------- تركيب حامل التثبيت بالحائط احتياطات التركيب ------------------------- مكونات التعليق عىل جدار ------------------------- أمام التلفزيونSoundbar تركيب جهاز تحديث البرنامج USB تحديث ------------------------- إعادة الضبط ------------------------- استكشاف...
- Page 135 .لالطالع عىل مصدر الطاقة واستهالك الطاقة، راجع الملصق المرفق مع المنتج • ) األساسيةSoundbar (الملصق: الجزء السفلي من وحدة .Samsung أو خدمة عمالءSamsung لشراء المكونات اإلضافية أو الكبالت االختيارية، اتصل بمركز خدمة • .35 للحصول عىل مزيد من المعلومات بخصوص طقم التثبيت عىل الحائط ، انظر صفحة...
- Page 136 نظرة عامة حول المنتج Soundbar اللوحة األمامية / اللوحة العلوية لجهاز اللوحة العلوية الشاشة .تعرض حالة المنتج والوضع الحالي )(الطاقة زر .التشغيل/إيقاف التشغيل Auto Power Down وظيفة • .يتم إيقاف تشغيل الوحدة تلقائي ً ا في الحاالت التالية .: في حال عدم وجود إشارة صوت لمدة 81 دقائقUSB / BT / HDMI / D.IN وضع –...
- Page 137 .عندما تقوم بتشغيل هذه الوحدة، سيكون هناك فترة تأخير لمدة 4 إىل 5 ثوان قبل صدور الصوت • ، انتقل إىل قائمة اإلعدادات لصوت التلفزيون ولتغيير سماعاتSoundbarإذا سمعت أصوات من التلفزيون و • .التلفزيون إىل سماعات خارجية Soundbar اللوح السفلي من HDMI USB (5V 0.5A) HDMI...
- Page 138 استخدام التحكم في ب ُ عد )AAA إدخال البطاريات قبل استخدام وحدة التحكم عن ب ُ عد (بطاريتان بحجم .اسحب الغالف الخلفي باتجاه السهم حتى يتم إزالته تمام ً ا (5.1 فولت) وتأكد من وضعAAA أدخل البطاريتين بحجم القطبين في االتجاه الصحيح. اسحب الغالف الخلفي للوراء .حتى...
- Page 139 WOOFER .بالضغط عىل الزر، يمكنك ضبط مستوى صوت كل سماعة SOUND TONE MODE CH LEVEL +6 ثم اضبط مستوى الصوت بين 6- إىلTOP LEVEL أوCENTER LEVEL اضغط عىل الزر • CONTROL .باستخدام األزرار أعىل/أسفل CH LEVEL . لضبطREAR LEVEL عند توصيل السماعات الخلفية ( ت ُ باع بشكل منفصل) يتم دعم اإلعداد •...
- Page 140 .اضغط عىل المناطق الم ُ شار إليها لتحديد االتجاه أعىل/أسفل/يسار/يمين /أعىل/أسفل PAIR يسار/يمين .اضغط باتجاه أعىل/أسفل/يسار/يمين في الزر لتحديد الوظائف أو ضبطها SOUND MODE تكرار • ." اضغط أعىلUSB" الستخدام زر التكرار في وضع تخطي الموسيقى • BASS اضغط عىل زر يمين لتحديد ملف الموسيقى التالي. اضغط عىل زر يسار لتحديد ملف الموسيقى .السابق...
- Page 141 SOUND MODE WOOFER SOUND مستوى TONE MODE CH LEVEL WOOFER CONTROL )(الجهير .+6 ادفع الزر لألعىل أو لألسفل لضبط مستوى صوت مضخم الصوت (الجهير) عىل 21- أو بين 6- إىل .لضبط مستوى صوت مضخم الصوت (الجهير) إىل 0 (اإلعداد االفتراضي)، اضغط عىل الزر WOOFER .بالضغط...
- Page 142 WOOFER 2.1.5 قناة 2.1.3 قناة DTS:X ,Dolby Atmos® بشكل منفصل. لشراء طقم، اتصل بالبائعSamsung يمكن شراء طقم مكبرات الصوت الخلفية الالسلكية من • .Soundbar الذي اشتريت منه سماعة ، يوفر إعداد مضخم الصوت فقط 2.1.3 صوت قناة، بينما يوفر...
- Page 143 • :الشركات المص ن ّ عة التي تدعم هذه الوظيفة هي • RCA وHisense وTOSHIBA وPANASONIC وPHILIPS وSharp وSony وLG وVIZIO وSamsung .Soundbar قم بإيقاف تشغيل . لمدة 5 ثوانWOOFER اضغط مع االستمرار عىل الزر : ألعىل مع االستمرار لمدة 5 ثوان، يتبدل الوضع بالترتيب التاليWOOFER في كل مرة تدفع الزر...
- Page 144 SOUNDBAR توصيل توصيل الطاقة الكهربائية : بمآخذ تيار كهربائي حسب الترتيب التاليSoundbar استخدم مكونات الطاقة لتوصيل مضخم الصوت وجهاز .لالطالع عىل مصدر الطاقة واستهالك الطاقة، راجع الملصق المرفق مع المنتج • ) األساسيةSoundbar (الملصق: الجزء السفلي من وحدة .قم بتوصيل سلك الكهرباء بمضخم الصوت ...
- Page 145 .ID SET تلقائي ً ا عند االنتهاء منSoundbar سيعمل جهاز • ID SET موجود باألعىلSAMSUNG شعار 5 Sec .) باللون األزرق (اكتمال االتصالLINK الخاص بـLED تحقق من استمرار إضاءة مؤشر ، عن الوميضLINK الخاص بـLED يتوقف مؤشر...
- Page 146 .16 انظر صفحة األحمر واألزرق انظر معلومات جهة االتصال لمركز األعطال الوميض . في الدليلSamsung خدمة عمالء مالحظات ال تقم بتوصيل سلك طاقة هذا المنتج أو التلفزيون الخاص بك بمقبس الحائط حتى االنتهاء من كل التوصيالت • .بين المكونات .قبل نقل أو تركيب المنتج، تأكد من إيقاف تشغيل الطاقة وفصل سلك الطاقة...
- Page 147 تنبيه .هوائيات االستقبال الالسلكية مدمجة في مضخم الصوت الالسلكي. أبعد الوحدات عن الماء والرطوبة • للحصول عىل أفضل أداء أثناء االستماع، تأكد من أن المنطقة المحيطة بموقع مضخ ِّ م الصوت الالسلكي ووحدة • .االستقبال الالسلكية ( ت ُ باع منفصلة) خالية من العوائق 18 - ARA...
- Page 148 Soundbar ( ت ُ باع بشكل منفصل) بجهازSWA-9100S توصيل جهاز الخلفيةSamsung يمكنك تعزيز الصوت المحيطي الالسلكي ليصبح حقيقي ً ا عن طريق توصيل طقم سماعات . الخاص بكSoundbar - ت ُ باع بشكل منفصل) بجهازSWA-9100S( الالسلكية .قم بتوصيل وحدة االستقبال الالسلكية بوحدتي مكبر الصوت المجسم...
- Page 149 .ID SET تلقائي ً ا عند االنتهاء منSoundbar سيعمل جهاز • ID SET 5 Sec موجود باألعىلSAMSUNG شعار تنبيه ، قد تسمع تشوش ً اSWA-9100S عند توصيله بجهازSoundbar في حالة تشغيل موسيقى بجهاز • .من مضخم الصوت أثناء إنهاء االتصال...
- Page 150 استخدام التوصيل السلكي بالتلفزيون HDMI الطريقة 1. التوصيل باستخدام (قناة إرجاع الصوت/قناة إرجاع الصوتHDMI ARC/eARC توصيل التلفزيون الذي يدعم )الم ُ حس َّ ن تنبيه . ً أوالHDMI والكبل البصري، يتم استالم إشارة كبلHDMI عند توصيل كل من كبل •...
- Page 151 في قائمة التلفزيون عىل وضع التشغيل. راجع دليل مستخدمeARC ، يجب ضبط وظيفةeARC لالتصال بـ • ← ) ( : رئيسيةSamsung التلفزيون للحصول عىل تفاصيل حول الضبط. (عىل سبيل المثال، تلفزيون )) (تلقائيHDMI-eARC ) ← الصوت ← إعدادات الخبير ← وضع ( ) ← كل اإلعدادات...
- Page 152 الطريقة 2.التوصيل باستخدام كبل بصري قائمة الفحص قبل التوصيل . ً أوالHDMI والكبل البصري، يتم استالم إشارة كبلHDMI عند توصيل كل من كبل • .عندما تستخدم كبال ً بصري ً ا وتوجد أغطية عىل األطراف، تأكد من إزالة األغطية •...
- Page 153 Q-Symphony استخدام وظيفة إلخراج الصوت من خالل جهازين للحصول عىلSamsung مع تلفزيونSoundbar ، يتزامنQ-Symphony بالنسبة إىل ." ضمن قائمة مخرج الصوت في التليفزيون. حدد القائمة المقابلةTV+Soundbar" أفضل تأثير محيطي. عند توصيل HDMI كبل قائمة التلفزيون D.IN أو )كبل بصري (غير مز و َّ د...
- Page 154 ."BT PAIRING" ألكثر من 5 ثوان لعرضSoundbar جهاز ). بالتلفزيون. (لمزيد من المعلومات، راجع دليل التلفزيونBluetooth حدد وضع [" من القائمة المعروضة عىل شاشة التلفزيون. ي ُ شار إىلAV[ Samsung Soundbar Q6B-Series" حدد " عىل قائمة أجهزة التلفزيون التي تدعم تقنيةPaired" " أوNeed Pairing" المتاح بالجهازSoundbar .،...
- Page 155 من التلفزيونSoundbar فصل ."BT" (المصدر) في اللوحة العلوية أو في جهاز التحكم عن ب ُ عد وقم بالتبديل إىل أي وضع بخالف اضغط عىل الزر . (قد يختلف الوقت المطلوب حسبSoundbar يستغرق الفصل وق ت ً ا ألن التلفزيون يجب أن يستقبل استجابة من •...
- Page 156 التوصيل بجهاز خارجي HDMI الطريقة 1.التوصيل باستخدام كبل ) وتشغيلهDolby Atmos® (قادر عىل فك تشفير قائمة الفحص قبل التوصيل ."إذا كانت خيارات إخراج الصوت تتضمن صو ت ً ا ثانوي ً ا، فتأكد من ضبط الصوت الثانوي عىل وضع "إيقاف التشغيل •...
- Page 157 " خاصتك أو أي جهاز آخر وتأكد من تحديد "دون ترميزBD افتح خيارات إخراج الصوت من قائمة االعدادات لم ُ شغ ّ ل ، انتقل إىل القائمة الرئيسية ← الصوت ← مخرجات رقمية ثم حددSamsung منBD لدفق البت. مثل، في م ُ شغ ّ ل...
- Page 158 USB توصيل محرك أقراص .Soundbar من خاللUSB يمكنك تشغيل ملفات الموسيقي الموجودة عىل محرك أقراص USB منفذ HDMI USB (5V 0.5A) HDMI TO TV (eARC/ARC) DC 24V DIGITAL AUDIO IN (OPTICAL) USB (5V 0.5A) . الموجود في أسفل المنتجUSB بمنفذUSB قم بتوصيل محرك أقراص ."USB"...
- Page 159 " اضغط مع االستمرار عىل زرBT READY“ ب. عندما يظهر ."BT PAIRING" ألكثر من 5 ثوان لعرضSoundbar جهاز .[" من القائمةAV[ Samsung Soundbar Q6B-Series" حدد " في الشاشةBT" ← ] متصال ً بالجهاز المحمول، يظهر [اسم الجهاز المحمولSoundbar عندما يكون جهاز...
- Page 160 إذا فشل الجهاز في االتصال [") في قائمةAV[ Samsung Soundbar Q6B-Series"( ، (عىل سبيل المثالSoundbar إذا كان لديك جهاز • .السماعات عىل الجهاز المحمول، احذفه . 2ثم كرر الخطوتين 1 و • ؟BT PAIRING وBT READY ما الفرق بين...
-
Page 161: Sound Mode
: ضوضاء أو يحدث به عطل في الحاالت التاليةBluetooth قد ي ُ صدر جهاز • .Soundbar أوBluetooth عندما يكون الجسم متصل بجهاز إرسال واستقبال اإلشارة الموجود عىل جهاز – .في الزوايا أو عندما يكون هناك عائق قريب، مثل حائط أو جدار، حيث قد تحدث تغييرات كهربائية –... - Page 162 • ).(سيتم فصل الجهاز الذي ال يعمل حالي ً ا . فقط في نفس الوقتBluetooth واحد وجهازيSamsung يمكن توصيل تلفزيون • .Samsung عندما يتلقى طلب اتصال من تلفزيونBluetooth من أجهزةSoundbar سيتم فصل جهاز • 33 - ARA...
- Page 163 .Soundbar باستخدام جهازك المحمول لتشغيل الصوت من عىل الجهاز المحمول من خاللSoundbar اضغط عىل .ربما ال يتم دعم هذه الوظيفة بناء ً عىل الجهاز المحمول • . إصدار 1.8 أو أحدثAndroid التي تعمل بنظامSamsung هذه الوظيفة متوافقة فقط مع أجهزة محمول • Soundbar الجزء العلوي من جهاز...
- Page 164 تركيب حامل التثبيت مكونات التعليق عىل جدار بالحائط دعامة التثبيت بالحائط احتياطات التركيب 2 × )L10 × M4( .التركيب عىل في وضع عمودي فقط • ال تقم بتركيب الجهاز في األماكن ذات درجات الحرارة • براغي حامل البراغي .العالية أو الرطوبة التحقق...
- Page 165 ضع البراغي (غير المز و َّ دة) في كل حامل البراغي ثم قم بمحاذاة خط المنتصف لدعامة التثبيت عىل .قم بربط البراغي بإحكام في فتحة البراغي الحائط مع منتصف جهاز التلفزيون (في حالة تثبيت أسفل التلفزيون)، ثم قم بتركيب دعامةSoundbar .التثبيت...
- Page 166 تركيب جهاز بـ دعامة التثبيت عىلSoundbar قم بتركيب الحائط المرفقة عن طريق تعليق دعامة التثبيت أمامSOUNDBAR .عىل الحائط عىل براغي الحاملعىل الحائط التلفزيون الجدار . عىل حامل تلفزيونsound bar ضع ينزلق لألسفل حتى توضع حواملSoundbar اجعل .التركيب عىل الحائط بإحكام عىل براغي الحامل )أدخل...
- Page 167 ووص ِّ ل محركSoundbar قم بإيقاف تشغيل جهاز المحتوية عىل تحديث البرنامج الثابتUSB أقراص .Soundbar عىل جهازUSB بمنفذ تحديثات البرامج الثابتة لنظامSamsung قد تقدم شركة واضغط عىل الزرSoundbar 5. قم بتشغيل جهاز . في المستقبلSoundbar .USB (المصدر) لتحديد...
- Page 168 إعادة الضبط Soundbar الجزء العلوي من جهاز INIT OK قيد التشغيل، اضغط عىلSoundbar عندما يكون جهاز (مستوى الصوت) عىل هيكل الجهاز في آن زري ” عىل الشاشة ثمINIT OK“ واحد لمدة 5 ثوان ٍ . ستظهر .Soundbar ستبدأ إعادة ضبط جهاز تنبيه...
- Page 169 . مباشرةSoundbar )Soundbar عىل التلفزيون. شغ ِّ لHDMI-CEC قد ال يتم تنشيط قد ال تكون وصلة الكبل المتصلة بجهاز :Samsung في قائمة التلفزيون. (تلفزيونCEC غير محكمة. افصل الكبل وقمSoundbar ) ← كل ( ) ← قائمة ← اإلعدادات...
-
Page 170: Bluetooth
جهازك غير قادر عىل تشغيل إشارة اإلدخال. قم عىل سبيل المثال أجهزةSoundbar Dolby أوPCM بتغيير خرج صوت التلفزيون إىل المايكرويف والموجهات الالسلكية وغير :Samsung . (بالنسبة لتلفزيونDigital .ذلك ← ) ( ) ← قائمة ← اإلعدادات ( رئيسية... - Page 171 DTS, Inc. in the United States )Applicable to Thin Client models only( and other countries. © 2021 DTS, Inc. ALL As an ENERGY STAR® Partner, SAMSUNG has RIGHTS RESERVED. determined that this product meets the ENERGY STAR® guidelines for energy efficiency.
- Page 172 إشعار ترخيص المصدر المفتوح إلرسال استفسارات وطلبات األسئلة المتعلقة بالمصادر Samsung Open Source المفتوحة، اتصل بـ )http://opensource.samsung.com( مالحظة هامة عن الخدمة تم توفير األشكال والرسومات التوضيحية في دليل المستخدم هذا كمرجع فقط وقد تختلف هذه الرسومات .عن مظهر المنتج الفعلي...
- Page 173 المواصفات والدليل المواصفات HW-Q600B اسم الطراز 5V/0.5A 8.3 كجم الوزن 0.501 ملمx 57.0 x 1030.0 )األبعاد (العرض × االرتفاع × العمق من 5+ درجات مئوية إىل 53+ درجة مئوية درجة الحرارة المناسبة للتشغيل 75 % % 01 إىل درجة الرطوبة المناسبة للتشغيل...
- Page 174 © 2022 Samsung Electronics Co., Ltd. All rights reserved. Contact SAMSUNG WORLD WIDE If you have any questions or comments relating to Samsung products, please contact the SAMSUNG customer care Centre. Country Samsung Service Centre Web Site Country Samsung Service Centre ...