Table des Matières
Publicité
Les langues disponibles
Les langues disponibles
Liens rapides
TABLE OF CONTENTS
IMPORTANT SAFEGUARDS........................................................
SAFETY INSTRUCTIONS.............................................................
DESCRIPTION OF PARTS............................................................
BEFORE FIRST USE.....................................................................
USE YOUR ICE MAKER................................................................
CARE AND CLEANING.................................................................
TROUBLESHOOTING GUIDE.......................................................
Ice Maker
Instruction Manual
MODEL:
043-0295-6
1
2
3
4
4
6
6
Publicité
Table des Matières

Manuels Connexes pour Master Chef 043-0295-6

Sommaire des Matières pour Master Chef 043-0295-6
-
Page 1: Table Des Matières
Ice Maker Instruction Manual MODEL: 043-0295-6 TABLE OF CONTENTS IMPORTANT SAFEGUARDS............SAFETY INSTRUCTIONS............. DESCRIPTION OF PARTS............BEFORE FIRST USE..............USE YOUR ICE MAKER..............CARE AND CLEANING..............TROUBLESHOOTING GUIDE............ -
Page 2: Important Safeguards
IMPORTANT SAFEGUARDS When using electrical appliances, basic safety precautions should always be followed: Read all instructions. Do not touch hot surfaces. Use handles or knobs. To protect against electrical hazards, do not immerse cord, plugs, or the appliance in water or other liquid. This appliance is not intended for use by persons (including children) with reduced physical, sensory or mental capabilities, or lack of experience and knowledge, unless they have been given supervision or instruction concerning... -
Page 3: Safety Instructions
SAFETY INSTRUCTIONS This appliance must be plugged into at least a 15 A, 110 - 115 V, 60 Hz GROUNDED OUTLET. This appliance must be grounded. It is equipped with a 3-wire cord grounding plug. The plug must be plugged into an outlet that is properly installed and grounded. -
Page 4: Description Of Parts
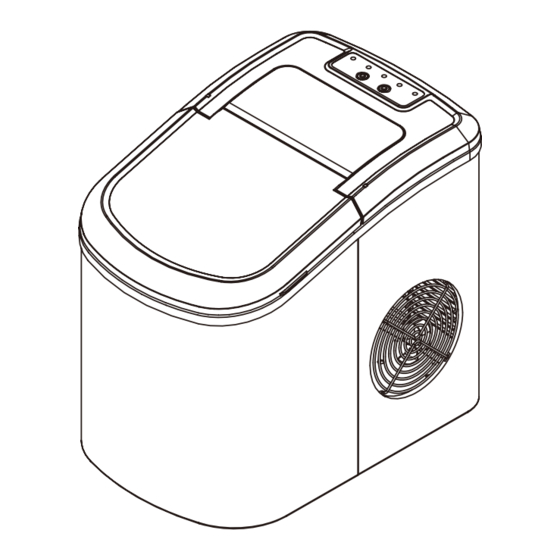
DESCRIPTION OF PARTS 1. Cover 2. Control panel a. ADD WATER indicator Light b. ICE FULL indicator Light c. POWER indicator Light d. ON/OFF button e. ‘S’ small ice size indicator light f. ‘L’ large ice size indicator light g. SELECT button-to choose ice size 3. -
Page 5: Before First Use
BEFORE FIRST USE This portable ice maker uses a fully-automatic control system, with an advanced microcomputer for easy and convenient ice making. Making ice is simple and fast. Just add water, plug into an outlet, and press the ON/OFF button. You can select one of the two ice cube sizes with the touch of a button. When first turning on the unit or during ice-making cycles, the compressor will stay idle for 3 minutes, while energizing. - Page 6 Press the ON/OFF button and the green POWER LED will light signifying that the unit is on.To change between either the small or large ice size, press the SELECT button until the desired ice size is indicated. The ice making cycle will last approximately 8-13 minutes depending on the ice size that is selected.
-
Page 7: Care And Cleaning
CARE AND CLEANING Stop the ice-making cycle by pressing the POWER button. the green LED light will go out, indicating the ice maker is off. Unplug the Ice Maker from the wall outlet and allow the unit to warm up to room temperature. If the Water Tray is not in the vertical position behind the Evaporator Fingers, gently push the Water Tray back so that all water drains into the Water Reservoir. - Page 8 Turn off ice maker, unplug from electrical outlet, refill water if required, replace the plug, then restart the unit. Inspect relative parts. Remove the drain cap on Electrical power surge. the back of the unit and ICE FULL and drain out a small amount ADD WATER Air in the lines or the of water.
-
Page 9: Machine À Glaçons
Machine à glaçons Guide d'utilisation Nº de modèle: 043-0295-6 TABLE DES MATIERES CONSIGNES DE SÉCURITÉ IMPORTANTES......INSTRUCTIONS EN MATIÈRE DE SÉCURITÉ......DESCRIPTION DES PIÈCES............AVANT LE PREMIER USAGE............MODE D’EMPLOI................NETTOYAGE ET ENTRETIEN............PROBLÈMES ET SOLUTIONS............. -
Page 10: Consignes De Sécurité Importantes
CONSIGNES DE SÉCURITÉ IMPORTANTES Lorsqu’on utilise un appareil électrique, il faut toujours respecter certaines règles de sécurité fondamentales, notamment les suivantes Lisez toutes les instructions. Ne touchez pas aux surfaces chaudes. Utilisez les poignées ou les boutons. Pour éviter les risques électriques, n'immergez pas le cordon, la fiche ou l’appareil dans l’eau ou tout autre liquide. -
Page 11: Instructions En Matière De Sécurité
INSTRUCTIONS EN MATIÈRE DE SÉCURITÉ Cet appareil doit être branché à une PRISE DE MISE À LA TERRE d’au moins 15 A, 110 - 115 V, 60 Hz. Cet appareil doit être mis à la terre. Il est muni d’un câble d’alimentation à... -
Page 12: Description Des Pièces
DESCRIPTION DES PIÈCES 1. Couvercle 2. Tableau des commandes a. Voyant « EAU» b. Voyant « BAC » c. Voyant lumineux « MARCHE» d. Bouton marche/arrêt « M/A » e. Voyant « P » pour le petit format f. Voyant « G » pour le grand format g. -
Page 13: Avant Le Premier Usage
AVANT LE PREMIER USAGE Cette machine à glaçons portable utilise un système de contrôle entièrement automatique avec une technologie de pointe pour une fabrication de glaçons facile et pratique. Faire des glaçons est simple et rapide. Ajoutez de l’eau, branchez l'appareil dans une prise et appuyez sur le bouton « M/A ». - Page 14 Appuyez sur le bouton de mise en marche et le voyant vert restera allumé. Pour changer la grosseur des glaçons, appuyez sur le bouton « SELECTION », Le cycle de fabrication des glaçons dure environ de 8 à 13 minutes, dépendant de la grosseur choisie.
-
Page 15: Nettoyage Et Entretien
NETTOYAGE ET ENTRETIEN Arrêtez le cycle de fabrication en appuyant sur le bouton de mise en marche et le voyant vert DEL s'éteindra. Débranchez l’appareil de la prise murale. Laissez l’appareil revenir à la température ambiante. Si le plateau ne se trouve pas en position verticale derrière les bandes de l’évaporateur, replacez-le doucement pour que l’eau se déverse dans le réservoir. - Page 16 Éteignez la machine à glaçons, débranchez-la de la prise électrique, remplissez le réservoir d'eau si nécessaire, replacez le bouchon, puis Une panne de courant redémarrez la machine à s'est produite. glaçons. Inspectez les Il y a de l'air dans les pièces relatives.