Publicité
Les langues disponibles
Les langues disponibles
Liens rapides
OPERATOR'S MANUAL
A Division of Snow Joe
, LLC
®
IMPORTANT!
Safety Instructions
All Operators Must Read These
Instructions Before Use
Any electrical appliance can be dangerous if used
incorrectly. Some of the safety precautions given in this
manual apply generally to many appliances. Other warnings
are specific to the use of this snow thrower. Keep this manual
for future reference.
General Safety WARNINGS!
You and any other operator of this snow thrower must read,
understand, and follow these instructions in their entirety, and
should reread them at the start of each snow season. Failure
to follow these instructions may result in ELECTRIC SHOCK,
FIRE, and/or serious PERSONAL INJURY.
Notice the personal safety alert symbol
manual to draw your attention to a WARNING given along
with the particular operating instruction. This means that
the operation requires special ATTENTION, CAUTION,
and AWARENESS.
1. Keep work area clean and well lit. Cluttered, dark areas
invite accidents.
2. Do not operate the snow thrower in an explosive
atmosphere, such as in the presence of flammable
liquids, gases, or dust. Electrical appliances create sparks
that may ignite the dust or fumes.
3. Keep children, pets, and bystanders away from the
work area. Be aware that the normal noise of the
machine when turned on may make it difficult for you to
hear approaching people. Spectators should wear safety
glasses and be kept a safe distance away from the work
area. Do not let spectators touch the snow thrower or the
extension cord.
4. Electrical plugs must match the outlet. Never modify
the plug in any way. Do not use any adapter plugs with
grounded appliances. Unmodified plugs and matching
outlets will reduce the risk of electric shock.
© 2021 by Snow Joe
, LLC
®
All rights reserved. Original instructions.
ELECTRIC SNOW THROWER
R
22-INCH | 15-AMP | LED LIGHTS
Model SJ627E
m
used in this
5. Avoid body contact with earthed or grounded surfaces
(i.e. upper and lower water pipes, radiators, ranges,
refrigerators, microwave ovens, and outer frames of
heating equipment). Take necessary precautions to avoid
electric shock. There is an increased risk of electric shock
if your body is earthed or grounded.
6. Do not abuse the cord. Keep the cord away from heat,
oil, sharp edges, or moving parts. Never carry the snow
thrower by its cord or yank the cord to disconnect it from
the electrical outlet. Damaged or entangled cords increase
the risk of electric shock.
7. Replace or properly repair damaged cords. If the cord
becomes damaged in any manner while plugged into the
wall receptacle, immediately pull the extension cord plug
from the receptacle.
8. Contact with water while operating the snow thrower
can result in electric shock and serious bodily injury.
Do not use the snow thrower in damp or wet locations or
expose to rain. Do not handle the plug or the appliance
with wet hands or while standing in water.
m
9.
WARNING – Use outdoor extension cords marked
SW-A, SOW-A, STW-A, STOW-A, SJW-A, SJOW-A,
SJTW-A, or SJTOW-A. These cords are rated for outdoor
use and reduce the risk of electric shock.
10. Turn off the power switch and disconnect the power
cable before making any adjustments to the unit and
before inspecting, servicing, changing accessories, or
cleaning the snow thrower. Follow the same procedure
if any other dangerous conditions are present during
operation. Any adjustments to the unit should be
performed after revolving parts inside the snow thrower
stop completely. Such preventative safety measures
reduce the risk of starting the power tool accidentally.
11. If you find the main power cable or the extension cable
damaged, please pull out the plug from the socket and
disconnect the power immediately. Repair the cable or
replace it if necessary.
12. When replacing any parts, you must strictly observe
the instructions and procedures described in this
operator's manual. Special care should be paid to any
rubber parts, since these parts may increase the engine
load and decrease its mechanical power if damaged.
13. Do not move or transport the snow thrower when the
plug is connected to the power socket and the switch
is turned on.
1
Form No. SJ-SJ627E-880E-MR5
SAVE THESE INSTRUCTIONS
EN
Publicité

Manuels Connexes pour SNOWJOE SJ627E


Sommaire des Matières pour SNOWJOE SJ627E
- Page 1 OPERATOR’S MANUAL Model SJ627E A Division of Snow Joe , LLC ® Form No. SJ-SJ627E-880E-MR5 IMPORTANT! 5. Avoid body contact with earthed or grounded surfaces (i.e. upper and lower water pipes, radiators, ranges, Safety Instructions refrigerators, microwave ovens, and outer frames of heating equipment).
- Page 2 SW-A, SOW-A, STW-A, with lighted end (Model PJEXT50-B). Visit STOW-A, SJW-A, SJOW-A, SJTW-A, or SJTOW-A. snowjoe.com to purchase this extension cord online Before use, check that the extension cord is in good or, to order by phone, call 1-866-SNOWJOE condition.
- Page 3 ® ® not overreach. In case you fall or collide with the snow center at 1-866-SNOWJOE (1-866-766-9563). thrower, inspect the unit for any damage or cracks. • Noise control – When using the snow thrower, you must When stepping backwards, be careful to avoid obstacles respect local laws and regulations regarding noise control beneath your feet or behind you to avoid falling.
- Page 4 Safety Symbols The following table describes safety symbols that may appear on this product. Read, understand, and follow all instructions on the machine before attempting to assemble and operate. Symbols Descriptions Symbols Descriptions READ THE OPERATOR'S Disconnect the plug before MANUAL(S) –...
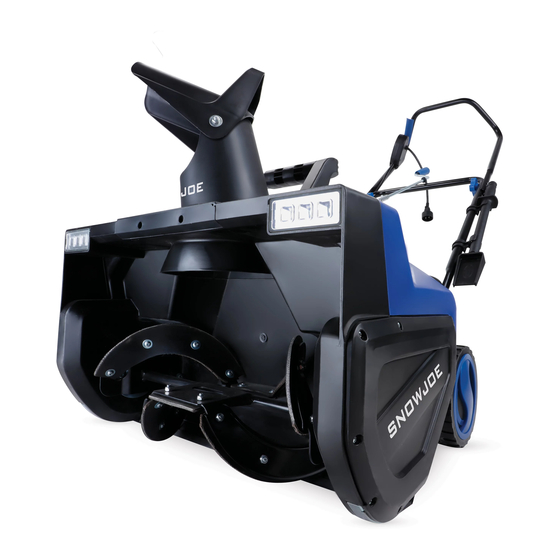
- Page 5 Know Your Electric Snow Thrower Read the owner’s manual and safety rules carefully before operating your electric snow thrower. Compare the illustration below to the actual unit in order to familiarize yourself with the location of the various controls and adjustments. Save this manual for future reference.
- Page 6 + Sun Joe customer service ® ® center at 1-866-SNOWJOE (1-866-766-9563) for assistance. Handle with care during assembly so that electrical wiring does not become damaged. 3. Before securing the upper frame, slide the extension cord restraint hook up the upper frame (Fig. 3).
- Page 7 Fig. 3 Fig. 6 Extension cord restraint hook Chute clean-out Upper frame tool 4. Secure the connection of the upper frame to the middle 6. Clip on the 2 cable clips on the frame, and insert the cable frame by fastening the second set knobs and bolts on inside of the cable clips (Fig.
- Page 8 3. Secure the lower chute crank in place with the hitch pin Fig. 9 (Fig. 12). Fig. 12 Hitch pin NOTE: Do not overtighten the knob. Chute Crank Assembly 4. Remove the other hitch pin from the lower chute crank 1.
- Page 9 ® ® ® NOTE: Before using this machine, make sure that the power service center at 1-866-SNOWJOE (1-866-766-9563). source you will use complies with the specifications detailed in this manual. Before inserting the plug into the socket, verify Powering On + Off that the snow thrower’s auger and rubber plates are firmly...
- Page 10 6. While moving the snow thrower, do not drag the power Fig. 19 cable violently or roughly. The snow thrower should move within the range that the cable can reach. On/Off switch 7. Do not push the snow thrower with excessive force. You should push the machine gently and evenly in Safety lock accordance with the unit’s throw rate.
- Page 11 Changing Throw Direction + Fig. 22 Throw Height WARNING! Never direct the discharge chute at the operator, at bystanders, at vehicles, or at nearby windows. The discharged snow and foreign objects accidentally picked up by the snow thrower can cause serious damage and personal injury.
- Page 12 Maintenance Fig. 24 Nuts + Bolts WARNING! Make sure to turn off the switch and disconnect the extension cord before performing any maintenance task on your snow thrower. Lifetime Lubrication (Motor + Auger) Lubrication is not necessary and may damage the unit. The snow thrower is lubricated for lifetime use at the factory before shipment.
- Page 13 Replacing the Scraper Bar 2. Lift the belt tension pulley and roll the worn belt up and off the big pulley from the top of the big pulley (Fig. 30). 1. The scraper bar is located at the base of the snow thrower beneath the rotor housing (Fig.
- Page 14 24-inch electric snow ® thrower cover (Model SJCVR-24) for added protection. Big pulley Visit snowjoe.com to purchase the cover online. Small pulley Service + Support 5. Replace the left panel of the snow blower with all screws (Fig. 29).
- Page 15 NOTE: Accessories are subject to change without any obligation on the part of Snow Joe + Sun Joe to provide notice of such ® ® changes. Accessories can be ordered online at snowjoe.com or via phone by contacting the Snow Joe + Sun Joe customer ® ®...
- Page 16 This Warranty gives you specific legal rights, and you may also have other rights which vary from State to State. PRODUCT REGISTRATION: Snow Joe strongly encourages you to register your Product. You can register online at snowjoe.com/register, or by printing and mailing in a registration card available online from our website, or calling our Customer Service Department at 1-866-SNOWJOE (1-866-766-9563), or by e-mailing us at help@snowjoe.com.
- Page 19 55.9 CM | 15 A | LUCES LED MANUAL DEL OPERADOR Modelo SJ627E Una división de Snow Joe , LLC ® Forma Nº SJ-SJ627E-880S-MR5 ¡IMPORTANTE! 5. Evite el contacto del cuerpo con superficies conectadas a tierra (es decir, tuberías de agua en cielo Instrucciones de seguridad raso o subterráneas, radiadores, cocinas, refrigeradores, hornos microondas y estructuras externas de equipos calefactores).
- Page 20 ® servicio Snow Joe + Sun Joe ® ® PJEXT50-B). Visite snowjoe.com para comprar Seguridad eléctrica este cable de extensión, o pídalo llamando al 1-866-SNOWJOE (1-866-766-9563). 1. Un interruptor de circuito de falla de conexión a • No use un cable de extensión de más de 100 pies tierra (GFCI) deberá...
- Page 21 Seguridad personal Instrucciones de seguridad para quitanieves de rodadura 1. Manténgase alerta: vea lo que está haciendo y utilice su sentido común al operar este quitanieve. No use el • Lea cuidadosamente el manual del operador: entérese quitanieve cuando se encuentre cansado, enfermo, o de las aplicaciones y limitaciones de su quitanieve; así bajo la influencia de drogas, alcohol o medicamentos.
- Page 22 Snow Joe + Sun Joe ® ® 1-866-SNOWJOE (1-866-766-9563). • Control de ruido: al usar el quitanieve, usted debe respetar las leyes y normas locales con respecto al control de ruido y la protección del medio ambiente. Para evitar perturbaciones de ruido, usted debe elegir a conciencia una hora de operación apropiada y tomar en cuenta las...
- Page 23 Símbolos de seguridad La siguiente tabla describe los símbolos de seguridad que pueden aparecer en este producto. Lea, comprenda y siga todas las instrucciones relacionadas a esta máquina antes de intentar ensamblarla y operarla. Símbolo Descripción Símbolo Descripción LEA EL(LOS) MANUAL(ES) DEL Desconecte el enchufe antes de OPERADOR: lea, comprenda y llevar a cabo cualquier reparación...
- Page 24 Conozca su quitanieve Lea cuidadosamente el manual del operador y las reglas de seguridad antes de operar su quitanieve eléctrico. Compare la ilustración debajo con la unidad real para familiarizarse con las ubicaciones de los diversos controles y ajustes. Guarde este manual para referencias futuras.
- Page 25 + Sun Joe ® ® llamando al 1-866-SNOWJOE (1-866-766-9563). NOTA: no se deshaga de la caja de transporte ni del material de embalaje hasta que usted esté listo para usar 2. Asegure la conexión del marco intermedio con el marco su quitanieve eléctrico.
- Page 26 Fig. 3 Fig. 6 Gancho de sujeción para cable de Marco extensión Herramienta superior de limpieza de conducto 4. Asegure la conexión del marco superior con el marco 6. Conecte los dos ganchos para cable en el marco e inserte intermedio ajustando el segundo juego de tuercas de el cable dentro de los ganchos (Fig.
- Page 27 Fig. 9 Fig. 12 Pasador NOTA: no sobreajuste la perilla. 4. Retire el otro pasador de la manivela inferior de conducto (Fig. 13). Ensamblado de la manivela de conducto 1. Retire el pasador del extremo hembra de la manivela Fig. 13 inferior del conducto (Fig.
- Page 28 + Sun Joe ® ® especificaciones detalladas en este manual. Antes de insertar 1-866-SNOWJOE (1-866-766-9563). el enchufe en el receptáculo, verifique que la barrena y las placas de goma del quitanieve estén firmemente aseguradas Encendido y apagado con los tornillos, y que las placas de goma estén de cara a la dirección correcta.
- Page 29 dicho punto de pivote para moverlo hacia adelante o hacia Fig. 19 atrás. 4. Empiece su ruta de limpieza cerca al tomacorriente y Interruptor de trabaje hacia afuera, lanzando la nieve en un movimiento encendido/ hacia adelante y hacia atrás. Para limpiar en la dirección Botón de apagado opuesta, mueva su cuerpo por sobre el cable y gire el...
- Page 30 11. Para áreas más grandes, se requiere un patrón definido de operación para despejar bien un área con nieve. Fig. 21 Estos patrones evitarán el lanzamiento de nieve en lugares Manivela de no deseados, eliminando la necesidad de una segunda conducto pasada para quitar nieve (Fig.
- Page 31 4. Use un paño empapado con agua caliente y un cepillo suave para limpiar el quitanieve. ¡Nunca moje la máquina Fig. 23 ni la rocíe con agua! 5. No use detergentes o solventes ya que pueden causar daños irreparables al quitanieve. Los agentes químicos Perilla de pueden dañar las partes de plástico.
- Page 32 2. Afloje los dos conjuntos intermedios de tuercas y pernos 3. Instale la nueva barra raspadora y ajústela de forma para desmontar la placa de goma gastada del marco de segura al quitanieve con los tres tornillos (Fig. 28). Reemplazo de correa y polea metal (Fig.
- Page 33 Polea pequeña Servicio y soporte Polea grande Si su quitanieve SJ627E de Snow Joe requiere reparaciones ® o mantenimiento, llame al 1-866-SNOWJOE (1-866-766-9563) 5. Vuelva a colocar el panel izquierdo del quitanieve, usando todos los tornillos (Fig. 29).
- Page 34 NOTA: los accesorios están sujetos a cambios sin obligación alguna por parte de Snow Joe + Sun Joe de notificar sobre ® ® dichos cambios. Los accesorios pueden ser pedidos en línea en snowjoe.com o vía telefónica llamando a la central de servicio al cliente Snow Joe + Sun Joe al 1-866-SNOWJOE (1-866-766-9563). ®...
- Page 35 Web, llamando a nuestra central de servicio al cliente al 1-866-SNOWJOE (1-866-766-9563), o enviándonos un e-mail a help@snowjoe.com. Si usted no registra su Producto sus derechos de garantía no disminuirán; sin embargo, registrar su Producto permitirá que Snow Joe le pueda atender mejor si usted tiene alguna necesidad como cliente.
- Page 37 MANUEL D’UTILISATION Modèle SJ627E Une division de Snow Joe , LLC ® Formulaire n° SJ-SJ627E-880F-MR5 IMPORTANT! 3. Maintenez les enfants, les animaux familiers et les spectateurs éloignés de la zone de travail. Souvenez- Consignes de sécurité vous que le volume sonore normal de la machine en marche peut vous empêcher d'entendre facilement des...
- Page 38 (modèle équiper le(s) circuit(s) ou la(les) prise(s) utilisés pour PJEXT50-B). Se rendre sur le site snowjoe.com la souffleuse à neige. Des prises intégrant un DDFT sont pour acheter en ligne cette rallonge électrique, ou offertes et peuvent être utilisées pour répondre à...
- Page 39 Tableau 1. Méthode d'attache de rallonge électrique 6. Position du corps – Restez en permanence sur les deux pieds pour ne pas perdre l'équilibre. Les talons bien Rallonge Cordon posés sur le sol, saisissez fermement le guidon. Ne vous électrique d’alimentation laissez pas surprendre par un revêtement inégal et ne vous arc-boutez pas.
- Page 40 + Sun Joe ® ® surcharger le moteur et réduire sa puissance mécanique 1-866-SNOWJOE (1-866-766-9563). si elles sont endommagées. Avant d'utiliser la souffleuse • Lutte contre le bruit – Quand vous utilisez la souffleuse à neige, vérifiez toujours que les boulons, les écrous et les à...
- Page 41 Symboles de sécurité Le tableau suivant décrit et explique les symboles de sécurité pouvant être marqués sur cette machine. Avant d'essayer de procéder à son assemblage et de l'utiliser, lisez, comprenez et suivez toutes les instructions sur cette machine. Symboles Descriptions Symboles Descriptions...
- Page 42 Apprenez à mieux connaître votre souffleuse à neige électrique Avant d’utiliser votre souffleuse à neige électrique, lisez attentivement le manuel de l'utilisateur et les consignes de sécurité. Comparez l’illustration ci-dessous avec votre machine afin de vous familiariser avec l’emplacement des différents réglages et commandes. Conservez ce manuel pour pouvoir le consulter dans le futur. 1.
- Page 43 électrique vers le haut du l'assemblage. Appeler plutôt le service clientèle Snow Joe ® cadre supérieur (Fig. 3). Sun Joe au 1-866-SNOWJOE (1-866-766-9563) pour ® de l'aide. Procéder à l'assemblage avec précautions pour ne pas endommager le câblage.
- Page 44 Fig. 3 Fig. 6 Crochet de retenue de Cadre rallonge Outil de curage supérieur électrique de goulotte 4. Attachez ensemble le cadre supérieur et le cadre 6. Posez les deux serre-câbles sur le cadre, puis insérez le intermédiaire en attachant de chaque côté le second jeu câble à...
- Page 45 2. Attachez le déflecteur de goulotte en verrouillant le bouton 3. Une fois en place, attachez la manivelle de commande de du déflecteur (Fig. 9). goulotte inférieure à l'aide de la goupille fendue (Fig. 12). Fig. 12 Fig. 9 Goupille fendue REMARQUE : ne serrez pas trop le bouton.
- Page 46 Snow Joe ® ® patins en caoutchouc de la souffleuse à neige sont solidement Sun Joe au 1-866-SNOWJOE (1-866-766-9563). ® attachés par des vis. Les patins en caoutchouc doivent être Mise en marche et arrêt orientés dans le bon sens. Effectuez un essai pour vous assurer que le rotor tourne librement.
- Page 47 2. Tout en maintenant enfoncé le bouton-poussoir de toute pièce endommagée. sécurité, pressez vers vous le levier-interrupteur marche/ 2. Maintenez les enfants, les animaux familiers et les arrêt. Une fois que la machine a démarré, relâchez le spectateurs éloignés de la zone de travail. bouton-poussoir de sécurité...
- Page 48 11. Pour déneiger entièrement des superficies plus grandes, Fig. 21 il est nécessaire de procéder systématiquement en sachant d'avance où faire passer la souffleuse à neige. Manivelle de En procédant de la sorte, vous éviterez de rejeter la neige commande là...
- Page 49 la machine! Fig. 23 5. N'utilisez ni détergents ni solvants, car ils pourraient endommager irrémédiablement la souffleuse à neige. Les produits chimiques peuvent détruire les pièces en plastique. Bouton de 6. Pour protéger la souffleuse à neige de la corrosion quand déflecteur vous la remisez pendant de longues périodes, huilez légèrement les pièces en métal.
- Page 50 2. Desserrez les deux jeux intermédiaires d’écrous et de 3. Posez la nouvelle lame de raclage et attachez-la boulons afin de pouvoir détacher de son support en métal solidement à la souffleuse à neige à l'aide des trois vis le patin en caoutchouc usé (Fig. 26). (Fig.
- Page 51 à l'aide des deux mêmes vis. bâche non attachée ou d'une housse universelle pour souffleuse à neige électrique 61 cm de Snow Joe ® (modèle SJCVR-24). Pour acheter la housse en ligne, veuillez vous rendre sur le site www.snowjoe.com.
- Page 52 Si votre souffleuse à neige électrique Snow Joe SJ627E ® nécessite une intervention technique ou un entretien, veuillez appeler le 1-866-SNOWJOE (1-866-766-9563) pour de l’aide. Numéros de modèle et de série Lorsque vous communiquez avec l'entreprise pour commander des pièces ou prendre rendez-vous pour une intervention technique chez un revendeur agréé, vous devez fournir les...
- Page 53 + Sun Joe soit pour autant tenue de ® ® donner un préavis desdits changements. Les accessoires peuvent être commandés en ligne sur le site snowjoe.com ou par téléphone en appelant le service clientèle Snow Joe + Sun Joe au 1-866-SNOWJOE (1-866-766-9563).
- Page 54 Snow Joe vous recommande vivement d’enregistrer votre Produit. Vous pouvez l’enregistrer en ligne sur le site snowjoe.com/register, ou en imprimant et en envoyant par courrier une carte d’enregistrement offerte en ligne sur notre site Web, ou par téléphone en appelant notre Service à la clientèle au 1-866-SNOWJOE (1-866-766-9563), ou encore en nous envoyant un courriel à...
- Page 56 snowjoe.com...