Stelpro MAESTRO Guide De Démarrage Rapide
Masquer les pouces
Voir aussi pour MAESTRO:
- Guide de démarrage rapide (16 pages) ,
- Guide de démarrage rapide (16 pages) ,
- Guide de démarrage rapide (16 pages)

Manuels Connexes pour Stelpro MAESTRO


Sommaire des Matières pour Stelpro MAESTRO
- Page 1 ORCHESTRATING COMFORT MAÎTRE DE VOTRE CONFORT QUICKSTART GUIDE | GUIDE DE DÉMARRAGE RAPIDE MAESTRO SMART THERMOSTAT THERMOSTAT INTELLIGENT MAESTRO...
- Page 2 Create your own ecosystem in your home and take full control of your comfort with the Maestro mobile app. MADE AND DESIGNED FOR CANADA Established in Quebec for more than 35 years, the Stelpro family business understands the specific needs our climate imposes on us and Canadians' concerns regarding safety and environmental protection.
-
Page 3: Quatre Étapes Facile Vers Le Contrôle De Votre Confort
• 2 - Install your Maestro thermostats 3 - Install the Maestro application and create your Maestro account 4 - Build your Maestro network For further information or to consult the complete User Guide, please visit our website. www.stelpro.com/en-CA/support-maestro QUATRE ÉTAPES FACILE VERS LE CONTRÔLE DE VOTRE CONFORT... -
Page 4: Contenu De La Boîte
WHAT’S IN THE BOX CONTENU DE LA BOÎTE • SMART THERMOSTAT THERMOSTAT INTELLIGENT QUICKSTART GUIDE GUIDE DE DÉMARRAGE MOUNTING PLATE | SCREWS (2) | CAPS (2) PLAQUE DE MONTAGE | VIS DE MONTAGE (2) CAPUCHON DE CONNEXION (2) TOOLS REQUIRED OUTILS REQUIS •... - Page 5 BEFORE YOU START WHERE TO INSTALL YOUR MAESTRO THERMOSTAT Install the thermostat at approximately 1.5 m (5 ft.) from the floor, on an indoor wall that faces the heating system. IMPORTANT: Leave a clearance of at least 30 cm (12 in.) around the thermostat to ensure it is properly ventilated.
-
Page 6: Installer Le Thermostat Maestro
Avant de vous lancer, prenez quelques minutes pour regarder la vidéo d’installation étape par étape du thermostat Maestro. www.stelpro.com/fr-CA/maestro ATTENTION : L’installation du thermostat doit être effectuée par un électricien certifié. NOTE : Un thermostat Maestro ne peut pas contrôler plus de 4 000 Watts au total. - Page 7 TURN OFF THE HEATING SYSTEM’S ELECTRICAL CURRENT COUPER L’ALIMENTATION ÉLECTRIQUE DU SYSTÈME DE CHAUFFAGE...
- Page 8 REMOVE PREVIOUS THERMOSTAT RETIRER L’ANCIEN THERMOSTAT...
- Page 9 SECURE THE MAESTRO THERMOSTAT MOUNTING PLATE TO THE ELECTRICAL BOX FIXER LA PLAQUE DE MONTAGE DU THERMOSTAT MAESTRO À LA BOÎTE ÉLECTRIQUE...
- Page 10 CONNECT THE WIRES INSIDE THE CAPS PROVIDED RACCORDER LES FILS ÉLECTRIQUES AVEC LES CAPUCHONS DE CONNEXION FOURNIS 2 WIRES 2 FILS 4 WIRES 4 FILS...
- Page 11 SECURE THE THERMOSTAT ON THE MOUNTING PLATE FIXER LE THERMOSTAT SUR LA PLAQUE DE MONTAGE...
- Page 12 TURN ON THE ELECTRICAL CURRENT RÉTABLIR L’ALIMENTATION ÉLECTRIQUE...
- Page 13 SET-UP BASIC OPTIONS ON FIRST START EFFECTUER LES RÉGLAGES DE BASE AU PREMIER DÉMARRAGE 2 SETTINGS TO BE SET: > TEMPERATURE FORMAT (°Celsius / °Fahrenheit) > HEATING MODE (Baseboard / Fan-forced heater) Use the LEFT/RIGHT arrows to change the selection and used CENTER button to confirm.
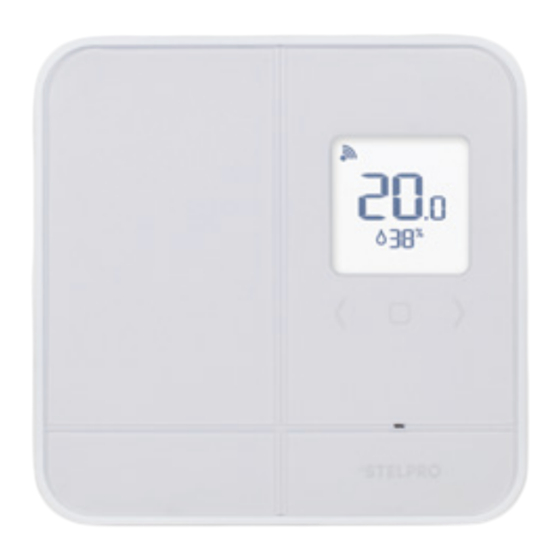
- Page 14 THERMOSTAT INTERFACE INTERFACE DU THERMOSTAT OVERHEATING APPLIANCE APPAREIL EN SURCHAUFFE KEYBOARD LOCKED CLAVIER VERROUILLÉ ROOM TEMPERATURE TEMPÉRATURE AMBIANTE RELATIVE AMBIENT HUMIDITY/ OUTDOOR TEMPERATURE HUMIDITÉ RELATIVE AMBIANTE OU TEMPÉRATURE EXTÉRIEURE SETPOINT IS LOW OR OPEN WINDOW DETECTED (BLINKING ICON) TEMPÉRATURE DE CONSIGNE BASSE OU DÉTECTION DE FENÊTRE OUVERTE (ICÔNE CLIGNOTANTE) ADVANCED MENUS INDICATOR...
- Page 15 THERMOSTAT ADVANCED MENUS MODIFY THE SETTINGS To access the advanced menus, hold the CENTER button for 3 seconds. Menu 1: Zigbee connectivity ( • Menu 2: Temperature format (°C or °F) • Menu 3: Heating mode ( • Menu 4: Lock/unlock keyboard ( •...
- Page 16 For further information or to consult the complete User Guide, please visit our website. stelpro.com/en-CA/maestro Pour obtenir de plus amples renseignements ou pour consulter le guide d'utilisation complet, visitez notre site web. stelpro.com/fr-CA/maestro...