Table des Matières
Publicité
Les langues disponibles
Les langues disponibles
Liens rapides
Publicité
Chapitres
Table des Matières

Manuels Connexes pour asmodus LUSTRO

Sommaire des Matières pour asmodus LUSTRO
- Page 1 BEDIENUNGSANLEITUNG MANUEL D‘UTILISATION USER MANUAL...
- Page 2 SPRACHEN / LANGUES / LANGUAGES � � � � � � � � � � � � � � � � � � � � � � � � � � � � � � � � � � � � � � � � � � � � � � � � � � � � � � � Deutsch Français �...
- Page 3 Geräts zu gewährleisten. Verwenden Sie in Kombination mit diesem Produkt bitte nur originale bzw. empfohlene Produkte. Die InnoCigs GmbH & Co. KG leistet als offizieller Importeur dieses ASMODUS-Pro- dukts keinen Service und/oder Gewährleistung bei der Nutzung mit nicht empfohlenen Produkten.
-
Page 4: Table Des Matières
Inhaltsverzeichnis Hinweise & Vorsichtsmaßnahmen ............03 Lieferumfang | Aufbau des Geräts . -
Page 5: Hinweise & Vorsichtsmaßnahmen
Hinweise & Vorsichtsmaßnahmen Personen unter 18 Jahren, Schwangere, stillende Mütter und Menschen mit Herz-Kreislauf-Erkrankungen dürfen dieses Produkt nicht verwenden. Nicht empfohlen für Nichtraucher. Das E-Zigaretten-Produkt darf nicht in die Hände von Kindern und Jugendlichen gelangen. Dieses Produkt entspricht den innerhalb der EU Dieses Produkt darf gültigen Bestimmungen für technische Geräte und darf nicht von Minderjährigen... - Page 6 Hinweise & Vorsichtsmaßnahmen Benutzerhinweise 1. Sollte Ihnen das Gerät heruntergefallen sein, überprüfen Sie bitte, ob sich keine Komponenten gelockert haben, ob kein Liquid austritt und ob kein Defekt an Ihrem Mundstück vorliegt. Sofern nach visueller Prü- fung des Produkts keine Anzeichen einer Beschädigung vorliegen, können Sie das Gerät weiterbenutzen. Bitte wischen Sie Ihr Mundstück zuvor aus hygienischen Gründen mit einem Tuch ab.
- Page 7 Hinweise & Vorsichtsmaßnahmen 6. Wenn Liquid mit Ihrer Haut in Berührung kommt, wischen Sie es schnellstmöglich ab und reinigen Sie die Stelle anschließend gründlich mit klarem Wasser. 7. Wenn Sie versehentlich Liquid verschlucken, wenden Sie sich bitte an eine Vergiftungszentrale. Unter der Telefonnummer +49 (0)30 - 19 240 erreichen Sie Tag und Nacht den Giftnotruf der Charité...
- Page 8 Hinweise & Vorsichtsmaßnahmen Allgemeine Informationen zu Zugtechniken beim Dampfen Beim Dampfen wird zwischen zwei Zugtechniken unterschieden: Moderates Dampfen (Mund-zu-Lunge) Der Dampf einer E-Zigarette wird während der gesamten Zugdauer zunächst im Mundraum gesammelt und anschließend in die Lunge inhaliert. Diese Zugtechnik wird als moderates Dampfen von Mund-zu-Lunge bezeichnet und ist genauso wie beim Rauchen einer Tabak-Zigarette.
- Page 9 Hinweise & Vorsichtsmaßnahmen Subohm-Dampfen (Direkte Lungeninhalation) Der Dampf einer E-Zigarette wird während des Zuges direkt in die Lunge inhaliert. Diese Zugtechnik wird als subohmes Dampfen mit direkter Lungeninhalation bezeichnet. Voraussetzung ist ein geringer Zugwiderstand und eine hohe Luftzufuhr zum Verdampferkopf. Beides wirkt sich positiv auf die Produkti- on großer Dampfmengen aus.
-
Page 10: Lieferumfang | Aufbau Des Geräts
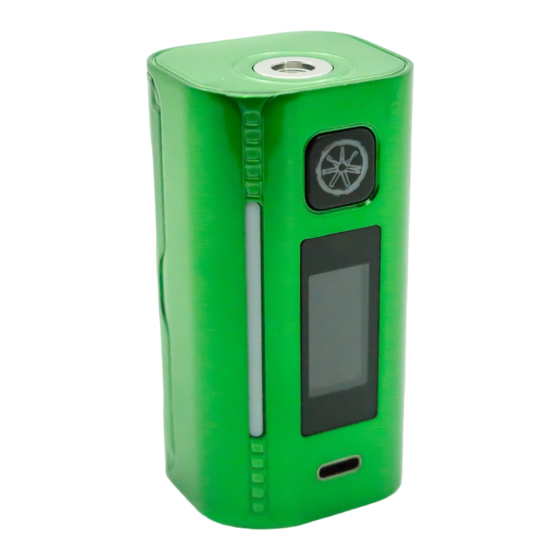
Lieferumfang & Aufbau des Geräts Lieferumfang 510er Anschluss 1x Lustro 200W Akkuträger (ohne 18650er Akkuzellen) 1x Micro-USB-Kabel 1x Bedienungsanleitung Feuertaste Akku- Abdeckung Touchscreen Micro-USB-Anschluss LED-Beleuchtung... -
Page 11: Eckdaten & Leistungsmerkmale
Eckdaten & Leistungsmerkmale Ausgabemodi POWER | TEMP (COIL: SS304, SS316, SS317, Ti, Ni200) | TCR | TFR | CURVE Ausgangsleistung 5 bis 200 Watt im VW-Modus 5 bis 120 Watt im TC-Modus Widerstandsbereich 0,1 Ohm bis 2,5 Ohm Temperaturbereich 100°C bis 300°C | 212°F bis 572°F Sicherheitsfunktionen Ausgangsspannung max. -
Page 12: Bedienung Des Geräts
Betätigen Sie die Feuertaste fünf Mal schnell hintereinander (innerhalb von 3 Sekunden), um das Gerät einzuschalten und fünf Mal, um es wieder auszuschal- ten. Beim Einschalten erscheint das ASMODUS-Logo auf dem Display. Beim Ausschalten erscheint ein LOGOUT-Symbol. Drücken Sie darauf, bis Ihnen der Hinweis “SYSTEM OFF”... - Page 13 Bedienung des Geräts Dampfen Während Sie die Feuertaste des Geräts gedrückt halten, inhalieren Sie den Dampf langsam und kontinuierlich über das Mundstück Ihres Clearomizers. Lassen Sie die Feuertaste beim Ausatmen des Dampfes los. Hinweis: Wenn die Feuertaste länger als 10 Sekunden gedrückt wird, gibt das Gerät aus Sicherheitsgründen keine Leistung mehr ab.
- Page 14 Bedienung des Geräts Auswählen des Betriebsmodus Während der Bildschirm entsperrt ist, wischen Sie im oberen Teil, wo Ihnen der aktuelle Betriebsmodus ange- zeigt wird (POWER/TEMP/CURVE/TCR/TFR) nach links oder rechts, um den Betriebsmodus zu wechseln.
- Page 15 Bedienung des Geräts Einstellungen im POWER-Modus (Variable Wattage) Leistungsregelung: Während der Bildschirm entsperrt ist, drücken Sie länger auf den aktuell angezeigten Leistungswert in Watt, um ihn zu verändern. Drücken Sie auf “ ” oder “ ”, um den Wert zu erhöhen oder zu verringern.
- Page 16 Bedienung des Geräts Einstellungen im TEMP-Modus (Variable Temperature) Drahtart im TEMP-Modus auswählen: Während der Bildschirm im TEMP-Modus entsperrt ist, drücken Sie länger auf die TEMP-Anzeige. Drücken Sie auf “ ” oder “ ”, um die Wicklungsart des Verdampferkopfes auszuwählen. Betätigen Sie die Feuertaste, um Ihre Einstellung zu bestätigen und den Vorgang zu beenden. Wechseln zwischen Temperatur- und Leistungsanzeige: Während der Bildschirm im TEMP-Modus entsperrt ist, drücken Sie auf den aktuell angezeigten Leistungs- oder Temperaturwert, um zum jeweils anderen Wert zu wechseln.
- Page 17 Bedienung des Geräts Einstellungen im CURVE-Modus (Vorheizfunktion) Leistungspunkt (P1 – P5) auswählen: Während der Bildschirm im CURVE-Modus entsperrt ist, wischen Sie nach oben oder nach unten entlang des Bildschirms, um zwischen den Leistungspunkten P1 bis P5 zu wechseln. Wechseln zwischen Leistungs- und Zeiteinstellung für einen Leistungspunkt: Während der Bildschirm im CURVE-Modus entsperrt ist, drücken Sie auf den aktuell angezeigten Leistungs- oder Zeitwert, um zum jeweils anderen Wert zu wechseln.
- Page 18 Bedienung des Geräts Einstellungen im TCR-Modus (Temperature Coefficient of Resistance) TCR-Speicherplatz (M1 – M5) auswählen: Während der Bildschirm im TCR-Modus entsperrt ist, wischen Sie nach oben oder nach unten entlang des Bildschirms, um zwischen den TCR-Speicherplätzen M1 bis M5 zu wechseln. TCR-Wert einstellen: Während der Bildschirm im TCR-Modus entsperrt ist, drücken Sie länger auf die TCR-Anzeige.
- Page 19 Bedienung des Geräts Einstellungen im TFR-Modus (Temperature Factor of Resistance) TFR-Speicherplatz (M1 – M5) auswählen: Während der Bildschirm im TFR-Modus entsperrt ist, wischen Sie nach oben oder nach unten entlang des Bildschirms, um zwischen den TFR-Speicherplätzen M1 bis M5 zu wechseln. TFR-Wert einstellen: Während der Bildschirm im TFR-Modus entsperrt ist, drücken Sie länger auf die TFR-Anzeige.
-
Page 20: Systemeinstellungen
Bedienung des Geräts Systemeinstellungen Betätigen Sie beim eingeschaltetem Gerät die Feuertaste fünf Mal schnell hintereinander (innerhalb von 3 Sekunden), um in das Menü für die Systemeinstellungen zu gelangen. Wischen Sie nach links oder rechts, um die unterschiedlichen Menüpunkte aufzurufen. Bestätigen Sie Ihre Auswahl, indem Sie länger auf das entsprechende Symbol drücken. - Page 21 Frage, indem Sie auf “YES” tippen und halten Sie anschließend die Feuertaste so lange gedrückt, bis auf dem Display “Download Mode” erscheint. Laden Sie die aktuelle Firmwa- re-Version bei www.asmodus.com herunter. Systemversion anzeigen: Drücken Sie länger auf das V-Symbol, um sich die aktuelle Sys-...
- Page 22 Bedienung des Geräts Geschwindigkeit der Lichtleiste: Während des Dampfens steigt links vom Bildschirm ein Lichtstreifen in einer LED-Leiste auf. Drücken Sie länger auf das LIGHT SPEED-Symbol, um durch Drücken auf “ ” oder “ ” die Geschwindigkeit, mit welcher der Lichtstreifen aufsteigt, festzulegen.
- Page 23 Bedienung des Geräts Wechsel zwischen Slide- und Clicksteuerung des Touchscreens: Drücken sie länger auf das SCHLOSS-Symbol, um auszuwählen, ob Sie den Touchscreen Ihres Gerätes via Slide- oder Click-Funktion steuern möchten. Drücken Sie auf “ ” oder “ ”, um Ihre Aus- wahl zu treffen.
-
Page 24: Sonstige Funktionen
Bedienung des Geräts Sonstige Funktionen Während der Bildschirm gesperrt ist, streichen Sie von unten nach oben über den Screen, um in das Menü für sonstige Funktionen zu gelangen. Taschenlampe: Drücken Sie auf das LAMPEN-Symbol, um die LED-Leuchten am Boden Ihres Gerätes an- bzw. auszuschalten. Durch Drücken auf den gelben Button oben auf dem Display wählen Sie zwischen zwei Helligkeitsstufen oder schalten die Lampe aus. -
Page 25: Laden Des Akkus
Sie auf “UPGRADE”, um das Gerät entsprechend zu aktualisieren. Hinweis: Laden Sie Software und Softwarepakete bitte von unserer offiziellen Website www.asmodus.com herunter. Laden des Akkus Die 18650er Akkuzellen können über Micro-USB aufgeladen werden. Stellen Sie bei Verwendung eines Adapters sicher, dass er für das Laden mit 5V/1A geeignet ist. -
Page 26: Fehlermeldungen
Fehlermeldungen “HIGH ATOMIZER”: Der Widerstand des Verdampferkopfes ist zu hoch. “LOW ATOMIZER”: Der Widerstand des Verdampferkopfes ist zu gering. “ATOMIZER REMOVE”: Es kann kein Widerstand erkannt werden. “CHECK ATOMIZER”: Es kann kein Verdampferkopf erkannt werden. “ATOMIZER SHORT”: Es ist ein Kurzschluss aufgetreten. “HIGH BATTERY”: Die Akkuspannung ist zu hoch. -
Page 27: Gewährleistung & Service
Gewährleistungskonditionen der InnoCigs GmbH & Co. KG Das von Ihnen erworbene ASMODUS-Produkt wurde für Sie von der InnoCigs GmbH & Co. KG importiert. Sollte das Produkt nicht funktionieren oder in irgendeiner Weise defekt sein, so wenden Sie sich bitte direkt an den Fachhändler, von dem Sie das Produkt erworben haben. -
Page 28: Kontakt
Kontakt zu InnoCigs Kontakt zu Ihrem ASMODUS-Importeur InnoCigs GmbH & Co. KG Stahltwiete 23 22761 Hamburg | GERMANY Telefon: +49 (0) 40 – 22 86 729 0 Fax: +49 (0) 40 – 22 86 729 99 E-Mail: service@innocigs.com... -
Page 29: Informations Pour Les Utilisateurs
En combinaison avec ce produit, utilisez exclusivement des produits originaux et recommandés. En tant qu‘importateur officiel de ce produit ASMODUS, InnoCigs GmbH & Co. KG ne garantit aucun service après-vente et aucune garantie en cas d‘utilisation de produits non recommandés. - Page 30 TABLE DES MATIÈRES Indications et mesures de précaution ........... . 29 Étendue de la livraison | Structure de l‘appareil .
-
Page 31: Indications Et Mesures De Précaution
Indications et mesures de précaution Les personnes âgées de moins de 18 ans, les femmes enceintes, les mères allaitantes et les personnes souffrant de maladies cardiovasculaires ne doivent pas utiliser ce produit. Déconseillé aux non-fumeurs. Tenir cet accessoire pour cigarette électronique hors de portée des enfants et des adolescents. Ce produit répond aux dispositions applicables au Ce produit ne doit pas être sein de l‘Union Européenne concernant les appareils... -
Page 32: Recommandations D'utilisation
Indications et mesures de précaution Recommandations d‘utilisation 1. Si vous avez fait tomber votre appareil, veuillez vérifier qu‘aucun composant ne se soit desserré, qu‘aucun liquide ne s‘écoule et que votre embout ne présente aucun défaut. Dans la mesure où, après un contrôle visuel, le produit ne présente aucun dommage, vous pouvez continuer de l‘utiliser. - Page 33 Indications et mesures de précaution 6. Si du liquide entre en contact avec votre peau, essuyez-le au plus vite, puis nettoyez rigoureusement à l‘eau claire. 7. Si vous avalez du liquide par mégarde, veuillez contacter un centre antipoison. Vous pouvez joindre à toute heure du jour et de la nuit le service d‘urgence antipoison de l‘hôpital universitaire de la Charité...
-
Page 34: Informations Générales Sur Vape Et Techniques De Tirage
Indications et mesures de précaution Informations générales sur vape et techniques de tirage Le vapotage distingue deux techniques de tirage différentes : Vape modérée par tirage indirect (de la bouche vers les poumons) La vapeur d‘une cigarette électronique, durant la totalité de la durée de tirage, passe d‘abord par la bouche pour être ensuite inhalée par les poumons. -
Page 35: Vape À Basse Résistance En Sub-Ohm (Inhalation Directe Vers Les Poumons)
Indications et mesures de précaution Vape à basse résistance en sub-ohm (inhalation directe vers les poumons) La vapeur d‘une cigarette électronique, durant la totalité de la durée de tirage, passe directement vers les poumons. Cette technique de tirage est désignée comme vape à basse résistance en sub-ohm avec inhalation directe vers les poumons. -
Page 36: Étendue De La Livraison | Structure De L'appareil
Étendue de la livraison | Structure de l‘appareil Étendue de la livraison Connection 510 1x Box Lustro 200W (sans accus 18650) 1x Câble micro-USB 1x Manuel d‘utilisation Bouton fire Compartiment de l’accus Écran tactile Port micro-USB Éclairage LED... -
Page 37: Données Clés Et Caractéristiques De Performance
Données clés et caractéristiques de performance Modes de sortie POWER | TEMP (COIL: SS304, SS316, SS317, Ti, Ni200) | TCR | TFR | CURVE Puissance de sortie de 5 à 200 watts en mode POWER de 5 à 120 watts en mode TEMP Plage de résistance de 0,1 à... -
Page 38: Utilisation De L'appareil
à nouveau. Lors du démarrage, le logo « ASMODUS » s‘affiche sur l‘écran. Lorsque vous éteig- nez l‘appareil, l‘icône de « SYSTEM OFF » apparaît. Appuyez dessus jusqu‘à ce que la version actuelle du système s‘affiche. -
Page 39: Déverrouiller L'écran
Utilisation de l‘appareil Vapoter Pendant que vous maintenez enfoncée la touche d‘allumage de votre batterie, inhalez la vapeur lentement et en continu via l‘embout de votre clearomiseur. Relâchez la touche d‘allumage lorsque vous expirez la vapeur. Remarque : Si l‘on appuie sur le bouton d‘allumage pendant plus de 10 secondes, l‘appareil se met hors tension pour des raisons de sécurité. -
Page 40: Sélection Du Mode De Fonctionnement
Utilisation de l‘appareil Sélection du mode de fonctionnement Quand l‘écran est déverrouillé, effectuez un balayage vers la gauche ou la droite sur la partie supérieure de l‘écran où le mode de fonctionnement actuel est affiché (POWER/TEMP/CURVE/TCR/TFR) pour changer le mode de fonctionnement. -
Page 41: Réglages En Mode Power (Variable Wattage)
Utilisation de l‘appareil Réglages en mode Power (Variable Wattage) Réglage de la puissance : Quand l‘écran est déverrouillé, appuyez plus longtemps sur la valeur actuelle en watts de la puissance pour la changer. Appuyez sur « » ou « » pour augmenter ou diminuer la valeur souhaitée. -
Page 42: Réglages En Mode Temp (Variable Temperature)
« » ou « » Utilisation de l‘appareil Réglages en mode TEMP (Variable Temperature) Sélectionner la nature de fil en mode TEMP : Quand l‘écran est déverrouillé en mode TEMP, appuyez plus longtemps sur l‘indicateur TEMP. Appuyez sur « » ou « »... -
Page 43: Réglages En Mode Curve (Fonction De Préchauffage)
Utilisation de l‘appareil Réglages en mode CURVE (Fonction de préchauffage) Sélectionner le point de puissance (P1 – P5) : Quand l‘écran est déverrouillé en mode CURVE, balayez l‘écran du doigt vers le haut ou vers le bas pour choisir entre les points de puissance allant de P1 à P5. Choisir entre le réglage de la puissance et du temps pour un point de puissance : Quand l‘écran est déverrouillé... -
Page 44: Réglages En Mode Tcr (Temperature Coefficient Of Resistance)
Utilisation de l‘appareil Réglages en mode TCR (Temperature Coefficient of Resistance) Sélectionner l‘espace de mémoire TCR (M1 – M5) : Quand l‘écran est déverrouillé en mode TCR, balayez l‘écran du doigt vers le haut ou vers le bas pour choisir entre les espaces de stockage TCR allant de M1 à Régler la valeur TCR : Quand l‘écran est déverrouillé... -
Page 45: Réglages En Mode Tfr (Temperature Factor Of Resistance)
Utilisation de l‘appareil Réglages en mode TFR (Temperature Factor of Resistance) Sélectionner l‘espace de mémoire TFR (M1 – M5) : Quand l‘écran est déverrouillé en mode TFR, balayez l‘écran du doigt vers le haut ou vers le bas pour choisir entre les espaces de stockage TFR allant de M1 à M5. Régler la valeur TFR : Quand l‘écran est déverrouillé... -
Page 46: Réglages Du Système
Utilisation de l‘appareil Réglages du système Appuyez rapidement cinq fois de suite sur le bouton d‘allumage (en moins de 3 secondes) pour accéder au menu des réglages du système. Effectuez un balayage vers la gauche ou vers la droite pour accéder aux différents éléments du menu. - Page 47 à la question en tapant sur « YES », et appuyez sur le bouton d‘allumage jusqu‘à ce que « Download Mode » apparaisse à l‘écran. Téléchargez la version actuelle du firmware (micrologiciel) sur www.asmodus.com. Afficher la version du système : Appuyez plus longtemps sur l‘icône V pour que la version...
- Page 48 Utilisation de l‘appareil Vitesse de la barre lumineuse : Pendant le vapotage, une barre lumineuse grandit à gauche de l‘écran, dans une barre LED. Appuyez quelques secondes sur le symbole LIGHT SPEED, puis réglez la vitesse de croissance des barres lumineuses en appuyant sur «...
- Page 49 Utilisation de l‘appareil Sélection entre commande par glissement ou par clic de l‘écran tactile : Appuyez quelques secondes sur le symbole VERROU, puis réglez le mode de commande de l‘écran tactile de votre appareil entre la fonction glissement et la fonction clic en appuyant sur «...
-
Page 50: Autres Fonctions
Utilisation de l‘appareil Autres fonctions Lorsque l‘écran est verrouillé, balayez l‘écran de bas en haut pour afficher le menu Autres fonctions. Lampe de poche : Appuyez sur le symbole LAMPE afin d‘allumer ou d‘éteindre la lampe LED sur la base de votre appareil. Appuyez sur le bouton jaune en haut de l‘écran pour sélectionner deux niveaux d‘intensité... -
Page 51: Verrouillage / Déverrouillage Des Touches De Réglage Et De La Touche D'allumage
« Download Mode » s‘affiche à l‘écran. Ouvrez le logiciel de mise à jour sur votre PC et cliquez sur « UPGRADE » pour effectuer l‘actualisation correspondante de l‘appareil. Remarque : Merci de télécharger les logiciels et les progiciels sur notre site officiel www.asmodus.com. Recharge de la batterie L‘unité... -
Page 52: Message D'erreur
Messages d‘erreur « HIGH ATOMIZER » : La résistance de la tête d‘atomiseur est trop élevée. « LOW ATOMIZER » : La résistance de la tête d‘atomiseur est trop basse. « ATOMIZER REMOVE » : Aucune résistance n‘est détectée. « CHECK ATOMIZER » : Aucune tête d’atomiseur n‘est détectée. «... -
Page 53: Garantie & Service
Conditions de garantie d‘InnoCigs GmbH & Co. KG Le produit ASMODUS que vous avez acheté a été importé pour vous par InnoCigs GmbH & Co. KG. Si le produit ne fonctionne pas ou est défectueux, veuillez contacter le revendeur spécialisé auprès duquel vous avez acheté... -
Page 54: Contact
Contact d’InnoCigs Contactez votre importateur d’ASMODUS InnoCigs GmbH & Co. KG Stahltwiete 23 22761 Hambourg | ALLEMAGNE Téléphone : +49 (0)40 22 86 729 0 Fax : +49 (0)40 22 86 729 99 E-Mail : service@innocigs.com... -
Page 55: Information For The User
The InnoCigs GmbH & Co. KG, as the official importer of this ASMODUS product, does not provide any service and / or warranty when non-recommended products are used together with this product. - Page 56 Table of Contents Notes & Precautions ..............55 Contents | Design of the Device .
-
Page 57: Notes & Precautions
Notes & Precautions Persons under 18 years, pregnant women, nursing mothers and people with cardiovascular disease should not use this product. Not recommended for non-smokers. Please keep out of reach of children and minors. This product complies with EU require- This product must not ments on technical goods and may be be used by minors. - Page 58 Notes & Precautions User Instructions 1. If the device is dropped, you should check that there are no loose components, that there is no leakage of e-liquid, and that your mouthpiece is not damaged. If there are no signs of damage upon visual inspection of the product, you can continue using the device.
- Page 59 Notes & Precautions 7. If e-liquid is swallowed, contact your local poison control center. The Poison Emergency Call of the Charité University Hospital Berlin can be reached day and night by phone at +49 (0)30 - 19 240. In Austria, you can reach the 24h hotline of the Vienna Poison Information Center by phone at +43 (0)1 - 406 43 43.
-
Page 60: General Information About Puffing Techniques While Vaping
Notes & Precautions General Information about Puffing Techniques while Vaping When vaping, a distinction is made between two puffing techniques: Moderate Vaping (Mouth-to-Lung) The vapor from an e-cigarette is first collected in the oral cavity for the entire duration of the puff and then inhaled into the lungs. - Page 61 Notes & Precautions Sub-Ohm Vaping (Direct Lung Inhalation) While puffing, the vapor of an e-cigarette is directly inhaled into the lungs. This puffing technique is referred to as sub-ohm vaping with direct lung inhalation. To achieve this, there must be low puffing resistance and a strong air supply to the evaporator head.
-
Page 62: Contents | Design Of The Device
Contents & Design of the Device Contents 510 Connector 1x Lustro 200W Box Mod (without 18650 batteries) 1x Micro USB Cable 1x User Manual Fire Button Battery Cover Touch Screen Micro USB Port LED Lights... -
Page 63: Main Features & Performance
Main Features & Performance Output Modes POWER | TEMP (COIL: SS304, SS316, SS317, Ti, Ni200) | TCR | TFR | CURVE Power Output 5 to 200 Watts in POWER Mode 5 to 120 Watts in TEMP Mode Resistance Range 0.1 to 2.5 Ohm Temperature Range 100°C to 300°C | 212°F to 572°F Safety Functions... -
Page 64: Using The Device
Press the Fire button five times in rapid succession (within 3 seconds) to turn the unit on, and five times to turn it off again. When the power is turned on, the ASMODUS logo appears on the display. When the power is turned off, “SYSTEM OFF” appears. -
Page 65: Unlocking The Screen
Using the Device Vaping While holding the fire button of your e-cigarette, inhale the vapor slowly and continuously through the mouth- piece of your clearomizer. Release the fire button while exhaling the vapor. Note: If you press and hold the Fire button for more than 10 seconds, the unit will automatically switch off. Unlocking the Screen As soon as the screen turns off it is locked. -
Page 66: Selecting The Operation Mode
Using the Device Selecting the Operation Mode To change the operation mode, swipe left or right in the upper part of the screen while it is unlocked, where the current operation mode is displayed (POWER/TEMP/CURVE/TCR/TFR). - Page 67 Using the Device Settings in Power Mode (Variable Wattage) Power Control: When the screen is unlocked, press and hold the currently displayed power value in watts to change it. Then, press “ “ or “ “ to increase or decrease the value. Press the Fire button to confirm your setting and end the process.
- Page 68 Using the Device Settings in TEMP Mode (Variable Temperature) Selecting the Wire Type in TEMP Mode: When the screen is unlocked in TEMP mode, press and hold the TEMP display. Then press “ “ or “ “ to select the winding type for the head. Press the Fire button to confirm your setting and end the process.
- Page 69 Using the Device Settings in CURVE Mode (Preheat Function) Selecting the Power Point (P1 – P5): When the screen is unlocked in CURVE mode, swipe up or down the screen to switch between the power points (P1 – P5). Changing between the Power and Time Setting for one Power Point: When the screen is unlocked in CURVE mode, press the currently displayed power or time value to change to the other value.
- Page 70 Using the Device Settings in TCR Mode (Temperature Coefficient of Resistance) Selecting the TCR Memory Cell (M1 – M5): When the screen is unlocked in TCR mode, swipe up or down the screen to switch between the TCR memory cells (M1 – M5). Setting TCR Value: When the screen is unlocked in TCR mode, press and hold the TCR display.
- Page 71 Using the Device Settings in TFR Mode (Temperature Factor of Resistance) Selecting the TFR Memory Cell (M1 – M5): When the screen is unlocked in TFR mode, swipe up or down the screen to switch between the TFR memory cells (M1 – M5). Setting TFR Value: When the screen is unlocked in TFR mode, press and hold the TFR display.
-
Page 72: System Settings
Using the Device System Settings While device is on, press the Fire button five times in rapid succession (within 3 seconds) to enter the system settings menu. Swipe left or right to access the various menu items. Confirm your selection by pressing and holding the corresponding symbol. - Page 73 “Upgrade?” will appear on the display. Confirm the query by tapping “YES” and then press and hold the Fire button until “Download Mode” appears on the display. Download the current firmware version at www.asmodus.com. Displaying System Version: Press and hold the V symbol to display the current system...
- Page 74 Using the Device Light Speed Settings: While vaping, there is a lightstrip arising in the LED bar left to the screen. Press and hold the LIGHT SPEED symbol to select the speed the strip arises by pressing “ “ or “ “. You may select between FAST, MEDIUM and SLOW. Press the Fire button to confirm your setting and end the process.
- Page 75 Using the Device Change between Swipe and Click Control of Touch Screen: Press and hold the PADLOCK symbol to select, weather you want to control the touch screen via swipe or click mode by pressing “ “ or “ “. Press the Fire button to confirm your setting and end the process.
-
Page 76: Other Functions
Using the Device Other Functions When the screen is locked, swipe from bottom to top to enter the other functions menu. Flashlight: Press the FLASHLIGHT button to turn on the flashlight at the bottom of your device. By pressing the yellow button on top of the screen you can choose between two light levels or turn the flashlight off. -
Page 77: Charging The Batteries
USB cable. Open the upgrade software on your computer and click on “UPGRADE” to update the device accordingly. Note: Please download software and software packages from our official website www.asmodus.com. Charging the Batteries The 18650 batteries can be charged via a micro USB cable. If using an adapter, make sure it is suitable for charging with 5V/1A. -
Page 78: Error Messages
Error Messages „HIGH ATOMIZER“: The resistance of the atomizer head is too high. „LOW ATOMIZER“: The resistance of the atomizer head is too low. „ATOMIZER REMOVE“: No resistance can be detected. „CHECK ATOMIZER“: No atomizer head can be detected. „ATOMIZER SHORT“: A short circuit has occurred. „HIGH BATTERY“: The battery voltage is too high. -
Page 79: Warranty & Service
Warranty Terms of the InnoCigs GmbH & Co. KG The ASMODUS product you‘ve bought has been imported by the InnoCigs GmbH & Co. KG. If the product ceases functioning or is defective in any way, please contact the specialist retailer where you purchased the product. -
Page 80: Contact
Contact to InnoCigs Contact to your ASMODUS Importer InnoCigs GmbH & Co. KG Stahltwiete 23 22761 Hamburg | GERMANY Phone: +49 (0) 40 – 22 86 729 0 Fax: +49 (0) 40 – 22 86 729 99 E-Mail: service@innocigs.com... - Page 81 Imported by: InnoCigs GmbH & Co. KG Stahltwiete 23 22761 Hamburg | GERMANY E-Mail: service@innocigs.com Phone: +49 (0) 40 - 22 86 729 0 Web: www.innocigs.com www.asmodus.com | Made in China...