Table des Matières
Publicité
Les langues disponibles
Les langues disponibles
Liens rapides
A
C
E
G
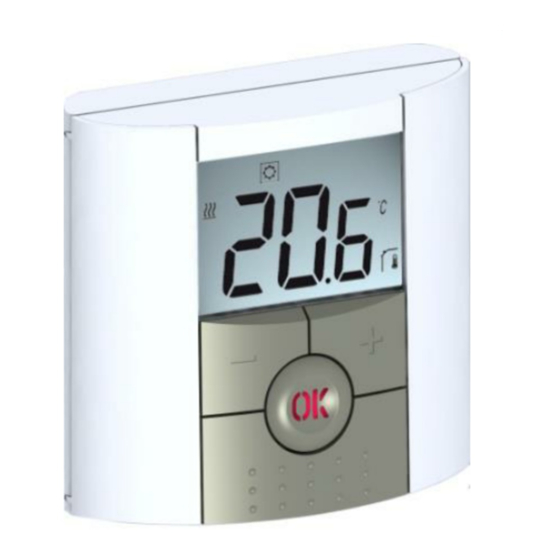
Description
B- Minus key (-)
D- Status LED
F- Left navigation key (◄)
H- Escape key (
)
1. Operating mode menu (active mode is framed).
2. Parameter number if "3" is displayed.
3. Installation Parameter menu.
4. Type of sensor used and temperature displayed. "2" is
Regulation => Internal or external ambient sensor.
Regulation => Floor sensor.
Regulation => Internal sensor with Floor limitation.
Regulation => View of the outside temperature
5. Heating demand indication.
6. Low batteries indicator.
7. °C or °F unit indicator
8. Setting or measured temperature if "2" is displayed.
9. Key lock indicator
10. RF indicator.
Red Fix (when backlight is lit up): Heating demand
Green flash: your validation is required
Red flash: Error on sensor or batteries
First installation
Batteries installation :
- Open the two sides covers and Insert the 2 AAA Alkaline supplied batteries (or
remove the small protection sticker if the batteries are already installed in the
compartment)
- Close the two side's covers.
Description
A- Touche moins (-)
C- Voyant d'état
E- Touche navigation gauche (◄)
G- Touche retour (
)
1. Mode de fonctionnement (mode actif encadré).
2. Numéro du paramètre si "3" est affiché.
3. Menu de paramétrage.
4. Type de sonde utilisée pour la régulation ou température affichée.
Régulation => Interne ou ambiance déportée.
Régulation => Sonde de sol (capteur de dalle).
Régulation => Interne avec sonde de sol en limitation de dalle.
Visualisation de la température extérieure.
5. Indicateur de chauffe.
6. Piles faibles.
7. Type de degré utilisé °C ou °F.
8. Consigne et température mesurée par les différentes sondes si "2" est affichée
9. Blocage du clavier activé.
10. Indicateur RF
Rouge: Indicateur de chauffe.
Vert Clignotant: Votre validation est requise.
Rouge clignotant: Défaut piles ou sondes.
Première installation
Installation des piles :
- Ouvrez les deux trappes latérales et insérez les piles (attention au sens) ou retirez les
films de protection si les piles sont déjà fournies et insérées. (Dans ce cas-là il se peut que
les piles aient une autonomie réduite due à la durée de stockage de votre thermostat).
- Fermez les trappes.
B
D
F
H
BT-DRF/ Quick installation guide
GB
B- Plus key (+)
D- Validation key (OK)
F- Right navigation key (►)
H- Edition key ( )
BT-DRF/ Guide d'installation rapide
F
B- Touche plus (+)
D- Touche de validation (OK)
F- Touche navigation droite (►)
H- Touche Edition ( )
For more information, use the QR Code or web link
RF Installation
- Put your receiver in « RF init » mode. (please refer to the receiver leaflet for this, only the RF
receiver of the same range are compatibles)
- Now on the thermostat press and maintain the edition key (
parameter « ini » must be displayed.
The thermostat will send now the radio configuration signal to the receiver.
- On the receiver check the good reception (generally showed by a green LED blinking). Once
the configuration between the receiver and the thermostat is made, press on the escape key (
) to come back to the main screen.
- Now you can check the RF distance, go to the room which must be regulated. Put your
thermostat on the final position (On the wall or table...), then put the thermostat in Comfort
mode (setting temperature position 37°C). Close the door and go to the receiver to check if the
new status of the thermostat has been received. (The heating is showed by a Red LED).
- Now return to the thermostat and switch off it. Check on the receiver again if it's also
switched off (The red LED must be turned off)
If the RF signals were received correctly, adjust your setting temperature as you want.
If the RF signals weren't received correctly, check the installation (Receiver position,
distance...)
* To make the installation easier, put the thermostat near to the receiver during the
configuration mode. (A minimal distance of > 1meter must be respected)
Starting
The thermostat follows automatically the default working mode comfort
Available working modes
-
Comfort mode
-
Reduced mode
-
OFF mode (the installation can freeze!)
-
Antifreeze mode
-
Timer mode
Choose the working mode you want to follow with the navigation keys (◄) or (►). Each time a
value blinks, adjust it with the (+) and (-) keys and confirm by pressing the (OK) key.
Pour plus d'informations, utiliser le QR Code ou le lien internet
Initialisation RF
- Pour configurer le thermostat RF avec le récepteur, il faut que ce dernier soit en mode
« RF init ». (Se reporter à la notice d'installation fournie avec votre récepteur RF, seul les
récepteurs de la même gamme sont compatibles).
- Ensuite sur le thermostat appuyez sur la touche Edition ( ) durant 10 secondes. Le
paramètre « Rf ini » apparaît sur l'afficheur. Le thermostat envoie alors les trames de
configuration au récepteur.
- Vérifiez la bonne réception sur le récepteur (généralement, Led verte clignotante). Une fois
le récepteur configuré, appuyez sur la touche (
- Vous pouvez maintenant faire un test de portée pour être sure de l'installation. Dans la
pièce ou doit se trouver le thermostat, placez le à l'endroit où il sera positionner plus tard
(sur un meuble ou fixé au mur). Régler la consigne courante sur la position Maxi (35°C),
Fermez les portes et allez vérifier la bonne réception (le récepteur doit être en chauffe Led
Rouge à 1). Retournez au thermostat et mettez-le maintenant en position arrêt, vérifiez que
le récepteur est aussi passé en arrêt (Led rouge à 0)
- Si la réception des signaux thermostats ne se fait pas correctement, essayez de rapprocher
le thermostat du récepteur, vérifier l'installation du récepteur (reportez-vous à la partie
Problèmes et solution)
* Pour une initialisation RF maîtrisée il est préférable d'avoir le récepteur à portée de vue
lors de l'initialisation (distance minimale > 1Mètre)
Démarrage
Votre thermostat suit automatiquement le mode confort
Modes de fonctionnement disponibles
-
Mode confort
-
Mode économique
-
Mode arrêt (l'installation peut geler!)
-
Mode hors-gel
-
Mode timer
Choisissez le mode de fonctionnement que vous voulez suivre avec les touches de
navigation (◄) ou (►). Lorsqu'une valeur clignote, ajustez la avec les touches (+) et (-) puis
validez avec la touche (OK).
http://www.wattselectronics.com/item.php?item=
LGBCFGE
) during 10s, then the
) pour revenir au mode utilisateur.
Publicité
Chapitres
Table des Matières

Manuels Connexes pour Watts Water Technologies BT Série

Sommaire des Matières pour Watts Water Technologies BT Série
- Page 1 http://www.wattselectronics.com/item.php?item= LGBCFGE BT-DRF/ Quick installation guide For more information, use the QR Code or web link RF Installation Description - Put your receiver in « RF init » mode. (please refer to the receiver leaflet for this, only the RF B- Minus key (-) B- Plus key (+) D- Status LED...
- Page 2 BT-DRF/ Schnellinstallationsanleitung Für weitere Informationen, verwenden Sie den QR-Code oder Web-Link Beschreibung - Halten Sie nun die Bearbeitungstaste des Thermostats ( ) 10 Sekunden lang gedrückt. Daraufhin muss der A- Minus Taste (-) B- Plus Taste (+) C- Status LED Parameter «...
- Page 3 BT-DRF/ Snelle installatiegids Voor meer informatie kunt u de QR Code of de web link gebruiken Introductie RF initialisatie A- Min toets (-) B- Plus toets (+) - Om de thermpostaat te kunnen initialiseren (inlezen) op de ontvanger, dient de ontvanger op « RF init » gezet te C- Status LED D- Bevestigen toets (OK) worden(zie de handleiding van de ontvanger)
- Page 4 BT-DRF/ Stručný návod na inštaláciu Pre viac informácií, použite QR kód alebo webového odkazu Nastavenie rádiového spojenia Popis prístroja A- Mínus - tlačidlo (-) B- Plus tlačidlo (+) - Aby ste mohli nakonfigurovať spojenie medzi termostatom a prijímačom, musíte najskôr preradiť svoj prijímač do modusu C- Status LED D- Potvrdenie (OK) RF init pre rádiové...
- Page 5 BT-DRF/ Οδηγός γρήγορης εγκατάστασης Για περισσότερες πληροφορίες, χρησιμοποιήστε τον κωδικό QR ή το σύνδεσμο Περιγραφή Κουμπί μείον (-) B- Κουμπί συν (+) Ενδ. λυχνία κατάστασης D- Κουμπί επιβεβαίωσης (OK) E- Κουμπί πλοήγησης αριστερά (◄) F- Κουμπί πλοήγησης δεξιά (►) G- Κουμπί επιστροφής ( H- Κουμπί...
- Page 7 BT DRF-01 USER GUIDE RF Digital Thermostat 6-11 GUIDE D’UTILISATION Thermostat digital 12-18 Bedienungsanleitung Digitaler Funkthermostat 19-25 GUÍA DE USUARIO Termostato digital RF 26-31 GUIA DO UTILIZADOR Termostato Digital de RF 32-37 HANDLEIDING Digitale Thermostaat RF 38-43 Руководство по эксплуатации Электронный...
-
Page 8: Table Des Matières
IMPORTANT! Before starting work the installer should carefully read this Installation & Operation Manual, and make sure all instructions contained therein are understood and observed. - The thermostat should be mounted, operated and maintained by specially trained personnel only. Personnel in the course of training are only allowed to handle the product under the supervision of an experienced fitter. -
Page 9: Presentation
1. Presentation Electronic thermostat with LCD display specially designed to control different type of heating systems. Due to the radio frequencies technologies it can be easily integrated in all circumstances (renovation, new construction…) It will be your best partner to optimize your energy consumption and increase your comfort. - Modern design with soft touch material. -
Page 10: First Installation
1. Operating mode menu (active mode is framed). 2. Parameter number if “3” is displayed. 3. Installation Parameter menu. 4. Type of sensor used and temperature displayed. Regulation => Internal or external ambient sensor. Regulation => Floor sensor. Regulation => Internal sensor with Floor limitation. Regulation =>... -
Page 11: Working Mode Definition
3. Working mode definition How to change the working mode? - Open the small center cover to have access to the navigation keys (◄ ) or (► ). - You can now press theses keys to display the working mode line. Move the frame cursor on the desired working mode and press (OK) to enter in the operating mode you have chosen. -
Page 12: Parameter's Menu
- The ambient temperature - If external sensor is connected: the outside temperature If Parameter “SenS” is set on “Air”, the external sensor will be used as an outside temperature sensor 5. Parameter’s menu Your thermostat has a parameter’s menu, in order to enter in this menu, press and maintain the edition key ( ) during 5sec. Then parameter menu will appear and first parameter screen will be displayed: Now you can select a parameter which must be adjusted with the navigation keys (◄... -
Page 13: Technical Characteristics
6. Technical characteristics Environmental: 0°C - 40°C Operating temperature: Shipping and storage temperature: -10°C to +50°C Electrical Protection IP30 Installation Category Class II Pollution Degree Measured temperature precision 0.1°C Setting temperature range Comfort, Reduced 5°C to 35°C by 0,5°C step Holiday (Antifreeze) 10°C (adjustable) Timer... - Page 14 IMPORTANT! - Avant de commencer les travaux, le monteur doit lire, comprendre et observer les présentes instructions de montage et de service. - Seul un spécialiste en la matière est autorisé à effectuer le montage, le réglage et la maintenance du thermostat. Un monteur en formation ne peut réaliser de travaux sur l'appareil que sous la surveillance d'un expert.
-
Page 15: Presentation
1. Presentation Le thermostat RF électronique associé à son récepteur a été conçu pour la régulation de la plupart des installations de chauffage. Grace à sa solution Radio fréquence (868Mhz) il s’intégrera facilement dans toutes les circonstances (Rénovation, neuf…) Il sera votre meilleur allié pour optimiser vos consommations d’énergie tout en augmentant votre confort. - Design modern avec sensation “soft touch”. -
Page 16: Première Mise En Service
11. Mode de fonctionnement (mode actif encadré). 12. Numéro du paramètre si “3” est affiché. 13. Menu de paramétrage. 14. Type de sonde utilisée pour la régulation ou température affichée. Régulation => Interne ou ambiance déportée. Régulation => Sonde de sol (capteur de dalle). Régulation =>... -
Page 17: Mode De Fonctionnement
Mode de fonctionnement Comment changer le mode de fonctionnement de votre thermostat? - Ouvrez la trappe frontale de votre thermostat afin d’accéder aux touches de navigation (◄ ) ou (► ). - Vous pouvez maintenant appuyer sur une des touches afin de faire apparaitre la barre de menu des modes de fonctionnement. Déplacez le cadre de sélection sur le menu souhaité... -
Page 18: Fonctions Spéciales
Fonctions spéciales Verrouillage clavier Utilisez cette fonction afin d’éviter tout changement des réglages du thermostat (Chambre d’enfant, lieu public…) - Pour bloquer le clavier de votre thermostat, appuyez et maintenez tout d’abord la touche échappe ( ) enfoncée, puis appuyez sur la touche édition ( ). -
Page 19: Caractéristiques Techniques
- Un écart de température trop important peut signifier aussi une mauvaise installation de votre thermostat. OutC , AMbC , FlrC: Etalonnage de la sonde externe L’étalonnage de la sonde externe doit être fait de la même façon que celle décrite ci-dessus, à la différence près du placement du thermomètre. -
Page 20: Problèmes Et Solutions
Problèmes et solutions Mon BT DRF-01 ne s’allume pas - Vérifiez que le film de protection des piles est bien enlevé. Problème de piles - Vérifiez le sens des piles. - Vérifiez la capacité des piles La Led de mon BT DRF-01 clignote en rouge Le logo clignote (sonde ambiante) - Contactez votre installateur ou votre vendeur. -
Page 21: Sicherheitshinweise
ACHTUNG! Die installierende Person sollte vor Inbetriebnahme des Geräts diese Installations- und Bedienungsanleitung sorgfältig durchlesen und sich mit den darin enthaltenen Anweisungen vertraut machen. - Der Thermostat darf nur von speziell ausgebildetem Personal montiert, bedient und gewartet werden. Personen, die sich noch in der Ausbildung befinden, dürfen das Gerät nur unter Aufsicht eines erfahrenen Technikers bedienen. -
Page 22: Beschreibung Des Geräts
1. Beschreibung des Geräts Elektronisch programmierbarer Thermostat mit LCD-Anzeige für die Regelung verschiedener Arten von Heizungssystemen. Dieses Gerät hilft Ihnen, den Energieverbrauch zu optimieren und erhöht den Komfort. - Modernes Design mit Soft-Touch-Material - Einfache Verkabelung und Installation - Funktion für einfache Programmerstellung - Wochenweise in Schritten von 30 min programmierbar - Vorübergehende manuelle Programmänderung möglich - Frostschutzfunktion... -
Page 23: Erstinstallation
1. Betriebsarten-Menü (Die aktive Betriebsart ist eingerahmt.) 2. Parameternummer, falls „3“ angezeigt wird. 3. Menü der Einrichtungsparameter. 4. Anzeige des verwendeten Sensortyps und der Temperatur Regelung => interner oder externer Umgebungssensor. Regelung => Fußbodensensor. Regelung => interner Sensor mit Bodensensor zur Temperaturbegrenzung. Anzeige der Außentemperatur 5. -
Page 24: Einschalten
* Zur Erleichterung der Installation sollte sich der Thermostat, solange er im Konfigurationsmodus ist, nahe am Receiver befinden. (Dabei ist ein Mindestabstand von ca.1 Meter einzuhalten.) Einschalten Der Thermostat ist nun betriebsbereit. Standardbetriebsart ist Komfort 3. Festlegen der Betriebsart Gehen Sie folgendermaßen vor, um die Betriebsart zu ändern: - Öffnen Sie die kleine Abdeckung in der Mitte, um auf die Navigationstasten nach links (◄... -
Page 25: Spezialfunktionen
4. Spezialfunktionen Tastensperre-Funktion Verwenden Sie diese Funktion, um jegliche Änderungen an Ihren Einstellungen zu verhindern (im Kinderzimmer, in einem öffentlich zugänglichen Raum,...). - Zum Einschalten der Tastensperre halten Sie die Escape-Taste ( ) gedrückt, und drücken Sie die Bearbeitungstaste ( ). - Auf der Anzeige wird daraufhin das Symbol „... -
Page 26: Software-Version
Die Kalibrierungsmethode entspricht der Beschreibung zum Parameter „04 AirC“ weiter oben HG: Frostschutztemperatur Vorgegebener Wert 10°C. Mit den Tasten (-) und (+) können Sie die Einstellung für die Frostschutztemperatur ändern. Drücken Sie anschließend zur Bestätigung (OK). Clr ALL: Wiederherstellen der Werkseinstellungen Halten Sie die Taste (OK) 10 Sekunden lang gedrückt, um die Solltemperaturen und die Benutzerparameter im Parametermenü... -
Page 27: Fehlersuche Und -Behebung
Fehlersuche und –behebung Der BT D-RF lässt sich nicht einschalten - Überprüfen Sie, ob der Schutzaufkleber auf den Batterien entfernt wurde. Batterieproblem - Überprüfen Sie, ob die Batterien in der richtigen Richtung eingelegt sind. - Überprüfen Sie die Batteriekapazität Die LED des BT D-RF blinkt rot Das Symbol blinkt (Umgebungssensor). - Page 28 ¡IMPORTANTE! Antes de empezar a trabajar, el instalador debe leer detenidamente este manual de instalación y funcionamiento y asegurarse de comprender y cumplir todas las instrucciones contenidas en él. - El termostato debe ser montado, operado y mantenido únicamente por personal especialmente instruido. El personal en el curso de formación sólo puede manejar el producto bajo la supervisión de un instalador con experiencia.
-
Page 29: Presentación
1. Presentación Termostato electrónico con pantalla LCD especialmente diseñado para controlar diferentes tipos de sistemas de calefacción. Gracias a las tecnologías de frecuencias de radio, puede integrarse fácilmente en todas las circunstancias (renovación, nueva construcción…) Será su mejor aliado para optimizar su consumo de energía y aumentar su comodidad. - Diseño moderno con material suave al tacto. -
Page 30: Primera Instalación
1. Menú del modo de funcionamiento (el modo activo se muestra en un recuadro). 2. Número de parámetro si se muestra "3". 3. Menú de parámetros de instalación. 4. Tipo de sensor utilizado y temperatura mostrada. Regulación => Sensor ambiental interno o externo. Regulación =>... -
Page 31: Inicio
* Para simplificar la instalación será mejor tener el termostato cerca del receptor durante el modo de configuración. (Debe respetarse una distancia mínima de > 1 metro) Inicio El termostato está ahora preparado para funcionar. El modo de funcionamiento predeterminado será Confort 3. -
Page 32: Función Bloqueo De Teclado
Función Bloqueo de teclado Utilice esta función para impedir cambios en sus ajustes (en una sala infantil, zona pública…) - Para activar la función de bloqueo de teclas, mantenga pulsada primero la tecla Escape ( ) y a continuación pulse simultáneamente la tecla de edición ( ). -
Page 33: Características Técnicas
Clr ALL: Reposición al ajuste de fábrica Mantenga pulsada la tecla (Ok) durante 10 segundos para reponer las temperaturas de puntos de ajuste y los parámetros de usuario en este menú con los ajustes predeterminados de fábrica. Los programas de usuario también se repondrán. * Preste atención: Asegúrese de tener todos los elementos necesarios para reconfigurar su instalación antes de utilizar esta función. - Page 34 - Compruebe las conexiones. - Compruebe la alimentación eléctrica del elemento calefactor. - Contacte con su instalador. - Compruebe los siguientes puntos: Comunicación - El receptor debe colocarse a una distancia mínima de 50 cm respecto a todos los demás materiales eléctricos o inalámbricos (GSM, Wi-Fi..) - El receptor no debe fijarse en una pieza metálica o demasiado cerca de tubos hidráulicos...
-
Page 35: Instruções De Segurança
IMPORTANTE! Antes de iniciar os trabalhos, o instalador deve ler cuidadosamente este Manual de Instalação e Funcionamento, e certificar-se de que todas as instruções contidas no mesmo são compreendidas e observadas. - O termostato apenas deve ser montado, controlado e mantido por pessoal devidamente formado. Durante a formação de pessoal, o mesmo apenas deve ter autorização para manipular o produto sob supervisão de um instalador experimentado. - Page 36 1. Apresentação Termostato electrónico com ecrã LCD, especialmente concebido para controlar diferentes tipos de sistemas de aquecimento. Devido às tecnologias de frequências de rádio, pode ser facilmente integrado em todas as circunstâncias (renovação, nova construção…) Será o seu melhor parceiro para optimizar o seu consumo de energia e aumentar o seu conforto. - Concepção moderna com material de toque suave.
-
Page 37: Primeira Instalação
1. Menu de modo de funcionamento (o modo activo fica enquadrado). 2. Número de parâmetro, se for apresentado “3”. 3. Menu de Parâmetro de Instalação. 4. São apresentados o tipo de sensor utilizado e a temperatura. Regulação => Sensor ambiente interno ou externo. Regulação =>... -
Page 38: Definição Do Modo De Funcionamento
Se os sinais de RF não tiverem sido recebidos correctamente, verifique a instalação (Posição e distância do receptor...) * Para simplificar a instalação, é melhor colocar termostato perto do receptor durante o modo de configuração. (Tem que ser respeitada uma distância mínima > 1 metro) Iniciar Agora, o termostato está... - Page 39 Pode visualizar: - A definição de temperatura actual para controlo do termostato. - A temperatura ambiente - Se estiver ligado um sensor externo: a temperatura exterior Outras opções estão disponíveis, ligando um sensor externo para o seu termostato. Contacte o seu revendedor ou instalador para obter mais informações sobre essas oportunidades Menu de parâmetros O termostato tem um menu de parâmetros;...
-
Page 40: Resolução De Problemas
Protecção Eléctrica IP30 Categoria de Instalação Classe II Nível de Poluição Precisão de temperatura medida 0,1 °C Intervalo de definição de temperaturas Conforto, Reduzida 5 até 35 °C, em passos de 0,5 °C Férias (Anti-congelação) 10 °C (ajustável) Temporizador 5 até 35 °C Banda Proporcional (PWM Características de regulação 2 °C para um ciclo de 10 min) ou Histerese de 0,5 °C... -
Page 41: Voor Uw Veiligheid
Belangrijk! Alvorens met de montage begonnen wordt, dient men de handleiding goed te lezen en te begrijpen. Dit om een goed functioneren van het product te garanderen - De thermostaat dient gemonteerd te worden door een gekwalificeerd persoon. Indien het bovenstaande in acht genomen wordt, kan de fabrikant de geldende garantiebepalingen waarborgen. - Alle instructies in dit document dienen gevolgd te worden bij de installatie en het gebruik van de thermostaat. -
Page 42: Introductie
1. Introductie De beste keus als het gaat om energie besparen en optimaal comfort genieten. - Modern design met soft touch materiaal. - Eenvoudige aansluiting en montage. - Vorstbeveiligings modus - EEPROM geheugen (batterij onafhankelijk). - 2 AAA batterijen (ca 2 jaar levensduur). - 2 Draads uitgang voor een universele toepasbaarheid. -
Page 43: Eerste Montage
Parameter nummer als “3” wordt weergegeven Installatie Parameter menu Type sensor en weergegeven temperatuur Regeling => Interne of externe ruimte sensor Regeling => Vloer sensor Regeling => Interne sensor met limitering vloer Buiten temperatuur Indicator warmte vraag. Indicator batterijen leeg °C of °F indicator Gevraagde of gemeten temperatuur als “2”... -
Page 44: Handbediening Comfort
Handbediening Comfort De thermostaat handhaaft de door u ingestelde temperatuur. Door op (-) of (+) te drukken, zal de ingestelde waarde knipperen en kunt u deze aanpassen. Handbediening, verlaagd De thermostaat handhaaft de door u ingestelde verlaagde temperatuur. Door op (-) of (+) te drukken, zal de ingestelde waarde knipperen en kunt u deze aanpassen. UIT modus Hiermee schakelt u de installatie uit. -
Page 45: Parameters Menu
Parameters menu In dit menu kunt u specifiek voor uw installatie/wensen instellingen aanpassen. Door ( ) 5sec ingedrukt te houden komt u in dit menu. De eerste parameter verschijnt: Met (◄ ) of (► ) gaat u naar de in te stellen parameter. Door (OK) te drukken kunt u met (-) of (+) de parameter aanpassen. Met (OK) bevestigt u de aanpassing. -
Page 46: Technische Specificaties
Technische specificaties Nauwkeurigheid gemeten temperatuur 0.1°C Omgeving: 0°C - 40°C Werktemperatuur: Temperatuur tijdens transport en opslag: -10°C to +50°C Instelbare temperatuur Comfort, Verlaagd 5°C to 35°C by 0,5°C step Vakantie (Vorstbeveiliging) 0.5 - 10°C Timer 5°C to 35°C Regel karakteristiek Proportionele Band (PWM 2°C voor 10min cyclus) of Hysteresis van 0.5°C Elektrische Bescherming... -
Page 47: Техника Безопасности
ВНИМАНИЕ! - Перед началом работы и перед вводом в эксплуатацию данного оборудования, специалист по монтажу должен полностью прочесть и понять данное руководство по монтажу и эксплуатации. - Только квалифицированный персонал имеет право производить монтаж, демонтаж и техобслуживание данного термостатa. Обучающийся персонал допускается к работе с ним только под наблюдением опытного персонала. При соблюдении... -
Page 48: Краткое Описание
1. Краткое описание Электронный радиотермостат с ЖК дисплеем предназначен для температурного регулирования в напольных системах отопления. Он станет Вашим надежным помощником в повышении комфорта и экономии энергии. - Современный дизайн и приятный материал нажимных элементов. - Защита от замерзания. - Режим отпуск. - Память... -
Page 49: Подготовка Термостата К Работе
1. Меню режимов работы (активный режим обведен рамкой). 2. Номер параметра, если “3” на дисплее. 3. Символ меню параметров. 4. Тип температурного датчика и индикация температуры. Регулирование => по встр. или внешнему датчику. Регулирование => по датчику пола. Регулирование => по внутреннему датчику в комбинации с датчиком пола, как ограничителем температуры пола. Индикация... -
Page 50: Выбор Рабочего Режима
3. Выбор рабочего режима Для изменения рабочего режима выполните следующие действия: - Откройте центральную крышечку, для доступа к кнопкам (◄) и (►). - Нажмите на одну из них и на экране появится ряд рабочих режимов. Переместите рамку на на выбранный Вами рабочий режим... -
Page 51: Меню Параметров
5. Меню параметров Для перехода в меню параметров нажмите ( ) в течении 5 сек. При переходе в меню параметров на дисплее появится следующий символ: При помощи кнопок (◄) и (►), перейдите к выбранному параметру, нажмите кнопку (OK) для входа в его меню, измените его занчение... -
Page 52: Технические Характеристики
6. Технические характеристики Рабочая температура: 0°C - 40°C Температура хранения: -10°C - +50°C Степень защиты IP30 Класс защиты Cтепень загрязнения Точность измерения температуры 0.1°C Рабочие режимы 5°C - 35°C шагом 0,5°C Комфортный, ночной, защита от замерзания, таймер 10°C (регулируемая) 5°C to 35°C Регулирование... -
Page 53: Oblasť Použitia
POZOR! Osoba, ktorá bude uvádzať tento prístroj do prevádzky, by si mala predtým pozorne prečítať tento návod na inštaláciu a obsluhu a oboznámiť sa s pokynmi, ktoré sú v ňom obsiahnuté. Termostat smie byť namontovaný a obsluhovaný len špeciálne vyškolenou osobou. Osoby, ktoré sa ešte len zaškoľujú, smú obsluhovať prístroj len pod dohľadom skúseného technika. -
Page 54: Popis Prístroja
Popis prístroja Elektronicky programovateľný termostat s LCD-displejom na reguláciu rôznych druhov vykurovacích systémov. Tento prístroj Vám pomôže optimalizovať spotreu energie a zvyšuje komfort. - Moderný dizajn so Soft-Touch-materiálom - Jednoduchá kabeláž a inštalácia - Funkcia jednoduchého určenia programu - Programovateľný týždenne v krokoch po 30 min. - Možná... -
Page 55: Prvotná Inštalácia
1. Menü prevádzok (Aktívna prevádzka je orámovaná.) Číslo parametra, v prípade že sa ukáže „3“ 3. Menü parametrov zariadenia. 4. Indikátor použitého typu senzora a teploty. Regulácia => interný alebo externý sensor prostredia Regulácia => podlahový senzor Regulácia => interný sensor s podlahovým senzorom na vymedzenie teploty Indikátor vonkajšej teploty 5. -
Page 56: Manuálny Režim „Komfort
- Za pomoci týchto tlačidiel môžete teraz dosiahnuť na riadok s druhmi režimu. Posuňte označovací rámik na želaný druh režimu a stlačte (OK), aby ste zvolený režim aktivovali. Manuálny režim „Komfort“ Manuálny druh režimu, ktorý sa permanentne upravuje na nastavenú komfortnú teplotu. Ak stlačíte jedno z tlačidiel (-) a (+), začne blikať... - Page 57 Parametrové menü Váš termostat disponuje parametrovým menü, ktoré môžete vyvolať, ak 5 sekúnd podržíte spracovateľské tlačidlo ( ). Parametrové menü sa otvorí a ukáže prvý parameter: Pomocou navigačných tlačidiel (◄) a (►) môžete prejsť k nastavenému parametru. Parameter zvoľte pomocou (OK), zmeňte ho s (-) alebo (+), a zmenu nakoniec potvrďte tlačidlom (OK).
-
Page 58: Technické Údaje
6. Technické údaje Podmienky okolia: 0°C - 40°C Prevádzková teplota: Teplota pri transporte a uskladnení: -10°C až +50°C IP30 Elektrický druh ochrany Instalačná trieda Trieda II Stupeň znečistenia Presnosť merania teploty 0.1°C Rozsah nastavenia teploty Komfort, útlmová teplota 5°C až 35°C v 5° krokoch Ochrana proti mrazu 10°C (nastaviteľná) Časovač... -
Page 59: Alkalmazási Terület
FIGYELEM! A beüzemelő személy az üzembe helyezés előtt figyelmesen olvassa el ezt a használati utasítást és ismerje meg annak tartalmát. - A készüléket csak képzett személy szerelheti fel, állíthatja üzembe és végezheti el a karbantartását. A kiképzésben résztvevő személyek csak egy tapasztalt szakember felügyelete alatt dolgozhatnak. A fenti feltételek figyelembe vétele esetén a gyártó a készülékre vállalja a törvényi előírásoknak megfelelően a felelősséget. -
Page 60: Készülék Leírása
1. Készülék leírása Elektronikus, programozható termosztát LCD kijelzővel, különböző fűtési rendszerek szabályzásához. A készülék segít Önnek, az energiafelhasználást optimalizálni és a komfortérzetet növelni. - Modern kivitel puha tapintású anyagból - Könnyű bekábelezés és felszerelés - Könnyű programkészítő funkció - Hetenként, 30 perces lépésekben programozható - Ideiglenes, manuális programváltoztatási lehetőség - Fagyvédelmi funkció... -
Page 61: Első Üzembe Helyezés
1. Üzemmód menü (az aktív üzemmód bekeretezett) 2. Paraméterszám, ha a „3“ van a kijelzőn 3. Eszközök paramétereinek a menüje 4. Csatlakoztatott érzékelő és hőmérséklet kijelzése Szabályzás=> belső vagy külső érzékelő Szabályzás => Padlóhőmérséklet-érzékelő Szabályzás => belső érzékelő, padlóhőmérsékletérzékelővel, hőfokhatárolás Külső... -
Page 62: Manuális Üzemmód "Komfort
- Ezeknek a gomboknak a segítségével tud az üzemmódok közül választani. Mozgassa a kijelölő keretet a kívánt üzemmódra, és nyomja meg az (OK) gombot, hogya kiválasztott üzemmódot aktíválja. Manuális üzemmód “Komfort” Manuális üzemmód, állandóan a beállított komforthőmérsékletet tartja. Ha a (-) és (+) gomb közül az egyiket megnyomja, elkezd villogni a beállított hőmérséklet, ami aztán ezekkel a gombokkal módosítható. Man. -
Page 63: Parametermenü
Ha a „SenS“ paramétert „Air“-re állítja, akkkor a külső érzékelő, külső hőmérséklet érzékelőként működik. 5. Parametermenü Az Ön termosztátja rendelkezik egy paramétermenüvel, amelyet úgy tud előhívni, hogy a végrehajtó gombot ( ) 5 másodperc hosszan lenyomva tartja. A paramétermenü megnyílik és az első paramétert mutatja: A navigációs gombokkal (◄) és (►) tudja a beállítandó... -
Page 64: Műszaki Adatok
6. Műszaki adatok Környezeti feltételek: Üzemi hőmérséklet: 0 – 40 °C Szállítási és tárolási hőmérs. -10 °C-tól +50 °C-ig Érintésvédelem IP30 Installációs osztály II. osztály Szennyezettségi fok Hőmérs. mérési pontossága 0.1°C Beállítási tartomány Komfort-, Csökkentett hőmérséklet 5 - 35 °C 0,5 °C-os lépésekben Fagyvédelem 10 °C (állítható) Időzítés... -
Page 65: Οδηγιεσ Για Την Ασφαλεια
ΣΗΜΑΝΤΙΚΟ! - Πριν από την έναρξη των εργασιών, ο τεχνικός εγκατάστασης πρέπει να διαβάσει, να κατανοήσει και να ακολουθήσει τις παρούσες οδηγίες συναρμολόγησης και συντήρησης. - Η εγκατάσταση, ρύθμιση και συντήρηση του θερμοστάτη πρέπει να πραγματοποιείται μόνο από εξειδικευμένο και εξουσιοδοτημένο... -
Page 66: Εμφάνιση Και Φωτεινές Ενδείξεις
8. Παρουσίαση Ο προγραμματιζόμενος ηλεκτρονικός θερμοστάτης ραδιοσυχνοτήτων (RF) που συνδέεται με τον δέκτη έχει σχεδιαστεί για τη ρύθμιση των περισσότερων εγκαταστάσεων θέρμανσης. Χάρη στις ραδιοσυχνότητες (868MHz) ενσωματώνεται εύκολα σε όλες τις περιπτώσεις εγκατάστασης (ανακαίνιση, νέα εγκατάσταση…) Θα είναι ο καλύτερος σύμμαχός σας για να βελτιστοποιήσετε την κατανάλωση ενέργειας ενώ παράλληλα αυξάνετε την άνεσή σας. -
Page 67: Ενεργοποίηση Του Συστήματος Για Πρώτη Φορά
21. Τρόπος λειτουργίας (η ενεργή λειτουργία εμφανίζεται σε πλαίσιο). 22. Αριθμός προγράμματος ή παραμέτρου, αν εμφανίζεται το “3”. 23. Μενού διαμόρφωσης παραμέτρων. 24. Τύπος αισθητήρα που χρησιμοποιείται για τη ρύθμιση ή θερμοκρασίας που εμφανίζεται στην οθόνη. Ρύθμιση => Εσωτερική ή εξωτερικού χώρου από απόσταση. Ρύθμιση... -
Page 68: Έναρξη Λειτουργίας
- Αν η λήψη του σήματος του θερμοστάτη δεν είναι σωστή, δοκιμάστε να πλησιάσετε το θερμοστάτη στο δέκτη ή ελέγξτε την εγκατάσταση του δέκτη (Ανατρέξτε στην ενότητα "Αντιμετώπιση προβλημάτων"). * Για τις αρχικές ρυθμίσεις των ραδιοσυχνοτήτων (RF) ο δέκτης είναι προτιμότερο να βρίσκεται σε ορατή θέση κατά τη διάρκεια της... -
Page 69: Λειτουργία Με Χρονοδιακόπτη
10.5 Λειτουργία με χρονοδιακόπτη Η λειτουργία χρονοδιακόπτη σας δίνει τη δυνατότητα να ρυθμίσετε τη θερμοκρασία για τη διάρκεια που επιθυμείτε. (Μπορείτε να τη χρησιμοποιήσετε στην περίπτωση που μένετε στο σπίτι με άδεια, μια γιορτή…) - Αρχικά πρέπει να ρυθμίσετε την επιθυμητή θερμοκρασία με τα κουμπιά (-) ή (+) και να επιβεβαιώσετε με το κουμπί (OK). (Εργοστασιακή... -
Page 70: Τεχνικά Χαρακτηριστικά
- Τώρα μπορείτε να επιλέξετε μια παράμετρο και να τη ρυθμίσετε με τα κουμπιά (◄)ή (►). Μόλις εμφανιστεί η παράμετρος, πατήστε το (OK) για πρόσβαση στη ρύθμιση (η τιμή αναβοσβήνει) και αλλάξτε την τιμή με τα κουμπιά (-) ή (+). Πατήστε ξανά το κουμπί... - Page 71 Εύρος τιμών ρύθμισης Άνεση και οικονομική 5 °C - 35 °C για 0,5°C Κατά του παγετού 0,5 - 10°C Χρονοδιακόπτης 5°C - 35°C Χαρακτηριστικά ρύθμισης Αναλογική ζώνη 2 °C για έναν κύκλο 10 λεπτών (ρυθμιζόμενο) ή υστέρηση 0,5 °C. 2 λεπτά ON και OFF Ελάχιστοι...
-
Page 72: Αντιμετώπιση Προβλημάτων
14. Αντιμετώπιση προβλημάτων Ο θερμοστάτης BT DRF-01 δεν ανάβει - Βεβαιωθείτε ότι η προστατευτική ταινία των μπαταριών έχει αφαιρεθεί. Πρόβλημα με τις μπαταρίες - Ελέγξτε την κατεύθυνση των μπαταριών. - Ελέγξτε τη χωρητικότητα των μπαταριών. Η ενδ. λυχνία τύπου Led του BT DRF-01 αναβοσβήνει με κόκκινο χρώμα Το...