Table des Matières
Publicité
Les langues disponibles
Les langues disponibles
Liens rapides
Publicité
Table des Matières

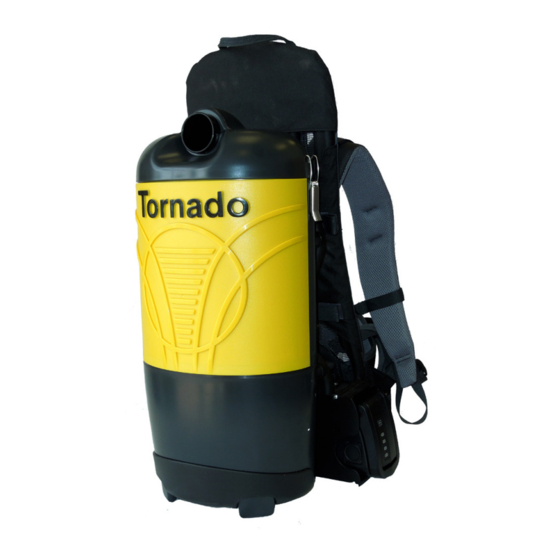
Sommaire des Matières pour Tornado Pac-Vac 6 Roam
- Page 1 TORNADO INDUSTRIES, LLC 3101 WICHITA COURT FORT WORTH, TX 76140 (800)-822-8867 FAX (817)-551-6507 WWW.TORNADOVAC.COM Operations & Maintenance Manual For Commercial Use Only Pac-Vac™ 6 Roam MODEL NO: 93016 Form No. L3016M BE 06/20 ©Tornado Industries, LLC. All rights reserved...
- Page 2 NOTES Within 30 days, to activate the warranty, go to; https://tornadovac.com/services/warranty-registration-form.aspx For warranty information go to www.tornadovac.com...
-
Page 3: General Precautions
Your new Tornado unit is a high quality, precision-made product. All parts used in the manufacturing of this unit have passed rigid quality control standards prior to assembly. Please safeguard the original receipt / invoice. If you experience any problems with your unit during the warranty period, the original receipt / invoice will act as proof of purchase. -
Page 4: Important Safety Instructions
IMPORTANT SAFETY INSTRUCTIONS FOR COMMERCIAL USE WHEN USING AN ELECTRICAL APPLIANCE, BASIC PRECAUTIONS SHOULD ALWAYS BE FOLLOWED INCLUDING THE FOLLOWING: READ ALL INSTRUCTIONS BEFORE USING THIS MACHINE WARNING : TO REDUCE THE RISK OF FIRE, ELECTRIC SHOCK, OR INJURY: • Do not leave machine unattended when plugged in. - Page 5 11. DO NOT smoke near batteries or charger. 12. DO NOT charge the unit outdoors. 13. DO NOT attempt to repair, service, or modify the battery system or charger. Contact Tornado Customer Service with any issues. 14. DO NOT short-circuit the battery or charger terminals with conductive items such as paper clips. This can deliver high current, resulting in heat and fire.
- Page 6 Wearing the Backpack Vacuum The backpack is designed to balance the weight of the vacuum on the hips, not the shoulders. 1.Adjust the Vari-Quick height adjuster to your back length. 2. Loosen all of the straps and place the vacuum on your back. Fig.
- Page 7 OPERATION INSTRUCTIONS Please read the following operating instructions carefully. They will help you to get the best performance from this professional quality vacuum cleaner and to maintain it in optimum condition. Follow these simple steps for easy and effective operation of the Backpack vacuum. Open the lid and ensure that the cloth bag is correctly located and the flexible ring provides a proper seal when the lid is closed.
- Page 8 PREPARING BATTERY PACK FOR CHARGING 1. Plug the charger's power cord into the charger (Fig. 6). 2. Plug the charger's power cord into 120V wall outlet (Fig. 7). 3. The indicator light should turn Red and blink while charging and turn Green when fully charged (Fig. 8). The battery pack may require approximately 2.5 hours to fully charge.
- Page 9 TO CHANGE THE FILTER COLLECTION BAGS • Turn off the main power switch (Fig. 10). • Remove vacuum hose from top of unit (Fig 11). • Release the two latches and lift off lid (Fig. 12). • Separate lid from paper bag insert and dispose of paper bag (Fig. 13) •...
- Page 10 Clean the vacuum bag and HEPA filter or free any blockage and ensure that adequate airflow is restored. Use only approved Tornado paper filter bags. Ensure the vacuum hose, the extension wand and the vacuuming accessories are not blocked.
- Page 11 Part No. Description A352-6900 Hose CT171 Wand CT176 Crevice Tool B352-PF10 Carpet Tool CT188 Upholstery Tool CT184 Dusting Tool C352-PF20 Hard Floor Tool CT190 Easy Glide Carpet Tool...
- Page 12 NOTAS Dentro de los 30 días, para activar la garantía, vaya a: https://tornadovac.com/services/warranty-registration-form.aspx PARA OBTENER INFORMACIÓN SOBRE LA GARANTÍA, VISITE WWW.TORNADOVAC.COM...
-
Page 13: Proteja El Medioambiente
Su nueva unidad Tornado es un producto de alta calidad, hecho con precisión. Todas las piezas de esta unidad han su- perado estándares estrictos de control de calidad antes del montaje. Por favor, guarde en un lugar seguro el recibo o la factura original. -
Page 14: Instrucciones De Seguridad Importantes
INSTRUCCIONES DE SEGURIDAD IMPORTANTES ÚNICAMENTE PARA USO COMERCIAL CUANDO SE UTILIZA UN APARATO ELÉCTRICO, DEBEN SEGUIRSE SIEMPRE PRECAUCIONES BÁSICAS, QUE INCLUYEN LAS SIGUIENTES: LEA TODAS LAS INSTRUCCIONES ANTES DE UTILIZAR ESTE APARATO ADVERTENCIA : PARA REDUCIR EL RIESGO DE INCENDIO, DESCARGA ELÉCTRICA O LESIÓN: •... - Page 15 Para reducir el riesgo de descarga eléctrica, incendio, explosión de la batería o lesiones: 1. Utilice únicamente el cargador Tornado X1194 y la batería Tornado X1200 2. NO exponga la batería a temperaturas mayores a 122°F (50°C). Nunca deje la batería dentro de automóviles en días calurosos, donde la temperatura puede ser mucho mayor a la temperatura exterior.
- Page 16 El sistema de arnés Deuter Aircomfort de las Pac-Vac 6 y 10 de la Serie Aircomfort de Tornado ofrece cinco ajustes únicos que aseguran un calce seguro, cómodo y personalizado. a. Sistema patentado Vari-Quick b.
- Page 17 INSTRUCCIONES DE FUNCIONAMIENTO Por favor, lea atentamente las siguientes instrucciones de funcionamiento. Las mismas le ayudarán a obtener el mejor rendimiento de esta aspiradora de calidad profesional y mantenerla en óptimas condiciones. Siga estos sencillos pasos para que su Aspiradora de Mochila funcione de manera fácil y eficaz. Abra la tapa y asegúrese de que la bolsa de tela se encuentre correctamente ubicada y que el anillo flexible proporcione un sellado adecuado cuando la tapa se cierre.
- Page 18 CÓMO PREPARAR LA BATERÍA PARA SU CARGA 1. Enchufe el cable del cargador en el cargador (Fig. 6). 2. Enchufe el cable de alimentación del cargador a un toma de pared de 120V (Fig. 7). 3. La luz indicadora debe ser roja y parpadear durante la carga, y verde cuando está totalmente cargada (Fig. 8). La batería puede necesitar unas dos horas y media para estar totalmente cargada.
- Page 19 CÓMO CAMBIAR LAS BOLSAS DE RECOLECCIÓN DEL FILTRO • Apague el interruptor de alimentación principal (Fig.10). • Retire la manguera de vacío de la parte superior de la unidad (Fig. 11). • Suelte los dos pestillos y levante la tapa (Fig. 12). •...
- Page 20 Limpie la bolsa de la aspiradora y el filtro HEPA para liberar cualquier obstrucción, y asegúrese de que se restablezca un flujo de aire adecuado. Utilice únicamente bolsas de filtro de papel aprobadas por Tornado. Asegúrese de que la manguera de vacío, la barra de extensión y los accesorios de la aspiradora no estén bloqueados.
- Page 21 Part No. Description A352-6900 Hose CT171 Wand CT176 Crevice Tool B352-PF10 Carpet Tool CT188 Upholstery Tool CT184 Dusting Tool C352-PF20 Hard Floor Tool CT190 Easy Glide Carpet Tool...
- Page 22 REMARQUES Dans les 30 jours, pour activer la garantie, accédez à: https://tornadovac.com/services/warranty-registration-form.aspx Pour des informations sur la garantie, visitez www.tornadovac.com...
- Page 23 Votre nouvel appareil Tornado est un produit de précision de haute qualité. Toutes les pièces utilisées dans la fabrication de cet appareil ont passé avec succès des tests stricts de normes de contrôle de qualité avant leur assemblage. Veuillez con- server le reçu / la facture original(e).
-
Page 24: Instructions De Sécurité Importantes
INSTRUCTIONS DE SÉCURITÉ IMPORTANTES POUR USAGE COMMERCIAL LORS DE L’UTILISATION D’UN APPAREIL ÉLECTRIQUE, IL EST IMPORTANT DE TOUJOURS PRENDRE DES MESURES DE PRÉCAUTION DE BASE NOTAMMENT LES SUIVANTES : LISEZ TOUTES LES INSTRUCTIONS AVANT D’UTILISER CET APPAREIL AVERTISSEMENT : AFIN DE RÉDUIRE LE RISQUE D’INCENDIE, DE CHOC ÉLECTRIQUE, OU DE BLESSURE : •... -
Page 25: Sécurité De La Batterie Et De La Charge
Afin de réduire le risque d’électrocution, d’incendie, d’explosion ou de blessure : 1. Utilisez uniquement le chargeur Tornado X1194 et la batterie Tornado X1200 2. N’EXPOSEZ PAS les batteries aux températures supérieures à 122 °F (50 °C). Ne laissez jamais la batterie dans les automobiles par temps chaud, où... -
Page 26: Le Système Breveté D'air Comprend
Une ceinture dorsale pourvue d’une bordure avec une mousse bi-laminée renforcée avec du PE, fournit un confort aux hanches. Le système de baudrier d’air Deuter du Tornado Pac-Vac 6 et 10 Aircomfort Series offre cinq ajustements uniques, assurant ainsi une adaptation sécurisée, décontractée et individualisée. - Page 27 INSTRUCTIONS DE FONCTIONNEMENT Veuillez lire attentivement les instructions de fonctionnement ci-dessous. Elles vous aideront à obtenir la meilleure performance de cet aspirateur de qualité professionnelle et à le maintenir dans les meilleures conditions. Suivez ces étapes de base pour un fonctionnement simple et efficace de l’aspirateur dorsal. Ouvrez le couvercle et assurez-vous que le sac en tissu est correctement positionné...
-
Page 28: Préparation De La Batterie Pour La Charge
PRÉPARATION DE LA BATTERIE POUR LA CHARGE 1. Branchez le cordon dans le chargeur (Fig.6). 2. Branchez le cordon dans la prise murale de 120 V (Fig.7). 3. Le témoin lumineux doit passer au rouge et clignoter pendant la charge et passer au vert une fois que la batte- rie est complètement chargée (Fig.8). -
Page 29: Pour Remplacer Les Sacs Collecteurs En Papier
POUR REMPLACER LES SACS COLLECTEURS EN PAPIER • Veuillez éteindre l’interrupteur d’alimentation principal (Fig.10). • Enlevez le tuyau de l’aspirateur de la partie supérieure de l’appareil (Fig 11). • Débloquez les deux loquets et soulevez le couvercle (Fig. 12). • Séparez le couvercle du sac en papier et jetez le sac en papier (Fig.13) •... -
Page 30: Remplacement De L'unité De Filtre Hepa
Nettoyez minutieusement le sac d’aspirateur et le filtre HEPA ou libérez toute obstruction et assurez-vous que le débit d’air adéquat est restauré. Utilisez uniquement des sacs-filtres en papier approuvés par Tornado. Assurez-vous que le tuyau de l’aspirateur, le tube-rallonge et les accessoires de l’aspirateur ne sont pas bloqués. - Page 31 Part No. Description A352-6900 Hose CT171 Wand CT176 Crevice Tool B352-PF10 Carpet Tool CT188 Upholstery Tool CT184 Dusting Tool C352-PF20 Hard Floor Tool CT190 Easy Glide Carpet Tool...