Table des Matières
Publicité
Les langues disponibles
Les langues disponibles
Liens rapides
Publicité
Chapitres
Table des Matières

Manuels Connexes pour De Dietrich HoriZone tech DPI7698G


Sommaire des Matières pour De Dietrich HoriZone tech DPI7698G
- Page 1 GUIDE D’UTILISATION USER GUIDE TABLE INDUCTION INDUCTION HOB...
-
Page 3: Table Des Matières
TABLE DES MATIERES Sécurité et précautions importantes ..........4 Installation ..................7 Déballage ....................7 Encastrement ..................7 Branchement ..................9 Utilisation ..................10 Choix du récipient ................10 Description de votre dessus ..............11 Description de l’afficheur ..............12 Description des fonctions..............13 Mise en marche ..................13 Sélection du foyer ................14 Réglage de la puissance ..............16 Arrêt des foyers - de la table ..............16 Durée de cuisson................17... -
Page 4: Sécurité Et Précautions Importantes
SÉCURITÉ ET PRÉCAUTIONS IMPORTANTES Cette notice est également disponible sur le site internet de la marque. Merci de prendre connaissance de ces conseils avant d'installer et d'utiliser votre appareil. Ils ont été rédigés pour votre sécurité et celle d'autrui. Conservez cette notice d'utilisation avec votre appareil. - Page 5 SÉCURITÉ ET PRÉCAUTIONS IMPORTANTES table, sans Pour la cuisson, n’utilisez surveillance peut être jamais de feuille de papier dangereuse et donner lieu à un d’aluminium. déposez incendie. Ne tentez JAMAIS jamais des produits emballés d'éteindre un feu avec de l'eau, avec de l’aluminium, ou en mais coupez l'alimentation de barquette...
- Page 6 SÉCURITÉ ET PRÉCAUTIONS IMPORTANTES Après utilisation, arrêter le fonctionnement de la table de cuisson au moyen de son dispositif de commande et ne pas compter sur le détecteur de casseroles. MISE EN GARDE : Utilisez uniquement des protections de tables conçues par le fabricant l'appareil cuisson, référencées dans la notice...
-
Page 7: Déballage
1.1 DEBALLAGE 1.1.1 Enlevez tous les éléments de protection. Vérifiez et respectez les caractéristiques de l’appareil figurant sur la plaque signalétique (1.1.1). Veuillez noter dans les cadres ci- dessous les références de service et de type norme figurant sur cette plaque pour un usage futur. - Page 8 Vérifiez que l’air circule correctement 1.2.4 entre l’avant et l’arrière de votre table de cuisson. En cas d’installation de la table au- dessus d’un tiroir (1.2.4) ou au-dessus d’un four encastrable (1.2.5), respectez dimensions notées illustrations afin d’assurer une sortie d’air suffisante à...
-
Page 9: Branchement
1. 3 BRANCHEMENT ELECTRIQUE tables doivent être branchées sur le réseau par l’intermédiaire d’un dispositif à coupure omnipolaire conforme aux règles d’installations en vigueur. Une déconnection doit être incorporée dans canalisation fixe. Identifiez le câble et les couleurs des fils 1.3.1 de votre table de cuisson : Câble à... -
Page 10: Utilisation
• UTILISATION 2.1 CHOIX DU RECIPIENT plupart récipients sont compatibles avec l’induction. Seuls le verre, la terre, l’aluminium sans fond spécial, le cuivre et certains inox non magnétiques ne fonctionnent pas avec la cuisson induction. Nous vous suggérons de choisir des récipients à... -
Page 11: Description De Votre Dessus
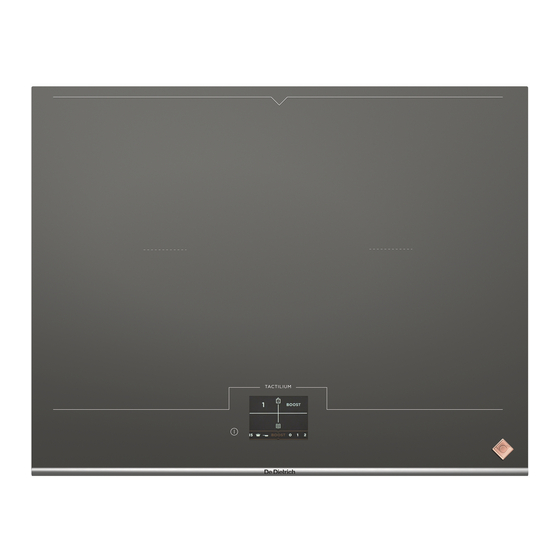
• UTILISATION 2.2 DESCRIPTION DE VOTRE DESSUS tech Horizone DPI7698G DPI7698DG play Horizone DPI7698GS... -
Page 12: Description De L'afficheur
• UTILISATION 2.3 DESCRIPTION DE L’AFFICHEUR Votre clavier est entièrement tactile. Un simple appui sur l’écran permet d’accéder aux commandes une fois la table mise en route. Un bandeau déroulant situé en partie basse de l’afficheur s’utilise en glissant le doigt dessus et permet de choisir la valeur (de puissance) ou les diverses fonctions disponibles. -
Page 13: Description Des Fonctions
• UTILISATION 2.4 DESCRIPTION DES FONCTIONS Fonction durée de cuisson Fonction ébullition (minuterie) Fonction maintien au chaud Fonction minuteur indépendant Fonction réglages Fonction «Elapsed time» Fonction gril / plancha Fonction sélection de la zone de cuisson 2.5 MISE EN MARCHE 4 configurations de cuisson apparaissent dans l’afficheur. -
Page 14: Selection Du Foyer
• UTILISATION 2.6 SELECTION DU FOYER Appuyez sur la touche Marche/Arrêt de la table (A). Appuyez sur la touche «Menu» pour accéder aux fonctions (B). Appuyez sur la fonction «Sélection de la zone de cuisson» (C) pour obtenir les 4 configurations de cuisson possibles (D). - Page 15 • UTILISATION Ajout d’une casserole supplémentaire : Posez votre casserole sur la zone désirée et appuyez sur l’écran pour détecter l’emplacement du nouveau récipient. Un chiffre couleur cuivre apparaît dans la zone choisie. Vous pouvez alors régler la puissance désirée. Sans demande de puissance de votre part, la zone de cuisson s’éteindra...
-
Page 16: Reglage De La Puissance
• UTILISATION 2.7 REGLAGE DE LA PUISSANCE Bandeau déroulant donnant accès aux puissances : Sélectionnez une valeur de puissance en appuyant directement sur le chiffre ou le symbole désiré. Vous pouvez également faire glisser votre doigt sur le bandeau déroulant. La zone de cuisson démarre aussitôt, sans avoir à... -
Page 17: Arrêt De La Table
• UTILISATION 2.9 ARRÊT DE LA TABLE Effectuez un appui long sur la touche Marche/Arrêt de la table, l’écran s’éteint. 2.10 DUREE DE CUISSON (minuterie) Chaque zone de cuisson possède une minuterie dédiée. Celle-ci peut être pro- grammée dès que la zone concernée est en fonctionnement. -
Page 18: Minuteur Independant
• UTILISATION 2.11 MINUTEUR INDEPENDANT Cette fonction vous permet de régler un compte à rebours à n’importe quel moment. Pour accéder à cette fonction : Allez dans le menu des fonctions et choisissez fonction «minuteur indépendant» (A). Réglez le temps désiré à l’aide des touches + ou - (B). - Page 19 • UTILISATION 2.12 ELAPSED TIME Cette fonction permet d’afficher le temps écoulé depuis la dernière modification de puissance sur un foyer choisi. Exemple : votre table fonctionne à puissance 6 depuis plusieurs minutes, sans programmation de durée. Pour connaître le temps écoulé, allez dans le menu des fonctions et choisissez la fonction «Elapsed time»...
- Page 20 • UTILISATION 2.13 EBULLITION (fonction «Boil») Cette fonction permet de faire bouillir et de maintenir l’ébullition de l’eau pour faire cuire des pâtes par exemple. Sélectionnez votre foyer (exemple : arrière-gauche). Allez dans le menu des fonctions et choisissez la fonction «Boil» (A). Par défaut la quantité...
-
Page 21: Maintien Au Chaud
• UTILISATION NOTA : Il est important que la température de l’eau ne soit ni trop chaude ni trop froide au départ de la cuisson car cela fausserait le résultat final. Ne pas utiliser de récipient en fonte. Cette fonction n’est utilisable que sur un seul foyer à... -
Page 22: Horizone Play
• UTILISATION PLAY 2.15 HORIZONE (selon modèle) Votre appareil est équipé d’un guide à l’arrière de la surface de cuisson qui permet de positionner les accessoires De Dietrich de la gamme Horizone Play tels que le billot, la plancha ou le gril. Mise en place des accessoires : Positionner la rainure de votre... -
Page 23: Réglages
• UTILISATION 2.17 REGLAGES Cette fonction donne accès à divers paramètres qu’il est possible de modifier : - La présélection des puissances. - La luminosité. - Le mode démonstration, (réservé au service après-vente). Votre zone de cuisson doit être éteinte. Allez dans le menu des fonctions et choisissez la fonction «Réglages»... -
Page 24: Luminosité
• UTILISATION 2.19 LUMINOSITE Cette fonction permet de modifier l’intensité de l’affichage dans l’écran. Pour accéder à cette fonction, allez dans la fonction «Réglages». Sélectionnez le symbole luminosité au centre de l’écran (A). Modifiez l’intensité désirée à l’aide des touches + ou - (B). Validez en appuyant sur le symbole «retour»... -
Page 25: Verrouillage Des Commandes
• UTILISATION 2.21 VERROUILLAGE DES COMMANDES Votre table de cuisson possède une sécurité enfants qui verrouille la table (pour le nettoyage par exemple). Pour des raisons de sécurité, seule la touche «Marche/arrêt» reste toujours active et autorise la coupure des zones de chauffe même verrouillées. -
Page 26: Securite Et Recommandations
• UTILISATION 2.22 «CLEAN LOCK» Cette fonction permet le verrouillage temporaire de votre table pendant un nettoyage. Pour activer «Clean lock» : Faites un appui court sur le cadenas «ouvert» dans l’afficheur, un bip est émis et un cadenas «fermé» clignote pendant tout le temps du verrouillage. - Page 27 • UTILISATION Limiteur de température : Chaque zone de cuisson est équipée d’un capteur de sécurité qui surveille en permanence la température du fond du récipient. En cas d’oubli d’un récipient vide sur une zone de cuisson allumée, ce capteur adapte automatiquement la puissance délivrée par la table et évite ainsi tout risque de détérioration de l’ustensile ou de la table.
-
Page 28: Entretien
• UTILISATION En cas de déclenchement de cette Auto-Stop system : sécurité, la coupure de la zone de vous oubliez d’éteindre cuisson est signalée par l’affichage préparation, votre table de cuisson est «Auto-Stop» dans la zone de commande équipée d’une fonction de sécurité et un signal sonore est émis pendant 2 «Auto-Stop system»... - Page 29 • ENTRETIEN A la première utilisation : salissure, laissez agir, et essuyez avec un chiffon doux. Il faut huiler votre billot avec de l’huile de Pour colorations métalliques cuisson (1 à 2 cuillères à soupe à étaler brillantes et entretien hebdomadaire, avec un chiffon propre sur toute les utilisez produit...
-
Page 30: Anomalies Et Solutions
• ANOMALIES ET SOLUTIONS Vous constatez : Causes possibles : Ce qu’il faut faire : apparait sur Mode Démo Appui sur l’icône sur l’écran. Le branchement de votre Vérifiez sa conformité. Votre installation disjoncte. table est défectueux. Chapitre branchement. La table dégage une odeur Rien. -
Page 31: Environnement
• ENVIRONNEMENT RESPECT DE L’ENVIRONNEMENT - Les matériaux d'emballage de cet appareil sont recyclables. Participez à leur recyclage et contribuez ainsi à la protection de l'environnement en les déposant dans conteneurs municipaux prévus à cet effet. - Votre appareil contient également de nombreux matériaux recyclables. -
Page 32: Service Consommateurs
Ces suivante : renseignements figurent sur la plaque Service Consommateurs signalétique. DE DIETRICH 5 avenue des Béthunes CS69526 SAINT OUEN L’AUMONE Vous pouvez nous contacter du lundi au 95060 CERGY PONTOISE CEDEX samedi de 8h00 à 20h00 au : >... -
Page 33: Guide De Demarrage Rapide
GUIDE DE DEMARRAGE RAPIDE ON/OFF Fonction durée de cuisson Fonction «Boil» (minuterie) Fonction maintien au chaud Fonction minuteur indépendant Fonction réglages Fonction «Elapsed time» Fonction Gril / Plancha Fonction sélection de la zone de cuisson... - Page 36 CONTENTS Important safety advice and precautions ........4 Installation ..................7 Unpacking ....................7 Fitting ....................7 Connection....................9 Use ....................10 Choice of cookware ................10 Description of the top................11 Description of the display..............12 Description of the functions ..............13 Switching on ..................13 Cooking zone selection ..............14 Adjusting the power 16 Switching the rings - hob off ..............16 Cooking time ..................17...
-
Page 37: Important Safety Advice And Precautions
IMPORTANT SAFETY ADVICE AND PRECAUTIONS This user guide is also available on the brand’s web site. Please read this advice carefully before installing and using your appliance. It is intended to protect your safety and the safety of others. Keep this user guide with the appliance. - Page 38 IMPORTANT SAFETY ADVICE AND PRECAUTIONS the pacemaker manufacturer Never use aluminium foil for or your GP. cooking. Never place items Leaving oil or fat to cook wrapped in aluminium foil or unattended on a hob can be packaged in aluminium dishes on your cooking hob.
- Page 39 IMPORTANT SAFETY ADVICE AND PRECAUTIONS After use, turn off the hob using its control device and do not rely on the pan sensor to do this. WARNING: Only use hob protectors designed by the manufacturer of the cooking appliance or listed as suitable in the user guide, or included with the appliance.
-
Page 40: Unpacking
1.1 UNPACKING 1.1.1 Remove all the protective packing pieces. Check appliance’s characteristics on the nameplate and be sure to comply with them (1.1.1). Note service standard references shown on this plate in the boxes below for future reference. Type: Service: 1. - Page 41 Check that air can flow correctly 1.2.4 between the front and back of your hob. If you are installing the hob above a drawer (1.2.4) or above a built-in oven (1.2.5), comply with the dimensions provided on the illustrations to ensure a sufficient air outlet at the front.
-
Page 42: Electrical Connections
1. 3 ELECTRICAL CONNECTIONS These hobs must be connected to the mains via an all-pole cut-off device that complies with current installation regulations. disconnection device must be incorporated into the fixed wiring. Identify the cable and wire colours for your hob: 5-wire cable (1.3.1 and 1.3.2) a) green-yellow 1.3.1... -
Page 43: Use
• 2.1 CHOICE OF COOKWARE Most cookware is compatible with induction. Only glass, terracotta, aluminium without a special base, copper and some non-magnetic stainless steels do not work with induction cooking. We suggest that you choose cookware with a thick, flat bottom. The heat will be distributed better and cooking will be more uniform. -
Page 44: Description Of The Top
• 2.2 DESCRIPTION OF THE TOP Horizone tech DPI7698G DPI7698DG Horizone play DPI7698GS... -
Page 45: Description Of The Display
• 2.3 DESCRIPTION OF THE DISPLAY Your keypad is fully touch-sensitive. Simply press the screen to access the commands once the hob is switched on. Slide your finger along the sliding strip in the bottom of the display to select the value (power) or various functions available. Horizone tech Hob On/Off Menu key... -
Page 46: Description Of The Functions
• 2.4 DESCRIPTION OF THE FUNCTIONS Cooking time function (timer) Boil function Independent timer function Keep warm function Elapsed time function Settings function Select cooking zone function Grill / griddle function 2.5 SWITCHING ON 4 cooking times appear in the display. QUATTRO mode 4 zones: for cookware with bases of 11 to 22 cm... -
Page 47: Cooking Zone Selection
• 2.6 COOKING ZONE SELECTION Press the on/off button (A) on the hob. Press the “Menu” key to access the functions (B). Press the “Select cooking zone” function (C) for the 4 cooking settings possible (D). Select one of the cooking settings depending on your cookware (E). - Page 48 • Add another pan: Put your pan on the required zone and press the screen to detect the new cookware’s location. A copper-coloured number appears in the chosen zone. You can then set the power level. If you do not select a power level, the cooking zone will automatically shut off after a few seconds.
-
Page 49: Setting The Power
• 2.7 SETTING THE POWER Scrolling strip providing access to the power levels: Select a power value by pressing the number or symbol you want directly. You may also slide your finger across the scrolling strip. The cooking zone starts immediately without you needing to validate. -
Page 50: Switching Off The Hob
• 2.9 SWITCHING OFF THE HOB Press and hold the hob On/Off key; the screen switches off. 2.10 COOKING TIME (timer) Each cooking zone has a dedicated timer. It can be programmed as soon as the cooking zone is turned on. First select your ring then the heating power, example 6 (A). -
Page 51: Independent Timer
• 2.11 INDEPENDENT TIMER With this function you can set a timer at any time. To access this function: Go to the functions menu and select the “independent timer” function (A). Set the time you want using the + or - keys (B). -
Page 52: Elapsed Time
• 2.12 ELAPSED TIME This function displays the time since the power setting was last changed for a selected cooking zone. Example: your hob has been running at power level 6 for a few minutes, with no time programmed. To see the elapsed time, go to the functions menu and select the “Elapsed time”... -
Page 53: Boil Function
• 2.13 BOIL function With this function you can boil and simmer water to cook pasta, for example. Select your ring (for example: rear left). Go to the functions menu and select the “Boil” function (A). By default, the quantity of water proposed is 2 litres, but you may modify it using the + or - keys (B). -
Page 54: Keep Warm Function
• NOTE: The water temperature must not be too hot or too cold at the start of cooking as this will distort the final result. Do not use a cast iron pan. This function can only be used on one ring at a time. -
Page 55: Grill / Griddle Function
(depending on model) Your appliance is equipped with a guide at the rear of the cooking surface which allows De Dietrich accessories in the Horizone Play range, such as the chopping board, griddle or grill to be positioned. Positioning accessories: Position the groove on your accessory on the guide on your appliance (A). -
Page 56: Settings
• 2.17 SETTINGS This function provides access to the various parameters you can modify: - Power presets. - Brightness. - Demo mode, (reserved after-sales department). The cooking area should be off. Go to the functions menu and select the “Settings” function (A). 2.18 POWER PRE-SELECTION This function allows you to modify the power levels defined in the pre-set set-... -
Page 57: Demo Mode
• 2.19 BRIGHTNESS This function modifies the intensity of the screen display. To access this function, go to the “Settings” function. Select the brightness symbol in the centre of the screen (A). Modify the intensity you want using the + or - keys (B). Validate by pressing the “back”... -
Page 58: Locking The Controls
• 2.21 LOCKING THE CONTROLS Your hob has a child safety device that locks the hob (for cleaning, for example). Due to safety reasons, only the “On/Off” key is always active. It authorises the heating zones to be switched off even when the hob is locked. -
Page 59: Clean Lock" Function
• 2.22 “CLEAN LOCK” FUNCTION This function locks the hob off while it is being cleaned. To activate Clean lock: Make a short press on the “open” padlock in the display; a beep sounds and a “closed” padlock flashes while the hob is locked. - Page 60 • Temperature limiter: Each cooking zone is fitted with a safety sensor that continuously monitors the temperature of the bottom of the pan. In the event that an empty vessel is left on a cooking zone that is on, this sensor automatically adjusts the power output of the hob, thereby avoiding any risk of damage to the cookware or the hob.
-
Page 61: Care
• If this safety system is used, the cut-off Auto-Stop system: to the cooking zone is displayed as If you forget to switch off a cooking zone, “Auto-Stop” on the control panel and a your hob has an “Auto-Stop system” beep sounds for about 2 minutes. - Page 62 • CARE On first use: For shiny metal streaks and weekly maintenance, use a special vitroceramic Oil with cooking oil (1 to 2 tablespoons glass product. Apply the special product rubbed over all surfaces with a clean (which contains silicon and preferably has cloth).
-
Page 63: Anomalies And Solutions
• ANOMALIES AND SOLUTIONS You observe: Possible causes: What you must do: appears on Demo mode Press the icon on the screen. Your hob disconnection is Check that it is correct. Your installation disconnects. faulty. Connection chapter. The hob smells the first few Nothing. -
Page 64: Environment
• ENVIRONMENT CARE FOR THE ENVIRONMENT - This appliance’s packing materials are recyclable. Recycle them and thus contribute to protecting the environment, by placing them in containers provided for the purpose by local authorities. - Your appliance also contains many recyclable materials. It therefore is marked with this symbol indicate... -
Page 65: Customer Service
• CUSTOMER SERVICE SERVICING AND REPAIRS, FRANCE Any repairs to your appliance must be made qualified professional accredited to work on the brand. When calling, please provide the full references of your appliance (commercial reference, service reference, serial number), so that we can handle your call better. -
Page 67: Quick Start Guide (Detachable Sheet)
QUICK START GUIDE ON/OFF Cooking time function (timer) Boil function Independent timer function Keep warm function Elapsed time function Settings function Select cooking zone function Grill / Griddle function... - Page 68 CZ5703158_00 03/17...