Publicité
Les langues disponibles
Les langues disponibles
Liens rapides
#1-01024
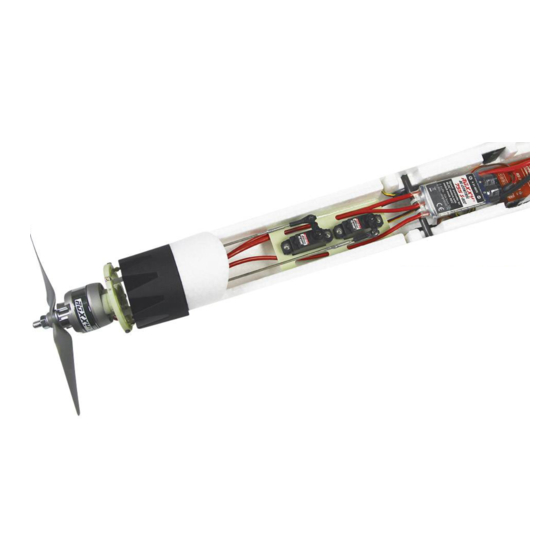
FunJet Vektorsteuereinheit
FunJet Motor vectorcontrol system
FunJet Kit de pièces
pour prop. Vectorielle
Bauanleitung
Abbildungen
Assembly instructions
Illustrations
Notice de montage
Illustrations
© Copyright by MULTIPLEX Modellsport GmbH & Co. KG 2019
VECTOR
2 - 5
8 - 9
6 - 11
8 - 9
12 - 15
8 - 9
#1-01165
Antriebssatz FunJet 2
mit Vektorsteuereinheit
Powerset FunJet 2
with vectorcontrol unit
Propulsion vectorielle FunJet 2
Publicité

Manuels Connexes pour Multiplex FunJet 2 VECTOR

Sommaire des Matières pour Multiplex FunJet 2 VECTOR
- Page 1 Propulsion vectorielle FunJet 2 Bauanleitung 2 - 5 Abbildungen 8 - 9 Assembly instructions 6 - 11 Illustrations 8 - 9 Notice de montage 12 - 15 Illustrations 8 - 9 © Copyright by MULTIPLEX Modellsport GmbH & Co. KG 2019...
- Page 2 1. Vorwort Vielen Dank, dass Sie sich für die FunJet Vektorsteuerung der erzielen. Generell besitzt der FunJet mit Vektorsteuerung Firma Multiplex entschieden haben. Mit dieser erweitern Sie bessere Flugeigenschaften je niedriger sein Abfluggewicht die fliegerischen Möglichkeiten ihres FunJets. Nun sind neue, ist.
- Page 3 3. Zusammenbau und Montage der Vektorsteuerung, Montage des Motors ⓾ Schrauben Sie den Kugelkopf an die dafür vorgesehe- Bohren Sie die Löcher der Augenschrauben auf 2mm auf. Schneiden Sie die zwei Gewindegänge des Motorbechers mit ne Stelle am Motorspant . Falls dieser in der Bohrung zu den Standard FunJet Motorträgerschrauben vor.
- Page 4 6. Programmierung und Settings vom Wingstabi, Inbetriebnahme Achten Sie bei den Einstellungen der Ausschläge darauf, dass Beim Fliegen ohne Wingstabi programmieren Sie eine Flug- die Gestänge nicht an der Mechanik des Vektors anstoßen. phase, in welcher die Vektorsteuerung ausgeschaltet und eine Bitte überprüfen Sie dies sorgfältig!!! Flugphase, in welcher sie eingeschaltet ist.
- Page 5 Stückliste lfd. Nr Anzahl Bezeichnung Abmessungen Außenring 1-01198 4 mm GFK Motorspant 1-01199 4 mm GFK Spantverlängerung 1-01200 4 mm GFK Servobrett 1-01206 1 mm GFK Löthülse M2 1610700 M2 / d=2,1 mm Schubstange mit Teilgewinde 1610400 S2,0 x 200 Gabelkopf 1610200 Kugelgelenk mit Kugelbolzen...
- Page 6 FunJet, enabling you to fly former- also recommend the use of the Multiplex Wingstabi #55010 or ly unimaginable manoeuvres such as knife-edge passes, flat Wingstabi Easy Control #1-00858 stabilising systems.
- Page 7 3. Assembling and installing the vector control unit, motor installation ⓾ Screw the ball-end bolt in the hole in the motor bulkhead Locate the ring-screws and drill out the holes to 2 mm Ø. Cut the threads in the two holes in the motor cylinder using in the location shown.
- Page 8 Abbildungen · Illustrations Übersicht · overview · vue d'ensemble ⓫ ⓭ ㉑ ㉑ ⓬ ⓾ ⓯ ⓮ ⓯ Abb. / Fig. 01 Abb. / Fig. 02 ⓯ Abb. / Fig. 03 ⓮ Abb. / Fig. 04 ⓮ ⓭ Abb. / Fig. 05 Ø...
- Page 9 Abbildungen · Illustrations Abb. / Fig. 08 Abb. / Fig. 09 ⓾ ⓾ Ø 2 mm Ø 2 mm Abb. / Fig. 10 Abb. / Fig. 11 Abb. / Fig. 12 Abb. / Fig. 13 Abb. / Fig. 14 Abb. / Fig. 15...
- Page 10 6. Programming the Wingstabi, settings, using the system for the first time When setting up the vector travels it is important to ensure that When using a Wingstabi you should use only Stage 0 (sta- the pushrods do not foul the vector unit mechanism. Please bilisation off) and Stage 1 (damping mode).
-
Page 11: List Of Parts
List of parts Serial no. Qty. Name Dimensions Outer ring 1-01198 4 mm GFK Motor bulkhead 1-01199 4 mm GFK Spacer 1-01200 4 mm GFK Servo plate 1-01206 1 mm GFK Threaded coupler 1610700 M2 / d=2,1 mm Pushrod 1610400 S2,0 x 200 Clevis 1610200... -
Page 12: Matériel Nécessaire
Merci d’avoir choisi le Contrôle Vektor FunJet de la société équipé du Contrôle Vektor est un facteur essentiel pour de Multiplex. Ce produit va vous permettre d’étendre les possibi- bonnes caractéristiques de vol. Nous recommandons éga- lités de vol de votre FunJet. Vous pourrez désormais effectuer lement l’utilisation du Wingstabi #55010 ou Wingstabi Easy... - Page 13 3. Assemblage du Contrôle Vektor, montage du moteur ⓾ Vissez la rotule à l’emplacement prévu sur le support mo- Percez les trous 2mm des têtes de vis . Coupez les fi- lets du support moteur à l’aide des vis de montage d’origine. teur .
- Page 14 6. Programmation et réglages du Wingstabi, mise en route Il est très important que les tringles ne touchent pas la méca- Pour le vol sans Wingstabi, il est nécessaire de programmer nique du Vektor, les longueurs des tringles doivent être reglées une phase de vol avec le Contrôle Vektor desactivé...
- Page 15 Nomenclature Rep. Qté Désignation Dimensions Anneau extérieur 1-01198 4 mm GFK Support moteur 1-01199 4 mm GFK Prolongement support 1-01200 4 mm GFK Support de servo 1-01206 1 mm GFK Embout à souder M2 1610700 M2 / d=2,1 mm Tige filetée 1610400 S2,0 x 200 Chape...
- Page 16 MULTIPLEX Modellsport GmbH & Co.KG · Westliche Gewerbestrasse 1 · D-75015 Bretten-Gölshausen www.multiplex-rc.de...