Publicité
Les langues disponibles
Les langues disponibles
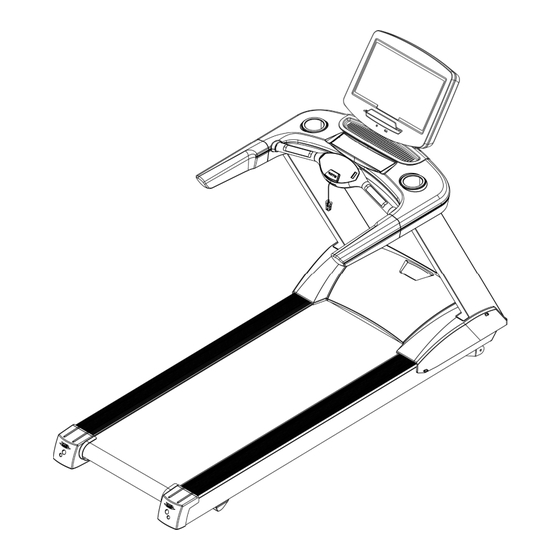
G550BM
Instrucciones de montaje y utilización
Instructions for assembly and use
Instructions de montage et utilisation
Montage-und Gebrauchsanleitung
Instruções de montagem e utilização
Istruzioni di montaggio e uso
Montage-en gebruiksinstrukties
1
Publicité
Table des Matières

Manuels Connexes pour BH HIPOWER G550BM


Sommaire des Matières pour BH HIPOWER G550BM
- Page 1 G550BM Instrucciones de montaje y utilización Instructions for assembly and use Instructions de montage et utilisation Montage-und Gebrauchsanleitung Instruções de montagem e utilização Istruzioni di montaggio e uso Montage-en gebruiksinstrukties...
- Page 2 Fig.1 Fig.2...
- Page 3 Fig.3 Fig.4...
- Page 4 Fig.5 Fig.6...
- Page 5 Fig.7 Fig.8...
- Page 6 Fig.9 Fig.10 Fig.11...
- Page 7 Español INDICACIONES GENERALES.- Tenga cuidado de no lubricar en exceso ya que se puede manchar el suelo o las alfombras donde la unidad Lea atentamente las instrucciones de este manual. Este le esté colocada. da indicaciones importantes sobre la seguridad, el uso y No use accesorios no recomendados por el fabricante.
- Page 8 PROTECCIÓN.- Siga cada uno de los pasos de las instrucciones de este montaje. Este modelo esta dotado de una protección electrónica de parada automática para una óptima conservación de los 1. MONTAJE DE BARANDILLAS.- circuitos tanto electrónicos como eléctricos. Se necesita un mínimo de dos personas para el montaje Esta protección se activará...
- Page 9 Importante: Una excesiva tensión de la banda puede MANTENIMIENTO.- llevar a la pérdida de velocidad de su máquina e incluso a deformaciones de la banda. Por ello, tenga en cuenta que Para un óptimo mantenimiento de su unidad, y que la produce el mismo efecto sobre la posición de la banda un fricción entre la banda y la tabla sea la mínima, lubrique la giro en el sentido de las agujas del reloj del tornillo...
- Page 10 En el monitor de su máquina de andar la zona aeróbica nunca llegar al máximo ritmo cardíaco que no podemos queda representada zonas. primera sobrepasar de acuerdo a nuestra edad. corresponde a un esfuerzo ligero entre el 65 y el 74% del Finalmente, es importante relajar sus músculos.
- Page 11 LOCALIZACIÓN DE FALLOS O AVERIAS SÍNTOMAS COMPROBACIONES SOLUCIONES 1. No se enciende el monitor. Asegúrese 1) Enchufe el cable a la red. máquina está enchufada a la Coloque interruptor red, el inte rruptor general en posición 1 y ponga la llave de posición 1 y la llave de seguridad.
- Page 12 English GENERAL INSTRUCTIONS.- SAFETY INSTRUCTIONS.- Carefully read through the instructions contained in this This product must have an earth connection. In the event manual. It provides you with important information about that the appliance malfunctions then the earth connection safety, use and maintenance of the treadmill. will redirect the electrical current away from the machine You should always observe certain safety precautions and reduce the risk of an electrical shock.
- Page 13 Should the circuit breaker trip repeatedly then the most into the bottom right-hand support on the structure (120), probable causes are: screw on the side section using screws (52). -Abnormal working conditions, -Treadmill belt in need of lubricant, Then insert the left handrail (50) into the bottom left- -Solvent based lubricants used (use BH type), hand support on the structure (120), screw on the side - Belt is too tight.
- Page 14 capacity and better blood circulation. In short, the energy Note: This preventive maintenance schedule is only produced during exercise burns kilocalories (known as meant for home use. calories). It is suggested to maintain the unit every month for commercial use. EXERCISE &...
- Page 15 Before beginning a session it is important to do a warm-up Use a vacuum cleaner to carefully vacuum around the for 2-3 minutes at low speed. This will help protect your visible components (belt, structure, etc.). You can also muscles and prepare your cardiorespiratory system. vacuum the underside of the unit by resting it on one of its sides.
-
Page 16: Fault Finding Chart
FAULT FINDING CHART PROBLEM CHECKS SOLUTIONS The monitor does not 1) Make sure that the machine 1) Plug the ma chine into the switch on. is plugged in, the ON/OFF mains supply. Set the switch switch in position 1 and that to position 1 and insert the the safety key is inserted. - Page 17 Français CONSIGNES GÉNÉRALES.- Il est déconseillé de tenir en permanence la machine dans un endroit humide car l’oxydation serait alors Lire cette notice très attentivement. Elle contient inévitable. d’importantes informations sur la sécurité et l’utilisation et Veillez à ne pas graisser la machine exagérément car la maintenance du tapis de course.
- Page 18 (135) Clé Allen 8mm. Ne pas utiliser la machine si le câble électrique est (136) Clé Allen 5mm. endommagé ou usé. (137) Clés à tube combinées. Tenir le câble électrique à l’écart des surfaces chaudes. Suivre chaque étape des instructions de montage. PROTECTION.- Ce modèle est doté...
- Page 19 ENTRETIEN.- machine et même par des déformations du tapis. Par conséquent, ne pas oublier qu’un tour dans le sens des Pour assurer un bon entretien de l’appareil et pour que le aiguilles d’une montre de la vis droite (R) répercute sur la frottement entre le tapis et le panneau soit le moins position du tapis de la même façon que le fait un tour dans important possible, lubrifiez la partie interne, Fig.10 (étant...
- Page 20 Il existe une formule simple pour le calcule, il suffit de nombre de pulsations ne doit pas dépasser 85 % (zone soustraire 220 de son âge. Pour que l’exercice soir aérobic) et ne jamais atteindre la fréquence cardiaque correct, on doit le maintenir pendant 15 à 20 minutes entre maximale qu’il ne faut pas dépasser, selon l’âge.
- Page 21 DÉFAILLANCES OU PANNES SYMPTÔMES VÉRIFICATIONS SOLUTIONS 1. Le moniteur ne s'allume 1) Vérifiez si la machine est 1) Branchez le câble à la prise pas. branchée courant c ourrant. Placez électrique, l'interrupteur l'interrupteur sur la position 1 général trouve et la clé de securité à sa position 1 et si la clé...
- Page 22 Deutsch ALLGEMEINE HINWEISE.- Es ist nicht ratsam, das Gerät ständig an einem feuchten Ort aufzustellen, da dies unweigerlich zu Lesen Anleitungen dieses Handbuchs Rostbildungen führt. aufmerksam. Hier finden Sie wichtige Hinweise zu Achten Sie darauf, dass Sie das Gerät nicht zu stark Sicherheit, Benutzung und Wartung des Laufbands.
- Page 23 (135) Inbusschlüssel 8mm. Halten Sie das Kabel von heißen Flächen fern. (136) Inbusschlüssel 5mm. SICHERUNGEN.- (137) Kombi-Steckschlüssel. Dieses Modell verfügt über eine elektronische Folgen Sie bitte den angegebenen Montageschritten. Schutzvorrichtung, die das Gerät automatisch anhält, um optimalen Zustand elektronischen 1. MONTAGE DES HANDLAUFS.- elektrischen Kreisläufe zu garantieren.
- Page 24 dem Transport, dass das Netzkabel aus dem Stecker VERSCHIEBEN DES BANDES NACH LINKS.- gezogen ist. Sollte sich das Band nach links verschoben haben, Sicherheitsgründen sollte Band NICHT drehen Sie die Schraube (L) auf der linken Seite des aufunebenen Böden geschoben werden. Geräts um 1/4 Umdrehung im Uhrzeigersinn.
- Page 25 Die Geschwindigkeitserhöhung trägt eine Erhöhüng der bzw. bei trainierten Personen auf 75-85% bringt. Wenn Arbeitsstärke mit und infolgedessen eine Erhöhüng des man erst einmal seine physische Kondition verbessert hat, Herzrhythmus. kann man die Trainingszeit zwischen diesen beiden Angenommen, die Anstrenung bleibt konstant, wird der Niveaus aufteilen, wobei jedoch ein Pulsschlag von mehr Herzrhythmus zunehmen bis zu einen Punkt, auf dem er als 85% (aerobischer Bereich) stets vermieden werden...
-
Page 26: Auffinden Von Fehlern Und Problemen
AUFFINDEN VON FEHLERN UND PROBLEMEN SYMPTOME MASSNAHMEN LÖSUNGEN 1. Der Monitor schaltet 1) Vergewissern Sie sich, dass 1) Stecken Sie das Kabel in nicht ein. Gerät Netz die Steckdose. Stellen Sie den ang eschlossen Schalter auf Position 1 und Hauptschalter auf Position 1 steht. setzen Sicherheitsschlüssel muss... - Page 27 Português INDICAÇÕES GERAIS.- INSTRUÇÕES DE SEGURANÇA.- Leia atentamente as instruções deste manual. Este lhe Este produto deverá estar ligado á terra. Se não funciona dará indicações importantes sobre a segurança, o uso e a correctamente ou se tiver uma avaria, a ligação á terra manutenção da faixa de andar.
- Page 28 Se isto ocorrer: Coloque o corrimão direito (51), Fig.3, perto da saída 1.- Ponha o interruptor (L) situado na carcaça na posição do cabo de controlo (M). Prenda a ponta do cabo de “0” (OFF) Fig.B. controlo (M), atando-o ao cabo de guia (N) que foi 2.- Aperte o interruptor do circuito (C) para fazer reset.
- Page 29 Recomenda-se lubrificar a base da banda entre a tabela e INSTRUÇÕES DE USO.- a faixa, conforme a frequência de uso. Horas por semana CONDIÇÃO FÍSICA. <3 >7 Estar em forma física, significa viver plenamente. Na <6 1 Ano 6 meses 3 meses sociedade moderna sofremos uma grande tensão.
- Page 30 minutos até que as suas pulsações desçam da linha dos Ritmo cardíaco Pulsações 65%. Isto evitará dores musculares, principalmente depois Máximo de uma sessão intensa. Também recomendamos acabar o programa com uns exercícios no chão de relaxação. Zona aerobia NOTA FINAL. Esperamos que possa gozar da sua unidade.
- Page 31 LOCALIZAÇÃO DE FALHAS OU DE AVARIAS SINTOMAS COMPROVAÇÕES SOLUÇÕES 1. O monitor não acende. 1) Verifique se a máquina está 1) Ligue o cabo à rede. ligada à rede, se o interruptor Coloque interruptor geral está na posição 1 e se a posição 1 e ponha a chave de chave segurança...
- Page 32 Italiano INDICAZIONI GENERALI.- Faccia attenzione a non lubrificarlo eccessivamente dato che si potrebbe sporcare il pavimento od i tappeti che Legga con attenzione le istruzioni di questo manuale, si trovano sotto l’ apparecchio. fornisce indicazioni importanti sulla sicurezza, uso e Non usi accessori non consigliati dal fabbricante.
- Page 33 PROTEZIONE.- Segua con attenzione ognuno dei passi indicati nelle istruzioni di montaggio. Questo modello ha una protezione elettronica di fermata automatica per assicurare un’ ottima conservazione dei 1. MONTAGGIO DEI CORRIMANO.- circuiti sia elettronici che elettrici. Come minimo sono necessarie due persone per il Questa protezione si attiverà...
- Page 34 Per evitare qualsiasi rischio, NON muova il nastro su Importante: Una tensione eccessiva del nastro potrebbe superfici che non siano lisce. causare una perdita di velocità del tapis roulant e perfino potrebbe creare deformazioni nel nastro. Per questo MANUTENZIONE.- motivo, tenga presente che produce lo stesso effetto sulla posizione del nastro un giro in senso orario della vite Per realizzare un’...
- Page 35 Essempio: Età 50 anni. Finalmente, è importante rilassare i suoi muscoli. Per 220-50=170 pulsazioni questo, basta camminare ad una velocità moderata durante 2-3 minuti fino a che le sue pulsazioni scendano Ritmo cardiaco Pulsazioni dalla linea del 65%. Questo eviterà dolori muscolari, Massimo soprattutto dopo una sessione intensa.
-
Page 36: Errori Dell' Apparecchio
LOCALIZZAZIONI DI GUASTI O DANNI SINTOMI VERIFICHE SOLUZIONI accende 1) Si ass icuri che l'apparecchio sia 1) Colleghi il cavo alla rete monitor. collegato alla rete elettrica, elettrica. Collochi l'interruttore l'interruttore generale si trovi in in posizione 1 e metta la posizione chiave chiave di sicurezza. - Page 37 Nederlands ALGEMENE AANWIJZINGEN.- Let erop dat u niet te veel olie gebruikt bij het smeren van het apparaat, omdat dit op de vloer of vloerkleden zou Lees zorgvuldig de instructies in deze gebruiksaanwijzing. kunnen lekken, daar waar het apparaat staat. Deze geeft u belangrijke aanwijzingen over de veiligheid, Gebruik geen accessoires die niet worden aanbevolen het gebruik en het onderhoud van de loopband.
- Page 38 Trek niet aan het snoer om de stekker uit het (79) Schroeven M-4x10. stopcontact te halen. (156) Tube smeermiddel. Gebruik het apparaat niet met een beschadigd of (135) Inbussleutel 8mm. versleten snoer. (136) Inbussleutel 5mm. Houd aansluitsnoer verwijderd warme (137) Combinatiesteeksleutels. oppervlakken.
- Page 39 VERPLAATSEN EN OPBERGEN.- VERPLAATSING VAN DE BAND NAAR LINKS.- Het apparaat is voorzien van wieltjes (137), Fig.9, wat het verplaatsen vergemakkelijkt. Verzeker u ervan dat de Wanneer de band zich naar links heeft verplaatst, draai u stekker uit het stopcontact is genomen. de schroef (L) aan de linkerkant van het apparaat 1/4 slag Vervoer de loopband, dit ter voorkoming van gevaarlijke met de wijzers van de klok mee.
- Page 40 hartritme. Als we veronderstellen dat we de inspanning personen. Later, wanneer u uw lichamelijke conditie konstant houden d.w.z. dezelfde hellingshoek en een verbeterd heeft, kunt u de tijd verdelen tussen deze beide konstante snelheid, dan zal het hartritme toenemen tot niveaus, er hierbij voor zorgend dat het aantal hartslagen een zekere waarde waarna het vervolgens konstat blijft.
- Page 41 STORINGSEN FOUTMELDINGEN SYMPTOMEN CONTROLE HANDELINGEN OPLOSSINGEN 1. De monitor schakelt 1) Controleer of het apparaat is 1) Sluit aan op het lichtnet. Zet niet in. aangesloten op het lichtnet, de de hoofdschakelaar op stand 1 hoofdschakelaar op st and 1 staat en plaats veiligheidssleutel correct...
- Page 42 G550BM...
- Page 43 Para pedido de repuesto: Indicar el código de la pieza y la cantidad To order replacement parts: State the part code and Quantity Pour toute commande pièces détachées: Indiquer le code de la pièce et la quantité Bestellung von Ersatzteilen: Bitte angeben Teil-code und Menge Para encomenda de peça de recambio: Indicar o código da peça ea quantidade Per ordinare pezzi di ricambio: Indicare il codice del pezzo e la quantità...
- Page 44 Nylon Nut M10xP1,5 Tuerca M10x1,5 G6508059 Nylon Nut M10xP1.5x8t Tuerca M10x1,5*8t G680BM061A Motor Motor G6508060 CKS Hex Screw M10xP1,5x25 Tornillo hex M10x1,5x25 G6508061 Flat Washer 10x20x3t Arandela plana 10x20x3t G6508062 Flat Washer ø10xø20x1.0t Arandela plana 10x20x1t G660121 Flat Washer ø10xø25x3t Arandela plana 10x20x3t G600066 Spring Washer M10...
- Page 45 Philips Screw M6xP1,0x10 Tornillo phillips M6x1,0x10 G6508108 Incline Base Assembly Base elevación G550109 Incline Base Fixing Base Apoyo base elevación G550110 Hex Screw M8xP1,25x25 Tornillo hex M8x1,25x25 G6508111 Plastic Sleevelet(Black) Casquillo plástico negro G6508112 Wheel 60x10x30 Black Rueda 60x10x30 G6508113 Hex Screw M10xP1,5x60 Tornillo hex M10x1,5x60 G6508114...
- Page 46 Transducer Variador G550BM163 Isolation Pad(Upper) Aislamiento superior G6508165 Isolation Pad(Lower) Aislamiento inferior G6508166 Adjustment Screw Tornillo ajustable tapa G6508170 Cover(Black) Washer 3x8x0,5t Arandela 3x8x0,5t G6508171 Terminal Wire (Kelly) Cable terminal G550BM174 Grouding Decal Pegatina base G550BM184 Grounding Decal(Aluminum pegatina tierra aluminio Foil With Single Sided G680BM185 20x670L...
- Page 47 Español Por medio de la presente Exercycle S.L. declara que este producto cumple con los requisitos esenciales y cualesquiera otras disposiciones aplicables o exigibles de las Directivas 2005/32/EC, 2004/108/CE, 2006/95/CE y 2006/42/CE. English Hereby, Exercycle S.L, declares that this product is in compliance with the essential requirements and other relevant provisions...
- Page 48 902 170 258 Tel.: +351 234 729 510 Fax: +34 945 56 05 27 e-mail: info@bhfitness.pt e-mail: hipower@bhfitness.com BH HIPOWER NORTH AMERICA BH HIPOWER MEXICO BH HIPOWER FRANCE 620 N. 2nd Street, St. Charles BH Exercycle de México S.A. MO 63301...