
Sommaire des Matières pour Create SPEAKER TABLE
- Page 1 S P E A K ER TA B L E TA B L E-SP EAK E R W I T H B LUE TOO T H ME SA-A LTAVOZ CO N B LUE TOO T H USER MANUAL...
- Page 4 SPE AKER TA BL E I N DE X ENGLISH ESPAÑOL Security instructions Instrucciones de seguridad Functions Funciones Parts list Listado de partes Control panel Panel de control Assembly steps Pasos de montaje Voice reminding messages Mensajes de voz de recordatorio Power on/off Encender y apagar AUX auto switch...
- Page 5 S PE A KE R TABL E INDE X ITALIANO DEUTSCH Istruzioni di sicurezza Sicherheitshinweise Caratteristiche Merkmale Elenco delle parti Liste der Einzelteile Pannello di controllo Schalttafel Fasi di montaggio Montageschritte Promemoria messaggi vocali Sprachnachrichten zur Erinnerung Accendi e spegni Einschalten und ausschalten Attiva la modalità...
- Page 6 EN G L I S H Thank you for choosing our table speaker. Before using the appliance, and to ensure the best use, carefully read these instructions. The safety precautions enclosed herein reduce the risk of death, injury and electrical shock when correctly adhered to.
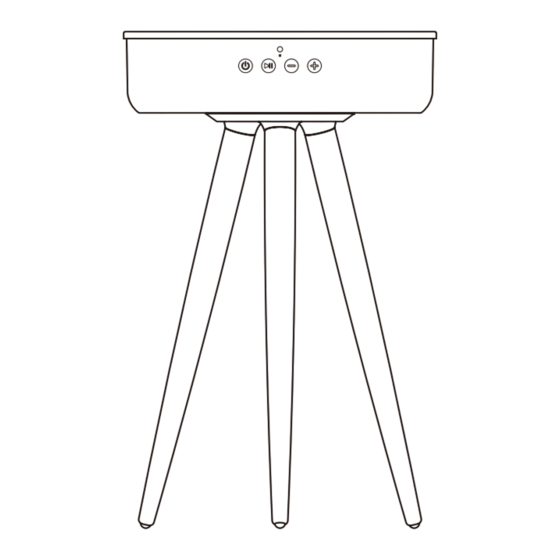
- Page 7 CONTROL PANEL 1. Mic 2. LED 3. Power button / TWS 4. Play / Pause / Phone 5. Volume - 6. Volume + 7. USB ports 8. Charging LED lights 9. Power in 10. Aux 11. Reset ASSEMBLY STEPS 1. Open the box, place the speaker on a flat surface with base upwards (showing the screw holes).
- Page 8 “SPEAKER TABLE” via Bluetooth. • The best distance between a smartphone and the speaker is more or less 10 m.
- Page 9 MAKING PHONE CALLS VIA BLUETOOTH • When a call comes in, the speaker will broadcast the incoming call’s phone number and the dial tone. Shortly press the Play/Pause/phone button to answer the phone (try to speak to the MIC so it will be a clear call). Short press again to hang up, and long press to decline.
- Page 10 3. When speakers are team paired TWS mode successfully under Bluetooth, the two speak- ers can still work as paired speakers by inserting the AUX cable into the AUX socket on the first speaker (Master). The Master speaker will be with green and blue LED light, the sub-speaker with Green LED light only.
- Page 11 E S PA ÑO L Gracias por elegir nuestra mesa altavoz. Antes de utilizar este electrodoméstico y para asegu- rar su mejor uso, por favor, lea detenidamente las instrucciones. Las medidas de seguridad aquí indicadas reducen el riesgo de incendio, descarga eléctrica y lesiones cuando se siguen correctamente.
- Page 12 PANEL DE CONTROL 1. Micrófono 2. LED 3. Botón de encendido / TWS 4. Reproducir / Pausar / Teléfono 5. Volumen - 6. Volumen + 7. Puertos USB 8. Luces LED de carga 9. Entrada de alimentación 10. Auxiliar 11. Reiniciar PASOS DE MONTAJE 1.
- Page 13 MENSAJES DE VOZ DE RECORDATORIO • Power on: Conecte la fuente de alimentación (mensaje de voz cuando se enciende el altavoz). • Bluetooth: Modo Bluetooth. • Power off: Apaga la fuente de alimentación (mensaje de voz cuando se apaga el altavoz). •...
- Page 14 LLAMADAS DE TELÉFONO A TRAVÉS DEL BLUETOOTH • Cuando entra una llamada, el altavoz transmitirá el número de teléfono de la llamada entrante y el tono de llamada. Pulse brevemente el botón Reproducir / Pausa / teléfono para contestar la llamada (procure dirigir la voz hacia el micrófono para que sea una llamada clara). Pulse brevemente de nuevo para colgar y pulse prolongadamente para rechazar la llamada.
- Page 15 2. Cuando los altavoces estén emparejados en equipo correctamente, pulse brevemente el botón POWER / TWS del altavoz principal o del altavoz secundario para desactivar el modo TWS de emparejamiento de equipo. 3. Cuando los altavoces están emparejados en equipo en modo TWS adecuadamente a través del Bluetooth, los dos altavoces aún pueden funcionar como altavoces empare- jados insertando el cable AUX en la toma AUX del primer altavoz (maestro).
- Page 16 P O RT U GU Ê S Obrigado por escolher nossa mesa de alto-falante. Antes de utilizar este aparelho e para garantir a sua melhor utilização, leia atentamente as instruções. As medidas de segurança listadas aqui reduzem o risco de incêndio, choque elétrico e feri- mentos, quando devidamente seguidas.
- Page 17 PAINEL DE CONTROLE 1. Microfone 2. LED 3. Botão liga / desliga / TWS 4. Tocar / Pausar / Telefone 5. Volume - 6. Volume + 7. Portas USB 8. Luzes LED de carregamento 9. Entrada de energia 10. Cabo AUX 11.
- Page 18 Reproduzir / Pausar / telefone, o alto-falante desligará a conexão com o celular pareado e outro smartphone pode se conectar ao dispositivo “SPEAKER TABLE” via Bluetooth. • A distância entre o smartphone e o alto-falante não deve exceder 10 m.
- Page 19 CHAMADAS TELEFÔNICAS VIA BLUETOOTH • Quando uma chamada é recebida, o alto-falante transmite o número de telefone da cham- ada recebida e o toque. Pressione brevemente o botão Reproduzir / Pausar / Telefone para atender a chamada (tente direcionar sua voz para o microfone para uma chamada clara). Pressione rapidamente novamente para desligar e pressione longamente para rejeitar a chamada.
- Page 20 2. Quando os alto-falantes forem emparelhados com sucesso em equipes, pressione breve- mente o botão POWER / TWS no alto-falante principal ou sub alto-falante para desativar o modo de emparelhamento de equipe TWS. 3. Quando os alto-falantes estão devidamente emparelhados no modo TWS via Bluetooth, os dois alto-falantes ainda podem funcionar como alto-falantes emparelhados inserindo o cabo AUX no soquete AUX do primeiro alto-falante (mestre).
- Page 21 F R A N Ç A I S Merci d'avoir choisi notre table d'enceinte. Avant d'utiliser cet appareil et pour garantir son utilisation optimale, veuillez lire attentivement les instructions. Les mesures de sécurité énumérées ici réduisent le risque d'incendie, de choc électrique et de blessure lorsqu'elles sont correctement suivies.
- Page 22 PANNEAU DE COMMANDE 1. Microphone 2. LED 3. Bouton d'alimentation / TWS 4. Lecture / Pause / Téléphone 5. Volume - 6. Volume + 7. Ports USB 8. Voyants de charge LED 9. Entrée de puissance 10. Assistant 11. Redémarrage ÉTAPES DE MONTAGE 1.
- Page 23 • Lorsque ce haut-parleur est connecté à votre smartphone, appuyez longuement sur le bou- ton Lecture/Pause/téléphone, le haut-parleur désactivera la connexion avec le téléphone mobile couplé et un autre smartphone pourra se connecter à l'appareil “SPEAKER TABLE” via Bluetooth. • La distance entre le smartphone et l'enceinte ne doit pas dépasser 10 m.
- Page 24 APPELS TÉLÉPHONIQUES VIA BLUETOOTH • Lorsqu'un appel arrive, le haut-parleur transmet le numéro de téléphone de l'appel entrant et la sonnerie. Appuyez brièvement sur le bouton Lecture / Pause / Téléphone pour répon- dre à l'appel (essayez de diriger votre voix dans le microphone pour un appel clair). Appuyez à...
- Page 25 2. Lorsque les haut-parleurs sont jumelés avec succès en équipes, appuyez brièvement sur le bouton POWER / TWS de l’enceinte principale ou secondaire pour désactiver le mode de jumelage d’équipe TWS. 3. Lorsque les haut-parleurs sont correctement jumelés en mode TWS via Bluetooth, les deux haut-parleurs peuvent toujours fonctionner comme haut-parleurs jumelés en in- sérant le câble AUX dans la prise AUX du premier haut-parleur (maître).
- Page 26 I TA L I A N O Grazie per aver scelto il nostro tavolo relatori. Prima di utilizzare questo apparecchio e per assicurarne il miglior utilizzo, leggere attentamente le istruzioni. Le misure di sicurezza qui elencate riducono il rischio di incendi, scosse elettriche e lesioni se seguite correttamente.
- Page 27 PANNELLO DI CONTROLLO 1. Microfono 2. LED 3. Pulsante di accensione/TWS 4. Riproduci/Pausa/Telefono 5. Volume - 6. Volume + 7. Porte USB 8. Luci di ricarica a LED 9. Ingresso alimentazione 10. Assistente 11. Ricomincia FASI DI MONTAGGIO 1. Aprire la custodia, posizionare l'altoparlante su una superficie piana con la base rivolta verso l'alto (che mostra i fori delle viti).
- Page 28 • Quando questo altoparlante è collegato allo smartphone, premi a lungo il pulsante Ripro- duci/Pausa/telefono, l'altoparlante disattiverà la connessione con il telefono cellulare as- sociato e un altro smartphone potrà connettersi al dispositivo “SPEAKER TABLE” tramite Bluetooth. • La distanza tra lo smartphone e l'altoparlante non deve superare i 10 m.
- Page 29 TELEFONATE VIA BLUETOOTH • All'arrivo di una chiamata, l'altoparlante trasmetterà il numero di telefono della chiamata in arrivo e la suoneria. Premi brevemente il pulsante Riproduci / Pausa / Telefono per ris- pondere alla chiamata (prova a dirigere la tua voce nel microfono per una chiamata chiara). Premere di nuovo brevemente per riagganciare e premere a lungo per rifiutare la chiamata.
- Page 30 2. Quando gli altoparlanti sono stati accoppiati con successo in squadre, premere breve- mente il pulsante POWER / TWS sull’altoparlante principale o sull’altoparlante secondario per disattivare la modalità di abbinamento team TWS. 3. Quando gli altoparlanti sono accoppiati correttamente in modalità TWS tramite Blue- tooth, i due altoparlanti possono ancora funzionare come altoparlanti associati inserendo il cavo AUX nella presa AUX del primo altoparlante (master).
- Page 31 D E U TS C H Vielen Dank, dass Sie sich für unseren Lautsprechertisch entschieden haben. Bevor Sie die- ses Gerät verwenden und um eine optimale Nutzung zu gewährleisten, lesen Sie bitte die Anweisungen sorgfältig durch. Die hier aufgeführten Sicherheitsmaßnahmen reduzieren die Gefahr von Feuer, Stromschlag und Verletzungen, wenn sie richtig befolgt werden.
- Page 32 SCHALTTAFEL 1. Mikrofon 2. LED 3. Netzschalter / TWS 4. Wiedergabe / Pause / Telefon 5. Lautstärke - 6. Lautstärke + 7. USB-Anschlüsse 8. LED-Ladeleuchten 9. Leistungsaufnahme 10. Assistent 11. Neustart MONTAGESCHRITTE 1. Öffnen Sie das Gehäuse und stellen Sie den Lautsprecher mit der Unterseite nach oben (mit den Schraubenlöchern) auf eine ebene Fläche.
- Page 33 • Wenn sich der Lautsprecher im Bluetooth-Modus befindet, wechselt er automatisch in den „Pairing-Status“. Das blaue LED-Licht blinkt langsam und der Name des Bluetooth-Geräts erscheint in Ihren Smartphone-Einstellungen als “SPEAKER TABLE”. • Der Lautsprecher wird über das Bluetooth-System mit Ihrem Smartphone gekoppelt, Sie hören nach dem Pairing „Bluetooth is connected“.
- Page 34 TELEFONIEREN ÜBER BLUETOOTH • Wenn ein Anruf eingeht, überträgt der Lautsprecher die Telefonnummer des eingehenden Anrufs und den Klingelton. Drücken Sie kurz die Wiedergabe-/Pause-/Telefontaste, um den Anruf anzunehmen (versuchen Sie, Ihre Stimme für einen klaren Anruf in das Mikrofon zu leiten).
- Page 35 2. Wenn die Lautsprecher erfolgreich in Teams gekoppelt wurden, drücken Sie kurz die POWER / TWS-Taste am Hauptlautsprecher oder Nebenlautsprecher, um den TWS-Team- Pairing-Modus zu deaktivieren. 3. Wenn die Lautsprecher im TWS-Modus über Bluetooth ordnungsgemäß gepaart sind, können die beiden Lautsprecher weiterhin als gepaarte Lautsprecher fungieren, indem das AUX-Kabel in die AUX-Buchse des ersten (Master-)Lautsprechers gesteckt wird.
- Page 36 N E D E R L A N D S Bedankt voor het kiezen van onze luidsprekertafel. Lees de instructies aandachtig door voor- dat u dit apparaat gebruikt en voor een optimaal gebruik. De hier vermelde veiligheidsmaatregelen verminderen het risico op brand, elektrische schokken en letsel als ze correct worden opgevolgd.
- Page 37 CONTROLEPANEEL 1. Microfoon 2. LED 3. Aan/uit-knop / TWS 4. Afspelen / Pauze / Telefoon 5. Volume - 6. Volume + 7. USB-poorten 8. LED-oplaadlampjes 9. Stroomaansluiting 10. Assistent 11. Herstarten MONTAGE STAPPEN 1. Open de behuizing, plaats de luidspreker op een vlakke ondergrond met de basis naar boven gericht (waarbij de schroefgaten zichtbaar zijn).
- Page 38 • Wanneer de luidspreker in de Bluetooth-modus staat, schakelt deze automatisch over naar de "koppelingsstatus". Het blauwe LED-lampje knippert langzaam en de naam van het Bluetooth-apparaat verschijnt in de instellingen van uw smartphone als “SPEAKER TABLE”. • De luidspreker zal via het Bluetooth-systeem met uw smartphone koppelen, u hoort na het koppelen "Bluetooth is connected".
- Page 39 BELLEN VIA BLUETOOTH • Wanneer een oproep binnenkomt, zendt de luidspreker het telefoonnummer van de inkomende oproep en de beltoon door. Druk kort op de knop Afspelen / Pauze / Telefoon om de oproep te beantwoorden (probeer uw stem in de microfoon te richten voor een duidelijke oproep).
- Page 40 2. Wanneer de luidsprekers met succes in teams zijn gekoppeld, drukt u kort op de POWER / TWS-knop op de hoofdluidspreker of subluidspreker om de TWS-teamkoppelingsmodus te deactiveren. 3. Wanneer de luidsprekers correct via Bluetooth in TWS-modus zijn gekoppeld, kunnen de twee luidsprekers nog steeds functioneren als gekoppelde luidsprekers door de AUX-kabel in de AUX-aansluiting van de eerste (master) luidspreker te steken.
- Page 41 P O LS K I Dziękujemy za wybranie naszego stolika głośnikowego. Przed użyciem tego urządzenia oraz w celu zapewnienia jak najlepszego użytkowania, prosimy o dokładne zapoznanie się z in- strukcją. Wymienione tutaj środki bezpieczeństwa zmniejszają ryzyko pożaru, porażenia prądem i obrażeń, jeśli są...
- Page 42 PANEL STEROWANIA 1. Mikrofon 2. LED 3. Przycisk zasilania / TWS 4. Odtwórz / Wstrzymaj / Telefon 5. Głośność - 6. Głośność + 7. Porty USB 8. Oświetlenie LED do ładowania 9. Wejście zasilania 10. Asystent 11. Uruchom ponownie ETAPY MONTAŻU 1.
- Page 43 • Gdy ten głośnik jest połączony ze smartfonem, naciśnij i przytrzymaj przycisk odtwarza- nia/pauzy/telefonu, głośnik wyłączy połączenie ze sparowanym telefonem komórkowym, a inny smartfon może połączyć się z urządzeniem “SPEAKER TABLE” przez Bluetooth. • Odległość między smartfonem a głośnikiem nie powinna przekraczać 10 m.
- Page 44 POŁĄCZENIA TELEFONICZNE PRZEZ BLUETOOTH • Gdy nadejdzie połączenie, głośnik przekaże numer telefonu połączenia przychodzącego i dzwonek. Krótko naciśnij przycisk Odtwórz / Wstrzymaj / Telefon, aby odebrać połączenie (spróbuj skierować głos do mikrofonu, aby uzyskać wyraźne połączenie). Krótkie naciśnię- cie ponownie, aby się rozłączyć, i długie naciśnięcie, aby odrzucić połączenie. •...
- Page 45 2. Gdy głośniki zostaną pomyślnie sparowane w zespołach, krótko naciśnij przycisk POWER / TWS na głośniku głównym lub dodatkowym, aby wyłączyć tryb parowania zespołowego TWS. 3. Gdy głośniki są prawidłowo sparowane zespołowo w trybie TWS przez Bluetooth, dwa głośniki mogą nadal działać jako sparowane głośniki, wkładając kabel AUX do gniazda AUX pierwszego (głównego) głośnika.
- Page 48 10/2021 Made in P.R.C.