Publicité
Les langues disponibles
Les langues disponibles
Liens rapides
MD2617
Für die Installationsanweisungen auf Deutsch, siehe Seite 12~13.
Pour l'instruction en Français, veuillez vous reporter à la page 14~15.
Para las instrucciones de la instalación en Español, favor vea la página 16~17.
Per le Istruzioni in Italiano, vedi pagina 18~19.
x1
INSTALLATION INSTRUCTION
Max:600x400mm/24x16"
Min:200x100mm/8x4"
1
TV
2
(VN-C1)
Publicité

Manuels Connexes pour Mounting Dream MD2617


Sommaire des Matières pour Mounting Dream MD2617
- Page 1 MD2617 INSTALLATION INSTRUCTION Für die Installationsanweisungen auf Deutsch, siehe Seite 12~13. Pour l'instruction en Français, veuillez vous reporter à la page 14~15. Para las instrucciones de la instalación en Español, favor vea la página 16~17. Per le Istruzioni in Italiano, vedi pagina 18~19.
- Page 2 Safety Caution combined. ● Do not apply this product to any purpose not indicated by Mounting Dream. ● Incorrect installation may result in product damage or body injury. Mounting Dream shall bear no responsibility for any damage or injury resulted from incorrect installation,...
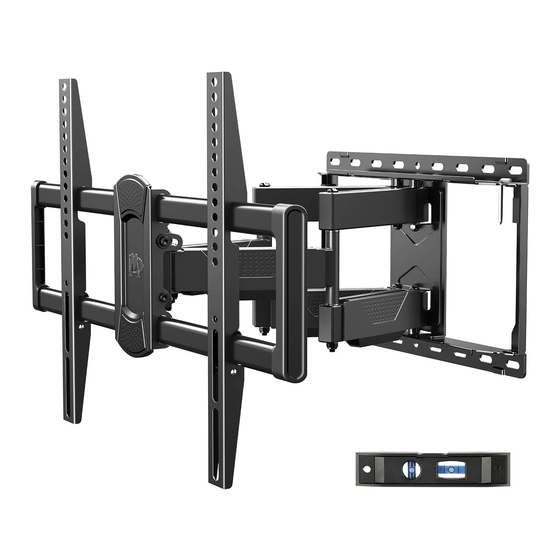
- Page 3 Parts and Hardware WARNING: This product contains small items that could be a choking hazard if swallowed. Before starting assembly, verify all parts are included and undamaged. NOTE: Not all hardware included will be used. Spacers TV Brackets TV Screws M4x12mm M8x22mm M4x30mm...
- Page 4 1-3 Attach the TV Brackets Screw and washer Spacer(s), screw and washer Tips: If you need to combine M6(e) or M8(c/f) screw with 2.5mm spacer(j), you have to remove the inner circle.
- Page 5 For wood stud installation, follow STEP 2A For concrete installation, follow STEP 2B on PAGE 6 Parts and Hardware Wall Plate Unit Mounting Template Lag Bolt M8x60mm Wood Stud Installation <16mm Min. Wood Stud Size: (5/8") nominal 4"(102mm) Max. actual 3 1/2"(89mm) 16"(406mm) Min.
- Page 6 Again, find another wood stud 16"(406mm) Centre line Mounting Template CAUTION: To avoid potential personal injury or property damage: All 4 lag bolts MUST BE firmly tightened to prevent unwanted movement of the wall plate assembly. Ensure the wall plate assembly is securely fastened to the wall before continuing on to the next step.
- Page 7 Solid Concrete Wall Installation Min. 8"(203mm) Concrete Wall Anchor 4pcs (Anchor Size: φ10x50mm) If need concrete anchor, please contact us via the info on the blue card. DANGER 2.5" 3/8" (65mm) (10mm) Mounting Template CAUTION: To avoid potential personal injury or property damage: All 4 lag bolts MUST BE firmly tightened to prevent unwanted movement of the wall plate assembly.
- Page 8 Parts and Hardware Allen Key M6x12mm Bolt M6x16mm Bolt Extension Bar Extension Bar M5x12mm Bolt Supporting Bar 3-1 Extension Bars Assembly...
- Page 9 3-2 Wall Plate Installation Integrity Test Before hanging TV, please conduct "wall plate installation integrity test" first. 100 LBS (45.5 KG) 3-3 Hang and Secure TV to Wall Plate...
- Page 10 4-1 TV leveling adjustment (±4°): Loosen 4 leveling bolts on the rear of TV plate by maximum 2 turns, adjust to level, and retighten to secure. Loosen Tighten 4-2 Tilting angle adjustment (+5°/-15°) : Pull TV to your desired angle then fasten 2 tilting bolts with Allen key Tilting bolts Tilting bolts...
- Page 11 Allen key storage: For easy adjustment, you might put the Allen key on the wall plate as illustration.
- Page 12 698mm 64mm MAX:600mm MIN:200mm +5° MAX:400mm MIN:100mm 420mm 267mm 420mm -15° 422mm 435mm +45°/-45°...
- Page 13 ● Verwenden Sie dieses Produkt nicht für einen anderen Zweck als speziell von Mounting Dream angegeben. ● Unsachgemäße Montage dieses Produkts kann zu Verletzungen und zu den Beschädigungen an Ihrem Gerät führen. Mounting Dream haftet nicht für Schäden oder Verletzungen, die durch unsachgemäße Montage, unsachgemäßen Zusammenbau oder unsachgemäße Verwendung verursacht wurden.
- Page 14 Installationsanweisungen Warnung: Dieses Produkt enthält kleine Teile, die beim Verschlucken zur Erstickungsgefahr führen können. Bevor Sie mit der Installation beginnen, überprüfen Sie bitte, ob alle Zubehörteile und Ersatzteile vollständig und unbeschädigt sind. Hinweis: Es wird nicht das gesamte mitgelieferte Befestigungsmaterial verwendet. Schritt 1 Befestigen Sie die Schienen am Fernseher Siehe Seite 2 Mitgelieferte Teile und Befestigungsmaterialien...
- Page 15 ● N'utilisez pas ce produit pour des autres objectifs non désignés par Mounting Dream. ● L'installation incorrecte causera le dommage matériel ou la blessure corporelle. Mounting Dream n'assumera aucune responsabilité pour le dommage et la blessure causés par...
- Page 16 Instruction d'installation AVERTISSEMENT : Ce produit contient des petites pièces, en cas d'ingestion, des risques de suffocation y arrivera. Avant l'installation, veuillez vérifier que tous les accessoires et toutes les pièces sont complets et non défectueux. ATTENTION : Les pièces fournies ne seront pas toutes utilisées durant l'installation. Étape 1 Installer des barres verticales sur votre téléviseur Voir à...
- Page 17 ● Favor NO utilizar el producto de Mounting Dream para otros usos no asignados. ● La instalación incorrecta puede producir daños al producto o lesiones al usuario. Cualquier pérdida o daño debido por la mala instalación o uso indebido, Mounting Dream no asume ninguna responsabilidad.
- Page 18 Instrucciones paso a paso de su instalación Advertencia: Este producto contiene piezas pequeñas, si por error se ingiere, puede provocar peligro de asfixia. Antes de comenzar la instalación, favor compruebe que todos los accesorios y piezas de repuesto estén completas y sin daño alguno.
- Page 19 ● Non applicare questo prodotto ad altri scopi non indicati da Mounting Dream. ● L'installazione errata potrebbe causare danni al prodotto o lesioni personali. Mounting Dream non si assume alcuna responsabilità per danni o lesioni causate da installazione...
- Page 20 Istruzioni di installazione Avvertenza: Questo prodotto contiene piccoli articoli che potrebbe causare il pericolo di soffocamento se ingoiati. Prima di iniziare l'installazione, controlla se tutti gli accessori e parti siano inclusi e non danneggiati. Nota: Non verranno utilizzati tutte le parti incluse. Passo 1 Installa barre verticali al televisore Vedi pagina 2 Accessori e parti...