Table des Matières
Publicité
Les langues disponibles
Les langues disponibles
Liens rapides
Publicité
Table des Matières

Sommaire des Matières pour Alecto PRO-147
- Page 1 GEBRUIKSAANWIJZING INSTRUCTION MANUAL MODE D’EMPLOI PRO-147...
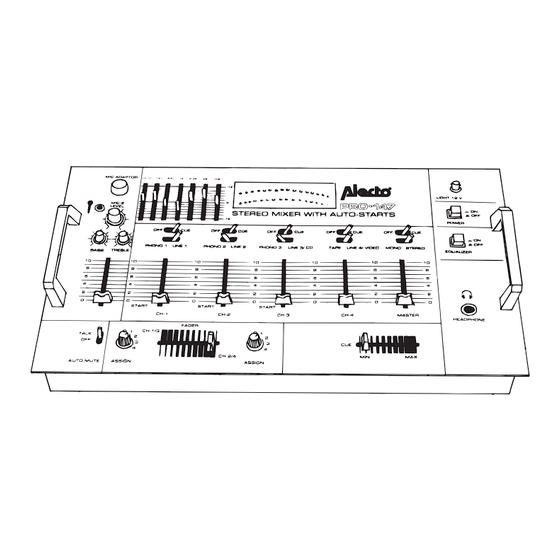
- Page 2 FUNCTIES 1 . Aan/uit schakelaar 12. Schuifregelaar mikrofoon 1 2. Lamp aansluiting 12V ~ 13. Schuifregelaars kanaal 1 t/m 4 3. Equalizer aanluit schakelaar 14. Mikrofoon 1 auto-mute schakelaar 4. Voorafluistering schakelaars 15. Keuze schakelaar cross-over fader 5. LED vu meter 16.
- Page 3 AANSLUITIINGEN 23. Aansluiting 220V snoer 31. Aansluiting phono 3 24. Zekeringhouder 32. Aansluiting line 2 25. Aansluitingen auto star t 33. Aansluiting phono 2 26. Opname uitgang 34. Aansluiting line 1 27. Aansluiting naar versterker 35. Aansluiting phono 1 28. Aansluiting line 4/video 36.
-
Page 4: Auto Start
Voor het maken van tape opnames dient de line ingang van de tape rekorder verbonden te worden met de REC uitgang (26) van de PRO-147. Opmerking: De uitgeschakelde kanaal-ingangen worden door de PRO-147 kortgesloten. Dit heeft tot gevolg dat de hierop aangesloten apparatuur niet meer funktioneer t. - Page 5 LICHT BNC aansluiting 12V AC. t.b.v. lampje. LET OP: maximale stroom afname 100 mA (1,2 Watt). Overschrijding van deze waarde leidt tot een gebrekkig funktioneren van de PRO-147 en het uiteindelijk defekt raken van de voedings trafo.
- Page 6 ONDERHOUD Plaats de PRO-147 op een vlak/stabiel opper vlak en zorg ervoor dat er geen loshangende kabels in de w eg zitten. Loshangende bekabeling en plaatsing op een onstabiel opper vlak verhogen het risico van ongelukken en beschadigingen. Indien gewenst kan de PRO-147 ook ingebouwd worden.
- Page 7 FUNCTIONALITY 1. On/off switch 12. Volume slide microphone 1 2. Light connection 12V 13. Volume slides channel 1-4 3. Equalizer on/off switch 14. Microphone 1 auto mute switch 4. Monitor switches 15. Selector cross-over fader 5. LED vu meter 16. Cross-over fader 6.
-
Page 8: Main Features
30. Inputs line 3/cd INSTRUCTION MANUAL MAIN FEATURES The soundmixer PRO-147 has been designed for various professional applications in discotheque, room-disco, mix-recordings etc. The mixer does have a lot of features like a 7-channel equalizer, monitoring, auto-start on 3 channels, tonecontrol on mix-channel, fader-control etc. -
Page 9: Connection Instructions
CONNECTION INSTRUCTIONS Make sure that the "POWER" switch of the mixer is in "OFF" position. - Plug shielded audio cables from mixer output (27) to your amplifier input. - Turn the amplifier volume control to its lowest position. - Turn the mixer volume control to "0"... - Page 10 MONITORING The headphone jack (20) is used to monitor (6.3 mm jack). Use an eight ohms stereo headphone. With the cue switches (4) it is possible to choose any channel (monitoring two or more channels simultaneously possible). Volume level is adjustable by slide control 18. EQUALIZER This mixer features a 7 channel equalizer (6), which may be used to adjust the tone of the mixed output signal.
-
Page 11: Input Sensitivity
Use the PRO-147 on a stable surface. An unstable mounting surface could cause the device to fall. Use a damp cloth for cleaning. Do not use liquid or aerosol cleaners. Do not attempt to service the PRO-147 yourself. Any unauthorized servicing may damage the PRO-147 and will void the warranty. - Page 12 FONCTIONS 1. Bouton de mise en route 11. Réglage pour les tons bas 2. Connexion pour une lampe de 12V 12. Commutateur coulissant microphone 1 3. Commutateur ON/OFF du correcteur de fréquences 13. Commutateurs coulissants canal 1/4 4. Commutateurs pré-écouter 14.
-
Page 13: Commentaires Generaux
Votre table de mixage à 6 canals est projeter pour une utilisation universelle pour le disco chez vous, les discothèques, des enregistrements, etc. La PRO-147 est équipée d'un correcteur de fréquences en 7 paliers et d'un régulateur pour Ie volume total. Grâce au commutateurs anti-bruit vous obtiendrez une mixage de différentes sources de bruit, parfaite. -
Page 14: Raccordement
1 jusgu'à 4 (cfr 13). Raccorder léntrée 'ligne'de votre magnétophone 1à la sortie REC (23) du PRO-147 afin d'avoir la possibilité de registrer les sons sur une cassette. Remarque : Les entrées des canals non-active seront mis en court-circuit par le PRO-147. -
Page 15: Entretien
Dépassage de cette valeur causera un fonctionement défectueux de la PR0-14 ENTRETIEN Placer le PRO-147 sur une surface stable. Bien veiller à ce que les câbles ne puissent pas être piétinés. Le câblage pendu augmente le risque de dégâts. La PRO-147 peut être incorporé si désirer. -
Page 16: Donnees Techniques
DONNEES TECHNIQUES SENSIBILITÉ PHONO 1, 2, 3 .................3 mV MIC 1,2 ...................1 mV LIGNE 1, 2, 3, 4 ................150mV IMPÉDANCE: PHONO 1, 2, 3 ................47 K ohm MIC 1, 2 ..................600 ohm LIGNE 1, 2, 3, 4................47 K ohm CORRECTEUR: FREQUENCES ....................
