Publicité
Les langues disponibles
Les langues disponibles
Publicité
Table des Matières

Manuels Connexes pour Golfbuddy CT2

Sommaire des Matières pour Golfbuddy CT2
- Page 1 Pages 1-15 Pages 16-29 Páginas 30-43 Seiten 44-57...
-
Page 2: Table Des Matières
Thank you for choosing the GolfBuddy CT2. The CT2 is a feature-rich GPS that brings functionality and versatility to one device. Designed to be wearable, pocketable or clipped to your golf bag, the CT2 caters to every golfer’s preference and style. The... -
Page 3: Device Overview
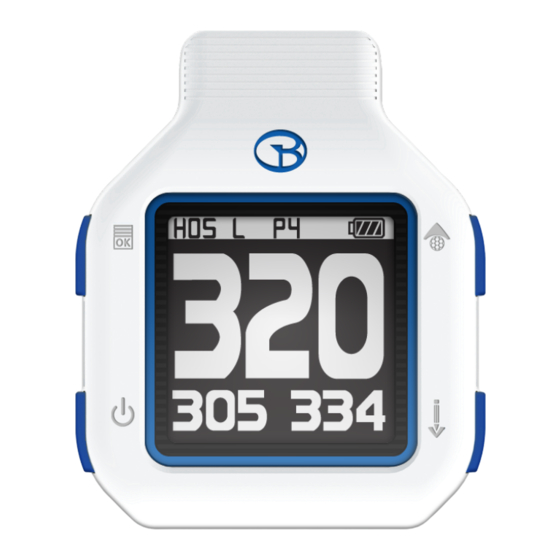
1. DEVICE OVERVIEW Button Overview - Power / ESC - Menu / Select - Up / Shot Distance - Down / Scorecard Screen Overviews FCB screenshot A Time Screen B Time/Date Screen Default Golf Screen Optional Golf Screen Hole Number Distance to the Center of the Green Time L/R Green Selection... -
Page 4: Getting Started
. 2.3 Time Setting The time will set automatically once the CT2 successfully connects to Satellite’s via GPS (please note: you must be outdoors to connect to satellites); however, time zones and daylight savings will need to be set accordingly. - Page 5 Sunrise/Sunset Time From the Time/Date screen, press the button to view the Sunrise/ Sunset Time (CT2 automatically acquires GPS signal for this feature). To Time + Sunrise/ exit this function and to return to time mode, press the button twice.
-
Page 6: Play Golf
3. PLAY GOLF 3.1 Main Menu From the Time/Date screen, press and hold the button to view the Main Menu and navigate with buttons. PLAY GOLF GPS / ODOMETER TIME DEVICE INFO Play Golf Mode From the Time/Date screen, press and hold the button. - Page 7 3.3 In Round Information A, B, and C By repeatedly pressing the button you will scroll through Informative screens shown below. FCB screenshot A Dynamic Green with Time with Center Time of play & total Distances Distance distance walked with Center Distance The Auto Time Display is an automatic feature that displays the time and date when the golfer is within 20 yards of the center of the green.
- Page 8 2.4 Measuring Shot Distance From Play Golf Mode, press and hold the button for 2 seconds to start measuring your shot distance. The Shot Distance Mode will default back to the Play Golf Screen and will measure distances in the background. Once you have reached your ball, press the button again to finish measuring and view the shot distance.
-
Page 9: Settings & Menu
4. SETTINGS & MENU 4.1 Settings & Menu From Play Golf Mode, press and hold the button for 2 seconds to access the Play Golf Menu and scroll through the selections with the buttons. Select the highlighted menu option by pressing button. - Page 10 4.2 Settings & Selections (Continued) Quick Selection for Prior Hole From the Play Golf Menu, scroll with the buttons and select the icon, press the button to enter the Quick Selection for Prior Hole screen. Scroll through and select the prior hole by navigating with the buttons, then press the button to confirm the selection.
-
Page 11: Advanced Operations
YES and select by pressing with the button. *Note: GPS tracking is activated automatically when the CT2 is in Play Golf Mode (refer to Page 7). 5.3 Systems Information While in Watch Mode, press the... - Page 12 6. SOFTWARE UPDATES Your GolfBuddy CT2 unit has been pre-loaded with the latest firmware and world-wide course maps available at the time of manufacture, so it’s ready to play right out of the box. For optimum performance and longer product life, we do recommend you register your unit and keep it updated with the latest levels of firmware.
- Page 13 • Connect your GolfBuddy unit to a USB port on your computer using the USB cable provided with the unit. • After a short time, your GolfBuddy unit should show an icon on the screen indicating it is connected to the computer.
- Page 14 - already selected). Click “OK” to start the course update. Once all the courses have been downloaded you will receive a message “Update Complete”. You can now disconnect the unit. Your GolfBuddy is now ready to go with the latest updates!
- Page 15 You can search courses by country, state, and city. You can also look up when the course was last updated. Profile Info System Information for user’s CT2 can be found under the profile tab. Thank you for purchasing our GolfBuddy Product.
- Page 16 – páginas 4-5 1 – Corde réglable 3. JOUER AU GOLF – páginas 6-8 1 – Guide de démarrage rapide CT2 4. SETTINGS & MENU – páginas 9-10 5. ADVANCED OPERATIONS – página 11 6. SOFTWARE UPDATE – páginas 12-15...
- Page 17 1. APERÇU DE L'APPAREIL Liste des boutons - Power / ESC - Menu / Select - Haut / Distance du coup - Bas / Carte de parcours Liste des écrans FCB screenshot Time Screen Ecran heure / date Ecran Golf par défaut Optional Golf Screen Numéro de trou Distance au centre du green...
- Page 18 2.3 Réglage de l'heure L'heure sera réglée automatiquement dès que le CT2 se connecte aux satellites par GPS (note : vous devez être à l'extérieur pour que la connexion réussisse); toutefois, le fuseau horaire et l'heure d'été...
- Page 19 Heure de lever / coucher du soleil Depuis l'écran Date/Heure, appuyez sur le bouton ( 3 ) pour consulter l'heure de lever/coucher du soleil (le CT2 se connecte automatiquement au signal GPS pour cette fonction). Pour sortir de cette fonction et Time + Sunrise/ retourner au mode horaire, appuyez deux fois sur la touche ( 3 ).
- Page 20 3. JOUER AU GOLF 3.1 Menu principal Depuis l'écran Date/Heure, appuyez et maintenez le bouton ( 2 ) pour voir le menu principal et naviguez avec les boutons ( 3 ) et ( Jouer au golf GPS / compteur kilométrique Heure Informations sur l'appareil...
- Page 21 3.3 Information en cours de partie En appuyant de manière répétitive sur le bouton ( 2 ), vous ferez défiler les écrans d'information A, B et C comme illustré ci-dessous. FCB screenshot Green dynamique Temps avec distance Durée de jeu & distance avec distances au centre totale parcourue avec...
- Page 22 2.4 Mesure de la distance du coup Depuis le mode jouer au golf, appuyez et maintenez le bouton ( 3 ) pendant 2 secondes pour commencer à mesurer la distance de votre coup. Le mode distance du coup retournera par défaut à l'écran jouer au golf et continuera à...
- Page 23 4. REGLAGES & MENU 4.1 Réglages & menu Depuis le mode jouer au golf, appuyez et maintenez le bouton ( 2 ) pendant 2 secondes pour accéder au menu jouer au golf, et faites défiler les sélections avec les boutons ( 3 ) et ( ).
- Page 24 4.2 Settings & Selections (Continued) Sélection rapide pour trou précédent Depuis le menu jouer au golf, défilez avec les boutons ( 3 ) et ( ) et sélectionnez l'icône , appuyez sur le bouton ( 2 ) pour activer la sélection rapide pour l'écran trou précédent.
- Page 25 ( 2 ) et défilez avec les boutons ( 3 ) et ( jusqu'à voir YES, puis sélectionnez avec le bouton ( 2 ). *Note: le traçage GPS est automatiquement activé lorsque le CT2 est en mode jouer au golf (voir page 7).
- Page 26 6. MISE À JOUR LOGICIELLE Votre appareil GolfBuddy CT2 est doté du dernier firmware et des dernières cartes de parcours du monde entier disponibles au moment de la fabrication : il est donc prêt à accompagner votre jeu dès son déballage. Pour une performance optimale et une plus longue durée de vie du produit, nous vous recommandons d'enregistrer votre appareil et de le maintenir à...
- Page 27 3. Enregistrement de votre GolfBuddy CT2: • Connectez votre appareil GolfBuddy à un port USB de votre ordinateur en utilisant le câble USB fourni avec l'appareil. • Après un bref moment, votre appareil GolfBuddy devrait afficher une icône à l'écran indiquant qu'il est connecté...
- Page 28 Une fois que tous les parcours ont été téléchargés et votre appareil mis à jour, vous verrez le message "Update Complete". Vous pouvez alors débrancher l'appareil. Votre GolfBuddy est désormais prêt à l'emploi avec les dernières mises à jour !
- Page 29 Vous pouvez rechercher des parcours par pays, état et ville. Vous pouvez aussi consulter la date de dernière mise à jour du parcours. Information profil Les information sur le système du CT2 de l'utilisateur se trouvent sous l'onglet profil. Merci d'avoir acquis notre produit GolfBuddy.
- Page 30 1 – Clip cargador – páginas 4-5 3. JUGAR AL GOLF 1 – Cordón ajustable – páginas 6-8 1 – Guía de inicio rápido de CT2 4. CONFIGURACIÓN Y MENÚ – páginas 9-10 5. OPERACIONES AVANZADAS – página 11 6. ACTUALIZACIÓN DEL SOFTWARE...
- Page 31 1. Información general del dispositivo Descripción del botón - Encendido / ESC - Menú / Seleccionar - Subir / Distancia del lanzamiento - Bajar / Puntuación Descripciones de la pantalla FCB screenshot Time Screen Pantalla de hora / fecha Pantalla de golf predeterminada Pantalla de golf opcional Número de hoyo Distancia al centro del Green...
- Page 32 2.3 Configuración de la hora La hora se configurará automáticamente una vez que el CT2 se haya conectado exitosamente al GPS a través del satélite (tenga en cuenta que debe estar en el exterior para conectarse con los satélites), sin embargo, las zonas horarias y el horario de verano tendrán que configurarse respectivamente.
- Page 33 Hora de salida / puesta del sol En la pantalla Hora/Fecha, pulse el botón ( 3 ) para ver la Hora de salida / puesta del sol (el CT2 capta automáticamente la señal GPS para esta Time + Sunrise/ función). Para salir de esta función y volver al modo de la hora, pulse dos Sunset veces el botón ( 3 ).
- Page 34 3. JUGAR AL GOLF 3.1 Menú principal En la pantalla de la hora/fecha, mantenga pulsado el botón ( 2 ) para ver el menú principal y naveg- ar con los botones ( 3 ) / ( Jugar al golf GPS / Odómetro Hora Información del dispositivo...
- Page 35 3.3 Información de las rondas Si pulsa continuamente el botón ( 2 ), se desplazará por las pantallas informativas A, B y C que se muestran a continuación. FCB screenshot Green dinámico con Hora con distancia Tiempo de juego distancias del centro y distancia total recorrida con...
- Page 36 2.4 Medición de la distancia del lanzamiento En el modo Jugar al golf, mantenga pulsado el botón ( 3 ) durante 2 segundos para iniciar la medición de la distancia del lanzamiento. El modo de la distancia del lanzamiento regresará automáticamente a la pantalla Jugar al golf y medirá...
- Page 37 4. CONFIGURACIÓN Y MENÚ 4.1 Configuración y menú En el modo de Jugar al golf, mantenga pulsado el botón ( 2 ) durante 2 segundos para acceder al menú de Jugar al golf y desplácese por las selecciones con los botones ( 3 ) / ( ).
- Page 38 4.2 Configuración y Seleccion (Continuación) Selección rápida del hoyo anterior En el menú de Jugar al golf, desplácese con los botones ( 3 ) / ( ) y seleccione el icono , pulse el botón ( 2 ) para entrar en la pantalla de Selección rápida del hoyo anterior.
- Page 39 ( 2 ) y, a continuación, desplácese con los botones ( 3 ) / ( ) hasta SÍ y seleccione pulsando con el botón ( 2 ). *Nota: la localización GPS se activa automáticamente cuando el CT2 esté en modo de Jugar al golf (consulte la página 7). 5.3 Información de los sistemas Mientras esté...
- Page 40 6. ACTUALIZACIÓN DEL SOFTWARE El GolfBuddy CT2 fue cargado previamente con el último firmware y los mapas de campos de todo el mundo disponibles en el momento de la fabricación, por lo que está listo para ponerlo en funcionamiento una vez que lo saque de la caja. Para un mejor rendimiento y una mayor duración del producto, le recomendamos que registre el producto y lo mantenga actualizado...
- Page 41 3 . R e g is t ro del Go lfBud dy C T 2 : •Con e c te e l G o l f B u d d y a u n p u e r to US B de su o rd e n a d o r u t i li za n d o e l ca b l e U SB p ro p o rc i o n a d o c on e l p ro du c t o.
- Page 42 Haga clic en "Aceptar" para iniciar la actualización del campo. Una vez que haya descargado todos los campos y el producto esté actualizado, recibirá un mensaje "Actualización completa". Ahora puede desconectar el producto. ¡El GolfBuddy está listo para pasar a las últimas actualizaciones!
- Page 43 Puede buscar campos por país, estado y ciudad. También puede buscar cúando fue la última vez que se actualizó el campo. Información del perfil La información del sistema del CT2 del usuario la puede encontrar en la pestaña Perfil. Gracias por comprar nuestro producto GolfBuddy.
- Page 44 Vielen Dank, dass Sie sich für den GolfBuddy CT2 entschieden haben. Das CT2 ist ein GPS-Gerät mit breitem Funktionsumfang, das Funktionalität und Vielseitigkeit vereint. Das tragbare CT2 passt in die Hosentasche oder wird am Gürtel oder Golfbag getragen. Es passt sich den Vorlieben und dem Stil eines jeden Golfers mühelos an.
- Page 45 1. GERÄTEÜBERSICHT Tastenübersicht - Ein / Aus / ESC - Menü / Auswahl - Nach oben / Schlaglänge - Nach unten / Scorekarte Ansichtsübersicht FCB screenshot Time Screen Ansicht Uhrzeit / Datum Standardansicht Golf Optionale Ansicht Golf Zeit Lochnummer Abstand zur Mitte des Grüns Auswahl linkes / rechtes Abstand zur Vorderkante Grün...
- Page 46 Ladeclip zusammen und ziehen ihn vom Gerät 2.3 Uhrzeit einstellen Die Zeit wird automatisch eingestellt, sobald das CT2 eine Verbindung zum GPS-Satelliten aufgebaut hat (Hinweis: Hierfür müssen Sie sich im Freien aufhalten). Zeitzonen und Sommerzeit müssen Sie jedoch selbst einstellen. Um in der Ansicht Uhrzeit/Datum die Zeitanzeige manuell einzustellen, halten Sie die Taste ( ) gedrückt, bis Sie im Modus zur Zeiteinstellung sind.
- Page 47 2.3 Uhrzeit einstellen (fortsetzung) 12/24-Stunden-Format: Drücken Sie im Modus zur Zeiteinstellung die Taste ( 2 ) 2 Mal, um das 12/24-Stunden-Format zu ändern. Wenn das blinkende Symbol angezeigt wird, navigieren Sie mit den Tasten ( 3 ) bzw. ( ) zur gewünschten Auswahl. Drücken Sie die Taste ( 2 ) 2 Mal, um die Änderungen zu übernehmen und zum Uhrzeitmodus zurückzukehren.
- Page 48 3. GOLF SPIELEN 3.1 Hauptmenü Halten Sie in der Ansicht Uhrzeit/Datum die Taste ( 2 ) gedrückt, um das Hauptmenü anzuzeigen, und navigieren Sie dann mit den Tasten ( 3 ) bzw. ( GOLF SPIELEN GPS / KILOMETERZÄHLER UHRZEIT GERÄTEINFORMATIONEN Mondus Golf Spielen Halten Sie in der Ansicht Uhrzeit/Datum die Taste ( 2 ) gedrückt.
- Page 49 3.3 Rundeninformationen Durch anhaltendes Drücken der Taste ( 2 ) können Sie durch die Informationsansichten A, B und C scrollen (siehe unten). FCB screenshot Dynamische Grünansicht Uhrzeit mit Abstand Spielzeit und gesamte mit Längen zur Mitte zurückgelegte Länge mit Abstand zur Mitte Die automatische Zeitanzeige erscheint auf dem Display, wenn der Golfspieler bis zu 18 Meter von der Mitte des Grüns entfernt ist.
- Page 50 2.4 Schlaglänge messen Halten Sie im Modus Golf spielen die Taste ( 3 ) 2 Sekunden lang gedrückt, um Ihre Schlaglänge zu messen. Vom Modus Schlaglänge wird automatisch zurück zur Ansicht Golf spielen gewechselt. Die Schlaglängen werden im Hintergrund gemessen. Wenn Sie Ihren Ball erreicht haben, drücken Sie wieder die Taste ( 3 ), um die Messung zu beenden und die Schlaglänge anzuzeigen.
- Page 51 4. EINSTELLUNGEN UND MENÜ 4.1 Einstellungen Und Menü Halten Sie im Modus Golf spielen die Taste ( 2 ) 2 Sekunden lang gedrückt, um das Menü zum Golfspielen anzuzeigen und mit den Tasten ( 3 ) bzw. ( ) durch die Auswahl zu scrollen. Wählen Sie die markierte Menüoption aus, indem Sie die Taste ( 2 ) drücken.
- Page 52 4.2 Einstellungen Und Auswahl (Fortsetzung) Schnellauswahl für vorheriges Loch Scrollen Sie im Menü Golf spielen mit den Tasten ( 3 ) bzw. ( ) und wählen Sie das Symbol . Drücken Sie dann die Taste ( 2 ), um zur Ansicht Schnellauswahl für vorheriges Loch zu gelangen.
- Page 53 Tasten ( 3 ) bzw. ( ) zu YES und bestätigen Sie mit der Taste ( 2 ). *Hinweis: Das GPS-Tracking wird automatisch aktiviert, wenn sich das CT2 im Modus Golf spielen befindet (siehe Seite 7). 5.3 Systeminformationen Drücken Sie im Uhrenmodus die Taste ( 2 ). Scrollen Sie dann mit den Tasten ( 3 ) bzw.
- Page 54 Herstellungsdatum verfügbar waren. Es ist direkt nach dem Auspacken betriebsbereit. Zur Leistungsoptimierung und Verlängerung der Lebensdauer Ihres Geräts empfehlen wir Ihnen, das CT2 zu registrieren und stets mit der neuesten Firmware zu aktualisieren. Nach der Registrierung erhalten Sie kostenlos die neuesten Karten von Golfplätzen sowie Softwareaktualisierungen.
- Page 55 • Verbinden Sie Ihren GolfBuddy über das mitgelieferte USB-Kabel mit einem USB-Anschluss Ihres Computers. • Nach kurzer Zeit wird auf dem Display Ihres GolfBuddy ein Symbol angezeigt, das bestätigt, dass Ihr Gerät mit dem Computer verbunden ist. Hinweise: Sie können alle Meldungen Ihres Computers zu benötigten Treibern ignorieren.
- Page 56 2. Schritt : Firmware aktualisieren Klicken Sie im 2. Schritt auf "Next" (Weiter), um die neueste Firmware zu installieren. Wenn die Firmware bereits auf dem neuesten Stand ist, klicken Sie auf "Next" (Weiter), um mit dem 3. Schritt fortzufahren. 3. Schritt : Golfplätze herunterladen Wählen Sie die Länder aus, die Sie aktualisieren möchten, und...
- Page 57 Aktualisierte Golfplatzinformationen Sie können Golfplätze nach Land, Bundesstaat und Stadt suchen. Sie sehen auch, wann die Golfplätze zuletzt aktualisiert wurden. Profilinformationen Systeminformationen zu Ihrem CT2 finden Sie unter der Registerkarte "Profile". Vielen Dank, dass Sie sich für unser GolfBuddy-Produkt entschieden haben.