Table des Matières
Publicité
Les langues disponibles
Les langues disponibles
Liens rapides
Bedienungsanleitung / Manual / Manuel
T: +43-7235-605-0
info@epluse.com
BA_THERMOPORT_05_d_e_f // 191755
Technische Änderungen vorbehalten / Technical data are subject to change / Sous réserve de toutes modifications techniques
Langwiesen 7
A-4209 Engerwitzdorf
Austria
F: +43-7235-605-8
www.epluse.com
THERMOPORT
THERMOPORT
THERMOPORT 20
20
20
Publicité
Table des Matières

Sommaire des Matières pour E+E Elektronik THERMOPORT 20
- Page 1 Bedienungsanleitung / Manual / Manuel THERMOPORT 20 THERMOPORT THERMOPORT Langwiesen 7 A-4209 Engerwitzdorf Austria T: +43-7235-605-0 F: +43-7235-605-8 info@epluse.com www.epluse.com BA_THERMOPORT_05_d_e_f // 191755 Technische Änderungen vorbehalten / Technical data are subject to change / Sous réserve de toutes modifications techniques...
-
Page 2: Table Des Matières
Bedienungsanleitung / Manual / Manuel THERMOPORT 20 INHALTSVERZEICHNIS VOR DER INBETRIEBNAHME LESEN THERMOPORT 20 / TECHNISCHE DATEN DAS DISPLAY BEDIENUNG DAS OBERE MENÜ DAS UNTERE MENÜ BATTERIEWECHSEL WARTUNG UND ABGLEICH TABLE OF CONTENTS PRIOR TO OPERATION THERMOPORT 20 / TECHNICAL DATA... -
Page 3: Vor Der Inbetriebnahme Lesen
Bedienungsanleitung THERMOPORT 20 deutsch 1. Vor der Inbetriebnahme lesen • Vor der Verwendung des Gerätes ist die Bedienungsanleitung aufmerksam zu lesen und in allen Punkten zu befolgen. • Niemals an spannungsführenden Teilen messen. • Messbereiche der Messwertaufnehmer beachten. (Überhitzen kann zur Zerstörung führen) •... - Page 4 Bedienungsanleitung THERMOPORT 20 deutsch Bestimmungsgemäße Verwendung: • Das Messgerät darf nur innerhalb der spezifizierten technischen Daten betrieben werden. • Das Messgerät darf nur unter den Bedingungen und für die Zwecke eingesetzt werden, für die es konstruiert wurde. • Die Betriebssicherheit ist bei Modifizierung oder Umbauten nicht mehr gewährleistet.
-
Page 5: Thermoport 20 / Technische Daten
Bedienungsanleitung THERMOPORT 20 deutsch THERMOPORT 20 Die neue Handmessgeräte-Serie zur Messung von Temperaturen zeichnet sich aus durch: • großes Display mit Hintergrundbeleuchtung • einfache Bedienung mittels Daumenrad • robustes und formschönes Gehäuse • hohe Genauigkeit und Auflösung (0,01°C bei PT100) Kanäle... -
Page 6: Das Display
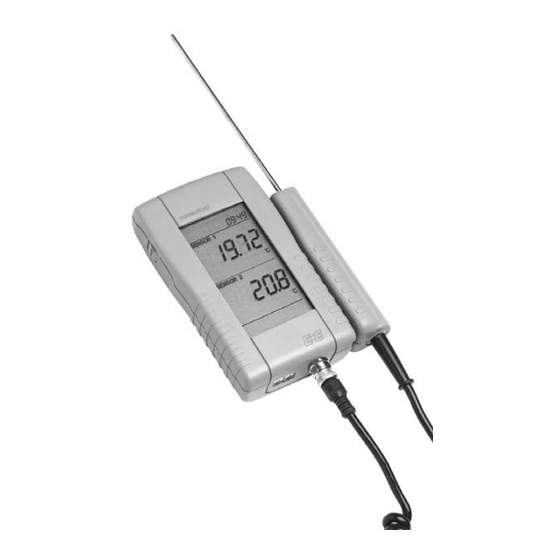
Bedienungsanleitung THERMOPORT 20 deutsch Das Display Oberes Menü mit Datum und Uhrzeit Sensor 1-Anzeige (Temperatur 1) Sensor 1-Einheiten (°C, °F) Sensor 2-Anzeige (Temperatur 2) Sensor 2-Einheiten (°F, °C) Unteres Konfigurations- und Abgleich-Menü Seite 6... -
Page 7: Bedienung
Bedienungsanleitung THERMOPORT 20 deutsch Bedienung Im Gegensatz zu den konventionellen Handmessgeräten besitzt das Gerät THERMOPORT 20 kein Tastenfeld, sondern ein sogenanntes "THUMB-WHEEL" (Daumen-Rad) auf der linken Seite des Gerätes. Das Rad lässt eine 15° Drehbewegung nach unten und oben zu und kann in der Mittelstellung zusätzlich gedrückt werden. - Page 8 Bedienungsanleitung THERMOPORT 20 deutsch Die 3 Positionen des THUMB-WHEEL (Daumen-Rad) Einschalten: kurz drücken Symbol im weiteren Text Einschalten mit Licht: ca. 2 Sekunden drücken Ausschalten: ca. 2 Sekunden drücken (kein Menü aktiviert) Symbol im weiteren Text Oberes Menü mit HOLD MAX MIN AVG aktivieren.
-
Page 9: Das Obere Menü
Bedienungsanleitung THERMOPORT 20 deutsch Das obere Menü Im oberen Menü können die Standard-Funktionen: HOLD HOLD MAX MIN AVG gewählt werden. Ausgewählt wird mit , die angewählte Funktion blinkt und wird mit bestätigt. Eine bestätigte Funktion wird statisch im Display angezeigt. Abbrechen lässt sich das Menü... -
Page 10: Das Untere Menü
Bedienungsanleitung THERMOPORT 20 deutsch Das untere Menü Im unteren Konfigurations- und Abgleich-Menü können die Unit 1 Funktionen: Unit1 Unit2 Time Date AutoOff CAL 12LH Unit 2 gewählt werden. Ausgewählt wird mit , die angewählte Funktion blinkt und wird mit bestätigt. Abbrechen lässt sich das Menü... - Page 11 Bedienungsanleitung THERMOPORT 20 deutsch Beim THERMOPORT 20 kann über das Sondermenü (V) das verwendete Thermoelement eingestellt werden. Unterstützt werden die Elemente: K, J, N, E, R, S, T. Aufgrund der eingeschränkten Darstellung des Displays gilt folgende Vereinbarung: Thermoelement Display-Anzeige Bild: Thermoelement Auswahl Wählen kann man mit...
- Page 12 Bedienungsanleitung THERMOPORT 20 deutsch Unit1: Mit Unit1 wählt man die Einheit der Temperatur 1. Zur Auswahl stehen °C und °F. Wählen kann man mit ; bestätigt wird mit Unit2: Mit Unit2 wählt man die Einheit der Temperatur 2. Zur Auswahl stehen °C und °F. Wählen kann man mit bestätigt wird mit...
- Page 13 Bedienungsanleitung THERMOPORT 20 deutsch AutoOff: Mit AutoOff stellt man die Zeitdauer in Minuten für die automatische Abschaltung ein. Wird OFF (<1) eingestellt, schaltet das Gerät nie automatisch ab. Wählen kann man mit ; bestätigt wird mit Einpunktkalibrierungen der Temperatur CAL1: Mit CAL1 (Einpunktkalibrierung ) stellt man den Offset für die Temperatur 1 ein.
- Page 14 Bedienungsanleitung THERMOPORT 20 deutsch CAL2: Mit CAL2 (Einpunktkalibrierung) stellt man den Offset für die Temperatur 2 ein. Der Offset wird im oberen Teil des Displays angezeigt. Maximal lassen sich beim TC- Eingang +/- 10°C/°F in 0,1°C/°F Schritten einstellen. Wichtig: Kalibrierungen sollten nur von Der Offset ist im gesamten Messbereich aktiv.
- Page 15 Bedienungsanleitung THERMOPORT 20 deutsch Koeffizientenkalibrierung des PT100 Eingangs CAL1 LH: Jede Kennlinie eines PT100 kann durch ein Polynom beschrieben werden. Polynome dienen dazu, Fehler und Nichtlinearitäten eines Sensorelementes zu minimieren. Für Temperaturen von -200°C ... 0°C wird die Kennlinie eines PT100 durch folgendes Polynom beschrieben: Rt = R0 [1 + At + Bt²...
- Page 16 Bedienungsanleitung THERMOPORT 20 deutsch In der folgenden Tabelle sind die Werte für die Werkseinstellungen der Werte A,B,C und R0 dargestellt: Koeffizienten Werkseinstellung + 3,9083 x 10⁻³ - 5,775 x 10-7 - 4,183 x 10-12 100.0000 Wählen Sie zuerst den Koeffizienten mit und bestätigen Sie mit...
- Page 17 Bedienungsanleitung THERMOPORT 20 deutsch Aufgrund der eingeschränkten Darstellung des Displays gilt folgende Vereinbarung: Koeffizienten Display-Anzeige Seite 17...
- Page 18 Bedienungsanleitung THERMOPORT 20 deutsch Änderung des Koeffizienten A 1. Wählen des Vorzeichen mit: und bestätigen Sie mit 2. Zahl für Zahl ändern mit und bestätigen mit Abbrechen lässt sich das Menü, wenn 20 Sekunden keine Taste gedrückt wird. Die Eingabe der Koeffizienten B,C und R0 erfolgt analog.
-
Page 19: Batteriewechsel
Bedienungsanleitung THERMOPORT 20 deutsch Batteriewechsel Erscheint im Display die Anzeige "BAT" , verbleibt eine Standzeit von einigen Stunden. Öffnen Sie den Batteriedeckel auf der Rückseite des Gerätes. Entnehmen Sie die leeren Batterien und ersetzen Sie diese durch neue. Verwenden Sie bitte ausschließlich Batterien des Typ IEC LR6 AA. -
Page 20: Wartung Und Abgleich
Bedienungsanleitung THERMOPORT 20 deutsch Wartung und Abgleich Beim Einsatz in der Klimatechnik empfehlen wir eine jährliche Wartung. Vor der Kontrolle oder einem Abgleich sollte das Gerät bei einer Temperatur von ca. 20°C...25°C für 12 Stunden gelagert werden. Rekalibrierungen sollten ausschließlich von Fachpersonal oder besser noch bei akkreditierten Labors durchgeführt werden. -
Page 22: Prior To Operation
Manual THERMOPORT 20 english 1. Prior to operation • Prior to using the instrument (commissioning / assembly) the user is requested to thoroughly read the instruction manual and comply with it in all points. • Never take measurements on live parts. - Page 23 Manual THERMOPORT 20 english Proper use: • The instrument may only be used under the conditions defined in the technical data sheet. • The measuring instrument may only be used under those conditions and for those purposes for which it was built.
-
Page 24: Thermoport 20 / Technical Data
Manual THERMOPORT 20 english THERMOPORT 20 The new hand held device series for measuring temperature stands out due to: • big display with backlight • easy thumb wheel operation • resistant and elegant housing • high accuracy and resolution (0,01°C for PT100) -
Page 25: The Display
Manual THERMOPORT 20 english The Display Upper menu with date and time Probe 1 value (temperature 1) Probe 1 units (°C, °F) Probe 2 value (temperature 2) Probe 2 units (°F,°C) Lower menu for configuration and adjustment page 25... -
Page 26: Operating The Instrument
Manual THERMOPORT 20 english Operating the instrument In contrast to most traditional hand held instruments, the THERMOPORT have field “THUMB-WHEEL” on their left side. The wheel permits a 15º turn up and downwards and can additio- nally be pressed in the central position. - Page 27 Manual THERMOPORT 20 english The 3 positions of the THUMB-WHEEL: Switch on: press shortly Symbol used in manual Switch on with light: press for approx. 2 seconds Switch off: press for approx. 2 seconds (no menu activated) Symbol used in manual...
-
Page 28: The Upper Menu
Manual THERMOPORT 20 english The upper menu The upper menu contains the standard functions, which are: HOLD MAX MIN AVG HOLD Select with , the selected function flashes and can be confirmed with . When a function has been confirmed it remains continu- ously on the display. -
Page 29: The Lower Menu
Manual THERMOPORT 20 english The lower menu Unit 1 The following functions can be selected in the lower menu for con- figuration and adjustment: Unit 2 Unit1 Unit2 Time Date AutoOff CAL 12LH Select with , the selected function flashes and can be confirmed with . - Page 30 Manual THERMOPORT 20 english In the THERMOPORT 20 the additional menu (V) defines the ther- mocouple type. Types K, J, N, E, R, S, T can be connected. Due to the limitated possibilities of the screen the following settings are used:...
- Page 31 Manual THERMOPORT 20 english Unit1: Unit1 selects the unit of temperature 1 which is either °C or °F. Select with ; confirm with Unit2: Unit2 selects the unit of temperature 2 which is either ºC or ºF. Select with ; confirm with Time: Set time.
- Page 32 Manual THERMOPORT 20 english AutoOff: AutoOff is used to define an interval in minutes after which the instrument switches off automatically. The setting OFF (<1) deactivates the automatic switch off. Select with confirm with One point temperature calibration CAL1: CAL1 (one point calibration) gives the user the possibility to define an offset for temperature 1.
- Page 33 Manual THERMOPORT 20 english CAL2: CAL2 (one point calibration) gives the user the possibility to set an offset for temperature 2. The offset is displayed on the upper part of the screen. The maximum offset on the TC channel is +/- 10°C/°F in 0,1°C/°F step.
- Page 34 Manual THERMOPORT 20 english Calibration of the PT100 channel by means of coefficients CAL1 LH: Every characteristic curve of a PT100 sensor can be defined by a polynomial. Polynomials are used for minimizing errors and non-linear behaviour of a sensor element.
- Page 35 Manual THERMOPORT 20 english The following table contains the factory settings for the values A, B, C and R0. Coefficient Default Value + 3,9083 x 10⁻³ - 5,775 x 10-7 - 4,183 x 10-12 100.0000 Select your coefficient first, using ;...
- Page 36 Manual THERMOPORT 20 english Due to display limitations the following settings are used: Coefficient Display page 36...
- Page 37 Manual THERMOPORT 20 english Changing coefficient A 1. Select sign with: ; confirm with 2. Change number by number with confirm with For cancelling the menu, leave the wheel unused for 20 seconds. Coefficients B,C and R0 can be entered correspondingly.
-
Page 38: Changing The Battery
Manual THERMOPORT 20 english Changing the battery The letters "BAT" on the display indicate a remaining operating time of a few hours. Open the battery case on the back of the instrument. Remove the empty batteries and insert new ones. -
Page 39: Maintenance And Adjustment
Manual THERMOPORT 20 english Maintenance and adjustment For use in climatological purposes we recommend a yearly maintenance. Before checking or adjusting the instrument it should be left in an environment of 20ºC to 25ºC temperature for about 12 (68°F to 77°F) hours. -
Page 41: A Lire Avant La Mise En Service
Manuel THERMOPORT 20 français 1. A lire avant la mise en service • Avant d'employer l'appareil, vous devez lire attentivement ce mode d'emploi et le respecter dans tous ces points. • N'effectuez jamais de mesure sur des pièces conductrices de tension •... - Page 42 Manuel THERMOPORT 20 français Conseils d'utilisation : • L'appareil de mesure doit être exclusivement exploité dans les limites indiquées dans les caractéristiques techniques. • L'appareil de mesure doit être exploité uniquement dans les conditions et dans les buts pour lesquels il a été construit.
-
Page 43: Thermoport 20 / Données Techniques
Manuel THERMOPORT 20 français THERMOPORT 20 La nouvelle série d'appareils de mesure portables compacts destnés à la mesure de la température se caractérise par : • un grand afficheur rétro-éclairé • un maniement simple à l'aide d'une molette • un boîtier robuste et de belle forme •... -
Page 44: L'affichage
Manuel THERMOPORT 20 français L'affichage Menu supérieur avec date et heure Capteur 1-affichage (température 1) Capteur 1-unités (°C, °F) Capteur 2-affichage (température 2) Capteur 2-unités (°F,°C) Menu inférieur de configuration et de calibration page 44... -
Page 45: Commande
Manuel THERMOPORT 20 français Commande Contrairement aux appareils de mesure portables conventionnels, les appareils HUMIPORT 20 n'ont pas de touches mais une dénom- mée "THUMB-WHEEL" (molette) sur la gauche de l'appareil. Cette molette permet une rotation de 15° vers le bas et vers le haut et peut aussi être appuyée en position centrale. - Page 46 Manuel THERMOPORT 20 français Les trois positions de la THUMB-WHEEL (roue à doigt) Mise en route: appuyer brièvement Symbole dans le texte Mise en route avec éclairage : appuyer pendant env. 2 secondes Mise hors circuit : appuyer pendant env. 2 secondes (aucun menu activé)
-
Page 47: Menu Superieur
Manuel THERMOPORT 20 français Menu supérieur C'est dans le menu supérieur que l'on peut sélectionner les fonc- tions standards : HOLD HOLD MAX MIN AVG. Sélection avec , la fonction sélectionnée clignote et est confirmée à l'aide de . Une fonction une fois confirmée est affichée sous forme de calcul statique dans l'affichage. -
Page 48: Menu Inferieur
Manuel THERMOPORT 20 français Menu inférieur Unit 1 Dans le menu inférieur de configuration et de calibration, il est possible de sélectionner les fonctions suivantes : Unit 2 Unit1 Unit2 Time Date AutoOff CAL 12LH. Sélection avec , la fonction sélectionnée clignote et est confirmée Time à... - Page 49 Manuel THERMOPORT 20 français Pour le THERMOPORT 20 le menu supplémentaire (V) définit le type de thermocouple. Les éléments K, J, N, E, R, S, T. peuvent être utilisés. En raison des possibilités restreintes de l´écran les indications suivantes sont affichées:...
- Page 50 Manuel THERMOPORT 20 français Unit1 : Avec Unit1, on sélectionne l'unité de température. On a le choix entre °C et °F. On peut sélectionner avec ; confirmer avec Unit2 : Avec Unit2, on sélectionne l'humidité rel./abs. ou la tempé- rature du point de rosée. on a le choix entre g/m³, %r.H. dp°C, dp°F.
- Page 51 Manuel THERMOPORT 20 français AutoOff : Avec AutoOff, on règle la durée en minutes de la commande de mise hors circuit automatique. Si OFF (<1) est réglé, l'appareil ne se met jamais automatiquement hors circuit. On peut sélectionner avec ; confirmer avec Étalonnage ponctuel de la température...
- Page 52 Manuel THERMOPORT 20 français CAL2: Avec CAL2 (étalonnage ponctuel), on règle le décalage de la température 2. Le décalage est affiché dans la partie supérieure de l'affichage. On peut régler au maximum +/- 10%°C/°F en pas de 0,1°C/°F pour l´entrée TC.
- Page 53 Manuel THERMOPORT 20 français Etalonnage des coefficients de l´entrée PT100 CAL1 LH: Chaque courbe de réponse d´une PT100 peut être définie par un polynôme. Les polynômes servent à minimiser les erreurs et les non-linéarités d´un élément du capteur. Pour les températures de -200°C ... 0°C la courbe de réponse d´une PT100 est définie par le polynôme suivant:...
- Page 54 Manuel THERMOPORT 20 français Le tableau suivant représente les valeurs usine des coefficients A,B,C et R0 : Coefficients Valeur + 3,9083 x 10⁻³ - 5,775 x 10-7 - 4,183 x 10-12 100.0000 Sélectionner tout d´abord les coefficients avec et confirmer avec...
- Page 55 Manuel THERMOPORT 20 français En raison des possibilités restreintes de l´écran les indications suivantes sont affichées : Coefficient Affichage page 55...
- Page 56 Manuel THERMOPORT 20 français Changement du coefficient A 1. Sélectionner l´indice avec: et confirmer avec 2. Changer chiffre par chiffre avec et confirmer avec Pour annuler le menu, ne pas activer la touche pen- dant 20 secondes. La saisie des coefficients B,C et R0 s´effectue de faςon analogue.
-
Page 57: Changement De La Pile
Manuel THERMOPORT 20 français Changement de la pile Lorsque "BAT" apparaît dans l'affichage, le temps d'utilisation restant est de quelques heures. Ouvrez le couvercle des piles au dos de l'appareil. Retirez les piles vides et remplace-les par des neuves. Utilisez exclusivement des piles du type C.I.E. LR6 AA. -
Page 58: Maintenance Et Compensation
Manuel THERMOPORT 20 français Maintenance et compensation En cas d'emploi dans la climatisation, nous recommandons une maintenance annuelle. Avant tout contrôle ou avant la calibration, il faut entreposer l'appareil à une température d'env. 20°C...25°C pendant 12 heures. Les étalonnages suivants doivent exclusivement être effectués par des spécialistes ou, mieux encore, dans les laboratoires accrédités. - Page 60 ® FIRMENSITZ / HEAD OFFICE / USINE: E+E ELEKTRONIK Ges.m.b.H. Langwiesen 7 A-4209 Engerwitzdorf Österreich / Austria Tel: ++43/7235/605-0 Fax: ++43/7235/605-8 info@epluse.com E+E CHINA TECHNISCHE BÜROS / TECHNICAL OFFICES / BUREAUX TECHNIQUES: B0820, Hui Bin Office Building, No. 8, Bei Chen Dong St., Chao Yang District, Beijing 100101, P.R.