Table des Matières

Manuels Connexes pour FS AC32

Sommaire des Matières pour FS AC32
- Page 1 FS-AC32 ENTERPRISE WIRELESS LAN CONTROLLER WIRELESS LAN CONTROLLER FÜR UNTERNEHMEN CONTRÔLEUR LAN SANS FIL POUR ENTREPRISE Quick Start Guide V1.0 Quick-Start Anleitung Guide de Démarrage Rapide...
-
Page 2: Accessories
Thank you for choosing the enterprise wireless LAN controller. The guide is designed to familiarize you with the layout of the wireless LAN controller and describes how to deploy the wireless LAN controller in your network. FS-AC32 Accessories Power Cord x 1... -
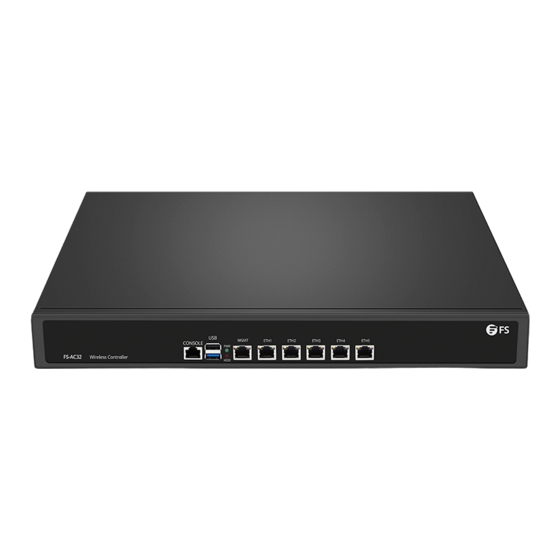
Page 3: Installation Requirements
Back Panel Button 110-220VAC 50-60Hz ON/OFF Power Supply Button Description Power ON/OFF Control the controller power on or off. Front Panel LEDs LED indicator Status Description Off The power module is not in the position or fails. Solid Green The power module is operational. Solid Red The hard drive is reading and writing. -
Page 4: Desk Mounting
Site Environment Do not place the controller in a damp/wet location. Keep the controller far away from the heat source. Ensure that the controller is properly grounded. Wear an anti-static wrist strap during installation and maintenance. Put the tools and parts away from where people walk by. Use UPS (Uninterruptible Power Supply) to prevent power failure and other interferences. -
Page 5: Rack Mounting
Rack Mounting 1. Secure the mounting brackets on the two sides of the controller with six M4 screws. 2. Attach the controller to the rack using four M6 screws and cage nuts. -
Page 6: Connecting The Power
Grounding the Controller 1. Connect one end of the grounding cable to a proper earth ground, such as the rack in which the controller is mounted. 2. Secure the grounding lug to the grounding point on the controller back panel with the washers and screws. - Page 7 Connecting the RJ45 Ports 1. Connect an Ethernet cable to the RJ45 port of a computer or other network devices. 2. Connect the other end of the Ethernet cable to the RJ45 port of the controller. Connecting the Console Port 1.
- Page 8 Connecting the MGMT Port 1. Connect one end of a standard RJ45 Ethernet cable to a computer. 2. Connect the other end of the cable to the MGMT port on the front of the controller. Configuring the Wireless LAN Controller Configuring the Controller Using the Web-based Interface Step 1: Connect the computer to the Management port of the controller using the network cable.
- Page 9 Step 3: Open a browser, type http://192.168.1.1, and enter the default username and password, admin/admin. Wireless Controller admin ***** Simplified Chinese Login Step 4: Click Login to display the web-based configuration page. Configuring the Controller Using the Console Port Step 1: Connect a computer to the controller's console port using the supplied console cable. Step 2: Start the terminal simulation software such as HyperTerminal on the computer.
-
Page 10: Product Warranty
Product Warranty FS ensures our customers that any damage or faulty items due to our workmanship, we will offer a free return within 30 days from the day you receive your goods. This excludes any custom made items or tailored solutions. -
Page 11: Beschreibung
Vielen Dank, dass Sie sich für diesen Wireless LAN Controller entschieden haben. Diese Anleitung soll Sie mit dem Aufbau des Wireless LAN Controllers vertraut machen und beschreibt , wie Sie den Controller in Ihrem Netzwerk einsetzen. FS-AC32 Zubehör Netzkabel x 1... - Page 12 Taste auf der Rückseite 110-220VAC 50-60Hz ON/OFF Stromversorgung Taste Beschreibung Ein-/Ausschalten Steuern Sie das Ein- oder Ausschalten des Controllers. LEDs auf der Vorderseite LED Indikator Status Beschreibung Das Leistungsmodul ist nicht in der Position oder fällt aus. Grün Das Leistungsmodul ist betriebsbereit. Die Festplatte wird gelesen und beschrieben.
-
Page 13: Montage Des Wireless Lan Controllers
Standortumgebung Stellen Sie den Controller nicht an einem feuchten/nassen Ort auf. Stellen Sie den Controller weit entfernt von Wärmequellen. Stellen Sie sicher, dass der Controller ordnungsgemäß geerdet ist. Tragen Sie ein antistatisches Armband während der Installation und Wartung. Setzen Sie die Werkzeuge und Teile entfernt von solchen Orten, die Hochbetrieb herrschen. Verwenden Sie eine USV (Unterbrechungsfreie Stromversorgung), um Stromausfälle und andere Störungen zu vermeiden. - Page 14 Rackmontage 1. Befestigen Sie die Montagehalterungen mit den mitgelieferten M4-Schrauben an den beiden Seiten des Controllers. 2. Befestigen Sie den Controller mit vier M6-Schrauben und Käfigmuttern am Rack.
-
Page 15: Anschluss Der Stromversorgung
Erdung des Controllers 1. Schließen Sie ein End des Erdungskabels an eine geeignete Erdung an, z.B. an das Rack, in dem der Controller montiert ist. 2. Befestigen Sie die Erdungsöse mit den Unterlegscheiben und Schrauben am Erdungspunkt an der Rückseite des Controllers. Anschluss der Stromversorgung 1. - Page 16 Anschluss der RJ45-Ports 1. Schließen Sie ein Ethernet-Kabel an den RJ45-Port eines Computers oder anderer Netzwerkgeräte 2. Schließen Sie das andere Ende des Ethernet-Kabels an den RJ45-Port des Controllers an. Anschluss der Console-Port 1. Stecken Sie den RJ45-Stecker in den RJ45 Console-Port an der Vorderseite des Controllers. 2.
- Page 17 Anschluss des MGMT-Ports 1. Schließen Sie ein End eines Standard-RJ45-Ethernet-Kabels an einen Computer an. 2. Schließen Sie das andere End des Kabels an den MGMT-Port an der Vorderseite des Controllers an. Konfigurieren des Wireless LAN Controllers Konfigurieren des Controllers über die webbasierte Schnittstelle Schritt 1: Verbinden Sie den Computer über das Netzwerkkabel mit dem Management-Port des Controllers.
- Page 18 Schritt 3: Öffnen Sie einen Browser und geben Sie http://192.168.1.1 ein. Dann geben Sie Standardnutzernamen und -passwort admin/admin ein. Wireless Controller admin ***** Simplified Chinese Login Schritt 4: Klicken Sie auf Login, um die webbasierte Konfigurationsseite aufzurufen. Konfigurieren des Controllers über den Console-Port Schritt 1: Schließen Sie einen Computer mit dem mitgelieferten Konsolenkabel an den Konsolenanschluss des Controllers an.
- Page 19 Produktgarantie FS garantiert den Kunden, dass wir bei Schäden oder fehlerhaften Artikeln, die auf unsere Verarbeitung zurückzuführen sind, eine kostenlose Rückgabe innerhalb von 30 Tagen nach Erhalt der Ware anbieten. Dies gilt nicht für maßgefertigte Artikel oder maßgeschneiderte Lösungen.
-
Page 20: Accessoires
Merci d'avoir choisi le contrôleur LAN sans fil pour entreprise. Ce guide est conçu pour que vous puissiez vous familiariser avec la configuration du contrôleur LAN sans fil et décrit comment procéder à son déploiement. FS-AC32 Accessoires Câble d'Alimentation x 1... -
Page 21: Exigences D'installation
Bouton du Panneau Arrière 110-220VAC 50-60Hz ON/OFF Power Supply Bouton Description Power ON/OFF Activation ou désactivation de l'alimentation du contrôleur. Indicateurs LED du Panneau Frontal Indicateur LED Statut Description Éteint Le module d'alimentation n'est pas en position ou est défaillant. Vert Le module d'alimentation est opérationnel. -
Page 22: Site De L'installation
Site de l'Installation Ne pas installer le contrôleur dans un endroit humide ou mouillé. Gardez le contrôleur loin de toute source de chaleur. Assurez-vous que le contrôleur est correctement mis à la terre. Portez un bracelet antistatique durant l'installation et la maintenance. Placez les outils et les pièces à... -
Page 23: Installation Dans Un Rack
Installation dans un Rack 1. Fixez les supports de montage sur les deux côtés du contrôleur avec six vis M4. 2. Fixez le contrôleur au rack à l'aide de quatre vis M6 et d'écrous à cage. -
Page 24: Mise À La Terre Du Contrôleur
Mise à la Terre du Contrôleur 1. Connectez une extrémité du câble de mise à la terre à une terre appropriée, telle que le rack dans lequel le contrôleur est monté. 2. Fixez la cosse de mise à la terre au point de mise à la terre du panneau arrière du contrôleur à l'aide des rondelles et des vis. -
Page 25: Connexion Des Ports Rj45
Connexion des Ports RJ45 1. Connectez un câble Ethernet au port RJ45 d'un ordinateur ou d'autres périphériques réseau. 2. Connectez l'autre extrémité du câble Ethernet au port RJ45 du contrôleur. Connexion au Port Console 1. Insérez le connecteur RJ45 dans le port de console RJ45 situé sur la face frontale du contrôleur. 2. -
Page 26: Connexion Au Port Mgmt
Connexion au Port MGMT 1. Connectez une extrémité d'un câble Ethernet standard RJ45 à un ordinateur. 2. Connectez l'autre extrémité du câble au port MGMT situé sur la face frontale du contrôleur. Configuration du Contrôleur LAN Sans Fil Configuration du Contrôleur à l'Aide de l'Interface Web Étape 1: Connectez l'ordinateur au port de Gestion du contrôleur à... -
Page 27: Configuration Du Contrôleur À L'aide Du Port De Console
Étape 3: Ouvrez un navigateur, tapez http://192.168.1.1, et entrez le nom d'utilisateur et le mot de passe par défaut : admin/admin. Wireless Controller admin ***** Simplified Chinese Login Étape 4: Cliquez sur Connexion pour afficher la page de configuration basée sur le Web. Configuration du Contrôleur à... -
Page 28: Dépannage
Garantie du Produit FS garantit à ses clients que tout article endommagé ou défectueux dû à sa fabrication pourra être retourné gratuitement dans un délai de 30 Jours à compter de la date de réception de la marchan- dise. Cela exclut les articles fabriqués sur mesure ou les solutions personnalisées. -
Page 29: Compliance Information
Any changes or modifications not expressly approved by the grantee of this device could void the user's authority to operate the equipment. Responsible party (only for FCC matter) FS.COM Inc. 380 Centerpoint Blvd, New Castle, DE 19720, United States https://www.fs.com... - Page 30 Die FS.COM GmbH erklärt hiermit, dass dieses Gerät mit der Richtlinie 2014/30/EU und 2014/35/EU konform ist. Eine Kopie der EU-Konformitätserklärung finden Sie unter www.fs.com/de/company/quality_control.html. FS.COM GmbH déclare par la présente que cet appareil est conforme à la Directive 2014/30/UE et 2014/35/UE. Une copie de la Déclaration UE de Conformité est disponible sur https://www.fs.com/fr/company/quality_control.html FS.COM LIMITED...