Table des Matières
Publicité
Les langues disponibles
Les langues disponibles
Liens rapides
Schnellheizer
Radiateur rapide
Riscaldatore rapido
Rapid heaters
SH 2020
Bedienung und Installation ................................................ 2
Utilisation et installation ....................................................13
Uso e installazione .......................................................... 24
Operation and installation ................................................ 35
Ident - Nr. 50.0941a / 10.10.2018
Publicité
Chapitres
Table des Matières
Dépannage

Sommaire des Matières pour Elcalor SH 2020
- Page 1 Schnellheizer Radiateur rapide Riscaldatore rapido Rapid heaters SH 2020 Bedienung und Installation ..........2 Utilisation et installation ............13 Uso e installazione ............24 Operation and installation ..........35 Ident - Nr. 50.0941a / 10.10.2018...
-
Page 2: Table Des Matières
Inhalt - Besondere Hinweise BESONDERE HINWEISE BEDIENUNG Allgemeine Hinweise ........... 3 Sicherheit ..............3 Gerätebeschreibung ........... 4 Bedienung ..............4 Einstellungen ............... 5 Reinigung, Pflege und Wartung ......... 8 Problembehebung ............8 INSTALLATION Sicherheit ..............9 Gerätebeschreibung ........... 9 Montage ................ 9 Inbetriebnahme ............ -
Page 3: Allgemeine Hinweise
Bedienung BEDIENUNG 1.3 Hinweise am Gerät Symbol Bedeutung Gerät nicht abdecken 1. Allgemeine Hinweise Die Kapitel „Besondere Hinweise“ und „Bedienung“ rich- 1.4 Maßeinheiten ten sich an den Gerätebenutzer und den Fachhandwerker. Das Kapitel „Installation“ richtet sich an den Fachhand- Hinweis werker. -
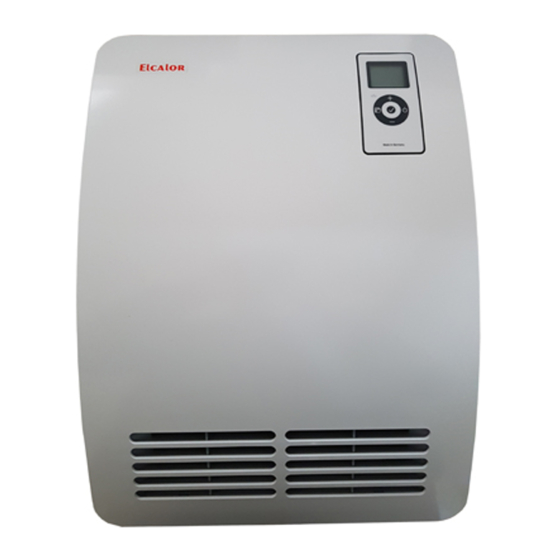
Page 4: Gerätebeschreibung
Bedienung 4. Bedienung WARNUNG Verbrennung Betreiben Sie das Gerät nicht ... ◦ wenn die Mindestabstände zu angrenzenden Objektflächen oder sonstigen brennbaren Ma- terialien (z. B. Möbel, Textilien) unterschritten werden. ◦ in Räumen, die durch Chemikalien, Staub, Gase oder Dämpfe feuer- oder explosionsgefährdet sind. -
Page 5: Gerät Ein- Und Ausschalten
Bedienung 4.1.2 Anzeige Hinweis Wenn 20 Sekunden lang keine Bedieneraktion erfolgt, Wenn das Gerät bei aktiviertem Zeitprogramm für schaltet sich die Hintergrundbeleuchtung aus. Durch Drü- längere Zeit ausgeschaltet war, werden Sie nach cken einer beliebigen Taste schalten Sie die Hintergrund- dem Einschalten aufgefordert, Wochentag und Uhr- beleuchtung wieder ein. -
Page 6: Silent Mode
Bedienung 5.3 Basismenü Um den Kurzzeittimer zu aktivieren, drücken Sie die Taste „OK“. Das Gerät schaltet bis zum Ablauf der eingestellten Um in das Basismenü zu gelangen, drücken Sie kurz die Zeit in den Komfortbetrieb. Während dieser Zeit blinkt die Taste „Menü“. - Page 7 Bedienung 5.4.2 Zeitprogramme Zeitprogramm Pro3 Es stehen Ihnen drei Zeitprogramme zur Verfügung. Die Mit dem Zeitprogramm Pro3 können Sie bis zu 14 se- Zeitprogramme Pro1 und Pro2 sind werkseitig vorkonfi- parate Komfortphasen festlegen, die sich wöchentlich guriert. Das Zeitprogramm Pro3 können Sie nach Ihren wiederholen.
-
Page 8: Reinigung, Pflege Und Wartung
Bedienung 7. Problembehebung P1: Offset Raumtemperatur Eine ungleichmäßige Temperaturverteilung im Raum kann Problem Ursache Behebung zu einer Differenz zwischen der angezeigten Ist-Tempe- Der Raum wird Temperatur am Gerät Prüfen Sie die eingestell- ratur I1 und der von Ihnen gemessenen Raumtemperatur nicht ausreichend ist zu niedrig einge- te Temperatur am Gerät. -
Page 9: Installation
Installation INSTALLATION 10.2 Montage der Wandhalterung Das Gerät ist für die Wandmontage mittels der mitgelie- ferten Wandhalterung vorgesehen. Hinweis 8. Sicherheit ◦ Sie können die Wandhalterung als Schablone zur Wandbefestigung verwenden. Dies gewähr- Die Installation, Inbetriebnahme sowie Wartung und Re- leistet den notwendigen Bodenabstand. -
Page 10: Demontage Des Gerätes
WARNUNG Stromschlag ◦ Führen Sie alle elektrischen Anschluss- und In- stallationsarbeiten nach Vorschrift aus. ◦ Die Installation mit festverlegter elektrischer Anschlussleitung ist nicht zulässig. SH 2020 Wandaufhängung Sachschaden ◦ Beachten Sie das Typenschild. Die angegebene Spannung muss mit der Netzspannung überein- stimmen. -
Page 11: Angaben Zum Energieverbrauch
Installation 14.2 Angaben zum Energieverbrauch Die Produktdaten entsprechen den EU-Verordnungen zur Richtlinie für umweltgerechte Gestaltung energiever- brauchsrelevanter Produkte (ErP). Produktinformationen zu elektrischen Einzelraumheizgeräten nach Verordnung (EU) 2015/1188 SH 2020 60239532 Hersteller Star Unity Wärmeleistung Nennwärmeleistung P Mindestwärmeleistung (Richtwert) P Maximale kontinuierliche Wärmeleistung P... -
Page 12: Garantie
Garantie - Umwelt und Recycling Garantie Die Garantieleistungen unterliegen den Bestimmungen des FEA, dem Fachverband Elektroapparate für Haushalt und Gewerbe Schweiz. Die Garantie gilt für 2 Jahr - gerechnet ab Lieferdatum - und beläuft sich auf Material und Arbeit. Lieferdatum: Firma: Für Reparaturen bitte Gerät einsenden an: (Adresse siehe Rückseite) Umwelt und Recycling... -
Page 13: Remarques Particulières
Table des matières - Remarques particulières REMARQUES PARTICULIÈRES UTILISATION Remarques générales ..........14 Sécurité ............... 14 Description de l’appareil ........... 15 Utilisation ..............15 Configuration ............. 16 Nettoyage, entretien et maintenance ...... 19 Aide au dépannage ............ 19 INSTALLATION Sécurité ............... 20 Description de l’appareil ........... -
Page 14: Remarques Générales
Utilisation UTILISATION » Ce symbole signale une action à entreprendre. Les actions nécessaires sont décrites étape par étape. 1.3 Remarques apposées sur l’appareil Symbole Signification 1. Remarques générales Ne pas couvrir l’appareil Les chapitres « Remarques particulières » et « Utilisa- tion »... -
Page 15: Label De Conformité
Utilisation 4. Utilisation AVERTISSEMENT Brûlure N’utilisez pas l’appareil... ◦ si les distances minimales avec les objets voi- sins ou autres objets inflammables (par ex. meubles, textiles) ne sont pas respectées. ◦ dans les locaux où existe un risque d’incendie ou d’explosion en raison de la présence de pro- duits chimiques, poussières, gaz ou vapeurs. -
Page 16: Affichage
Utilisation 4.1.2 Affichage Les paramétrages restent conservés lorsque l’appareil est éteint ou lors d’une coupure de courant. Cet appareil pos- En l’absence d’action de l’utilisateur pendant 20 secondes, sède une certaine autonomie permettant de conserver le le rétro-éclairage s’éteint. Appuyez sur une touche quel- jour de la semaine et l’heure actuels pendant plusieurs conque pour réactiver le rétro-éclairage. -
Page 17: Menu Principal
Utilisation 5.3 Menu principal Maintenez la touche « OK » appuyée pendant plus de 3 secondes pour interrompre la minuterie. Pour accéder au menu principal, appuyez brièvement Le temps programmé écoulé, l’appareil revient automati- sur la touche « Menu ». Vous pouvez alors accéder aux quement au mode réduit. -
Page 18: Programmes De Temporisation
Utilisation 5.4.2 Programmes de temporisation Programme Pro3 Vous disposez de trois programmes de temporisation. Avec le programme Pro3, vous pouvez définir jusqu’à 14 Les programmes Pro1 et Pro2 sont préconfigurés en plages horaires de mode confort séparées, celles-ci se usine. Vous pouvez définir le programme Pro3 selon vos répétant à... -
Page 19: Nettoyage, Entretien Et Maintenance
Utilisation 7. Aide au dépannage P1: Décalage température ambiante Une répartition irrégulière de la température dans le Problème Cause Remède local peut être à l’origine d’un écart entre la température Le local n’est pas La température réglée Contrôlez la température réelle l1 et celle que vous mesurez. -
Page 20: Installation
Installation INSTALLATION 10.2 Montage du support mural L’appareil est prévu pour une pose murale à l’aide du support fourni. Remarque 8. Sécurité ◦ Le support mural peut servir de gabarit de pose. Il permet de respecter la distance nécessaire L’installation, la mise en service, la maintenance et les par rapport au sol. -
Page 21: Pose De L'appareil
◦ Exécutez tous les travaux de raccordement et d’installation électriques conformément aux prescriptions. ◦ Il est interdit d’effectuer une installation avec un câble de raccordement électrique fixe. SH 2020 Dommages matériels Support mural ◦ Tenez compte des indications de la plaque signalétique. La tension indiquée doit corres- pondre à... -
Page 22: Indications Relatives À La Consommation Énergétique
Installation 14.2 Indications relatives à la 14.3 Tableau des données consommation énergétique SH 2020 Les caractéristiques du produit sont conformes aux pres- 60239532 criptions de la directive UE sur l’écoconception applicable Données électriques aux produits liés à l’énergie (ErP). Puissance raccordée 2000 Informations produit sur les dispositifs de chauffage décentra-... -
Page 23: Garantie
Garantie - Environnement et recyclage Garantie Les prestations en garantie sont soumises aux prescriptions de la FEA, l’association suisse des fabricants et fournisseurs d’appareils électrodomestiques. La garantie est de 2 ans, à compter de la date de livraison et couvre les frais de matériel et de travail. -
Page 24: Avvertenze Speciali
Indice - Avvertenze speciali AVVERTENZE SPECIALI Avvertenze generali ..........25 Sicurezza ..............25 Descrizione dell’apparecchio........26 Uso ................26 Impostazioni ............... 27 Pulizia, cura e manutenzione ........30 Eliminazione dei problemi ........30 INSTALLAZIONE Sicurezza ..............31 Descrizione dell’apparecchio........31 Installazione ............... -
Page 25: Avvertenze Generali
1.3 Avvertenze riportate sull’apparecchio Simbolo Significato Non coprire l'apparecchio 1. Avvertenze generali I capitoli “Avvertenze speciali” e “Uso” si rivolgono all’uti- 1.4 Unità di misura lizzatore finale e al tecnico specializzato. Il capitolo “Installazione” si rivolge al tecnico specializ- Nota zato. -
Page 26: Descrizione Dell'apparecchio
4. Uso AVVERTENZA Ustione Non utilizzare l'apparecchio... ◦ se non sono rispettate le distanze minime dalle superfici di oggetti vicini o di altri materiali in- fiammabili (ad es. mobili, tessuti); ◦ in locali soggetti a pericolo di incendio o esplo- sione a causa di prodotti chimici, polvere, gas o vapori;... -
Page 27: Accensione E Spegnimento Dell'apparecchio
4.2 Accensione e spegnimento 4.1.1 Interfaccia utilizzatore dell’apparecchio Tasto Denomina- Descrizione zione Nota Tasto "Standby" Accensione dell'unità di programmazione; Alla prima accensione, e all'accensione dopo lunghi Impostazione dell'unità di program- mazione e del riscaldatore in modalità periodi di inattività, è possibile avvertire odori per Standby breve tempo. -
Page 28: Silent Mode
La temperatura nominale può essere modificata ma- Per attivare il timer breve, premere il tasto “OK”. L’appa- nualmente anche se il programma orario è attivato. La recchio passa alla modalità comfort fino allo scadere del temperatura nominale modificata viene mantenuta fino al tempo impostato. - Page 29 5.4.2 Programmi orari Programma orario Pro3 Sono disponibili tre programmi orari. I programmi orari Con il programma orario Pro3 è possibile definire fino a 14 Pro1 e Pro2 sono preconfigurati in fabbrica. Il programma fasi separate di comfort, che si ripetono settimanalmente. orario Pro3 può...
-
Page 30: Pulizia, Cura E Manutenzione
7. Eliminazione dei problemi P2: Formato ora Con il parametro P2 è possibile impostare il formato di Problema Causa Rimedio visualizzazione dell’orario (12 ore o 24 ore). Il locale non si La temperatura impo- Verificare la temperatura P3: Unità indicazione della temperatura scalda a sufficien- stata sull'apparecchio impostata sull'apparec-... -
Page 31: Sicurezza
Installazione INSTALLAZIONE 10.2 Installazione del supporto a parete L’apparecchio è previsto per il montaggio a parete da ese- guirsi con il supporto fornito. Nota 8. Sicurezza ◦ Il supporto a parete può essere utilizzato come modello per il fissaggio; sarà così garantita la L’installazione, la messa in servizio, la manutenzione e distanza corretta dal pavimento. -
Page 32: Smontaggio Dell'apparecchio
◦ Verificare che la sezione del cavo di alimenta- zione sul posto sia sufficiente. SH 2020 L’apparecchio viene fornito con cavo con spina, ma è ido- Montaggio a parete neo anche all’allacciamento fisso. -
Page 33: Dati Relativi Al Consumo Energetico
Installazione 14.2 Dati relativi al consumo energetico 14.3 Tabella dei dati I dati del prodotto soddisfano i Regolamenti UE relativi SH 2020 alla direttiva sulla progettazione eco-compatibile dei pro- 60239532 dotti che consumano energia (ErP). Dati elettrici Informazioni prodotto relativi ad apparecchi per il riscaldamento... - Page 34 Garanzia - Ambiente e riciclaggio Garanzia Le prestazioni di garanzia sono regolate dalla FEA, Associazione Svizzera Apparecchi elettrodomestici economia domestica e industria. La Garanzia é valida due anni, a partire dalla data di consegna e si rapporta al materiale. Data di consegna: Ditta: In caso di riparazione la preghiamo di inviare l’attrezzo a (Indirizzo retro) Ambiente e riciclaggio...
- Page 35 Contents - Special information SPECIAL INFORMATION OPERATION General information ..........36 Safety ................36 Appliance description ..........37 Operation ..............37 Settings ............... 38 Cleaning, care and maintenance ......40 Troubleshooting ............41 INSTALLATION Safety ................41 Appliance description ..........41 Installation ..............
-
Page 36: General Information
Operation OPERATION 1.3 Information on the appliance Symbol Meaning Never cover the appliance 1. General information The chapters "Special information" and "Operation" are 1.4 Units of measurement intended for both users and qualified contractors. The chapter "Installation" is intended for qualified con- Note tractors. -
Page 37: Test Symbols
Operation 4. Operation WARNING Burns Never operate this appliance... ◦ if the distance from adjacent objects or other flammable materials (e.g. furniture, textiles) would be less than the minimum permissible distance. ◦ in rooms where it is at risk of fire or explosion as a result of chemicals, dust, gases or vapours. -
Page 38: Switching The Appliance On And Off
Operation 4.1.2 Display Note If no user action occurs for 20 seconds, the backlighting If the appliance has been switched off for a longer switches off. Press any button to switch the background time with a time program activated, you will be lighting on again. -
Page 39: Configuration Menu
Operation Rapid heating stage Display Description Switch "Window open detection" function on and off Set "Hi" in the standard menu for silent mode. The ap- pliance heats with a heating output of 2000 W and fast fan speed. Select the powerful rapid heating stage if you need to heat up a cold room rapidly to the selected temperature. -
Page 40: Cleaning, Care And Maintenance
Operation Time programs Pro1 and Pro2 5.4.3 Parameter You can specify the comfort mode start and end times You can call up the following parameters: with time programs Pro1 and Pro2. During this time pe- Display Description Options riod, the appliance heats to the set comfort temperature. Room temperature offset ±3 °C | Outside this specified time period, the appliance operates... -
Page 41: Troubleshooting
Operation - Installation INSTALLATION 7. Troubleshooting Problem Cause Remedy Room does not get Temperature set too Check the temperature warm enough. Ap- low on the appliance. set on the appliance. Ad- pliance does not just if necessary. 8. Safety get hot. No power supply. -
Page 42: Installing The Wall Mounting Bracket
Installation 10.2 Installing the wall mounting bracket 10.3 Appliance installation The appliance is intended for wall mounting using the wall mounting bracket supplied. Note ◦ The wall mounting bracket can be used as a template for wall mounting. This ensures suffi- cient clearance from the floor. -
Page 43: Commissioning
(ErP). junction box Product information on electric individual room heaters to regulation (EU) 2015/1188 WARNING Electrocution SH 2020 In the case of a permanent connection, the appliance must be able to be separated from the power supply 60239532 Manufacturer Star Unity by an isolator that disconnects all poles with at least 3 mm contact separation. -
Page 44: Guarantee - Environment And Recycling
Guarantee - Environment and recycling Guarantee The guarantee services are subject to the provisions of the FEA, the Swiss Association of Domestic and Commercial Electrical Appliances. The guarantee is valid for 2 years – calculated from the date of delivery – and covers material and labour. Delivery date: Company: For repairs, please return the appliance to us: (see over for address) - Page 45 Notes...
- Page 46 Notes...
- Page 47 Notes...
- Page 48 Star Unity AG Fabrik elektrischer Apparate elcalor Elektro-Heizgeräte Seestraße 315, CH-8804 Au-ZH Telefon +41/44 782 61 61 Telefax +41/44 782 61 60...