Table des Matières
Publicité
Liens rapides
INDEX
Page Contents
2
3
4
5
6
7
8
18
20
IGLOO WL C61199
IGLOO EASY C61197
IGLOO ECO C61196
INSTRUCTION MANUAL
EN
IT
FR
E
ES
Congratulations on choosing a Clay Paky product
We thank you for your custom.
Please note that this product, as all the others in the rich Clay Paky
range, has been designed and made with total quality to ensure
excellent performance and best meet your expectations and
requirements.
Carefully read this instruction manual in its entirety and keep it safe
for future reference. It is essential to know the information and
comply with the instructions given in this manual to ensure the fitting
is installed, used and serviced correctly and safely.
CLAY PAKY S.p.A. disclaims all liability for damage to the fitting or
to other property or persons deriving from installation, use and
maintenance that have not been carried out in conformity with this
instruction manual, which must always accompany the fitting.
CLAY PAKY S.p.A. reserves the right to modify the characteristics
stated in this instruction manual at any time and without prior notice.
1
1
Publicité
Table des Matières

Manuels Connexes pour Clay Paky IGLOO WL

Sommaire des Matières pour Clay Paky IGLOO WL
-
Page 1: Table Des Matières
Congratulations on choosing a Clay Paky product We thank you for your custom. Page Contents Please note that this product, as all the others in the rich Clay Paky Safety Information range, has been designed and made with total quality to ensure... -
Page 2: Safety Information
SAFETY INFORMATION • Installation Make sure all parts for fixing the equipment are in a good state of repair. Make sure the point of anchorage is stable before positioning the equipment. The safety chain must be properly hooked onto the fitting and secured to the framework, so that, if the primary support system fails, the fitting falls as little as possible. -
Page 3: Informazioni Di Sicurezza
INFORMAZIONI DI SICUREZZA • Installazione Assicurarsi che tutte le parti per il fissaggio del dispositivo siano in buona condizione. Assicurarsi della stabilità del punto di ancoraggio prima di posizionare il dispositivo. La fune di sicurezza, debitamente agganciata all’apparecchio e fissata alla struttura di sostegno, deve essere installata in modo che, in caso di cedimento del sistema di supporto primario, si abbia la minor caduta possibile dell’apparecchio. -
Page 4: Consignes De Sécurité
CONSIGNES DE SÉCURITÉ • Installation S’assurer que toutes les pièces pour la fixation du projecteur sont en bon état. S’assurer de la stabilité du point d’ancrage avant de positionner le projecteur. Le câble de sécurité, à fixer correctement à l’appareil et à la structure de support, doit être installé de façon à... -
Page 5: Informationen Zur Sicherheit
INFORMATIONEN ZUR SICHERHEIT • Installation Sicherstellen, dass alle Teile für die Befestigung des Projektors in einwandfreiem Zustand sind. Vor der Installation des Projektors die Stabilität der Verankerungsstelle überprüfen. Das korrekt am Gerät eingehakte und an der Haltestruktur befestigte Sicherheitsseil muss so installiert werden, dass bei einem Nachgeben der Haupthalterung die Fallhöhe des Gerätes so gering wie möglich ist. -
Page 6: Informaciones De Suguridad
INFORMACIONES DE SEGURIDAD • Instalación Asegúrese de que todos los elementos de fijación del proyector estén en buenas condiciones. Controle la estabilidad del punto de anclaje antes de instalar el proyector. La cuerda de seguridad, correctamente enganchada al aparato y fijada a la estructura de soporte, debe colocarse de modo que, si el soporte principal cede, el aparato sufra la menor caída posible. -
Page 7: Unpacking And Preparation
WARNING: For dimensional, thermal or operating problems, IGLOO use in CLAY PAKY projectors other than those listed or other brand projectors is NOT permitted. MINIMUM MAXIMUM PROJECTOR ambient temperature ambient temperature o Alpha 300 Series o Alpha 700 Series o Sharpy - 20 °C... -
Page 8: Installation And Start-Up
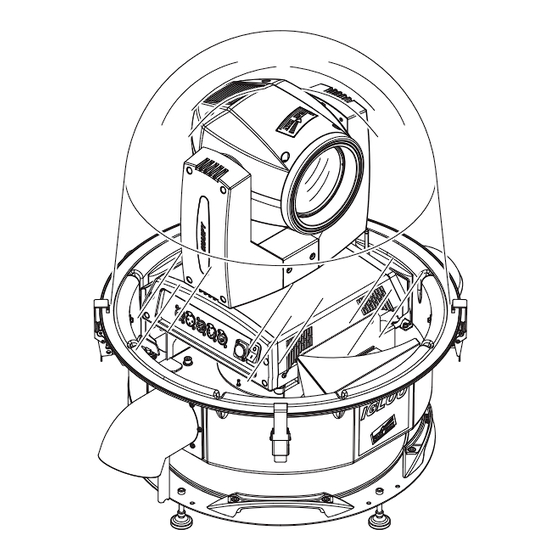
INSTALLATION AND START-UP WARNING: to avoid damaging the projector, use the screws supplied with the bracket unit and not the ones previously removed. Mounting brackets for projector placement - Fig. 1 The dedicated brackets replacing the side handles should be mounted before inserting the projector in the IGLOO: C61192 - fast fit bracket for ALPHA 300/700 C61191 - fast fit bracket for SHARPY and SHARPY WASH 330 C61183 - fast fit bracket for A.leda K10 line... - Page 9 90° Projector placement - Fig. 2 Once placed in the igloo the projector is fixed to the base by tightening the screws using 1/4 turns secured to the brackets. IGLOO...
- Page 10 Connecting and disconnecting power cable- Fig. 3 Connecting to the control signal line Igloo Easy (DMX) - Fig. 4 Use a cable conforming to specifications EIA RS-485: 2-pole twisted, shielded, 120Ohm characteristic impedance, 22-24 AWG, low capacity. Do not use microphone cable or other cable with characteristics differing from those specified.
- Page 11 Wireless control - Fig. 5 The wireless control is only available in the IGLOO version (not EASY). IGLOO...
- Page 12 DIP SWITCH 1: DMX ADDRESS SETTINGS DIP-SWITCH 2: RECEIVING CONTROL MODE SETTINGS The DMX address set on the Dip-switch 1, is the address to control the Switch 1, 2, 3 ON: Switch 1, 2, 3 OFF: switching-on / switching-off of the device via the control unit. Wireless operating mode (Radio) Wired operating mode (DMX cable) 9 10...
- Page 13 DMX connection cable for IGLOO (not EASY) - Fig. 7 PLEASE NOTE: If you do not intend to use the wireless option, the DMX cable must be connected as seen in fig.7 and not directly to the projector. Closing the device - Fig. 8 IGLOO...
- Page 14 CAUTION: The 2 IGLOO conveyors should always be facing down. By gripping them with both hands it is possible to rotate them in the desired position. An acoustic signal will alert incorrect conveyor positions. Installing Igloo - Fig. 9 WARNING: with the exception of when the Igloo is positioned on the floor, the safety cable must be fitted. (Cod. 105041/003 available on request).
- Page 15 C61193 - OPTIONAL ACCESSORIES 2 x 183102/805 1 x 272023/001 1 x 033205 1 x 105041/003 Mounting kit C61193 - Fig. 10 IGLOO...
- Page 16 CAUTION: To avoid damage to the internal parts of the fixture, installed inside the IGLOO, when the fixture is not working, is recommended to turn the head down before turning the fixture off, so that the front lens of the fixture is invested as little as possible from the sun.
- Page 17 Lock assembly - Fig. 12 The device latches are fitted with holes for affixing safety locks if desired. IGLOO...
-
Page 18: Maintenance
MAINTENANCE Replacing fuse - Fig. 13 IGLOO... - Page 19 WARNING: no alcohol Periodical cleaning - Fig. 14 To ensure optimal operation and performance for a long time it is essential to periodically clean the parts subject to dust and grease deposits. The frequency with which the following operations are to be carried out depends on various factors, such as the amount of the effects and the quality of the working environment (air humidity, presence of dust, salinity, etc.).
-
Page 20: Technical Information
32 Kg (70.6 lbs). Note: Carefully read the instruction manual, dedicated to the projector inside the Igloo, for additional technical details. CLAY PAKY - Via Pastrengo, 3/b - 24068 Seriate (BG) Italy - Tel. +39-035-654311 - Fax +39-035-301876 - www.claypaky.it S.p.A.