Table des Matières
Publicité
Les langues disponibles
Les langues disponibles
Liens rapides
Publicité
Table des Matières
Dépannage

Sommaire des Matières pour Sylvania SB378W
- Page 1 37" Bluetooth Soundbar with Wireless Subwoofer MODEL: SB378W Please read this instruction manual carefully and keep it for future reference. SYLVANIA is a registered trademark of OSRAM Sylvania Inc. used under license.
-
Page 2: Important Safety Instructions
IMPORTANT SAFETY INSTRUCTIONS CAUTION RISK OF ELECTRIC SHOCK DO NOT OPEN CAUTION: TO REDUCE THE ELECTRIC SHOCK, DO NOT REMOVE THE COVER (OR BACK). NO USER SERVICEABLE PARTS INSIDE. REFER SERVICING TO QUALIFIED SERVICE PERSONNEL. DANGEROUS VOLTAGE: The lighting flash with arrowhead symbol within an equilateral triangle is intended to alert the user to the presence of uninsulated “dangerous voltage”... - Page 3 -- Reorient or relocate the receiving antenna. -- Increase the separation between the equipment and receiver. -- Connect the equipment into an outlet on a circuit different from that to which the receiver is connected. -- Consult the dealer or an experienced radio/TV technician for help. To assure continued operation, follow the attached installation instructions and use only shielded cables when connecting to other devices.
- Page 4 provided for your safety. If the provided plug does not fit into your outlet, consult an electrician for replacement of the obsolete outlet. 10. Protect the power cord from being walked on or pinched particularly at plugs, convenience receptacles, and the point where they exit from the apparatus. 11.
-
Page 5: Placement And Mounting
PLACEMENT AND MOUNTING 1. Placing the device on table - Ventilation When placing the Sound Bar and Subwoofer on an entertainment center, bookshelf, or any type of enclosed space, be sure to allow at least 2-3 inches of space around the Sound Bar for ventilation. - Page 6 Mounting to a wall 2.1 Mounting to a wooden wall (screws not supplied) A. Mark the position of the mounting screws on the wall using a pencil(not supplied). B. Drill the screws direc tly into the marks that you made on the wall and leave approx.
-
Page 7: Product Overview
PRODUCT OVERVIEW Front View Remote sensor 3. Speaker 3. Speaker Indicator Rear View 7. LINE IN Jacks 5. OPTICAL Jack LINE IN 16V,1.5A AUX IN OPTICAL 6. AUX IN Jack 4. USB Port 8. DC IN jack Top View 9. Standby/Source button 12. -
Page 8: Power Indicator
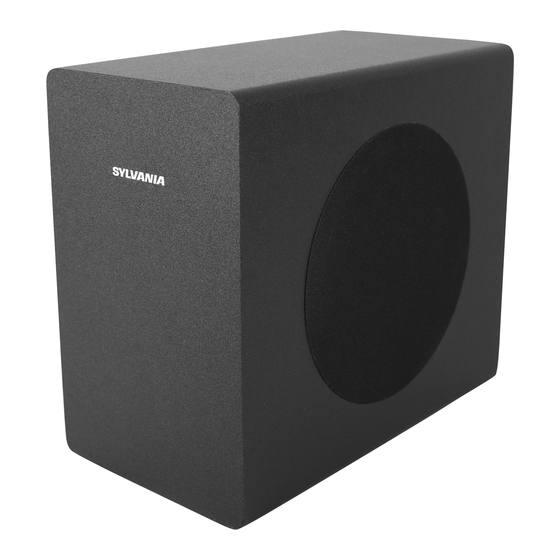
PRODUCT OVERVIEW Side View of Subwoofer 1. Speaker Rear View of Subwoofer INDICATOR STANDBY POWER INDICATOR 5. Pairing Indicator 4. POWER INDICATOR 3. STANDBY Button 2. DC IN Jack... -
Page 9: Remote Control
REMOTE CONTROL (Power On/Off) Button 2. AUX Button 3. LINE IN Button (Previous) Button 5. Sound Mode (MUSIC, TALK, MOVIE, STANDARD) 6. REC. (USB Recording) Button (Mute) Button 8. BT Button (Bluetooth mode) 9. OPTICAL Button (Mode Switch) Button (Next) Button Play/Pause Button (Volume Up/Down) Button BATTERY INSTALLATION OF REMOTE CONTROL... -
Page 10: Operation Range
BETTERY PRECAUTIONS: Follow these precautions when using a battery in this device: 1. Use only the size and type of battery specified. 2. Be sure to follow the correct polarity when installing the battery as indicated in the battery compartment, a reserved battery may cause damage to the device. 3. -
Page 11: General Operations
GENERAL OPERATIONS Connect the DC 16V, 1.5A Adapter to the DC IN jack on the Main Unit. Plug the Adapter into the AC outlet with AC100~240V;50/60Hz. The mode indicator on Main Unit will light up and turn RED. Connect the DC16V, 1.5A Adapter to the DC IN jack on the SUBWOOFER. Plug the Adapter into the AC outlet with AC100~240V;50/60Hz. -
Page 12: Bluetooth Operation
Blue and blink. 3. Power on the external Bluetooth enabled device and enter Bluetooth mode, try searching the unit. 4. When " SYLVANIA SB378W" appears, select it and make connection. 5. After successful pairing, the mode indicator will stop blinking. During playing: ~ Press the button on remote control to skip tracks. -
Page 13: Aux In Operation
AUX IN OPERATION An external Audio player (such as mobile phone, MP3 player etc.) can be connected to this unit and listen through the unit's speakers. Plug one end of the AUX IN cable into the AUX IN jack on the unit. Plug another end of the AUX IN cable into the headphone jack or Aux Out jack on the external audio player. -
Page 14: Line In Operation
LINE IN OPERATION An external Audio/Video player (such as TV, DVD player etc.) can be connected to this unit and listen through the speakers. 1. Plug one end of the Line in cable into the LINE IN jacks (L&R) on the unit. 2. - Page 15 OPTICAL IN OPERATION 1. Connect the Optical out jack from the external audio player (such as TV, DVD player etc.) to the OPTICAL jack on the rear of the unit with the optical connection cable as illustated below: (For PCM format only) LINE IN 16V,1.5A AUX IN...
-
Page 16: Usb Operation
USB OPERATION 1. Insert the USB device to the USB Player port on the unit. LINE IN 16V,1.5A AUX IN OPTICAL 2. Power on the Main Unit and SUBWOOFER and paired together as previous stated. 3. Press the button on remote control or press the Standby/Source button on Main Unit repeatedly, or press the USB button on remote control directly to switch to USB mode, the mode indicator on the unit will turn Pink Green (Red+Green+Blue). -
Page 17: Troubleshooting Guide
TROUBLESHOOTING GUIDE SYMPTOM POSSIBLE CAUSE POSSIBLE SOLUTION The adapter is not connected No power Connect the adapter to the unit and wall outlet The unit is in power off mode Press and hold the Standby/Source button on the unit or press the button on remote control to power on the unit Raise the volume level by pressing... - Page 18 SPECIFICATIONS Power input for main unit and subwoofe........AC100~240V, 50/60Hz Power output for main unit and subwoofer......DC16V 1.5A Audio output of the main unit................2x10W Audio output of the subwoofer.................1x20W Bluetooth effective working range in open area........up to 32 feet Remote effective working range..............up to 16 feet PACKAGES 1x Main Unit 1x Subwoofer...
- Page 19 To make a warranty claim, do not return this product to the store. Please email support@curtiscs.com or call 1-800-968-9853. 90 Days Warranty This product is warranted to be free from defects in material and workmanship for a period of ninety (90) days from the date of original purchase. During this period, your exclusive remedy is repair or replacement of this product or component found to be defective, at our option;...
- Page 20 Barre-son Bluetooth 37" avec caisson de basses sans fil MODÈLE: SB378W Lisez ce mode d'emploi avec attention et conservez-le pour référence future. SYLVANIA est une marque déposée d’OSRAM Sylvania Inc. Utilisé avec permis.
-
Page 21: Importantes Mesures De Sécurité
IMPORTANTES MESURES DE SÉCURITÉ ATTENTION RISQUE DE CHOC ÉLECTRIQUE NE PAS OUVRIR ATTENTION : AFIN DE RÉDUIRE TOUT RISQUE DE CHOC ÉLECTRIQUE, NE PAS RETIRER LE BOITIER (NI LA PARTIE ARRIÈRE). AUCUNE PIÈCE REMPLAÇABLE PAR L'UTILISATEUR. VEUILLEZ CONTACTER LE PERSONNEL QUALIFI É EN CAS DE DÉFAILLANCE. - Page 22 constaté en l'allumant et en l'éteignant, alors il vous est conseillé d'y remédier d'une des manières suivantes : --Réorientez ou déplacez l'antenne réceptrice. --Augmentez la distance entre l'équipement et le récepteur. --Connectez l'équipement à une prise ou circuit différent de celui du récepteur. --Prenez conseil auprès du revendeur ou d'un technicien qualifié...
- Page 23 Installez l'appareil de manière à ne pas gêner son aération correcte. Par exemple, l'appareil ne doit pas être installé sur un lit, un sofa, un tapis ou une surface similaire susceptible d'en obstruer les ouvertures d'aération. Il ne doit également pas être installé à l'intérieur d'un environnement fermé...
-
Page 24: Positionnement Et Montage
POSITIONNEMENT ET MONTAGE 1. Positionner l’appareil sur une table - Ventilation Si vous posez la barre-son sur une étagère de matériel hi-fi, une bibliothèque ou tout autre type d’espace fermé, assurez-vous de ménager un espace libre de 2-3 pouces (5 à... -
Page 25: Montage Sur Un Mur
Montage sur un mur 2.1 Montage sur un mur de bois (screws not supplied) (vis non incluses) A. Marquez la position des vis de montage sur le mur à l’aide d’un crayon (non inclus). B. Percez les trous directement dans les marques faites sur le mur et laissez un espace libre d’environ 0,3 pouce (7 mm) entre la tête de vis et le mur. -
Page 26: Présentation Du Produit
PRÉSENTATION DU PRODUIT Vue avant Capteur de la télécommande 3. Haut-parleur 3. Haut-parleur Indicateur Vue arrière 5. Jack OPTIQUE 7. Jacks ENTRÉE LIGNE LINE IN 16V,1.5A AUX IN OPTICAL 4. Port USB 6.Jack ENTRÉE 8. Jack alimentation secteur Vue du dessus 12. -
Page 27: Indicateur D'alimentation
PRÉSENTATION DU PRODUIT Vue de côté du caisson de basses 1. Haut-parleur Vue arrière du caisson de basses INDICATOR 1 6V STANDBY POWER INDICATOR 5. Indicateur d’association 4. INDICATEUR D’ALIMENTATION 3. Bouton VEILLE 2. Jack alimentation secteur... -
Page 28: Installation De La Pile Dans La Télécommande
TÉLÉCOMMANDE 1. Bouton (Marche/Arrêt) 2. Bouton AUX 3. Bouton ENTRÉE LIGNE 4. Bouton (Précédent) 5. Mode son (MUSIQUE, VOIX, FILM, STANDARD) 6. Bouton Rec (enregistrement USB) 7. Bouton (Muet) 8. Bouton B Bouton OPTIQUE 10. Bouton (Sélection de mode) 11. Bouton (Suivant) 12. -
Page 29: Précautions À Prendre Avec La Pile
PRÉCAUTIONS À PRENDRE AVEC LA PILE : Respectez ces consignes lorsque vous utilisez une pile dans cet appareil : 1. Utilisez seulement une pile de la taille et du type spécifié. 2. Assurez-vous de respecter le sens de polarités lorsque vous installez la pile, indiqué... -
Page 30: Utilisation Générale
16 Feet (5M) UTILISATION GÉNÉRALE 1. Branchez l’adaptateur CD 16 V, 1,5 A dans le jack alimentation secteur de l’unité principale. Branchez l’adaptateur à une prise murale délivrant un courant de type CA 100~240 V; 50/60 Hz. L’indicateur de mode sur l’unité principale s’illumine en ROUGE. - Page 31 5. Appuyez sur le bouton de la télécommande, ou appuyez sur le bouton Veille/Source sur l’unité de manière répétée pour sélectionner le mode désiré. Ou appuyez sur aux, optical, bt, Line in, USB sur la télécommande pour passer directement au mode désiré, L’indicateur sur l’avant de l’unité s’illumine : Bleu………………………………………………………..……….
-
Page 32: Fonction Bluetooth
3. Allumez l’appareil Bluetooth externe, et activez le mode Bluetooth. Lancez une recherche des appareils à portée. 4. Lorsque « SYLVANIA SB378W » apparaît, sélectionnez le nom et effectuez l’association. 5. Après que l’association soit effectuée, l’indicateur de mode cesse de clignoter. -
Page 33: Fonction Entrée Aux
FONCTION ENTRÉE AUX Vous pouvez connecter un lecteur audio (comme téléphone mobile, un lecteur MP3, etc.) à l’unité et en diffuser le son depuis les haut-parleurs de l’unité. 1. Branchez une extrémité du câble ENTRÉE LIGNE dans le jack ENTRÉE LIGNE de l'unité. -
Page 34: Utilisation Du Mode Entrée Ligne
UTILISATION DU MODE ENTRÉE LIGNE Vous pouvez connecter un lecteur audio/vidéo externe (comme un téléviseur, un lecteur DVD, etc.) à l’unité et en diffuser le son depuis les haut-parleurs de l’unité. 1. Branchez l’autre extrémité du câble entrée ligne dans les jacks ENTRÉE LIGNE (G/D) de l'unité. -
Page 35: Utilisation Du Mode Optique
UTILISATION DU MODE OPTIQUE 1. Connectez le jack de sortie optique du lecteur externe (comme un téléviseur, un lecteur DVD, etc.) au jack d’entrée optique de l’arrière de l’unité avec le câble de connexion optique, comme illustré ci-dessous : (pour format PCM seulement). LINE IN 16V,1.5A AUX IN... -
Page 36: Opérations Usb
OPÉRATIONS USB 1. Insérez le périphérique USB dans le port du lecteur USB de l'appareil. LINE IN 16V,1.5A AUX IN OPTICAL 2. Allumez l'alimentation de l'hôte et du subwoofer et appuyez sur l'appariement comme décrit précédemment. 3. Appuyez sur la touche sur la télécommande ou appuyez à... -
Page 37: Opérations D'enregistrement
OPÉRATIONS D'ENREGISTREMENT Cette machine a la fonction d'enregistrement, veuillez d'abord brancher le périphérique USB. 1. Allumez l'alimentation de l'hôte et du subwoofer et appuyez dessus. 2. Appuyez sur la touche de la télécommande ou appuyez à plusieurs reprises sur la touche veille / alimentation de l'hôte, ou appuyez sur la touche BT, aux ou en ligne de la télécommande pour passer directement au mode désiré. -
Page 38: Guide De Dépannage
GUIDE DE DÉPANNAGE PROBLÈME CAUSE POSSIBLE SOLUTION POSSIBLE L’adaptateur n’est pas Branchez l’adaptateur à l’unité et à Pas d’alimentation branché. la prise murale. Appuyez et maintenez le bouton L’unité est éteinte. veille / source sur l'hôte Ou appuyez sur le bouton de la télécommande pour activer l'alimentation principale. -
Page 39: Caractéristiques Techniques
CARACTÉRISTIQUES TECHNIQUES Alimentation de l’unité principale et du caisson de basses....CA 100~240 V, 50/60 Hz Puissance de sortie de l’unité principale et du caisson de basses ……………….. CD 16 V 1,5 A Sortie audio de l’unité principale ………………………………………………………. 2x10 W Sortie audio du caisson de basses ……………………………………………………. - Page 40 Pour faire une demande de garantie, ne retournez pas ce produit au magasin. Veuillez envoyer un courriel électronique à support@curtiscs.com ou appeler le 1-800-968-9853. 90 jours de garantie Ce produit est garanti contre tout défaut de matériel et de fabrication pendant une période de quatre-vingt-dix (90) jours à...