
Manuels Connexes pour MAC Audio 410


Sommaire des Matières pour MAC Audio 410
- Page 1 MAC 410 BEDIENUNGSANLEITUNG/GARANTIEURKUNDE OWNER’S MANUAL/WARRANTY DOCUMENT MODE D’EMPLOI/CERTIFICAT DE GARANTIE MANUALE PER L‘UTENTE / CARTA DI GARANZIA...
- Page 2 This unit supports only the following iPod/iPhone models: • iPhone 6 Plus • iPhone 6 • iPhone 5s • iPhone 5c • iPhone 5 • iPod touch (5th generation) “Made for iPod,” and “Made for iPhone” mean that an electronic accessory (This head unit) has been designed to connect specifically to iPod /, or iPhone , respectively, and...
-
Page 4: Table Des Matières
Danke, dass Sie sich für ein Produkt von MAC AUDIO entschieden haben. Wir hoffen, Ihnen die Funktion des Geräts mit den in dieser Bedienungsanleitung beschriebenen Anweisungen einfach und verständlich erklären zu können. Bitte nehmen Sie sich einige Minuten Zeit um sich mit der Bedienungsanleitung zu befassen. -
Page 5: Sicherheitshinweise
SICHERHEITSHINWEISE • Montieren Sie das Gerät nicht an einem Ort, an dem die Sicherheit beim Fahren durch die Bedienung und die Verwendung des Geräts beeinträchtigt werden könnte. • Die Sicherheit im Straßenverkehr steht immer an erster Stelle. Das Autoradio ist immer so zu benutzen, dass sie Ihr Fahrzeug sicher steuern können und der aktuellen Verkehrssituation gewachsen sind. -
Page 6: Funktionen/Spezifikationen
FUNKTIONEN/SPEZIFIKATIONEN Bitte lesen Sie vor dem Gebrauch die Bedienungsanleitung. Die mitgelieferte Dokumentation enthält Informationen zu sämtlichen Funktionen Ihres neuen mobilen MAC AUDIO. MAC 410- Multimedia-Receivers. Lesen Sie die Anleitung vollständig, bevor Sie mit der Montage des Geräts beginnen, und bewahren Sie sie für den späteren Gebrauch auf. Wir empfehlen, die Montage des MAC 410 von einem zuverlässigen Fachhändler vornehmen zu lassen. - Page 7 Monitor • Bildschirmgröße: 17,8 cm / (7”) Digital LCD TS (Touch Screen) mit LED Backlight • Typ: High Definition TFT-Monitor mit LCD-Display • Auflösung: 1.152.000 Sub-Pixel, 800x3 (B) x 480 (H), WGA Gehäuse • 1.0 DIN (passend für Importfahrzeuge/ISO-DIN-Schächte) • Ausfahrbarer/hochfahrbarer TFT-Bildschirm mit Antrieb Personal Color Adjustment (Farbliche Darstellungen / Hintergrund) Erweitertes Grafik und User Interface Paket mit:...
-
Page 8: Optionales Zubehör
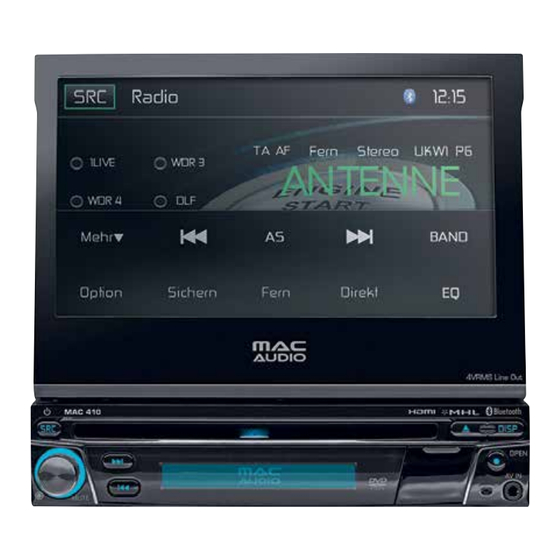
MAC AUDIO DAB+ 200 Receiver An das MAC 410 kann der DAB+ Receiver MAC AUDIO DAB+ 200 angeschlossen werden. Der MAC AUDIO DAB+ Receiver ermöglicht den Rundfunkempfang in digitaler Tonqualität. Hierzu müssen Sie das MAC AUDIO DAB+ Modul kaufen und installieren. Die Bedienung erfolgt über das Menü... - Page 9 Achtung: Die Abbildungen in dieser Anleitung haben lediglich Referenzcharakter. Abweichungen gegenüber Ihrem Gerät sind möglich. Bitte beachten Sie die tatsächliche Geräteausführung. 1. Taste SRC/Power ( ): Drücken Sie diese Taste, um das Gerät einzuschalten. Wenn das Gerät eingeschaltet ist, drücken Sie diese Taste, um die Wiedergabe zu starten (Radio/Disc/ SDHC/USB/Telefon/AV-IN1/AV-IN2/DAB/jLink HDMI).
-
Page 10: Fernbedienung
FERNBEDIENUNG Abbildung 2. MAC 410 Fernbedienung... -
Page 11: Funktionen Der Fernbedienung
Funktionen der Fernbedienung 1. Taste Power / MUTE: Drücken Sie diese Taste, um den Audioausgang ein- und auszuschalten. Halten Sie diese Taste 2 Sekunden lang gedrückt, um das Gerät auszuschalten. Durch erneutes Drücken schalten Sie das Gerät wieder ein. 2. Taste Fast Forward [ ]: Drücken Sie diese Taste, um einen Vorlauf der Disc mit 2-facher, 4-facher, 8-facher oder 20-facher Geschwindigkeit durchzuführen. -
Page 12: Austauschen Der Batterie Der Fernbedienung
18. Taste PS/AS: Berühren Sie diese Taste, um einen automatischen Sendersuchlauf durchzuführen und alle signalstarken Sender zu speichern. Halten Sie diese Taste gedrückt, um die Suchlauffunktion des Tuners zu starten. Drücken Sie diese Taste erneut, um den Suchlauf zu beenden. 19. -
Page 13: Verwenden Des Tft-Monitors
Entnehmen der Batterie Öffnen Sie das Batteriefach unten auf der Rückseite der Fernbedienung. PUSH OPEN Abbildung 3: MAC 410 Batterieaustausch der Fernbedienung Lithium Battery CR2025 (3V) (+) Positive facing out SLIDE BATTERY DOOR DOWN VERWENDEN DES TFT-MONITORS Aus-/Einfahren des Monitors Drücken Sie die Taste [OPEN] auf der Gerätevorderseite oder auf der Fernbedienung, um das... -
Page 14: Externe Geräte
EXTERNE GERÄTE AV-In1 AV-In1 dient zur Audio-/Videowiedergabe von einem externen Gerät, das über eine 3,5-mm- Buchse auf der Gerätevorderseite angeschlossen ist. AV-In2 AV-In2 dient zur Audio-/Videowiedergabe von einem externen Gerät, das über RCA-Anschlüsse auf der Geräterückseite angeschlossen ist. Sie können ein externes Audio-/Videogerät mit dem System verbinden. 1. -
Page 15: Kurzanleitung
Anzeige einer Quelle, um das Hauptmenü anzuzeigen. SRC-Taste Frontseite des MAC 410 2. Berühren Sie auf einem der beiden Hauptmenü-Bildschirme das Symbol für die gewünschte Quelle. Bildschirm 1 von 2: Disc, Radio, USB, AV-IN1, AV-IN2, DAB, SDHC, Phone (BT). - Page 16 Ändern der Systemeinstellungen Um die Systemeinstellungen aufzurufen und zu ändern: Berühren Sie das Icon ( ) im Hauptmenü, um das Menü SYSTEMEINSTELLUNGEN aufzurufen. Änderungen können in den Untermenüs vorgenommen werden, die hervorgehoben sind. Einstellen der Lautstärke Um die Lautstärke zu erhöhen oder zu verringern, drehen Sie den Regler auf der Vorderseite des Gerätes.
-
Page 17: System Zurücksetzen
Auswerfen einer Disc Drücken Sie die Taste EJECT ( ) auf der Gerätevorderseite, um eine Disc auszuwerfern. System zurücksetzen Um einen Systemabsturz oder eine unzulässige Bedienung zu korrigieren, benutzen Sie einen Stift, um den Reset-Knopf, der sich direkt unter der Abdeckklappe auf der Gerätevorderseite befindet, zu drücken und loszulassen. -
Page 18: Audio Equalizer-Menü
AUDIO EQUALIZER-MENÜ Equalizer-Einstellungen Auf dem Bildschirm mit den Equalizer-Einstellungen können Sie das Audiosystem ganz einfach an die akustischen Gegebenheiten im Fahrzeug anpassen, die je nach Fahrzeugtyp und Innenraumgröße unterschiedlich sein können. Beispiel: Durch korrekte Audioeinstellungen kann der Frequenzgang der Lautsprecher optimiert werden. Auch die Balance/Fader-Einstellungen sowie die Loudness-Option einer ausgewählten Audio-/ Videoquelle (Disc, Radio, USB/iPod®, AV-IN1, AV-IN2 oder BT) werden auf dem Equalizer- Einstellbildschirm vorgenommen. - Page 19 Loudness-Einstellungen Berühren Sie das Symbol EIN oder AUS, um die Loudness-Option ein- oder auszuschalten. Mit der Loudness-Funktion wird der Frequenzgang automatisch angepasst, um so den Klang bei niedrigen Lautstärken zu verbessern. Verlassen des Equalizer-Menüs Um das Equalizer-Menü zu verlasssen und zur aktuellen Quelle zurückzukehren, berühren Sie das Symbol SRC.
-
Page 20: Systemeinstellungen
. Es stehen sieben Systemeinstellungsuntermenüs (Allgemein, Audio, Zeit, Sprache, Bluetooth, DVD oder Lautstärke) zur Verfügung, um die Einstellungen für jede Option des MAC 410 vorzunehmen. Das Untermenü VERSION dient lediglich zur Information. Berühren Sie das gewünschte Untermenü, es wird dann hervorgehoben. Die verfügbaren Optionen erscheinen auf dem Bildschirm. - Page 21 Hintergrund: Berühren Sie Motorstart, Blauer Nebel, Grüne Würfel, Rote Wirbel oder Tribal, um einen Bildschirmhintergrund auszuwählen. Berühren Sie die Option erneut, um die Einstellung zu übernehmen. Kalibrierung Die Touchscreen-Kalibrierung wird verwendet, um die Parameter des Touchscreens einzustellen. Auf diese Weise wird gewährleistet, dass beim Drücken einer Taste oder eines Symbols auf dem Bildschirm die gewünschte Funktion gewählt wird.
- Page 22 Beleuchtung: Berühren Sie dieses Symbol, um die Einstellungen für die Beleuchtung aufzurufen. Berühren Sie eine Farbe, um die Beleuchtung für das Frontpanel-Display auszuwählen. UI-Farbe (Farbe für Benutzeroberfläche): Berühren Sie Grün, Rot, Orange, Blau oder Violett, um die Farbe für die Benutzeroberfläche auszuwählen. Berühren Sie die Farbe erneut, um die Auswahl zu übernehmen.
- Page 23 Untermenü Zeit Datum: Berühren Sie das Symbol DATUM und verwenden Sie die Schaltflächen ▲ oder ▼, um Tag, Monat und Jahr einzustellen. Nachdem Sie das Datum eingegeben haben, drücken Sie SICHERN. Das Datum erscheint rechts neben dem Symbol DATUM. Uhrmodus: Wählen Sie 12HR, um den 12-Stunden-Modus unter Verwendung von AM und PM einzustellen.
- Page 24 Auto-Antwort: Wählen Sie EIN oder AUS, um die Bluetooth-Funktion Auto-Antwort ein- oder auszuschalten. Kopplungscode: Diese Option erlaubt die Erstellung eines beliebigen 4-stelligen Codes für die Kopplung von Bluetooth-Geräten mit dem MAC 410. 1. Berühren Sie KOPPLUNGSCODE und der Eingabebildschirm für den Kopplungscode erscheint.
- Page 25 Eingabebildschirm für den Kopplungscode Bestätigungsbildschirm des Kopplungscodes Untermenü DVD DRC: Schalten Sie die DRC-Option (Dynamic Range Control, Dynamikbereichsteuerung) EIN, um die Wiedergabe bei niedrigen Lautstärken zu verbessern. Lade Werkseinst.: Dieser Menüpunkt erlaubt das Rücksetzen aller Werte auf die STandardeinstellungen. . Untermenü...
- Page 26 Bluetooth: Berühren Sie BLUETOOTH, um die Einstellungen aufzurufen, und anschließend ▲ oder ▼, um die relative Lautstärke von -6 bis +6 einzustellen. AV-IN1: Berühren Sie AV-IN1, um die Einstellungen aufzurufen, und anschließend ▲ oder ▼, um die relative Lautstärke von -6 bis +6 einzustellen. AV-IN2: Berühren Sie AV-IN2, um die Einstellungen aufzurufen, und anschließend ▲...
-
Page 27: Disc-Betrieb
DISC-BETRIEB Kompatible Audio-Discs Auf diesem System können die folgenden Disc-Typen wiedergegeben werden: - DVDs mit Audio- und/oder Videodateien. Audio-Discs - Audio-CDs mit Audio-, Video- und Bilddateien. MP3-Discs - Discs mit Audio-, Video- und Bilddateien (beispielsweise eine CD-R mit heruntergeladenen MP3-Dateien). HINWEIS: Das Gerät ist für die Wiedergabe bespielter (Original-)CDs/DVDs bestimmt. - Page 28 Titel/Kapitel-Informationen: Angezeigt werden die Nummer des derzeit gespielten Titels, die Gesamtanzahl der Titel auf der Dis, das aktuell gespielte Kapitel und die Gesamtanzahl der Kapitel auf der Disc. Uhrzeit: Anzeige der Zeit, die im Menü Einstellungen eingegeben wurde. Verstrichene Spielzeit: Zeigt die bereits verstrichene Spielzeit des Kapitels an. Gesamtspielzeit: Zeigt die Gesamtspielzeit der Disc an.
-
Page 29: Einlegen Einer Disc
PIC: Wenn das Symbol PIC berührt wird, erscheint der Bildeinstellungs-Bildschirm. Berühren Sie dieses Icon während der Wiedergabe, um Farbhelligkeit, Kontrast, Sättigung und Farbton einzustellen. Die Einstellungen können nach Ihren Vorlieben vorgenommen werden. Verwenden Sie zur Änderung der Einstellungen die Tasten + oder -. Der Einstellungsbereicht liegt zwischen 1 und 20. Hinweis: Der Bildeinstellungs-Bildschirm wird automatisch abgeschaltet, wenn innerhalb von 5 Sekunden keine Einstellung vorgenommen wird oder ein anderer Teil des Bildschirms berührt wird. - Page 30 Auswerfen einer Disc Drücken Sie die Taste auf der Vorderseite des Geräts, um die Disc auszuwerfen. Das Gerät wechselt automatisch in den Radiobetrieb. Sie können die Disc auch auswerfen, wenn das Gerät ausgeschaltet ist. Das Gerät bleibt danach ausgeschaltet. Zurücksetzen des Lademechanismus Wenn die Disc nicht richtig geladen wird oder der Mechanismus nicht korrekt funktioniert, halten Sie die Taste am Gerät gedrückt, um den Lademechanismus zurückzusetzen.
- Page 31 Allgemeine Disc-Informationen Disc-Eigenschaften Symbol Eigenschaften (12-cm-Disc) Max. Spieldauer Single Side Single Layer (DVD-5) (MPEG 2-Verfahren) Single Side Double Layer (DVD-9) 133 Minuten Double Side Single Layer (DVD-10) 242 Minuten Double Side Double Layer (DVD-18) 266 Minuten 484 Minuten Single Side Single Layer (VCD) (MPEG 1-Verfahren) 74 Minuten Single Side Single Layer...
- Page 32 CD-Betrieb Berühren Sie auf dem Hauptmenü-Bildschirm das Symbol DISC oder legen Sie eine CD mit der beschrifteten Seite nach oben in den Disc-Schlitz ein. Die Wiedergabe startet, wenn eine CD korrekt eingelegt wird. CD-Hauptmenü Anzeigen und Schaltflächen werden nachfolgend gezeigt. CD-Hauptmenü...
- Page 33 ) Wiederholung: Berühren Sie das Symbol, um die Wiedergabe des aktuellen Titels zu wiederholen. Das Symbol leuchtet auf, die Ziffer 1 erscheint unterhalb des Symbols und der Titel wird wiederholt. Berühren Sie das Symbol ein zweites Mal, um das Album zu wiederholen. Das Symbol leuchtet auf, der Buchstabe a erscheint unterhalb des Symbols und das Album wird wiederholt.
-
Page 34: Steuern Der Wiedergabe
Direkteingabe für Titel Wenn das Direkteingabe-Icon berührt wird, erscheint der Direkteingabe-Bildschirm. Ein Titel kann manuell ausgewählt werden, indem die entsprechende Nummer eingegeben wird. Nach Eingabe der Nummer, berühren Sie OK. Eine falsche Ziffer wird durch Berühren der Pfeiltaste gelöscht. Die Wiedergabe beginnt, nachdem OK gedrückt wurde. - Page 35 CD/MP3-Betrieb MP3 ist ein Format zur Speicherung digitaler Audiodaten. Ein CD-Musiktitel kann ohne erheblichen Qualitätsverlust in das MP3-Format komprimiert werden, dabei wir die Datenmenge erheblich reduziert. Legen Sie eine MP3-Disc mit der beschrifteten Seite nach oben in den Disc-Schlitz ein. Die Wiedergabe startet im MP3-Modus, wenn eine Disc korrekt eingelegt wurde.
- Page 36 Zurücksetzen des Lademechanismus: Wenn die Disc nicht richtig geladen wird oder der Mechanismus nicht korrekt funktioniert, halten Sie die Taste EJECT ( ) am Gerät gedrückt, um den Lademechanismus zurückzusetzen. Anschließend wird der normale Betrieb wieder aufgenommen. Wiedergabe von MP3/WMA-Dateien: Nachdem Sie eine MP3/WMA-Disc eingelegt haben, werden die Dateien in der Reihenfolge wiedergegeben, in der sie im Stammverzeichnis abgelegt wurden.
-
Page 37: Radiobetrieb
RADIOBETRIEB Berühren Sie im Hauptmenü RADIO, um das Radio-Menü aufzurufen. Radio-Menü Anzeigen und Schaltflächen werden nachfolgend gezeigt. Radio-Menü SRC: Berühren Sie dieses Icon, um das Quellenmenü aufzurufen und eine neue Wiedergabequelle auszuwählen. Radio: Zeigt die aktuelle Quelle an. Uhrzeit: Anzeige der Zeit, die im Menü Einstellungen eingegeben wurde. Voreingestellte Sender: Zeigt die voreingestellten Frequenzen an. - Page 38 ) / Manuelle Suche: Berühren Sie dieses Icon, um nächsten empfangbaren Sender mit einer höheren Frequenz zu suchen. Halten Sie das Icon gedrückt, um manuell in 50kHz-Schritten (für UKW) bzw. 9kHz-Schritten (für MW) nach Sendern zu suchen. Der Standardmodus wird nach 10 Sekunden Inaktivität wieder fortgesetzt.
- Page 39 Das Gerät kann automatisch auf eine Alternativfrequenz (AF) desselben Senders wechseln, wenn der Empfang schlecht wird. Drücken Sie die Schaltfläche AUS/EIN, um die automatische Auswahl von Alternativfrequenzen bei RDS Empfang ein- bzw. auszuschalten. EON ( Enhanced Other Networks ) Wenn EON-Daten empfangen werden, leuchtet die EON-Anzeige auf und die TA- und AF- Funktionen werden erweitert.
- Page 40 Die PTY-Funktion beinhaltet 27 Kategorien: 1. None 8. Adult Hits 15. Jazz 22. Personality 2. News 9. Soft Rock 16. Classic 23. Public 3. Info 10. Top 40 17. RGB 24. College 4. Sports 11. Country 18. Soft RGB 25. Weather 5.
-
Page 41: Sender Aufrufen
3. Berühren Sie den Speicherplatz, unter dem Sie den Sender speichern möchten. Die Senderfrequenz wird oben im Menü angezeigt. Der Speicherplatz wird nun hervorgehoben. Die Senderfrequenz ist jetzt in dem hervorgehobenen Speicherplatz gespeichert. Der Sender wird auf dem Radio-Display angezeigt. Ein Sender kann ebenfalls gespeichert werden, indem der Speicherplatz gedrückt gehalten wird. -
Page 42: Usb-Betrieb
USB-BETRIEB Die Audio/Video-Dateien auf dem USB-Gerät werden automatisch gelesen. Hinweis: Die USB-Eingänge erkennen die meisten USB-Flash-Speicher-Geräte und portablen Festplatten. Festplatten müssen als FAT32 formatiert sein, NTFS wird nicht unterstützt. Einstecken/Entfernen eines USB-Gerätes/einer Mikro-SD-Karte Einstecken eines USB-Gerätes / einer Mikro-SD-Karte: 1. Der USB/Mikro-SD-Anschluss befindet sich auf der Vorderseite des Gerätes. - Page 43 USB-Betrieb Berühren Sie das USB-Icon im Hauptmenü. USB/Micro SD Card-Hauptmenü Anzeigen und Schaltflächen werden nachfolgend gezeigt. USB-Hauptmenü SRC: Berühren Sie dieses Icon, um zum Hauptmenü zurückzukehren. Scrolling Display: Zeigt Informationen zum aktuellen Titel an. Titel-Nummer: Zeigt im Audio-Modus den aktuell wiedergegebenen Audiotitel und die Gesamtzahl der Audiotitel an.
- Page 44 ) Wiederholung: Audio-Modus: Berühren Sie das Symbol, um die Wiedergabe des aktuellen Titels zu wiederholen. Das Symbol leuchtet auf, der Buchstabe a erscheint unterhalb des Symbols und alle Audio-Titel werden wiederholt. Berühren Sie das Symbol erneut, um einen einzelnen Titel zu wiederholen. Das Symbol leuchtet auf, die Ziffer 1 erscheint unterhalb des Symbols.
-
Page 45: Wiedergabe Unterbrechen
) Ordner: Berühren Sie dieses Icon, um die Ordner-/Dateihierachie anzuzeigen. Berühren Sie den Ordner, um den Inhalt des Ordners anzuzeigen. Berühren Sie eine Datei, um diese auszuwählen. Berühren Sie die Datei erneut, um sie zu öffnen. Direkteingabe Wenn das Direkteingabe-Icon berührt wird, erscheint der Direkteingabe-Bildschirm. Ein Titel kann manuell ausgewählt werden, indem die entsprechende Nummer eingegeben wird. -
Page 46: Bedienelemente Für Ipod®/Iphone
BEDIENELEMENTE FÜR iPod®/iPhone® Aktivieren des iPod®-Modus Sie können über den Touchscreen auf Alben, Titel auf Ihrem iPod®/iPhone® zugreifen. Das Gerät schaltet automatisch in den iPod®-Modus, wenn ein iPod®, iPod® touch oder iPhone® an den USB-Anschluss auf der Gerätevorderseite angeschlossen wird. Der Zugriff auf den iPod® kann auch über das Hauptmenü... - Page 47 Titel-Nummer: Zeigt im Audio-Modus den aktuell wiedergegebenen Audiotitel und die Gesamtzahl der Audiotitel an. Uhrzeit: Anzeige der Zeit, die im Menü Einstellungen eingegeben wurde. Mehr (▲/▼ ): Berühren Sie ▲/▼, um die nächste oder vorherige Seite des iPod®-Menüs aufzurufen. : Berühren Sie dieses Icon, um zum vorherigenTitel zu wechseln. ►/II: Drücken Sie diese Taste, um die Wiedergabe zu unterbrechen.
- Page 48 Audiodateien: Berühren Sie dieses Symbol, um die Audiodateien anzuzeigen. Wählen Sie einen Audio-Titel aus durch Drücken des Symbols /Titel. Drücken Sie dieses Symbol erneut, um die Wiedergabe zu starten. Wiedergabesteuerung Direkteingabe Wenn das Direkteingabe-Icon berührt wird, erscheint der Direkteingabe-Bildschirm. Ein Titel kann manuell ausgewählt werden, indem die entsprechende Nummer eingegeben wird.
- Page 49 PIC: Wenn das Symbol PIC berührt wird, erscheint der Bildeinstellungs-Bildschirm. Berühren Sie dieses Icon während der Wiedergabe, um Farbhelligkeit, Kontrast, Sättigung und Farbton einzustellen. Die Einstellungen können nach Ihren Vorlieben vorgenommen werden. Verwenden Sie zur Änderung der Einstellungen die Tasten + oder -. Der Einstellungsbereicht liegt zwischen 1 und 20.
-
Page 50: Bedienelemente Für Av-In1/Av-In2
BEDIENELEMENTE FÜR AV-IN1/AV-IN2 AV-In1 AV-In1 dient zur Audio-/Videowiedergabe von einem externen Gerät, das über eine 3,5-mm- Buchse auf der Gerätevorderseite angeschlossen ist. Das MAC 410 kann die Lautstärke des angeschlossenen Gerätes erhöhen oder verringern. Alle anderen Funktionen werden am angeschlossenen Gerät gesteuert. -
Page 51: Verwenden Eines Smartphones Über Die Hdmi/Mhl-Schnittstelle
Informationen zu den unterstützten Funktionen finden Sie in der Dokumentation Ihres Smartphones. Für die meisten Android-Smartphones wird eine App benötigt, die Sie im Google Play Store herunterladen können. Geben Sie in das Suchfeld „MAC AUDIO HDMI/MHL Connect“ ein. -
Page 52: Verbinden Ihres Smartphones - Iphone 6
VERBINDEN IHRES SMARTPHONES - ANDROID / APPLE 1. Installation der MAC AUDIO HDMI / MHL Connect-App Laden Sie die MAC AUDIO HDMI / MHL Connect-App aus dem Google Play Store auf Ihr Smartphone herunter und installieren Sie diese (nur Android-Geräte). -
Page 53: Bluetooth-Betrieb
Wenn das Gerät mit dem Mobiltelefon gekoppelt wurde, erscheint die Modellbezeichnung MAC 410 auf dem Display Ihres Mobiltelefons. • Der Abstand zwischen dem MAC 410 und dem Mobiltelefon sollte max. 3 Meter betragen. • Der Weg zwischen Mobiltelefon und MAC 410 sollte frei sein. Platzieren Sie kein metallischen... - Page 54 Bluetooth: Zeigt die aktuelle Quelle an. MAC AUDIO 2525: Zeigt an, dass das Gerät mit dem MAC 410 gekoppelt ist. ): Zeigt an, ob das MAC 410 mit einem Bluetooth®-Gerät verbunden ist. Berühren Sie das Icon, um eine Verbindung mit einem Bluetooth®-Gerät herzustellen.
- Page 55 11. Jetzt sollte eine Meldung angezeigt werden, die Sie über die erfolgreiche Kopplung informiert. Jetzt erhalten Sie die Anfrage, ob die Verbindung herstellt werden soll. Wählen Sie Ja. Das Mobiltelefon und das MAC AUDIO-Gerät sollten sich verbinden. Auf dem Display des Mobiltelefons sollte eine Meldung erscheinen, dass die Geräte verbunden sind. Die Verbindung zwischen dem Mobiltelefon und Ihrem MAC AUDIO-Gerät wurde hergestellt.
-
Page 56: Eingehende Anrufe
Eingehende Anrufe Wenn Sie mit einem Bluetooth-Telefon verbunden sind, schaltet das MAC AUDIO-Gerät automatisch stumm, unterbricht die DVD/CD-Wiedergabe und wechselt in das Bluetooth-Menü, wenn ein Anruf eingeht. Die Telefonnummer oder der hinterlegte Name des Anrufers werden in der Mitte des Bildschirms angezeigt. Ein akustisches Signal vom Gerät ertönt und auf dem Bildschirm erscheint eine grafische Anzeige Bildschirm für eingehenden Bluetooth®-Anruf... -
Page 57: Stummschalten
Einen eingehenden Anruf annehmen Um einen eingehenden Anruf anzunehmen, drücken Sie . Für bestmöglichen Empfang, sprechen Sie laut und deutlich in das Mikrofon. Um das Gespräch zu beenden, drücken Sie Einen eingehenden Anruf abweisen Drücken Sie die Taste “To Phone”, um einen eingehenden Anruf abzuweisen. Der Anruf wird an Ihr Mobiltelefon/Mailbox weitergeleitet. -
Page 58: Music Function
Sie die Telefonnummer und sie wird gewählt Einen Anruf weiterleiten Drücken Sie “To Phone” während eines Telefonates, um das Gespräch vom MAC AUDIO- Gerät auf Ihr Mobiltelefon zurückzuleiten. Ein Anruf kann nur weitergeleitet werden, wenn er entgegengenommen wurde. Drücken Sie die Taste “To Device”, um das Gespräch wieder auf das MAC AUDIO-Gerät zu leiten. - Page 59 Sie die Abspielfunktionen (Play, Pause, Titelauswahl) über das MAC AUDIO-Gerät. Hinweis: Titelinformationen (z. B. verstrichene Wiedergabezeit, Songtitel, Songverzeichnis usw.) können auf dem MAC AUDIO-Gerät nicht angezeigt werden. Aufgrund der Vielfalt der auf dem Markt erhältlichen Audioplayer, können die Funktionen je nach Audioplayer sehr verschieden sein.
-
Page 60: Betrieb Einer Rückfahrkamera
BETRIEB EINER RÜCKFAHRKAMERA (falls vorhanden) An das Gerät kann eine Rückfahrkamera angeschlossen werden. Bevor Sie auf die Kamerafunktionen zugreifen können, muss eine Rückfahrkamera installiert werden. Wenn keine Kamera installiert ist und Sie auf die Funktion zugreifen, indem Sie den Rückwärtsgang einlegen, erscheint auf dem Bildschirm der Hinweis, dass die Funktion nicht verfügbar ist. -
Page 61: Lenkradfernbedienung (Swc)
CONTROL) (falls vorhanden) Das MAC 410 ist kompatibel mit den Lenkradsteuerungsadaptern Dietz UNICO DUAL PLUS + Kabel, PAC (Pacific Accessory Corporation) SWI-PS und Metra ASWC. Eine 3,5 mm- Klinkenbuchse (gekennzeichnet mit „SWC Interface“) auf der Rückseite des Geräts ermöglicht den Anschluss der Adapter. -
Page 62: Benutzerdefiniertes Hintergrundbild
HOCHLADEN EINES BENUTZERDEFINIERTEN HINTERGRUNDBILDES Es kann immer nur ein benutzerdefiniertes Hintergrund in das MAC 410 hochgeladen werden. Sie können das benutzerdefinierte Wallpaper jedoch beliebig oft hochladen. 1. Setzen Sie eine MicroSD-Karte, auf der Wallpaper-Bilder gespeichert sind, in den MicroSD- Kartensteckplatz ein. -
Page 63: Fehlerbehebung
FEHLERBEHEBUNG Problem Ursache Lösung Allgemein Das Gerät lässt sich Die Sicherung des Radios ist Setzen Sie eine neue Sicherung nicht einschalten! durchgebrannt. des richtigen Typs und mit der richtigen Amperezahl ein. Die Sicherung der Autobatterie ist Setzen Sie eine neue Sicherung durchgebrannt. -
Page 64: Tft Monitor
Problem Ursache Lösung TFT Monitor Kein Bild Der Anschluss der Handbremse ist Überprüfen Sie die Verkabelung, fehlerhaft. und korrigieren Sie sie ggf. Die Handbremse ist nicht Halten Sie das Fahrzeug an einer angezogen. sicheren Stelle an, und ziehen Sie die Handbremse. Flackerndes Bild Die DVD ist nicht mit den aktuellen Ändern Sie das Setup gemäß... -
Page 65: Fehlermeldungen
Problem Ursache Lösung Disc wird nicht Die Disc ist verbogen oder verkratzt. Verwenden Sie eine einwandfreie wiedergegeben Disc. Disc ist verschmutzt oder feucht. Reinigen Sie die Disc mit einem weichen Tuch. Die Laserlinse ist verschmutzt. Reinigen Sie die Laserlinse mit einer Reinigungs-CD. -
Page 66: Technische Daten
TECHNISCHE DATEN DVD/CD-Player Kompatible Disc-Medien: DVD +/- R/ +/- RW (Single und Dual Layer) und CD-R/-RW Kompatible Medienformate: CD-DA, MP3, WMA, VCD, SVCD, Xvid, Di, AVI, MPEG 1/2, AAC Rauschabstand: >95 dBA Dynamikbereich:>95 dB Frequenzgang: 20 Hz bis 20 kHz, -3 dB Übersprechdämpfung: >... -
Page 67: Pflege Und Wartung
Allgemein Auxiliary-Eingangsimpedanz: 10k Spannungsversorgung: 11 bis 16VDC, Gleichstrom, negativer Masseanschluss Aktive Antenne (Blau): 500mA max, Überstromschutz Remote-Verstärkeranschluss (Blau/Weiß): max. 500 mA, Überstromschutz Betriebstemperatur: 0C ~ 65C Sicherung: 15 Ampere, ATM/MIN-Flachsicherung DIN-Chassis-Abmessungen: 7” X 7” X 2” (178mm x 178mm x 50mm) Ausgangsleistung: max. - Page 68 Please read through the instruction manual carefully before starting to install the device. For the installation of the MAC 410 receiver into the car we recommend to turn to a specialist. Do not try to open this receiver and repair this receiver. Repairs must always be conducted by qualified specialists.
-
Page 69: Safety Precautions
SAFETY PRECAUTIONS • Do not mount the unit in a place which would make it difficult to operate and use whilst driving, thereby impairing your safety. • Road traffic safety is always of paramount importance. You should only ever use the car radio if you are able to control your vehicle safely and are aware of the current traffic situation. -
Page 70: Features
Please read the instruction manual for this product before using. The documentation provided will allow the user to fully enjoy all the features of your new MAC AUDIO MAC 410 Mobile Multimedia Receiver. Please read all of the instructions before beginning the installation and save this manual for future reference. - Page 71 Chassis • 1.0 DIN (Import / ISO-DIN Mountable) • Motorized Flip-Out / Flip-Up TFT Screen Personal Color Adjustment (Color illustrations / background) Extended graphical user interface adjustment with: • 5 menu colors: green / red / orange / blue / purple (to set the background color on the LCD) •...
-
Page 72: Optional Equipment
MAC AUDIO DAB+ 200 module. The operation of the MAC AUDIO DAB+ 200 is performed via the menu of the MAC 410. Please refer to the instructions included with the DAB+ receiver for detailed installation and operation information. - Page 73 Notice: The graphic in this manual is for reference only, and may be different from the actual unit. Reference to actual unit is suggested. 1. SRC / Power ON/OFF ( ) button: Press to turn the unit ON. When on, press to switch the playing source (Radio / Disc / SDHC / USB / Phone / AV-IN1 / AV-IN2 / DAB / jLink HDMI).
-
Page 74: Remote Control Operation
REMOTE CONTROL OPERATION Figure 2: MAC 410 Remote Control... - Page 75 Remote Control Functional Description 1. Power / MUTE Button: Press this button to turn the audio output ON and OFF. Press and hold this button for 2 seconds to turn the unit off, press to turn the unit on again. 2.
-
Page 76: Remote Control Battery Replacement
Uninstall Battery Slide out the battery compartment tray at the bottom on the back of the remote control. PUSH OPEN Figure 3: MAC 410 Remote Control Battery Replacement Lithium Battery CR2025 (3V) (+) Positive facing out SLIDE BATTERY DOOR DOWN... -
Page 77: Using The Tft Monitor
USING THE TFT MONITOR Open / Close monitor Press the [OPEN] Button on the front panel or remote control to open or close the display panel. NOTE: never manually open or close the display panel. Change the monitor tilt angle Due to the inherent character of LCD, you will get different vision impressions when you watch it from different angles. -
Page 78: External Devices
EXTERNAL DEVICES AV-In1 AV-IN1 is used for playback of audio/video from an external device connected to the unit through a 3.5mm jack located on the font panel. AV-In2 AV-IN2 is used for playback of audio/video from an external device connected through RCA connectors located on the back of the unit. -
Page 79: Quick Start Guide
2. Touch the desired source icon on one of the two main menu screens. Screen 1 of 2: Disc, Radio, USB, AV-IN1, AV-IN2, DAB, SDHC, Phone (BT). Touch Next at the bottom of the screen to access Screen 2 of 2: Steering Wheel Controls (SWC), Settings, Camera, HDMI Screen 1 Screen 2 MAC 410 Main Menu Screen... -
Page 80: Volume Adjustment
System Settings Adjustment To access and adjust system settings: Touch the Settings ( ) icon on the Main Menu screen to enter the SETTINGS MENU. Sub- menus where adjustments can be made will be highlighted. Volume Adjustment To increase or decrease the volume level, rotate the front panel rotary encoder knob. The unit’s front panel screen will display the volume level for 2 seconds. -
Page 81: Resetting The System
Resetting the System To correct a system halt or other illegal operation, use the tip of a pen to press and release the reset button located just below the front panel interface cover. System Reset Button After a system reset, the unit restores all factory default settings. Note: If the unit is reset while a DVD is playing, the unit will return to Main Menu once the reset is complete. -
Page 82: Audio Equalizer Controls Menu
AUDIO EQUALIZER CONTROLS MENU Adjusting Equalizer Controls The Equalizer adjustment screen allows the user to easily adjust the audio system to meet the acoustical characteristics of the vehicle. The acoustical characteristics vary depending on the type of vehicle and measurements. For example: proper setting of the audio controls can improve the speakers frequency response to compensate for cabin. - Page 83 Loud Setting Touch the buttons ON or OFF to turn the loud option. The loud option automatically alters the frequency response curve of audio to make it sound more natural when played at a lower volume level. Exiting the Equalizer To exit the Equalizer menu touch the SRC icon to return to the current source.
-
Page 84: System Settings
System Settings Sub-menus (General, Audio, Time, Language, Bluetooth, DVD or Volume) that are used to adjust the performance of each option of the MAC 410. The Version Sub-menu is for information only. Touch a desired Sub-Menu and the Sub-menu will appear highlighted. The features available for adjustment will appear on the screen. - Page 85 Note: Never use a pen or sharp object to calibrate the touch screen as this will damage the panel. 1. Touch the Calibrate Start icon and the first screen will appear with instructions. 2. Follow the instructions on the screen touching and momentarily holding finger or a stylus to the center of the target for 2 seconds.
- Page 86 Audio Sub-menu Features The Audio Sub-menu is used to turn the Subwoofer output ON or OFF and to select a Subwoofer crossover frequency. Audio Sub-menu Screen Subwoofer: Touch ON or OFF to turn the subwoofer output ON or OFF. Subwoofer Crossover: Touch a crossover frequency (80Hz, 120Hz or 160Hz) to set a cut-off frequency for the subwoofer’s low-pass filter (LPF).
- Page 87 Time: Touch the Time icon and use the ▲ or ▼ icons to set the hour, minute, and either AM or PM. After setting the time, touch Save. The time will appear to the right of the TIME icon. Date Settings Time Settings Date and Time Setting Screens Language Sub-menu Features...
- Page 88 Bluetooth Sub-menu Features The Bluetooth audio capabilities can be used for wireless phones hands free applications. Before attempting to use the Bluetooth functions on this unit, please make sure the wireless phone to be connected supports Bluetooth functions. Bluetooth Pairing Code Screen 2 Bluetooth: Touch ON or OFF to turn the Bluetooth function ON or OFF.
- Page 89 DVD Sub-menu features DRC: This feature allows the user to turn the Dynamic Range Control ON for better playback for low volumes or OFF. Load Factory: This feature allows the user to “Reset” to restore the factory default settings. Volume Sub-menu Features The Volume Sub-menu allows the user to increase or decrease the relative volume of the audio output of each source individually.
- Page 90 DAB: Touch the DAB icon to enter the setting, then use the ▲ or ▼ icons to increase or decrease the relative volume level between -6 to +6. The default relative volume level setting for all available sources is “0”. Version Sub-menu Features The Version Sub-menu is used to identify the model and resident operating system as well as the hardware and software versions.
-
Page 91: Disc Operation
DISC OPERATION Compatible Audio Discs Types This system will play the following types of discs: - DVDs that contain audio and/or video. Audio discs - Audio CDs that contain audio, video and image files. MP3 discs - A disc that contains audio, video and image files (for example, a CD-R with downloaded MP3 files). - Page 92 Title/Chapter Information: The title/chapter information displayed is the current number of the track playing, the total number of tracks on the disc, the current chapter playing and the total number of chapters on the disc. Time Display: This indicator displays the time as entered by the user in the Settings Menu. Chapter Elapsed Playback Time: The elapsed playback time of chapter is displayed on the screen.
-
Page 93: Inserting A Disc
PIC: When the PIC icon is touched the picture adjust screen appears. Touch this icon during playback to adjust the color brightness, contrast, saturation and hue. The levels can be adjusted to suit the users preferences. The adjustments are accomplished by touching the + or - icons to decrease or increase the desired setting. -
Page 94: Playback Information
Ejecting a Disc: Press the Eject ( ) button on the front of the unit to eject the disc. The unit automatically reverts to Tuner mode. You may eject a disc with the unit powered off. The unit will remain off after the disc is ejected. Resetting the Loading Mechanism: If the disc loads abnormally or an abnormal core mechanism operation occurs, press and hold the Eject ( ) button on the front of the unit to reset the loading... - Page 95 General Disc Information Disc Properties Symbol 12cm Disc Properties Max Play Time Single side single layer (DVD-5) (MPEG 2 Method) Single side double layer (DVD-9) 133 minutes Double side single layer (DVD-10) 242 minutes Double side double layer (DVD-18) 266 minutes 484 minutes Single side single layer (VCD) (MPEG 1 Method)
- Page 96 CD Operation From the Main Menu Screen touch the DISC icon or insert a CD into the disc slot, label side up. Playback begins in CD mode when a disc is inserted correctly. CD Main Menu The on-screen icons and touch key areas are outlined below. CD Main Menu SRC Icon: Touch this icon to return to the Main Menu Screen.
- Page 97 ) Repeat: Touch this icon to repeat playback of the current track. The icon on the TFT LCD screen will light and small number 1 will appear below the icon and the track will repeat. Touch this icon a second time and the album will repeat. The icon on the TFT LCD screen will light and small letter a will appear below the icon and the album will repeat.
-
Page 98: Controlling Playback
Track Direct Entry When the Direct Entry icon is touched the Direct Entry Screen appears. The user can manually select a track by touching the corresponding number. After entering the track numbers touch the OK icon. If a wrong digit is entered touching the arrow will remove the number. After touching OK playback will begin. -
Page 99: Mp3/Wma Operation
MP3/WMA Operation MP3 is a format for storing digital audio. An audio CD-quality song can be compressed into the MP3 format with very little loss of quality, while taking up much less space. Insert a MP3 Disc into the disc slot, label side up. Playback begins in MP3 mode when a disc is inserted correctly. The unit plays the songs in the order they were burned on to the disc. - Page 100 Controlling Playback Inserting a Disc: Upon inserting a MP3/WMA disc, disc play begins. You cannot insert a disc if there is already a disc in the unit or if the power is off. Ejecting a Disc: Press the Eject ( ) button on the front of the unit to eject the disc.
-
Page 101: Radio Tuner Operation
RADIO TUNER OPERATION From the main menu screen touch the radio icon. The radio tuner display screen appears. Radio Tuner TFT Display The on-screen icons and touch key areas are outlined below. Radio Tuner TFT Display Screen SRC Icon: Touch to view the SOURCE MENU and select a new playback source. Radio: Displays the current source. - Page 102 ) Next/Manual Seek: Touch this icon to momentarily seek the next available radio station or touch and hold to manually tune the radio in 50kHz (for FM) or 9kHz (for AM) increments. Default mode is resumed after 10 seconds of inactivity. Band: Touch to change between AM/FM bands.
- Page 103 The receiver can automatically switch to an alternative frequency (AF) of the same station if the reception becomes poor. Press the OFF/ON touch-point to turn the automatic scanning for alternative frequencies of an RDS broad-cast station off and on. EON ( Enhanced Other Networks ) When EON data is received, the EON indicator lights and the TA and AF functions are enhanced.
- Page 104 There are 27 categories in the PTY function. 1. None 8. Adult Hits 15. Jazz 22. Personality 2. News 9. Soft Rock 16. Classic 23. Public 3. Info 10. Top 40 17. RGB 24. College 4. Sports 11. Country 18. Soft RGB 25.
- Page 105 3. Touch the preset number in which you would like to store the current station. The station frequency is displayed at the top of the menu. The preset number will appear highlighted. The station frequency will be stored in the highlighted preset. The station will be displayed on the Tuner TFT LCD screen.
-
Page 106: Usb Operation
USB OPERATION The unit will read the audio/video files on USB devices automatically. NOTE: The USB ports will recognize most USB flash memory devices and portable hard drives. Hard drives must be formatted to FAT32 and NTFS is not supported. Inserting/Removing a USB Device or microSD Card To insert a USB device or microSD card: 1. - Page 107 USB Operation From the main menu screen touch the USB icon. USB Micro SD Card Main Menu The on-screen icons and touch key areas are outlined below. USB Main Menu SRC Icon: Touch this icon to return to the Main Menu Screen. Scrolling Display: Displays current track information.
- Page 108 ) Repeat: In audio mode touch this icon to repeat playback of the current audio track. The icon on the main TFT LCD screen will light and a small letter A will appear below the icon and all the audio tracks will repeat. Touch this icon again and single track will repeat. The icon on the TFT LCD screen will light and small number 1 will appear below the icon.
-
Page 109: Pausing Playback
) Folders: Touch the icon to display the folder/file hierarchy. Touch the folder icon and the contents of the folder will be displayed. Touch the file’s icon to select a file. Touch the icon again to confirm and open the file. Direct Entry When the Direct Entry icon is touched the Direct Entry Screen appears. -
Page 110: Ipod®/Iphone® Controls
iPod®/iPhone® CONTROLS Accessing iPod® Mode The user can control an iPod®/iPhone® using the touch screen to access, albums, songs, videos, etc. The unit will automatically switch to iPod® mode when an iPod®, iPod® touch or iPhone® is plugged into the front panel USB connector. Also the iPod® can be accessed from the Main Menu Screen by touching the iPod®... - Page 111 Track Number: Lists the current audio track playing and the total number of audio tracks in audio mode. Time Display: This indicator displays the time as entered by the user in the Settings Menu. More ( ▲/▼ ): Touch the p/q icons to display the next or previous page of the iPod® menu. ) Previous: Touch this icon to play the previous track.
- Page 112 ) Audio Files: Touch the audio file icon to display the audio files. Touch the audio file icon to select a track. Touch the audio file icon again to confirm and playback will begin. Controlling Playback Direct Entry When the Direct Entry icon is touched the Direct Entry Screen appears. The user can manually select a track by touching the corresponding number.
- Page 113 PIC: When the PIC icon is touched the picture adjust screen appears. Touch this icon during playback to adjust the color brightness, contrast, saturation and hue. The levels can be adjusted to suit the users preferences. The adjustments are accomplished by touching the + or - icons to decrease or increase the desired setting.
-
Page 114: Av-In1/Av-In2 Operation
AV-IN1/AV-IN2 OPERATION AV-In1 AV-In1 is used for playback of audio/video from an external device connected to the unit through a 3.5mm jack located on the font panel. The unit can increase or decrease the volume of the connected device. All other controls are done on the connected device. AV-In1 Screen (No Signal) AV-In2 AV-In2 is used for playback of audio/video from an external device connected through RCA... -
Page 115: Using A Smartphone Via Hdmi/Mhl
Depending on your model and brand of smartphone HDMI / MHL may not be supported. Check your smartphone documentation for supported features. Most Android smartphones will require an app that must be downloaded from Google Play Store. Search for “MAC AUDIO HDMI / MHL Connect” in the search bar. -
Page 116: Interfacing Your Smartphone - Iphone 6
CONNECTING YOUR SMARTPHONE - ANDROID / APPLE 1. MAC AUDIO HDMI / MHL Connect App Installation Procedure Download and install the MAC AUDIO HDMI / MHL Connect app from Google Play (Android Devices Only) onto your smartphone. 2. Smartphone / Head Unit BT Connection... -
Page 117: Bluetooth Operation
• Try to perform pairing within a few minutes of the mobile phone being turned on. • Once the unit has been paired with the mobile phone, the unit’s model number, “MAC 410”, will be displayed on the mobile phone. - Page 118 Bluetooth® device. ( ): Touch to disconnect from a Bluetooth® device. MAC 410 Device Name: Provides the name that will appear on the Bluetooth® device. Scan: Touch the icon to search for Bluetooth® devices. Options: Touch to display the Bluetooth® options page.
- Page 119 Yes or NO. Touch Yes. The mobile phone and the unit should connect. The mobile phone should display a message similar to “Device Connected” and the mobile phone and the unit are now connected. MAC 410 will appear on the mobile phone list of devices.
- Page 120 Managing Incoming Calls When connected to a Bluetooth® mobile phone, the unit will mute audio output, pause CD play, and change to the Bluetooth® screen below when a call is received. The incoming phone number or assigned name for that number will appear on the screen. An audible tone will sound from the unit and a graphic display will appear on the front panel.
-
Page 121: Answering An Incoming Call
Answering an Incoming Call To answer an incoming call touch the icon. For best reception, speak loudly and clearly into the units microphone. To end the conversation, touch the icon. Rejecting an Incoming Call Touch the To Phone icon to reject an incoming call. The call will revert to your mobile phone and be left for voice mail. -
Page 122: Call Transfer
Dialed Calls: The Dialed Calls list retrieves the list of dialed numbers from your wireless phone if your wireless phone allows the function. The last dialed number is the first number on the list. Touch the Dialed Calls menu option to view the list. To make a call from the Dialed Calls list, touch the name. -
Page 123: Hands-Free Microphone
Bluetooth Audio Control Screen While listening to audio the following functions are available: 1. Pause/Play ( ) icon: Touch to pause playback. Touch again to resume playback. 2. Previous ( ) icon: Touch to play the previous track. 3. Next ( ) icon: Touch to play the next track. -
Page 124: Rear Camera Operation
REAR CAMERA OPERATION This unit is “camera ready.” Before accessing any camera features, you must install a rear video camera. When the camera is not installed and the function is accessed by the gear selector being placed in reverse or by the unit’s menu, the message “No Signal!” will be displayed and the following screen will appear. -
Page 125: Steering Wheel Controls (Swc)
STEERING WHEEL CONTROLS (SWC) (if equipped) The MAC 410 is compatible with following steering wheel control adapters: Dietz UNICO DUAL PLUS + cable, PAC (Pacific Accessory Corporation) SWI-PS and Metra ASWC. A 3.5 mm female connector (labeled “SWC Interface”) on the back of the head unit allows connectivity to the adapters. -
Page 126: User Uploadable Wallpaper
UPLOADING USER WALLPAPER Only one user wallpaper can be loaded at a time into the MAC 410. However, the user wallpaper can be loaded an infinite amount of times. 1. Insert a MicroSD card with wallpaper images into the MicroSd card slot. -
Page 127: Troubleshooting
TROUBLESHOOTING Troubleshooting Problem Cause Corrective Action GENERAL Unit will not power on Radio Fuse open Install new fuse with correct rating Car battery fuse open Install new fuse with correct rating Illegal operation Press the RESET button located in the middle of the left side of the front panel No/low audio output Improper audio output connection... - Page 128 Problem Cause Corrective Action TFT Monitor No image Incorrect connection to parking brake Check wiring and correct wire Parking brake is not engaged Stop vehicle in safe place and apply parking brake Flashing image or DVD is not compatible with current TV Change setup to interference appears on system settings...
- Page 129 Problem Cause Corrective Action Disc does not play back Disc is warped or scratched Use disc in good condition Clean disc with soft cloth Disc is dirty or wet Laser pickup is dirty Clean laser pickup with cleaning disc Incompatible disc is used Use compatible disc Disc region code is not compatible Use disc with proper region...
-
Page 130: Specifications
SPECIFICATIONS DVD/CD-Player Compatible disc media: DVD +/- R/ +/- RW (single and dual layer) and CD-R/-RW Compatible media formats: CD-DA, MP3, WMA, VCD, SVCD, Xvid, AVI, MPEG 1/2, AAC Signal to noise ratio: >95 dBA Dynamic range: >95 dB Frequency response: 20 Hz to 20 kHz, -3 dB Channel separation: >... -
Page 131: Care And Maintenance
General Auxiliary Input impedance: 10k Power Supply: 11 to 16VDC, negative ground Power Antenna (Blue): 500mA max, current limited protection Amplifier Remote (Blue/White): 500mA max, current limited protection Operating Temperature: 0°C ~ 65°C Fuse: 15-amp, mini ATM type DIN chassis dimensions: 7” X 7” X 2” (178mm x 178mm x 50mm) Power Output: 4x 40 Watt max. - Page 132 Merci d’avoir opté pour un produit MAC AUDIO. Nous espérons que les instructions de ce manuel seront claires et simples à suivre. Il suffit de quelques minutes pour apprendre comment utiliser toutes les fonctions de notre nouveau récepteur multimédia mobile MAC 410 et en apprécier toutes les options.
-
Page 133: Consignes De Sécurité
CONSIGNES DE SÉCURITÉ • Vous ne devez pas installer l’appareil à un endroit où la commande et l’utilisation de l’appareil pourrait compromettre la sécurité. • La sécurité routière est toujours la priorité absolue. • Utilisez l’autoradio toujours de sorte à maîtriser votre véhicule quelle que soit la situation de la circulation du moment. -
Page 134: Fonctionnalités/Spécifications
410 de MAC AUDIO. S’il vous plaît, lisez toutes les instructions avant de commencer l’installation, et gardez ce manuel pour un usage ultérieur. Il est recommandé de faire installer le MAC 410 de MAC AUDIO dans un établissement d’installation reconnu. - Page 135 Écran • Dimensions: 17.8 cm / (7”); écran tactile (touchscreen) digital avec rétroéclairage DEL • Type: affichage à cristaux liquides TFT haute définition • Résolution: 1.152.000 sous-pixels, 800x3 (l) x 480 (h), WVGA Châssis • 1.0 DIN (importation/montage DIN ISO) •...
-
Page 136: Accessoire Optionnel
MAC AUDIO DAB+ 200. Le récepteur MAC AUDIO DAB+ 200 s’utilise par le biais du menu du MAC 410. Pour de plus amples informations à propos de l’installation et du fonctionnement, prière de consulter les instructions fournies avec le récepteur DAB+. - Page 137 Avis Les graphiques de ce manuel sont référentiels, ils peuvent différer de l’appareil que vous avez en main. Référez-vous à celui-ci en dernier ressort. 1. Touche SRC/Alimentation ( ): Appuyez sur cette touche pour mettre l’appareil sous tension. Lorsque l’appareil est sous tension, appuyez sur cette touche pour sélectionner la source de lecture (Radio / Disque / SDHC / USB / Téléphone / AV-IN1 / AV-IN2 / DAB / jLink HDMI).
-
Page 138: Fonctionnement De La Télécommande
FONCTIONNEMENT DE LA TÉLÉCOMMANDE Télécommande MAC 410... -
Page 139: Description Fonctionnelle De La Télécommande
Description fonctionnelle de la télécommande 1. Touche Alimentation / MUTE: Appuyez sur cette touche pour activer et désactiver la sortie audio. Appuyez sur cette touche pendant 2 secondes pour mettre l’appareil hors tension, rappuyez dessus pour remettre l’appareil sous tension. 2. -
Page 140: Remplacement De La Batterie De La Télécommande
18. Touche PS/AS : Appuyez sur cette touche pour lancer la recherche automatique et la mémorisation de toutes les stations avec un signal puissant. Maintenez cette touche enfoncée pour lancer la fonction de balayage sur le syntoniseur. Appuyez de nouveau sur cette touche pour arrêter le balayage. 19. -
Page 141: Utilisation De L'écran Tft
PUSH OPEN Changement de la batterie de la télécommande MAC 410 Lithium Battery CR2025 (3V) (+) Positive facing out SLIDE BATTERY DOOR DOWN UTILISATION DE L’ÉCRAN TFT Comment ouvrir/fermer l’écran. Appuyez sur le bouton [OPEN] du panneau avant de la télécommande pour ouvrir ou fermer le panneau d’affichage. -
Page 142: Appareils Externes
APPAREILS EXTERNES AV-In1 AV-IN1 desservit la lecture audio/vidéo à partir d’un dispositif périphérique connecté à l’appareil avec un connecteur de 3,5 mm situé sur le panneau avant. AV-In2 AV-IN2 desservit la lecture audio/vidéo à partir d’un dispositif périphérique connecté à l’appareil avec des connecteurs RCA situés à... -
Page 143: Guide De Démarrage Rapide
GUIDE DE DÉMARRAGE RAPIDE Allumer et éteindre l’appareil Appuyez le bouton SRC/Power On/Off ( ) du panneau avant pour allumer l’appareil. Pour l’éteindre, appuyez et maintenez appuyé le bouton SRC/Power On/Off ( ) du panneau avant pendant 2 secondes. Sélection d’une source audio/vidéo, Bluetooth, commande au volant ou caméra arrière Pour accéder à... -
Page 144: Bip De Confirmation
Modification des paramètres du système Pour consulter et modifier les paramètres du système: Pour ouvrir le MENU RÉGLAGES, effleurez l’icône Réglages ( ) sur l’écran du menu principal. Les couleurs des sous-menus pouvant être édités sont inversées. Réglage du volume Pour ouvrir le MENU RÉGLAGES, effleurez l’icône Réglages se trouvant sur le panneau avant. -
Page 145: Réinitialisation Du Système
Réinitialisation du système Pour corriger une erreur du système ou toute opération incorrecte, utilisez la pointe d’un stylo pour enfoncer et libérer le bouton de remise à zéro qui se trouve sous le couvercle des prises AV/ microSD/USB du panneau avant. Bouton de remise à... -
Page 146: Audio Menu De Commande De L'égaliseur
AUDIO MENU DE COMMANDES DE L’ÉGALISEUR Réglage des commandes de l’égaliseur L’écran de réglage de l’égaliseur permet de régler facilement le système audio pour s’adapter aux caractéristiques acoustiques de la voiture, en fonction du type de véhicule et des dimensions de la cabine. -
Page 147: Réglage Du Correcteur Physiologique
Réglage du correcteur physiologique Effleurez l’icône Loudness pour activer (ON) ou désactiver (OFF) l’option du correcteur physiologique. L’option Loudness modifie automatiquement la courbe des réponses de fréquence de la source audio pour la rendre plus naturelle lorsqu’elle est écoutée à un niveau sonore plus faible. -
Page 148: Réglage Du Système
Ce dernier contient sept sous-menus (Général, Audio, Horloge, Langue, Bluetooth, DVD et Volume) qui sont employés pour définir les performances de chaque option du MAC 410. Le sous-menu Version contient uniquement des informations. Effleurez le sous-menu souhaité: ses couleurs s’inversent. - Page 149 Papier peint: Effleurez Démarrage moteur, Voile bleu, Cubes verts, Tourbillon rouge ou Tribal pour choisir le papier peint de l’écran TFT à cristaux liquides. Effleurez encore une fois pour confirmer et activer le papier peint. Calibrage Ce réglage du calibrage de l’écran tactile est employé pour définir les paramètres de l’écran tactile afin de garantir que chaque pression sur l’écran déclenche réellement la fonction souhaitée.
-
Page 150: Fonctions Du Sous-Menu Audio
Demo (Démonstration): Appuyez sur ON ou OFF pour activer ou désactiver le mode de démonstration. Le réglage par défaut en usine est désactivé (OFF). Ouverture automatique du Moniteur TFT • Si « TFT Open » est « Auto on » lorsque l’appareil est allumé, le moniteur se déplace automatiquement dans une position de visionnement. -
Page 151: Sous-Menu Langue
Date: Effleurez l’icône de la date et employez les icônes ▲ et ▼ pour définir le jour, le mois et l’année. Après avoir défini la date, effleurez le bouton Enregistrer. La date s’affiche à droite de l’icône de la date Mode horloge: Effleurez 12 h pour afficher l’heure au format 12 h avec les indications AM (matin) et PM (après-midi). -
Page 152: Fonctions Du Sous-Menu Bluetooth
Sous-titres DVD: Si disponible, cette fonction permet à l’utilisateur de sélectionner l’une des langues disponibles sur le disque pour l’audio DVD. Menu du disque: Permet à l’utilisateur de sélectionner l’une des langues disponibles dans le menu du disque. Fonctions du sous-menu Bluetooth Les fonctionnalités audio Bluetooth permettent d’utiliser les téléphones sans fil pour les applications mains libres. -
Page 153: Fonctions Du Sous-Menu Dvd
Pairing Code Entry Screen Pairing Code Confirmation Screen Écrans du code de jumelage Fonctions du sous-menu DVD DRC: Cette fonction permet à l’utilisateur d’ACTIVER ou de DÉSACTIVER le « Dynamic Range Control » pour une lecture de meilleure qualité à bas volume. Réglages en usine: Cette fonction permet à... -
Page 154: Sous-Menu Version
Radio: Effleurez l’icône Radio pour activer la configuration puis employez les icônes ▲ et ▼ pour augmenter ou réduire le niveau du volume relatif entre -6 et +6. Bluetooth: Effleurez l’icône Bluetooth pour activer la configuration puis employez les icônes ▲ et ▼... -
Page 155: Utilisation Des Disques
UTILISATION DES DISQUES Types compatibles de disques audio Le système peut lire les types de disque suivants: DVD – DVD contenant audio ou vidéo. Disques audio – CD audio contenant audio, vidéo ou fichiers d’image. Disques MP3 – Un disque contenant audio, vidéo et fichiers d’image (par exemple, un CD-R avec des fichiers MP3 téléchargés). - Page 156 Informations à propos des titres ou chapitres: Les informations affichées à propos des titres ou chapitres correspondent au numéro actuel de la piste en cours de lecture, au nombre total de pistes sur le disque, au chapitre actuel en cours de lecture et au nombre total de chapitres sur le disque.
-
Page 157: Saisie Directe
PIC: Une pression sur l’icône PIC permet d’ouvrir l’écran de configuration de l’image. Effleurez cette icône durant la lecture pour ajuster la luminosité des couleurs, le contraste, la saturation et la teinte. Les niveaux peuvent être réglés afin de satisfaire aux préférences de l’utilisateur. Les réglages s’effectuent en effleurant les icônes + et - pour augmenter ou réduire la valeur souhaitée. -
Page 158: Ejecter Un Disque
Ejecter un disque Pressez le bouton sur le panneau avant pour éjecter le disque. L’appareil revient automatiquement au mode Tuner. Vous pouvez éjecter un disque avec l’appareil éteint. L’appareil restera éteint après l’éjection du disque. Régler le mécanisme de chargement de nouveau Si le disque se charge anormalement, ou une opération du mécanisme de cœur anormale advient, pressez et maintenez le bouton sur le panneau avant pour régler le mécanisme de... -
Page 159: Information Générale Du Disque
Information générale du disque Propriétés du disque Symbole Propriétés du disque de 12 cm Temps maximum de lecture Une face, couche simple (DVD-5) (Méthode MPEG 2) Une face, double couche (DVD-9) 133 minutes Deux faces, couche simple (DVD-10) 242 minutes Deux faces, double couche (DVD-18) 266 minutes 484 minutes... - Page 160 Fonctionnement du CD Sur l’écran du menu principal, appuyez sur l’icône de disque ou insérez und CD dans la fente à disques, avec l’étiquette vers le haut. La lecture commence quand un disque est inséré correctement. Menu principal du CD Les indicateurs sur écran et les zones de clés tactiles sont soulignés ci-dessous.
- Page 161 ) Répétition: Effleurez cette icône pour répéter la lecture de la piste actuelle. L’icône s’allumera sur l’écran TFT à cristaux liquides et un petit 1 s’affichera à côté de l’icône et la lecture de la piste sera répétée. Effleurez une seconde fois l’icône pour répéter l’album. L’icône s’allumera sur l’écran TFT à...
-
Page 162: Commander La Reproduction
Saisie directe de la piste En cas de pression sur l’icône Saisie directe, l’écran de saisie directe s’affiche sur l’écran. L’utilisateur peut sélectionner manuellement une piste en effleurant le numéro correspondant. Après la saisie des numéros des pistes, effleurez l’icône OK. En cas de saisie incorrecte, il suffit d’effleurer la flèche pour effacer la valeur incorrecte. -
Page 163: Utilisation D'un Cd/Mp3
Remarque: CD-R et CD-RW ne joueront pas à moins que la séance d’enregistrement n’ait été finalisée. Utilisation d’un CD/MP3 MP3 est un format de stockage de contenu audio numérique. Un morceau audio de qualité CD peut être compressé au format MP3 avec une très faible perte de qualité et un gain d’espace. Insérez un disque MP3 dans la fente à... -
Page 164: Commandes De Lecture
Commandes de lecture Insérer un disque: Après avoir inséré un disque MP3/WMA, la reproduction du disque commence. Vous ne pouvez insérer un disque s’il y a déjà un disque dans l’appareil et si la puissance est éteinte. Ejecter un disque: Pressez le bouton EJECT ( ) sur le panneau avant pour éjecter le disque. -
Page 165: Fonctionnement Du Syntoniseur
FONCTIONNEMENT DU SYNTONISEUR Effleurez l’icône Radio sur l’écran du menu principal. L’écran du tuner de la radio s’affiche. Affichage TFT du tuner de la radio Les indicateurs sur écran et les zones de clés tactiles sont soulignés ci-dessous.. Écran d’affichage TFT du tuner de la radio Icône SRC: Appuyez sur cette touche pour voir le MENU SOURCE et sélectionnez une nouvelle source de lecture. - Page 166 ) Recherche vers l’arrière / recherche manuelle: Effleurez cette icône pour rechercher la précédente station radio disponible. Effleurez et maintenez cette icône enfoncée pour balayer manuellement les fréquences de la radio par pas de 50 kHz (pour la bande FM) ou de 9 kHz (pour la bande AM).
- Page 167 Le système de données radio (RDS) permet de recevoir les rapports de circulation et offre de nombreux avantages dont la possibilité d’afficher le nom de la station radio sur l’écran de la radio. Appuyez sur l’option choisie pour changer les paramètres.
-
Page 168: Saisie Directe De La Fréquence
La fonction PTY vous permet de trouver les programmes de genre similaire. Appuyez la touche PTY pour afficher l’écran de recherche pour les types de programme. Écran PTY La fonction PTY abrite 27 catégories. 1. None 8. Adult Hits 15. Jazz 22. -
Page 169: Utilisation Des Stations Préréglées
Utilisation des stations préréglées Six boutons de préréglage numérotés mettent en mémoire et rappellent les stations de chaque bande. Les six stations, mises en mémoire (P1 à P6) pour la bande active, s’affichent à l’écran. Mettre une station en mémoire 1. -
Page 170: Recherche De Station De Radio Locale
Mise en mémoire automatique (AS) Pour sélectionner six stations fortes et les mettre en mémoire dans la bande actuelle. Cette fonction est le plus utile lorsque vous vous déplacez dans un endroit dans lequel vous ne connaissez pas les chaînes radio. 1. -
Page 171: Utilisation Usb
UTILISATION USB L’appareil lira les fichiers audio/Vidéo sur le dispositif USB/SD automatiquement. Remarque: Les ports USB reconnaissent la plupart des clés USB et des disques durs portables. Les disques durs doivent être formatés au FAT32, et NTFS n’est pas soutenu. Insérez/enlever un dispositif USB/Carte Micro SD Insérez un dispositif USB/Carte Micro SD: 1. - Page 172 Utilisation USB Touchez l’icône USB sur le menu principal. Menu USB / Micro SD Card Les indicateurs sur écran et les zones de clés tactiles sont soulignés ci-dessous. Menu USB SRC: Touchez cet icône pour retourner au menu principal. Défilement sur l’écran: Affiche les informations à propos de la piste actuelle. Nombre de pistes: Affiche la piste audio actuellement en cours de lecture et le nombre total de pistes audio en mode audio.
- Page 173 ) Répétition: En mode audio, effleurez cette icône pour répéter la lecture de la piste audio actuelle. L’icône s’allumera sur l’écran TFT principal à cristaux liquides et un « a » minuscule s’affichera à côté de l’icône et la lecture de toutes les pistes audio sera répétée. Effleurez encore une fois cette icône et la piste en cours de lecture sera répétée.
-
Page 174: Se Déplacer À Travers Les Chansons
) Fichiers vidéo: Effleurez l’icône Fichier vidéo pour afficher une liste des fichiers vidéo. Effleurez l’icône Fichier vidéo pour sélectionner un fichier vidéo. Effleurez encore une fois l’icône Fichier vidéo pour confirmer et lancer la lecture. ) Fichiers d’images (JPEG, etc.): Effleurez l’icône Image pour afficher le contenu d’un dossier ou un fichier JPEG individuel. -
Page 175: Suspendre/Reprendre La Reproduction
Suspendre/reprendre la reproduction Touchez le bouton pour suspendre ou reprendre la reproduction. PIC: Une pression sur l’icône PIC permet d’ouvrir l’écran de configuration de l’image. Effleurez cette icône durant la lecture pour ajuster la luminosité des couleurs, le contraste, la saturation et la teinte. -
Page 176: Commandes De L'ipod®/Iphone
COMMANDES DE L’iPod®/iPhone® Accéder au mode iPod® L’usager peut contrôler un iPod®/iPhone® en utilisant l’écran tactile pour accéder aux albums, chansons, vidéos, etc. L’appareil passe automatiquement au mode iPod® quand un iPod®, un iPod® Touch ou iPhone® est branché au connecteur USB du panneau avant. On peut aussi accéder à un iPod® depuis l’écran de menu principal en touchant l’icône de iPod®... - Page 177 Horloge: Affiche l’heure comme l’a saisie l’utilisateur sur le menu de configuration. Plus (▲/▼): Effleurez les icônes ▲/▼ pour afficher la page suivante ou précédente du menu du iPod®. : Touchez cet icône pour aller à la chanson précédente. Touchez pour mettre la lecture en pause. Touchez de nouveau pour reprendre la lecture. : Touchez cet icône pour aller à...
- Page 178 Fichiers audio: Effleurez l’icône Fichier audio pour afficher une liste des fichiers audio. Effleurez l’icône Fichier audio pour sélectionner une piste. Effleurez encore une fois l’icône Fichier audio pour confirmer et lancer la lecture. Commander la reproduction Saisie directe En cas de pression sur l’icône Saisie directe, l’écran de saisie directe s’affiche sur l’écran. L’utilisateur peut sélectionner manuellement une piste en effleurant le numéro correspondant.
- Page 179 PIC: Une pression sur l’icône PIC permet d’ouvrir l’écran de configuration de l’image. Effleurez cette icône durant la lecture pour ajuster la luminosité des couleurs, le contraste, la saturation et la teinte. Les niveaux peuvent être réglés afin de satisfaire aux préférences de l’utilisateur. Les réglages s’effectuent en effleurant les icônes + et - pour augmenter ou réduire la valeur souhaitée.
-
Page 180: Commandes Av-In1/Av-In2
COMMANDES AV-IN1/AV-IN2 AV-In1 AV-IN1 desservit la lecture audio/vidéo à partir d’un dispositif périphérique connecté à l’appareil avec un connecteur de 3,5 mm situé sur le panneau avant. Le périphérique peut augmenter ou réduire le volume du périphérique connecté. Toutes les autres commandes sont disponibles sur le périphérique connecté. -
Page 181: Utilisation D'un Smartphone Via Hdmi/Mhl
Consultez la documentation livrée avec votre smartphone pour connaître les fonctions prises en charge. Sur la plupart des smartphones Android, il est nécessaire de télécharger une application via Google Play Store. Recherchez l’application « MAC AUDIO HDMI / MHL Connect ». -
Page 182: Interfaçage De Votre Smartphone - Iphone
INTERFAÇAGE DE VOTRE SMARTPHONE - iPhone 6 ® iPhone 6 Plus / iPhone 5 / iPhone 5S / iPhone 5C ® ® ® ® REMARQUE : pour connecter votre smartphone, vous devez vous procurer l’« adaptateur AV numérique Lightning Apple » (adaptateur HDMI). Aucune application et aucun logiciel ne sont nécessaires pour les dispositifs Apple. -
Page 183: Connexion De Votre Smartphone - Android/Apple
HDMI / MHL Connect. Effleurez « Mobile Home Page » (Page d’accueil mobile) pour accéder à votre smartphone à partir de l’écran tactile de l’unité principale multimédia MAC AUDIO. Appuyez sur « Car Home Page » (Page d’accueil véhicule) pour revenir au menu de la source principale de l’unité... -
Page 184: Interface Utilisateur Bluetooth
• Certains téléphone portatifs (comme Sony Ericsson) peuvent avoir un choix « Power Saving Mode ». VEUILLEZ NE PAS utilisez le mode d’économie de puissance avec le MAC 410. • Avant d’accepter ou faire un appel, assurez vous que la fonction Bluetooth de votre téléphone portatif est allumée. - Page 185 “No”. Appuyez sur “Yes”. Le téléphone sans fil et l’appareil devraient s’apparier. Le téléphone mobile doit afficher un message indiquant qu’il est connecté. Le téléphone et l’unité sont désormais connectés. MAC 410 apparaît sur la liste des périphériques du téléphone mobile.
-
Page 186: Gestion Des Appels Entrants
Gestion des appels entrants Lorsqu’il est connecté à un téléphone portable compatible Bluetooth®, le périphérique active la fonction Muet de la sortie audio, met en pause la lecture du CD et passe à l’écran Bluetooth® ci-dessous dès qu’un appel est reçu. Le numéro de téléphone ou le nom attribué à l’appelant s’affichent sur l’écran. -
Page 187: Répondre À L'appel Entrant
Répondre à l’appel entrant Pour répondre à un appel, touchez le bouton .Pour la meilleure réception parlez fort et clairement. Pour terminer la conversation, touchez le bouton Rejeter un appel entrant Touchez le bouton “To Phone” pour rejeter un appel entrant. L’appel va revenir à votre téléphone et peut être laissé... -
Page 188: Transfert D'appel
Transfert d’appel Touchez le bouton “To Phone” pendant que vous parlez afin de transférer le son du MAC 410 vers le téléphone sans fil. Vous ne pouvez transférer un appel qu’après qu’il ait été répondu. Appuyez sur le bouton “To Device” pour renvoyer le son du téléphone sans fil vers le MAC 410. -
Page 189: Microphone Mains-Libres
Écran de réglage audio Bluetooth Pendant l’écoute d’une source audio, les fonctions suivantes sont disponibles : : Appuyez pour mettre la lecture en pause. Appuyez à nouveau pour commencer la lecture. : Touchez pour aller à la chanson précédente. : Touchez pour aller à la chanson prochaine. Les fonctionnalités varient en fonction du profil utilisé: •... -
Page 190: Caméra De Recul
CAMÉRA DE RECUL (le cas échéant) La caméra est déjà prête à être utilisée sur l’appareil. Avant d’accéder aux fonctions de la caméra, achetez et installez une caméra vidéo à l’arrière. Si la caméra n’est pas installée et qu’on utilise le sélecteur de vitesses pour accéder à la fonction, en le mettant en position de marche arrière, ou en utilisant le menu de l’appareil, il s’affiche l’information que la fonction n’est pas disponible. -
Page 191: Commande De Volant (Swc)
CONTROL) (le cas échéant) Le MAC 410 est compatible avec les adaptateurs de commande de volant Dietz UNICO DUAL PLUS avec câble, PAC (Pacific Accessory Corporation) SWI-PS et Metra ASWC. Une prise femelle de 3,5 mm (étiquetée «SWC Interface»), à l’arrière de l’appareil, permet de connecter aux adaptateurs. -
Page 192: Programmation Du Swc
CHARGEMENT D’UN FOND D’ÉCRAN PERSONNALISÉ Vous pouvez charger un seul fond d’écran personnalisé à la fois sur le MAC 410. Vous pouvez néanmoins charger le fond d’écran personnalisé autant de fois que vous le souhaitez. -
Page 193: Dépannage
DÉPANNAGE Problème Cause Mesure corrective PROBLÈMES D’ORDRE GÉNÉRAL L’appareil ne s’allume Fusible de radio brûlé Installez un nouveau fusible du calibre approprié. Fusible de batterie du véhicule brûlé. Installez un nouveau fusible du calibre approprié. Opération illégale. Appuyez sur le bouton RESET sur l’avant de l’appareil. - Page 194 Problème Cause Mesure corrective MONITEUR TFT Pas d’image Mauvais branchement sur le câble du Vérifiez le câblage et frein à main. corrigez. PRK SW est activé, le frein à main Garez le véhicule dans n’est pas enclenché. un endroit approprié et enclenchez le frein à...
-
Page 195: Messages D'erreur
Problème Cause Mesure corrective Le disque ne joue pas Le disque est voilé ou égratigné. Utilisez un disque en bon état. Disque est sale ou moite. Nettoyez le disque ou le remplacer. La saisie laser est sale. Nettoyez la saisie laser avec un disque de nettoyage. -
Page 196: Spécifications
SPÉCIFICATIONS Lecteur DVD/CD Disques compatibles: DVD + R / RW (à couche simple et double) et CD-R/RW Formats de supports compatibles: CD-DA, MP3, WMA, VCD, SVCD, Xvid, AVI, MPEG1 / 2, AAC Rapport signal/bruit: > 95 dBA Portée dynamique: >95 dB Réponse en fréquence: 20 Hz à... -
Page 197: Généralités
Généralités Impédance de l’entrée auxiliaire: 10k Source d’alimentation: 11 to 16VDC, mise à terre négative. Alimentation de l’antenne (Bleue): 500mA max, protection de limitation de courant Amplificateur à distance (Blue/White): 500mA max, protection de limitation de courant Température de Service: 0C ~ 65C Fusible: 15-amp, mini ATM type Dimensions du Châssis DIN: 7”... - Page 198 Grazie per aver scelto un prodotto MAC AUDIO. Ci auguriamo di riuscire a spiegarvi in modo semplice e chiaro il funzionamento di questo apparecchio attraverso le istruzioni descritte nel presente manuale d’uso. Vi preghiamo di prendervi qualche minuto per leggere il presente manuale d’uso che vi faciliterà...
-
Page 199: Avvertenze Di Sicurezza
AVVERTENZE DI SICUREZZA • Non installare mai questa unità dove l’utilizzo e l’osservazione potrebbero interferire con le condizioni di guida sicure. • Quando si è alla guida la sicurezza va sempre messa al primo posto. L’autoradio va utilizzata sempre in modo da guidare in modo sicuro mantenendo costantemente l’attenzione sulla strada. -
Page 200: Funzioni/Specifiche
Leggere il presente manuale prima dell’uso. La documentazione fornita contiene informazioni su tutte le funzioni del MAC AUDIO acquistato. Ricevitore multimediale MAC 410. Si prega di leggere attentamente le istruzioni prima di montare l’apparecchio e di conservarle per la consultazione successiva. Suggeriamo di far montare il MAC 410 da un rivenditore specializzato di fiducia. - Page 201 Monitor • Dimensioni dello schermo: 17,8 cm / (7”) Digital LCD TS (touch screen) con retroilluminazione • Tipo: monitor TFT ad alta definizione con display LCD • Risoluzione: 1.152.000 sub-pixel, 800x3 (L) x 480 (A), VGA Alloggiamento • DIN 1.0 (adatto ai veicoli di importazione / vani ISO DIN) •...
-
Page 202: Accessori Opzionali
A tale scopo è necessario acquistare e installare il modulo MAC AUDIO DAB+ che sarà poi utilizzabile dal menu del MAC 410. Tutte le istruzioni di montaggio e utilizzo sono fornite insieme al modulo ricevitore DAB+. - Page 203 Attenzione: le immagini riportate nelle presenti istruzioni sono solo a titolo esemplificativo, pertanto vi possono essere differenze rispetto al dispositivo acquistato. Si prega di far riferimento al modello effettivo. 1. Tasto SRC/Power ( ): premere questo tasto per accendere l’apparecchio. Una volta acceso premere questo tasto per avviare la riproduzione (radio / disco / SDHC / USB / telefono /AV- IN1 / AV-IN2 / DAB / jLink HDMI).
-
Page 204: Telecomando
TELECOMANDO Figura 2. Telecomando MAC 410... -
Page 205: Funzioni Del Telecomando
Funzioni del telecomando 1. Tasto Power / MUTE: premere questo tasto per attivare o disattivare l’uscita audio. Tenere premuto il tasto per 2 secondi per spegnere l’apparecchio. Premere nuovamente per riaccendere l’apparecchio. 2. Tasto Fast Forward [ ]: premere questo tasto per mandare avanti rapidamente la lettura di un disco a una velocità... -
Page 206: Sostituzione Della Batteria Del Telecomando
Rimozione della batteria Aprire il vano batterie posto nella parte inferiore del retro del telecomando. PUSH OPEN Figura 3: sostituzione della batteria del telecomando MAC 410 Lithium Battery CR2025 (3V) (+) Positive facing out SLIDE BATTERY DOOR DOWN... -
Page 207: Utilizzo Del Monitor Tft
UTILIZZO DEL MONITOR TFT Apertura/chiusura del monitor Premere il tasto [OPEN] sulla parte frontale del dispositivo o sul telecomando per aprire o chiudere il display. NOTA: il display non può essere estratto/spinto manualmente. Regolazione dell’inclinazione del monitor Grazie alle loro caratteristiche tecniche i display LCD offrono ottima visibilità da diverse angolazioni. -
Page 208: Dispositivi Esterni
DISPOSITIVI ESTERNI AV-In1 La porta AV-In1 è destinata alla riproduzione audio/video da un dispositivo esterno collegato a una presa da 3,5 mm sulla parte anteriore del dispositivo. AV-In2 La porta AV-In2 è destinata alla riproduzione audio/video da un dispositivo esterno collegato ai connettori RCA sulla parte posteriore del dispositivo. -
Page 209: Guida Rapida
SRC-Taste Pannello frontale del MAC 410 2. Selezionare la sorgente desiderata cliccando sull’icona corrispondente visualizzata su una delle due schermate del menu principale. Schermata 1 di 2: disco, radio, USB, AV-IN1, AV-IN2, DAB, SDHC, telefono (BT). - Page 210 Modificare le impostazioni di sistema Per visualizzare e modificare le impostazioni di sistema: cliccare sull’icona ( ) del menu principale per visualizzare il menu IMPOSTAZIONI. È possibile modificare le voci che sono evidenziate. Impostare il volume Ruotare la manopola posta sulla parte frontale dell’apparecchio per aumentare o ridurre il volume. Il volume impostato verrà...
- Page 211 Resettare il sistema In caso di blocco o malfunzionamento utilizzare una penna per premere e rilasciare il tasto Reset situato sotto il coperchio delle prese sulla parte anteriore dell’apparecchio. Tasto Reset Resettando il sistema verranno ripristinate tutte le impostazioni di fabbrica dell’apparecchio. NOTA: se l’apparecchio viene resettato durante la riproduzione di un DVD, al termine dell’operazione verrà...
-
Page 212: Impostazioni Di Sistema
Sono disponibili sette sottomenu (Generale, Audio, Ora, Lingua, Bluetooth, DVD o volume) contenenti le impostazioni per ogni opzione del MAC 410. Il sottomenu VERSIONE è solo a titolo informativo. Selezionando il sottomenu desiderato questo verrà evidenziato. Le opzioni disponibili vengono visualizzate sullo schermo. - Page 213 Sfondo: cliccare sull’immagine Avvio motore, Nebbia blu, Cubi verdi, Vortice rosso o Tribale per selezionare uno sfondo per lo schermo. Cliccare nuovamente l’opzione per confermare l’impostazione. Calibrazione La calibrazione del touch screen viene utilizzata per impostare i parametri del touch screen. In questo modo viene garantito che premendo un tasto o un’icona sullo schermo venga selezionata la funzione desiderata.
- Page 214 Illuminazione: cliccare sull’icona per visualizzare le impostazioni di illuminazione. Cliccare su un colore per selezionare l’illuminazione del display del pannello frontale. Colore UI (colore dell’interfaccia utente): cliccare su verde, rosso, arancione, blu o viola per selezionare il colore dell’interfaccia utente. Cliccare nuovamente sul colore per confermare l’impostazione.
- Page 215 Codice di abbinamento: questa opzione consente di creare un codice di 4 cifre a scelta per l’abbinamento di dispositivi Bluetooth con il MAC 410. 1. Cliccare sul CODICE DI ABBINAMENTO per accedere alla relativa schermata di immissione. 2. Utilizzare la tastiera per digitare un codice di 4 cifre a scelta.
- Page 216 DVD: cliccare su DVD e quindi su ▲ o ▼ per impostare il volume relativo da -6 a +6. USB: cliccare su USB per visualizzare le impostazioni e quindi su ▲ o ▼ per impostare il volume relativo da -6 a +6. Radio: cliccare su RADIO per visualizzare le impostazioni e quindi su ▲...
-
Page 217: Funzionamento Della Radio
FUNZIONAMENTO DELLA RADIO Cliccare sul menu principale RADIO per visualizzare il relativo menu. Menu della radio Di seguito sono indicati gli indicatori e i pulsanti. Menu della radio SRC: cliccare su questa icona per visualizzare il menu della sorgente e selezionare una nuova sorgente di riproduzione. - Page 218 ) / ricerca manuale: cliccare su questa icona per cercare la stazione successiva con una frequenza superiore. Mantenere l’icona pigiata per cercare manualmente le stazioni a intervalli di 50 kHz (per FM) e 9 kHz (per AM). La modalità standard viene riattivata dopo 10 secondi di inattività.
- Page 219 In presenza di segnale debole, l’apparecchio è in grado di passare automaticamente a una frequenza alternativa (AF) della stessa emittente. Cliccare su ON/OFF per attivare/disattivare la selezione automatica di frequenze alternative per la ricezione RDS. EON (Enhanced Other Networks) Quando vengono ricevuti dati EON la spia EON si illumina e le funzioni TA e AF vengono estese ad altre reti.
-
Page 220: Immissione Diretta Dell'emittente
La funzione PTY contiene 27 categorie: 1. None 8. Adult Hits 15. Jazz 22. Personality 2. News 9. Soft Rock 16. Classic 23. Public 3. Info 10. Top 40 17. RGB 24. College 4. Sports 11. Country 18. Soft RGB 25. - Page 221 3. Cliccare sullo spazio di memoria in cui si desidera salvare l’emittente. La frequenza della stazione viene visualizzata in alto nel menu. Lo spazio di memoria viene evidenziato. La frequenza dell’emittente viene salvata in uno spazio di memoria evidenziato. L’emittente viene visualizzata sul display della radio.
-
Page 222: Utilizzo Della Porta Usb
UTILIZZO DELLA PORTA USB I file audio/video sul dispositivo USB verranno letti automaticamente. Nota: gli ingressi USB riconoscono la maggior parte dei dispositivi di memoria flash USB e i dischi esterni portatili. I dischi esterni devono essere formattati come FAT32, il formato NTFS non è... - Page 223 Utilizzo della porta USB Cliccare sull’icona USB del menu principale. Menu principale USB / scheda MicroSD Di seguito sono indicati gli indicatori e i pulsanti. Menu principale USB SRC: cliccare su questa icona per tornare al menu principale. Scorrimento del display: mostra le informazioni sul brano in riproduzione. Numero del brano: in modalità...
- Page 224 ) Ripetizione: Modalità audio: cliccare sull’icona per ripetere la riproduzione del brano attuale. L’icona s’illumina, compare la lettera “a” al di sotto dell’icona e tutti i brani audio vengono ripetuti. Cliccare di nuovo sull’icona per ripetere solo un singolo brano. L’icona s’illumina e compare il numero 1 al di sotto della stessa.
-
Page 225: Interrompere La Riproduzione
Immissione diretta Cliccare sull’icona “Immissione diretta” per visualizzare la maschera d’immissione. È possibile selezionare manualmente un titolo digitando il numero corrispondente. Una volta immesso il numero cliccare su OK. Cliccare sulla freccia per cancellare i numeri inseriti erroneamente. Premere OK per avviare la riproduzione. Immissione diretta di titoli dell’USB Selezionare i vari titoli Cliccare su... -
Page 226: Elementi Di Comando Per Ipod®/Iphone
ELEMENTI DI COMANDO PER iPod®/iPhone® Attivare la modalità iPod® Attraverso il touch screen è possibile accedere agli album e ai titoli del proprio iPod®/iPhone®. Collegando un iPod®, iPod® touch o iPhone® alla presa USB posta sulla parte frontale dell’apparecchio, questo passa automaticamente alla modalità iPod®. È possibile accedere all’iPod®... - Page 227 Numero del brano: in modalità audio mostra il titolo del brano in riproduzione e il numero del brano. Ora: mostra l’ora come è stata configurata nel menu Impostazioni. Più (▲/▼ ): cliccare su ▲/▼ per visualizzare la pagina precedente o successiva del menu iPod®. : cliccare su questa icona per selezionare il titolo precedente.
- Page 228 File audio: cliccare su questa icona per visualizzare i file audio. Selezionare un brano audio cliccando sull’icona /titolo. Cliccare ancora su questa icona per avviare la riproduzione del disco. Controllo riproduzione Immissione diretta Cliccare sull’icona “Immissione diretta” per visualizzare la maschera d’immissione. È possibile selezionare manualmente un titolo digitando il numero corrispondente.
-
Page 229: Utilizzo Di Uno Smartphone Dall'interfaccia Hdmi/Mhl
Le informazioni sulle funzioni supportate sono disponibili nella documentazione del proprio smartphone. Per la maggior parte degli smartphone Android è necessario installare un’app scaricabile dal Google Play Store: cercare “MAC AUDIO HDMI/MHL Connect”. NOTA: per collegare lo smartphone è necessario un apposito adattatore HDMI/MHL. In alcuni casi occorre collegare la porta Micro-USB supplementare (dell’adattatore stesso) a una presa di... -
Page 230: Collegare Il Proprio Smartphone - Iphone
HDMI. COLLEGARE IL PROPRIO SMARTPHONE – ANDROID/ APPLE 1. Installazione dell’app MAC AUDIO HDMI /MHL Connect Scaricare e installare sul proprio smartphone l’app MAC AUDIO HDMI / MHL Connect disponibile su Google Play Store (solo per dispositivi Android). -
Page 231: Utilizzo Del Bluetooth
Una volta abbinati, sul display del cellulare verrà visualizzata la dicitura MAC 410. • La distanza tra il MAC 410 e il cellulare non deve superare i 3 metri. • Lo spazio tra il cellulare e il MAC 410 dovrebbe essere sgombro. Non posizionare oggetti metallici o altri ostacoli tra cellulare e dispositivo. - Page 232 Bluetooth: mostra la sorgente attuale. MAC AUDIO 2525: indica che il dispositivo è collegato al MAC 410. ): indica se il MAC 410 è collegato a un dispositivo Bluetooth®. Cliccare sull’icona per stabilire un collegamento con un dispositivo Bluetooth®. ( ): cliccare sull’icona per disattivare il collegamento con un dispositivo Bluetooth®.
- Page 233 Sul display del cellulare dovrebbe apparire un messaggio che avverte che i dispositivi sono connessi. Il collegamento tra cellulare e MAC AUDIO è stato stabilito. Nell’elenco di dispositivi del telefono cellulare compare il nome del navicevitore MAC...
-
Page 234: Effettuare Una Chiamata
Se il telefono è collegato tramite Bluetooth, quando arriva una chiamata l’audio dell’apparecchio MAC AUDIO si disattiva automaticamente, la riproduzione di DVD/CD viene interrotta e viene visualizzato il menu Bluetooth. Al centro dello schermo viene visualizzato il numero di telefono o il nome della persona che sta chiamando. -
Page 235: Regolazione Del Volume
Accettare una chiamata in arrivo Per accettare una chiamata in arrivo premere . Per una ricezione ottimale si consiglia di parlare in modo chiaro e a voce alta nel microfono. Per concludere la chiamata premere Rifiutare una chiamata in arrivo Premere il tasto “To Phone”... - Page 236 Cliccare sul numero di telefono per selezionarlo. Inoltrare una chiamata Cliccare su “To Phone” durante una chiamata per inoltrarla dal MAC AUDIO al cellulare. Una chiamata può essere inoltrata solo se è stata accettata. Cliccare su “To Device” per inoltrare di nuovo la chiamata al MAC AUDIO.
- Page 237 Nota: le informazioni sui brani (ad es. il tempo di riproduzione trascorso, il titolo della canzone, l’elenco delle canzoni ecc.) possono non venir visualizzate sull’apparecchio MAC AUDIO. A causa dell’ampia gamma di lettori audio disponibili sul mercato, le funzioni possono variare da lettore a lettore.
-
Page 238: Utilizzo Di Una Retrocamera
UTILIZZO DI UNA RETROCAMERA (se presente) All’apparecchio è possibile collegare una retrocamera. Prima di poter accedere alle funzioni della videocamera occorre installare una retrocamera. Se non è installata alcuna videocamera e si accede comunque alla funzione innestando la retromarcia, comparirà sullo schermo l’avviso che la funzione non è disponibile. Schermata della retrocamera Se è... -
Page 239: Comandi Al Volante (Swc)
CONTROL) (se presenti) Il MAC 410 è compatibile con gli adattatori per comandi al volante cavo Dietz UNICO DUAL PLUS +, PAC (Pacific Accessory Corporation) SWI-PS e Metra ASWC. L’adattatore può essere collegato al jack da 3,5 mm (contrassegnato con “SWC Interface”) sul retro dell’apparecchio. Per le istruzioni di installazione dettagliate consultare il manuale degli adattatori. -
Page 240: Sfondo Personalizzato
4. La “memorizzazione” / programmazione dell’SWC è quindi conclusa. SFONDO PERSONALIZZATO In aggiunta ai cinque sfondi selezionabili è possibile caricare sul MAC 410 uno sfondo personale. Nota: lo sfondo deve avere una risoluzione di 800 x 480, 24 o 32 bit ed essere in formato .bmp. -
Page 241: Risoluzione Dei Problemi
RISOLUZIONE DEI PROBLEMI Problema Causa Azione correttiva Generale L’unità non si Fusibile guasto. Installare un nuovo fusibile della accende potenza corretta. Fusibile dell’automobile guasto. Installare un nuovo fusibile della potenza corretta. Operazione non valida. Premere il tasto RESET. Nessuna uscita Collegamento dell’uscita audio Controllare i cavi e correggere il audio/uscita audio... - Page 242 Problema Causa Azione correttiva Monitor TFT Immagine assente Collegamento errato al filo del freno Controllare i cavi e correggere il di stazionamento. problema. Il freno di stazionamento non è Arrestare il veicolo in un luogo innestato. sicuro e applicare il freno di stazionamento.
- Page 243 Problema Causa Azione correttiva Il disco non viene Il disco è graffiato o danneggiato. Utilizzare un disco in ottime riprodotto condizioni. Il disco è sporco o bagnato. Pulire il disco con un panno morbido. La testina del laser è sporca. Pulire la testina del laser con disco di pulizia.
-
Page 244: Specifiche
SPECIFICHE Riproduttore di DVD/CD Supporti compatibili: DVD +/- R/ +/- RW (strato singolo e doppio) e CD-R / RW Formati multimediali compatibili: CD-DA, MP3, WMA, VCD, SVCD, Xvid, DivX, AVI, MPEG 1/2, AAC, immagini Kodak (JPEG) Rapporto segnale/disturbo: >95 dBA Serie Dinamica:>95 dB Risposta in frequenza: 20 Hz a 20 kHz, -3 dB Separazione dei canali: >... -
Page 245: Cura E Manutenzione
Generale Impedenza di ingresso ausiliaria: 10k Alimentazione elettrica: 11 a 16VDC, massa negativa Alimentazione penna (Blu): 500mA max, protezione contro la corrente limitata Amplificatore remoto (Blu/Bianco): 500 mA max, protezione contro la corrente limitata Temperatura di esercizio: 0C ~ 65C Fusibile: 15 Amp, tipo mini ATM Dimensioni del telaio DIN: 7”... - Page 246 Congratulations! You have made a wise selection in becoming the owner of a MAC AUDIO Mobile Video equipment. Due to high quality MAC AUDIO Mobile Video products have earned an excellent reputation through the western world. And this high quality standard enables us to grant a 2-years warranty for MAC AUDIO Mobile Video products.
- Page 247 arantiekarte arranty Typ/ Type Serien-Nr./Serial-No. Name und Anschrift des Händlers/Stempel Name and address of the dealer/stamp Käufer/Customer Name/Name Straße/Street PLZ, Ort/City Land /Country Kaufdatum/ buying date Nur gültig in Verbindung mit Ihrer Kaufquittung! No warranty without receipt!
- Page 248 Lise-Meitner-Str. 9 • D-50259 Pulheim • Germany Tel. +49 (0) 2234 807-0 • Fax +49 (0) 2234 807-399 www.mac-audio.de...