Table des Matières
Publicité
Les langues disponibles
Les langues disponibles
Liens rapides
LEDC09
DMX CONTROLLER FOR LED STRIPS – 4 CHANNELS
DMX-CONTROLLER VOOR LEDSTRIPS – 4 KANALEN
CONTRÔLEUR DMX POUR RUBANS LED – 4 CANAUX
CONTROLADOR DMX PARA CINTAS DE LEDs – 4 CANALES
DMX-CONTROLLER FÜR LED-LEISTEN – 4 KANÄLE
CONTROLADOR DMX PARA FAIXAS LED – 4 CANAIS
STEROWNIK DMX DO TAŚM LED – 4 KANAŁOWY
USER MANUAL
GEBRUIKERSHANDLEIDING
MODE D'EMPLOI
MANUAL DEL USUARIO
BEDIENUNGSANLEITUNG
MANUAL DO UTILIZADOR
INSTRUKCJA OBSŁUGI
3
7
12
17
22
27
32
Publicité
Table des Matières

Manuels Connexes pour VelLight LEDC09


Sommaire des Matières pour VelLight LEDC09
- Page 1 LEDC09 DMX CONTROLLER FOR LED STRIPS – 4 CHANNELS DMX-CONTROLLER VOOR LEDSTRIPS – 4 KANALEN CONTRÔLEUR DMX POUR RUBANS LED – 4 CANAUX CONTROLADOR DMX PARA CINTAS DE LEDs – 4 CANALES DMX-CONTROLLER FÜR LED-LEISTEN – 4 KANÄLE CONTROLADOR DMX PARA FAIXAS LED – 4 CANAIS STEROWNIK DMX DO TAŚM LED –...
- Page 2 LEDC09 V. 01 – 12/09/2013 ©Velleman nv...
-
Page 3: Safety Instructions
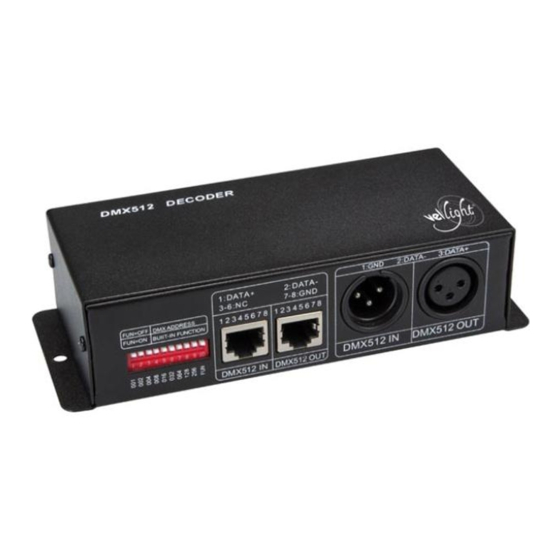
If in doubt, contact your local waste disposal authorities. Thank you for choosing Vellight! Please read the manual thoroughly before bringing this device into service. If the device was damaged in transit, don't install or use it and contact your dealer. - Page 4 DMX input 8P8C (RJ45) input from external DMX controller DMX output 8P8C (RJ45) output to next LEDC09 device in daisy chain connection DMX input 3-pin XLR input from external DMX controller DMX output 3-pin XLR output to next LEDC09 device in...
- Page 5 LEDC09 Test Mode In test mode, you can set a static colour, or use changing colours at different speeds. Static Colour To set a static colour: Set DIP switch 10 to ON. Set DIP switches 8 and 9 to OFF.
-
Page 6: Dip Switches
LEDC09 Some examples: DIP switch Mode Switching colours at medium speed Fading colours at maximum speed 0 = off; 1 = on; x = can be either on or off. DMX Mode To set the device to work with a DMX controller: Set DIP switch 10 to OFF. - Page 7 LEDC09 power output 12 V < 192 W 24 V < 384 W output current 4 x 4 A input signal DMX512 greyscale levels 256 (8 bits) PWM frequency ± 2600 Hz weight 310 g dimensions 165 x 68 x 40 mm Use this device with original accessories only.
- Page 8 LEDC09 Dank u voor uw aankoop! Lees deze handleiding grondig voor u het toestel in gebruik neemt. Werd het toestel beschadigd tijdens het transport, installeer of gebruik het dan niet en raadpleeg uw dealer. Veiligheidsinstructies Wees voorzichtig bij de installatie: raak geen kabels aan die onder stroom staan om dodelijke elektrische schokken te vermijden.
- Page 9 DMX-ingang 8P8C (RJ45)-ingang van externe DMX- controller DMX-uitgang 8P8C (RJ45)-uitgang naar het volgende LEDC09-toestel dat in serie aangesloten is DMX-ingang 3-polige XLR-ingang van externe DMX- controller DMX-uitgang 3-polige XLR-uitgang naar het volgende LEDC09-toestel dat in serie aangesloten is aansluitingen V–...
- Page 10 LEDC09 schakelaars in de OFF-positie, dan zijn alle leds uitgeschakeld. Staan meerdere DIP-schakelaars in de ON-positie, dan heeft de DIP-schakelaar met de hoogste waarde voorrang: DIP-schakelaar Kleur Rood Groen Blauw Geel Purper Cyaan 0 = uit; 1 = aan; x = aan of uit.
- Page 11 LEDC09 DMX-sturing Het toestel met DMX-sturing instellen: Zet DIP-schakelaar 10 op OFF. Sluit de externe DMX-controller aan op de DMX-ingang. Opgelet: Gebruik 8P8C-aansluitingen of 3-polige XLR- aansluitingen. Gebruik nooit beide aansluitingen tegelijk. Stel het DMX-adres in met DIP-schakelaars 1-9: Adres...
- Page 12 LEDC09 Gebruik dit toestel enkel met originele accessoires. Velleman nv is niet aansprakelijk voor schade of kwetsuren bij (verkeerd) gebruik van dit toestel. Voor meer informatie over dit product en de laatste versie van deze handleiding, zie www.velleman.eu. De informatie in deze handleiding kan te allen tijde worden gewijzigd zonder voorafgaande kennisgeving.
-
Page 13: Directives Générales
LEDC09 Consignes de sécurité Être prudent lors de l'installation : toucher un câble sous tension peut causer des électrochocs mortels. Toujours débrancher l’appareil s’il n’est pas utilisé et avant le nettoyage ou l'entretien. Tirer la fiche pour débrancher l'appareil ; non pas le câble. - Page 14 DMX entrée 8P8C (RJ45) depuis le contrôleur DMX externe sortie DMX sortie 8P8C (RJ45) vers l'autre appareil LEDC09 connecté en série entrée DMX entrée XLR à 3 broches depuis le contrôleur DMX externe sortie DMX sortie XLR à 3 broches vers l'autre appareil LEDC09 connecté...
- Page 15 LEDC09 Interrupteur DIP Couleur Rouge Vert Bleu Jaune Pourpre Cyan Blanc 0 = position OFF ; 1 = position ON ; x = position ON ou OFF. Changement de couleur Pour utiliser le changement de couleur : Régler l'interrupteur DIP 10 sur ON.
- Page 16 LEDC09 Mode de pilotage DMX Faire fonctionner l'appareil avec pilotage DMX : Régler l'interrupteur DIP 10 sur OFF. Connecter le contrôleur DMX externe à l'entrée DMX. Attention : Utiliser des connecteurs 8P8C ou des connecteurs XLR à 3 broches. Ne jamais utiliser les deux connecteurs en même temps.
- Page 17 Si tiene dudas, contacte con las autoridades locales para residuos. ¡Gracias por elegir Vellight! Lea atentamente las instrucciones del manual antes de usar el aparato. Si ha sufrido algún daño en el transporte no lo instale y póngase en contacto con su distribuidor.
-
Page 18: Normas Generales
LEDC09 Instrucciones de seguridad Cuidado durante la instalación: puede sufrir una peligrosa descarga eléctrica al tocar un cable conectado a la red eléctrica. Desconecte siempre el aparato de la red eléctrica si no va a usarlo durante un largo período de tiempo y antes de su limpieza o mantenimiento. - Page 19 DMX entrada 8P8C (RJ45) del controlador DMX externo salida DMX salida 8P8C (RJ45) al siguiente aparato LEDC09 conectado en serie entrada DMX entrada XLR de 3 polos del controlador DMX externo salida DMX salida XLR de 3 polos al siguiente aparato...
- Page 20 LEDC09 Interruptor DIP Color Rojo Verde Azul Amarillo Púrpura Cian Blanco 0 = desactivado; 1 = activado; x = desactivado o activado. Cambio de color Cambiar los colores: Ponga el interruptor DIP 10 en la posición ON. Seleccionar el modo dinámico deseado: o Para un cambio de color, ponga el interruptor 8 en la posición...
- Page 21 LEDC09 Modo DMX Hacer funcionar el aparato con un controlador DMX: Ponga el interruptor DIP 10 en la posición OFF. Conecte el controlador DMX externo a la entrada DMX. Advertencia: Utilice conectores 8P8C o conectores XLR de 3 polos. No utilice ambos.
- Page 22 Respektieren Sie die örtlichen Umweltvorschriften. Falls Zweifel bestehen, wenden Sie sich für Entsorgungsrichtlinien an Ihre örtliche Behörde. Vielen Dank, dass Sie sich für Vellight entschieden haben! Lesen Sie diese Bedienungsanleitung vor Inbetriebnahme sorgfältig durch. Überprüfen Sie, ob Transportschäden vorliegen. Sollte dies der Fall sein, verwenden Sie das Gerät nicht und wenden Sie sich an Ihren...
- Page 23 LEDC09 Sicherheitshinweise Seien Sie während der Installation des Gerätes sehr vorsichtig: das Berühren von unter Spannung stehenden Leitungen könnte zu lebensgefährlichen elektrischen Schlägen führen. Trennen Sie das Gerät bei Nichtbenutzung und vor jeder Reinigung vom Netz. Fassen Sie dazu den Netzstecker an der Grifffläche an und ziehen Sie nie an der Netzleitung.
- Page 24 Siehe Abbildungen, Seite 2-4 dieser Bedienungsanleitung. DIP-Schalter um einen Betriebsmodus auszuwählen DMX-Eingang 8P8C-Eingang (RJ45) vom externen DMX- Controller DMX-Ausgang 8P8C-Ausgang (RJ45) zum nächsten LEDC09- Gerät der Daisy-Chain-Verbindung DMX-Eingang 3-pol. XLR-Eingang vom externen DMX- Controller DMX-Ausgang 3-pol. XLR-Ausgang zum nächsten LEDC09- Gerät der Daisy-Chain-Verbindung...
- Page 25 LEDC09 Wählen Sie die gewünschte statische Farbe aus, indem Sie den entsprechenden DIP-Schalter (1-7) auf ON stellen. Sind alle DIP- Schalter ausgeschaltet, dann sind die LEDs ausgeschaltet. Stehen mehrere DIP-Schalter auf ON, dann dominiert der DIP- Schalter mit dem höchsten Wert:...
- Page 26 LEDC09 DIP-Schalter Modus Farbübergang mit max. Geschwindigkeit 0 = ausgeschaltet; 1 = eingeschaltet; x = aus- oder eingeschaltet. DMX-Modus Den DMX-Modus einstellen: Stellen Sie DIP-Schalter 10 auf OFF. Verbinden Sie den externen DMX-Controller mit dem DMX- Eingang. Achtung: Verwenden Sie weder 8P8C-Anschlüsse oder 3-pol.
- Page 27 LEDC09 Netzausgang 12 V < 192 W 24 V < 384 W Ausgangsstrom 4 x 4 A Eingangssignal DMX512 Graustufen 256 (8 bits) PWM-Frequenz ± 2600 Hz Gewicht 310 g Abmessungen 165 x 68 x 40 mm Verwenden Sie dieses Gerät nur mit originellen Zubehörteilen.
-
Page 28: Normas Gerais
Em caso de dúvidas, contacte com as autoridades locais para os resíduos. Obrigada por escolher a Vellight! Leia atentamente as instruções do manual antes de usar o aparelho. Caso o aparelho tenha sofrido algum dano durante o transporte não o instale e entre em contacto com o seu distribuidor. -
Page 29: Instalação
DMX entrada 8P8C (RJ45) para controlador DMX externo saída DMX saída 8P8C (RJ45) para o próximo LEDC09 dispositivo de ligação em cadeia entrada DMX entrada XLR 3-pinos para controlador DMX externo saída DMX saída XLR 3-pinos para o próximo LEDC09... - Page 30 LEDC09 Cor estática Para definir uma cor estática: Coloque o interruptor DIP 10 na posição ON. Coloque os interruptores DIP 8 e 9 na posição OFF. Seleccione a cor estática desejada ao colocar o respectivo interruptor DIP (1-7) na posição on. Se todos os interruptores DIP estiverem desligados, todas as luzes LED estarão...
- Page 31 LEDC09 Alguns exemplos: Interruptor DIP Modo Alternância de cores em velocidade média Dissipação de cores em velocidade máxima 0 = off; 1 = on; x = pode estar ligado ou desligado. Modo DMX Para configurar o dispositivo para funcionar com um controlador DMX: Coloque o interruptor DIP 10 em OFF.
-
Page 32: Instrukcja Obsługi
LEDC09 Especificações canais DMX alimentação 12-24 VDC (não incl.) potência 12 V < 192 W 24 V < 384 W corrente de saída 4 x 4 A sinal de entrada DMX512 escala de cinzentos 256 (8 bits) frequência do PWM (modulação ±... -
Page 33: Informacje Ogólne
środowiska. Jeśli masz wątpliwości skontaktuj się z firmą zajmującą się utylizacją odpadów. Dziękujemy za wybranie produktu Vellight! Prosimy o dokładne zapoznanie się z instrukcją obsługi przed użyciem. Jeśli urządzenie zostało uszkodzone podczas transportu, prosimy o nie korzystanie z niego i skontaktowanie się ze sprzedawcą. - Page 34 DMX wejście 8P8C (RJ45) z zewnętrznego sterownika DMX wyjście DMX wyjście 8P8C (RJ45) do kolejnego urządzenia LEDC09 w połączeniu łańcuchowym wejście DMX 3-pinowe wejście XLR z zewnętrznego sterownika DMX wyjście DMX 3-pinowe wyjście XLR (RJ45) do kolejnego urządzenia LEDC09 w połączeniu...
- Page 35 LEDC09 Uwaga: Należy używać albo złączy 8P8C, albo 3-pinowych złączy XLR. Nie używać obydwu naraz. Tryb diagnostyczny W trybie diagnostycznym można ustawić pojedynczy kolor lub uruchomić zmiany kolorów z różną prędkością. Pojedynczy kolor Aby ustawić pojedynczy kolor: Ustawić przełącznik DIP 10 na ON.
- Page 36 LEDC09 najwyższa prędkość. Jeżeli włączony zostanie więcej niż jeden przełącznik DIP, zadziała ten o wyższej wartości. Przykłady: Przełącznik DIP Tryb Przełączane kolory, prędkość średnia Płynna zmiana kolorów, prędkość maksymalna 0 = wyłączony; 1 = włączony; x = może być włączony lub wyłączony.
- Page 37 LEDC09 Specyfikacja techniczna kanały DMX zasilanie 12-24 V DC (brak w zestawie) moc wyjściowa 12 V < 192 W 24 V < 384 W prąd wyjściowy 4 x 4 A sygnał wejściowy DMX512 poziomy skali szarości 256 (8 bitów) częstotliwość PWM ±...
- Page 38 maintenance, abusive use or use contrary to the manufacturer’s instructions; - damage caused by a commercial, Velleman® Service and Quality Warranty professional or collective use of the article (the Since its foundation in 1972, Velleman® warranty validity will be reduced to six (6) acquired extensive experience in the months when the article is used electronics world and currently distributes its...
- Page 39 Algemene waarborgvoorwaarden • Toestellen dienen ter reparatie aangeboden consumentengoederen (voor Europese te worden bij uw Velleman®-verdeler. Het Unie): toestel dient vergezeld te zijn van het oorspronkelijke aankoopbewijs. Zorg voor een • Op alle consumentengoederen geldt een degelijke verpakking (bij voorkeur de originele garantieperiode van 24 maanden op verpakking) en voeg een duidelijke productie- en materiaalfouten en dit vanaf de...
- Page 40 disproportionnés, Velleman® s’autorise à dûment conditionné (de préférence dans remplacer ledit article par un article équivalent l’emballage d’origine avec mention du défaut) ; ou à rembourser la totalité ou une partie du • tuyau : il est conseillé de consulter la notice prix d’achat.
- Page 41 recambio al 50% del precio de compra o el defecto en el artículo los gastos podrían correr reembolso del 50% del precio de compra si a cargo del cliente; encuentra un fallo después de 1 año y hasta • Los gastos de transporte correrán a carga los 2 años después de la compra y entrega.
- Page 42 • Von der Garantie ausgeschlossen sind: • Jede kommerzielle Garantie lässt diese Rechte unberührt. - alle direkten oder indirekten Schäden, die nach Lieferung am Gerät und durch das Gerät Die oben stehende Aufzählung kann verursacht werden (z.B. Oxidation, Stöße, Fall, eventuell angepasst werden gemäß...
- Page 43 przez utlenianie, wstrząsy, upadki, kurz, brud, • W przypadku napraw pogwarancyjnych lub ...), wilgotności; odpłatnych klient ponosi dodatkowo koszt - gwarant nie ponosi odpowiedzialności za wysyłki produktu do i z serwisu. szkody wynikających z utraty danych; wymienione wyżej warunki są bez uszczerbku - produkty konsumenckie, części zamienne lub dla wszystkich komercyjnych gwarancji.
- Page 44 oxidação, choques, quedas, poeiras, areias, impurezas…) e provocado pelo aparelho, como o seu conteúdo (p.ex. perca de dados) e uma indemnização eventual por perca de receitas; - consumíveis, peças ou acessórios sujeitos a desgaste causado por um uso normal, como p.ex.