Table des Matières

Sommaire des Matières pour HP Autozubehor Smart 6
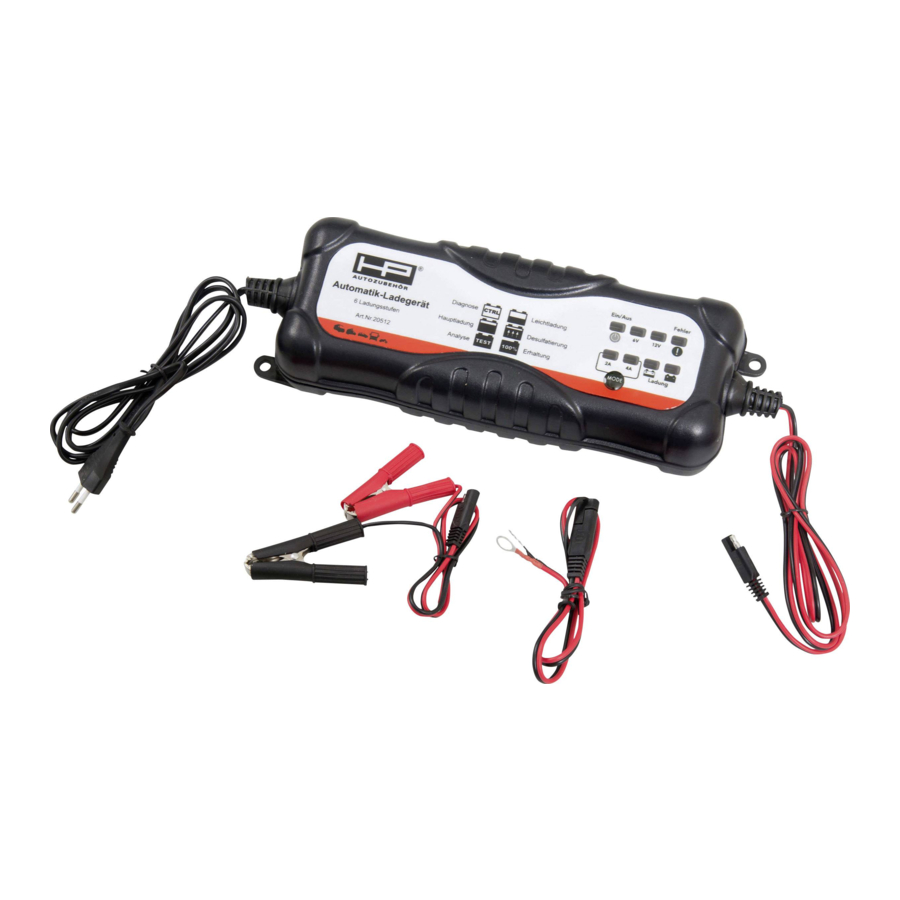
- Page 1 A U T O Z U B E H Ö R Batterie-Ladegerät Smart 6 Art.Nr. 20512 Bedienungsanleitung MANUEL D'UTILISATION INSTRUCTION MANUAL BEDIENUNGSANLEITUNG MANUAL DEL USUARIO MANUALE DI ISTRUZIONI...
-
Page 2: Chargeur Automatique De Batterie Intelligent
Chargeur Automatique de Batterie Intelligent Pour batteries 6V et 12V au plomb CONSERVEZ CES INSTRUCTIONS Ce manuel contient des instructions importantes pour la sécurité et le fonctionnement. Pour réduire le risque de blessure, lisez toutes les instructions et respectez-les à chaque emploi. -
Page 3: Caracteristiques De L'appareil
• Quand vous travaillez avec des batteries au plomb, assurez-vous toujours de la disponibilité d'une assistance immédiate en cas d'accident ou d'urgence. • Portez toujours de lunettes de protection quand vous utilisez cet appareil: le contact avec l'acide de la batterie peut rendre aveugle et/ou causer des brûlures sérieuses. Soyez au courant des mesures de premier secours en cas de contact accidentel avec de l'acide de batterie. - Page 4 3. Raccordez maintenant correctement les pinces/anneaux à la batterie; 4. Le chargeur commence la charge avec un courant faible de 1,5A pour récupérer la batterie, qui se termine lorsque la tension atteint 10,5V ± 0,25V, puis il commute en mode de charge normale INSTRUCTIONS D'UTILISATION.
-
Page 5: Donnees Techniques
• Voyants LED d'état de charge pour indiquer le niveau de charge alors que le LED FULL s'allume lorsque la batterie est complètement chargée et entre en mode de maintien. CHARGE FULL 3. Débranchez le cordon d'alimentation de la prise de courant quand la charge est complète. -
Page 6: Garantie Règlements
GARANTIE RÈGLEMENTS: Cette unité est une garantie en conformité avec les dispositions statutaires de 24 mois à compter de la date de facturation. Comme preuve de la demande de garantie est une copie de la facture. Les dommages, qui sont effectuées sur l'usure normale, une surcharge ou une mauvais manipulation seront exclus de la garantie, les pieces consom- mables ainsi. - Page 7 Automatic Smart Battery Charger For 6V and 12V Lead-acid batteries SAVE THESE INSTRUCTIONS This manual contains important safety and operating instruction. To reduce the risk of injury, please read all instructions and follow them with each use of this product. IMPORTANT SAFETY INSTRUCTIONS WARNING - BURST HAZARD Do not use the unit for charging dry-cell batteries that are commonly used with home...
-
Page 8: Product Features
• Have plenty of fresh water and soap nearby in case battery acid contacts skin. • If battery acid contacts skin or clothing, wash immediately with soap and water for at least 10 minutes and get medical attention immediately. • Never smoke or allow a spark or flame in vicinity of vehicle battery, engine or battery charger. - Page 9 Make sure correct polarity connection before plugging in the AC power. • Position the RED terminal on the POSITIVE post connector • Position the BLACK terminal on the NEGATIVE post connector 2. Connect the AC power cord with the AC power outlet. •...
-
Page 10: Technical Data
3. Disconnect the AC power cord from the AC power outlet when fully charged. Then disconnect the connection with Note: • ALWAYS disconnect the AC power cord from the AC power outlet before connecting (or disconnecting) the charger to (or from) the battery. TECHNICAL DATA: Input Voltage: 200-260VAC, 50Hz... -
Page 11: Warranty Conditions
WARRANTY CONDITIONS: This unit is a guarantee in accordance with the statutory provisions of 24 months from date of invoice date. As proof of the warranty claim is a copy of the invoice. Damages that are performed on normal wear and tear, overloading or improper handling will be excluded from the warranty, consumable parts as well. -
Page 12: Wichtige Sicherheitshinweise
Automatisches Intelligentes Batterieladegerät Für 6 V und 12 V Bleibatterien DIESE ANLEITUNG BITTE SORGFÄLTIG AUFBEWAHREN Diese Anleitung enthält wichtige Sicherheits- und Bedienungsanweisungen. Um jegliches Verletzungsrisiko zu vermeiden, lesen Sie bitte alle Anweisungen sorgfältig durch und halten Sie diese bei Betrieb des Gerätes ein. WICHTIGE SICHERHEITSHINWEISE WARNHINWEIS –... - Page 13 • Nicht am Kabel ziehen, sondern zum Herausziehen direkt den Netzstecker fassen, um das Gerät von der Stromquelle zu trennen. • NIEMALS VERSUCHEN, EINE GEFRORENE BATTERIE ÜBER STARTHILFEKABEL ZU STARTEN ODER AUFZULADEN. • Bei der Arbeit mit Bleibatterien unbedingt sicherstellen, dass im Fall eines Unfalls oder Notfalls stets unmittelbar Hilfe zur Verfügung steht.
- Page 14 Bedienungsschritte für den Erholungsvorgang: 1. Den AC-Anschlussstecker einstecken, ohne dass eine Verbindung zur Batterie vorliegt; 2. Den MODUS-Knopf 3-5 Sekunden lang gedrückt halten, bis sich die 12 V LED-Anzeige einschaltet; 3. Nun die Ausgangsklemmen/Klemmringe korrekt mit der Batterie verbinden; 4. Das Ladegerät beginnt den Ladevorgang zur Erholung der Batterie mit einem niedrigen Strom von 1,5 A;...
-
Page 15: Technische Daten
FÜR 12V BATTERIEN: Langsames Laden Schnelles Laden MODE MODE • LED-Anzeigen für den Ladestatus zeigen das Ladeniveau der Batterie an. Die Lade-LED leuchtet während des Lademodus, wogegen die FULL-LED-Anzeige aufleuchtet, wenn die Batterie vollständig aufgeladen ist und in den Erhaltungsmodus umschaltet. CHARGE FULL 3. - Page 16 GARANTIEBESTIMMUNGEN: Auf dieses Gerät wird eine Garantie gemäß den gesetzlichen Bestimmungen von 24 Monaten ab Rechnungsdatum gewährt. Als Nachweis für den Garantieanspruch dient eine Kopie der Rechnung. Schäden,die auf natürliche Abnutzung, Überlastung oder unsachgemäße Behandlung zurück zu führen sind, bleiben von der Garantie ausge- schlossen;...
-
Page 17: Instrucciones De Seguridad Importantes
Cargador automático de baterías inteligente Para baterías de plomo - ácido de 6 V y 12 V GUARDAR ESTAS INSTRUCCIONES Este manual contiene instrucciones de seguridad y funcionamiento importantes. Para reducir el riesgo de lesiones, rogamos leer todas las instrucciones y seguirlas en cada uso de este producto. -
Page 18: Características Del Producto
• Al trabajar con baterías de plomo ácido asegurarse siempre de que se dispone de asistencia inmediata en caso de accidente o emergencia. • Llevar siempre protección ocular cuando se utilice este producto: el contacto con el ácido de la batería puede provocar ceguera y/o graves quemaduras. Ser consciente de los procedimientos de primeros auxilios en caso de contacto accidental con el ácido de la batería. - Page 19 2. Pulsar el botón MODE durante 3~5 segundos hasta que se encienda el LED indicador 12 V; 3. Ahora conectar correctamente a la batería las pinzas / los terminales anulares de salida; 4. El cargador empieza a cargar con una intensidad baja de 1,5 A para recuperar la batería, que termina cuando la tensión llega a 10,5 V ±...
-
Page 20: Datos Técnicos
Para baterías de 12 V: Carga lenta Carga rápida MODE MODE • Los LED indicadores de estado de carga mostrarán el nivel de carga de la batería. El LED CHARGE (en carga) está encendido en el modo de carga, mientras que el LED FULL (cargada) está... -
Page 21: Condiciones De La Garantia
CONDICIONES DE LA GARANTIA: En este dispositiovo se concede una garantia de conformidad con las disposiciones legales de 24 meses desde la fecha de la factura. Como prueba de la garantiaentregar una copia de la factura. Los danos pos desgaste natural, sobrecargao un tratamiento inadecuado son de vuelta, ser excluidos de la garantia, también las piezas de desgaste. -
Page 22: Istruzioni Di Sicurezza Importanti
Caricabatterie automatico intelligente Per batterie piombo-acido da 6V e 12V CONSERVARE LE PRESENTI ISTRUZIONI Questo manuale contiene istruzioni di sicurezza e funzionamento importanti. Per ridurre il rischio di lesioni, si prega di leggere tutte le istruzioni e rispettarle ad ogni utilizzo del prodotto. -
Page 23: Caratteristiche Del Prodotto
• NON CERCARE MAI DI RIVITALIZZARE O SOSTITUIRE UNA BATTERIA CONGELATA. • Quando si lavora con batterie piombo-acido, assicurarsi sempre che, in caso di incidente o di emergenza, sia disponibile assistenza immediata. • Quando si fa uso del prodotto indossare sempre occhiali protettivi: eventuali contatti con l’acido contenuto nella batteria potrebbero provocare cecità... -
Page 24: Istruzioni Di Funzionamento
INSTRUCTIONS D'UTILISATION. 1. Inserire la spina nella presa AC senza aver stabilito un collegamento con la batteria; 2. Premere il pulsante MODALITÀ per 3~5 secondi fino a che l’indicatore a LED da 12V non si illumina; 3. A questo punto collegare in modo corretto alla batteria i morsetti di uscita/anelli terminali;... -
Page 25: Dati Tecnici
For 12V batteries: Carica lenta Carica veloce MODE MODE • Gli indicatori a LED dello stato della carica indicano il livello di carica della batteria. Il LED indicante la carica in corso è acceso mentre la carica è in corso mentre il LED indicante la carica COMPLETA è... -
Page 26: Condizioni Di Garanzia
CONDIZIONI DI GARANZIA: In questo dispositivo una garanzia in conformità con le disposizioni di legge di 24 mesi è concessa a partire dalla data della fattura. Come prova della richiesta di garanzia è una copia della fattura. Danni dovuti a normale usura, sovraccarico o uso non corretto, sono esclusi dalla garanzia;...