Table des Matières
Publicité
Les langues disponibles
Les langues disponibles
Liens rapides
Cleanflex Easy
Ionisatiepistool
Ionizing Air Gun
NL
Gebruikershandleiding
D
Bedienungsanleitung
GB
User's Manual
F
Notice d'utilisation
SIMCO-ION (Nederland) B.V.
Aalsvoort 74
NL-7241 MB Lochem
Telefoon +31 (0) 573-288333
E-mail
Internet
Traderegister Apeldoorn No. 08046136
Ionensprühpistole
Pistolet à Air Ionisé
2
15
28
41
cs@simco-ion.nl
http://www.simco-ion.nl
Publicité
Chapitres
Table des Matières

Sommaire des Matières pour ITW Simco-Ion Cleanflex Easy
- Page 1 SIMCO-ION (Nederland) B.V. Aalsvoort 74 NL-7241 MB Lochem Telefoon +31 (0) 573-288333 E-mail cs@simco-ion.nl Internet http://www.simco-ion.nl Traderegister Apeldoorn No. 08046136 Cleanflex Easy Ionisatiepistool Ionensprühpistole Ionizing Air Gun Pistolet à Air Ionisé Gebruikershandleiding Bedienungsanleitung User's Manual Notice d'utilisation...
-
Page 2: Table Des Matières
INHOUD Woord vooraf ............................3 Verklaring gebruikte symbolen ......................3 1 Inleiding ............................4 2 Beschrijving en werking ........................5 3 Veiligheid ............................6 4 Technische specificaties ........................7 5 Installatie ............................9 5.1 Controle ..............................9 5.2 Algemeen ..............................9 5.3 Voedings- en persluchtvoorziening ...................... -
Page 3: Woord Vooraf
Woord vooraf Deze handleiding is bedoeld voor installatie en gebruik van het ionisatiepistool type Cleanflex Easy. Deze handleiding moet altijd toegankelijk zijn voor het bedieningspersoneel. Lees deze handleiding geheel door voordat u dit product installeert en in gebruik neemt. Instructies in deze handleiding moeten worden opgevolgd om een goede werking van het product te waarborgen en om aanspraak te kunnen maken op garantie. -
Page 4: Inleiding
1 Inleiding Het Cleanflex Easy ionisatiepistool is een persluchtpistool dat bedoeld is om elektrostatisch geladen oppervlakken of onderdelen schoon te blazen. Het pistool produceert een luchtstroom die rijk is aan positieve en negatieve ionen. Door deze luchtstroom te richten op een elektrostatisch geladen oppervlak, vindt er een uitwisseling van elektronen plaats waardoor tijdens het schoonblazen het oppervlak wordt geneutraliseerd. -
Page 5: Beschrijving En Werking
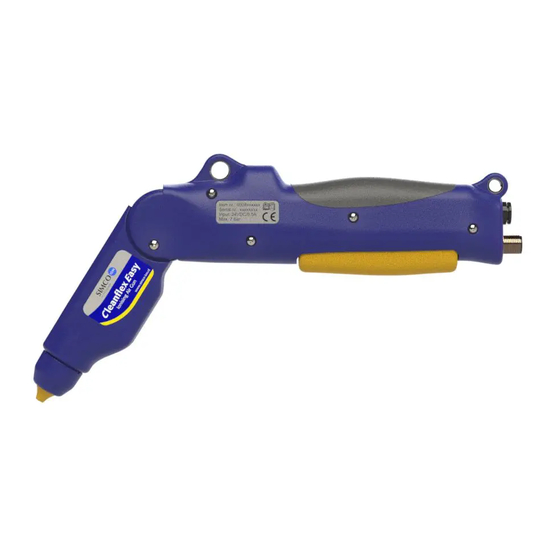
2 Beschrijving en werking Aan de onderkant van het pistool bevinden zich een M12-connector voor de 24V-voeding en de persluchtaansluiting. Boven het handvat van het pistool bevindt zich een LED-indicator die de status van het pistool weergeeft. De kop van de Cleanflex Easy kan gemakkelijk in vier standen versteld worden om de vorm van het pistool aan te passen aan de gebruikte toepassing. -
Page 6: Veiligheid
3 Veiligheid De volgende veiligheidsrichtlijnen moeten worden opgevolgd om verwondingen en beschadigingen van voorwerpen of de Cleanflex Easy zelf te voorkomen. - Elektrische installatie moet gebeuren volgens de nationaal en plaatselijk geldende voorschriften; - De Cleanflex Easy mag niet worden gebruikt in een brand- of explosiegevaarlijke omgeving; - De Cleanflex Easy is uitsluitend bestemd voor het schoonblazen en gelijktijdig neutraliseren van elektrostatisch geladen oppervlakken. -
Page 7: Technische Specificaties
4 Technische specificaties Benodigde voeding Voedingsspanning 24 V DC ±3 V Stroomverbruik Max. 0,5 A Connectie M12, female, 5 pole Ingang Perslucht 1 - 7 bar (15 - 100 PSI) Schoon en vrij van vocht en olie Aansluiting Quick disconnect type voor slang ø8 mm Uitgang Hoogspanning Intern gegenereerd... - Page 8 Figure 3: dimensions Cleanflex Easy Table 1: air consumption CleanflexEasy_UM_9752050810_NL_D_GB_F_V1_2...
-
Page 9: Installatie
5 Installatie - Bij werkzaamheden aan de apparatuur moet de apparatuur spanningsloos zijn. - Elektrische installatie moet gebeuren door een elektrotechnisch vakbekwaam persoon. - De Cleanflex Easy mag alleen binnenshuis en uitsluitend voor licht-industriële toepassingen gebruikt worden. - Raadpleeg de handleiding van de toegepaste voeding voor het correct en veilig aansluiten van het pistool. -
Page 10: Voedings- En Persluchtvoorziening
5.3 Voedings- en persluchtvoorziening - Zorg ervoor dat de Cleanflex Easy wordt voorzien van schone, vocht- en olievrije perslucht. - Zorg ervoor dat de persluchtaansluiting en de 24V-voeding zich binnen het bereik van de aansluitslang en aansluitkabel bevinden. Zowel de slang als de kabel moeten tijdens gebruik niet onder trekbelasting kunnen komen. -
Page 11: Ingebruikneming En Bediening
6 Ingebruikneming en bediening - Zorg voor 24 Volt voedingsspanning en perslucht op het pistool. Voor eerste gebruik is het raadzaam de perslucht op bijvoorbeeld 2 Bar in te stellen; - De LED-indicator op het pistool knippert snel groen tijdens het opstarten. Na ca. 5 seconden is het pistool gereed voor gebruik;... -
Page 12: Controle Op De Werking
7 Controle op de werking Tijdens gebruik licht de LED-indicator continu groen op. Wanneer de LED-indicator blijft knipperen (1x per 3 seconden) bij ingedrukte trekker, is de persluchtdruk te laag (<0,5 Bar). Verhoog dan de druk. Controleer of de persluchtverbindingen niet lekken. De Cleanflex Easy werkt goed als er voldoende lucht wordt uitgeblazen wanneer het te reinigen object of oppervlak schoon en geheel ontladen is. -
Page 13: Storingen
9 Storingen - Bij werkzaamheden aan de apparatuur moet de apparatuur spanningsloos zijn; - Elektrische installatie moet gebeuren door een elektrotechnisch vakbekwaam persoon. Signalering Probleem Wat dit betekent Wat hieraan te doen LED gedoofd Geen Voeding defect Voedingspanning herstellen voedingsspanning Voeding niet aangesloten Zie H5 Voeding verkeerd aangesloten... -
Page 14: Afdanken
11 Afdanken Volg voor het afdanken van het apparaat de lokaal geldende milieuregels. Gooi het apparaat aan het einde van zijn levensduur niet bij het normale afval, maar lever het in bij een officieel verzamelpunt. Op deze manier helpt u mee het milieu te beschermen. Reserveonderdelen en accessoires Figure 7: overview accessories Cleanflex Easy Artikelnummer... - Page 15 INHALT Vorwort .............................. 16 Erklärung der verwendeten Symbole ....................16 1 Einleitung ............................17 2 Beschreibung und Funktion ......................18 3 Sicherheit ............................19 4 Technische Daten ..........................20 5 Installation ............................22 5.1 Kontrolle ..............................22 5.2 Allgemeines ............................22 5.3 Spannungs- und Druckluftversorgung .....................
-
Page 16: Vorwort
Vorwort Diese Bedienungsanleitung beschreibt die Installation und Verwendung der Ionensprühpistole des Typs Cleanflex Easy. Diese Bedienungsanleitung muss jederzeit für das Bedienpersonal verfügbar sein. Lesen Sie diese Anleitung vollständig durch, bevor Sie das Produkt installieren und in Betrieb nehmen. Die Anweisungen in dieser Bedienungsanleitung müssen eingehalten werden, um die richtige Funktion des Produktes gewährleisten und die Garantie in Anspruch nehmen zu können. -
Page 17: Einleitung
1 Einleitung Die Cleanflex Easy Ionensprühpistole ist eine Druckluftpistole zur Reinigung elektrostatisch geladener Oberflächen oder Teile. Die Pistole erzeugt einen Luftstrom, der viele positive und negative Ionen enthält. Wird dieser Luftstrom auf eine elektrostatisch aufgeladene Oberfläche gerichtet, findet ein Austausch der Elektronen statt, wodurch die Oberfläche während des Abblasens neutralisiert wird. -
Page 18: Beschreibung Und Funktion
2 Beschreibung und Funktion An der Unterseite der Pistole befindet sich ein M12-Anschluss für den 24 V-Spannungs- und Druckluftanschluss. Über dem Griff der Pistole befindet sich eine LED-Anzeige, die den Status der Pistole anzeigt. Der Kopf der Cleanflex Easy kann einfach auf vier Positionen verstellt werden, um die Form der Pistole an die jeweilige Anwendung anzupassen. -
Page 19: Sicherheit
3 Sicherheit Zur Vermeidung von Verletzungen oder Schäden an anderen Gegenständen oder an der Cleanflex Easy selbst müssen die folgenden Sicherheitsvorschriften beachtet werden. - Die Elektroanlage muss gemäß den geltenden örtlichen Vorschriften installiert werden. - Die Cleanflex Easy darf nicht in feuer- oder explosionsgefährdeter Umgebung betrieben werden. -
Page 20: Technische Daten
4 Technische Daten Erforderliche Stromversorgung Betriebsspannung 24 V DC ±3 V Stromverbrauch Max. 0,5 A Anschluss M12, Buchse, 5-polig Eingang Druckluft 1 - 7 bar (15 - 100 PSI) sauber sowie wasser- und ölfrei Anschluss Schnellkupplung für ø8 mm Schlauch Ausgang Hochspannung intern generiert... - Page 21 Abbildung 3: Abmessungen Cleanflex Easy Tabelle 1: Luftverbrauch CleanflexEasy_UM_9752050810_NL_D_GB_F_V1_2...
-
Page 22: Installation
5 Installation - Bei Arbeiten am Gerät muss das Gerät spannungsfrei sein. - Die Installation der Elektroanlage muss von einer Elektrofachkraft ausgeführt werden. - Die Cleanflex Easy darf nur in Räumen und ausschließlich für leicht-industrielle Anwendungen verwendet werden. - Siehe die Bedienungsanleitung des dazugehörigen Stromversorgungsgeräts für den korrekten und sicheren Anschluss der Pistole. -
Page 23: Spannungs- Und Druckluftversorgung
5.3 Spannungs- und Druckluftversorgung - Stellen Sie sicher, dass die Cleanflex Easy mit sauberer, wasser- und ölfreier Druckluft versorgt wird. - Stellen Sie sicher, dass sich der Druckluftanschluss und der 24 V-Anschluss innerhalb der Reichweite des Schlauchs und des Kabels befinden. Sowohl der Schlauch als auch das Kabel dürfen während des Betriebs nicht unter Zug stehen. -
Page 24: Inbetriebnahme Und Bedienung
6 Inbetriebnahme und Bedienung - Sorgen Sie dafür, dass 24 V-Versorgungsspannung und Druckluft an der Pistole anliegen. Bei der ersten Inbetriebnahme wird empfohlen, die Druckluft auf beispielsweise 2 bar einzustellen. - Die LED-Anzeige an der Pistole blinkt während des Startens schnell grün. Nach etwa 5 Sekunden ist die Pistole betriebsbereit. -
Page 25: Funktionsprüfung
7 Funktionsprüfung Während der Verwendung leuchtet die LED-Anzeige kontinuierlich grün. Wenn die LED- Anzeige bei betätigtem Abzug weiterhin blinkt (1x alle 3 Sekunden) ist der Luftdruck zu niedrig (< 0,5 bar). Erhöhen Sie den Druck. Kontrollieren Sie, ob die Druckluftanschlüsse dicht sind. Die Cleanflex Easy funktioniert ordnungsgemäß, wenn ausreichend Luft ausgeblasen wird und das zu reinigende Teil oder die Oberfläche sauber und komplett entladen ist. -
Page 26: Störungen
9 Störungen - Bei Wartungsarbeiten am Gerät muss das Gerät spannungslos sein. - Die Installation der Elektroanlage muss von einer Elektrofachkraft ausgeführt werden. Anzeige Problem Bedeutung Lösung LED aus Keine Spannungs- Netzteil defekt Versorgungsspannung versorgung Netzteil nicht angeschlossen wiederherstellen Netzteil falsch angeschlossen Siehe H5 Schlechte Entladung Luftdruck zu niedrig eingestellt... -
Page 27: Entsorgung
11 Entsorgung Das Gerät ist den vor Ort geltenden Umweltvorschriften entsprechend zu entsorgen. ODER Entsorgen Sie das Gerät am Ende seiner Lebensdauer nicht über den normalen Hausmüll, sondern führen Sie es einer offiziellen Sammelstelle zu. Auf diese Weise helfen Sie, die Umwelt zu schützen. Ersatzteile und Zubehör Abbildung 7: Übersicht Zubehör Cleanflex Easy Artikelnummer... - Page 28 Contents Preface ............................2929 Explanation of symbols ........................29 1 Introduction ........................... 300 2 Description and operation ......................311 3 Safety ............................322 4 Techical specifications ........................333 5 Installation ............................ 355 5.1 Control ..............................355 5.2 General ..............................355 5.3 Power and compressed air supply ......................
-
Page 29: Preface
Preface This manual is intended for the installation and use of the Cleanflex Easy ionization air gun. This manual must always be accessible to the operating personnel. Read this manual completely before installing and using this product. Instructions in this manual must be followed to ensure proper operation of the product and to make a warranty claim. -
Page 30: Introduction
1 Introduction The Cleanflex Easy ionization gun is a compressed air gun designed to clean electrostatically charged surfaces or parts. The gun produces a flow of air rich in positive and negative ions. When directing this air flow to an electrostatically charged surface, an exchange of electrons takes place, so that the surface is neutralized during blowing clean. -
Page 31: Description And Operation
2 Description and operation At the bottom of the gun is an M12 connector for the 24V power supply and the compressed air connection. Above the handle of the gun is an LED indicator displaying the status of the gun. The head of the Cleanflex Easy can be easily adjusted into four positions to adapt the shape of the gun to the application used. -
Page 32: Safety
3 Safety The following safety guidelines must be observed in order to avoid injuries and damage to objects or the Cleanflex Easy. - Electrical installation must be carried out by a qualified electrician in accordance with national and local regulations - The Cleanflex Easy must not be used in a fire or explosion-hazardous environment;... -
Page 33: Techical Specifications
4 Techical specifications Supply Voltage 24 V DC ±3 V Energy consumption Max. 0,5 A Connection M12, female, 5 pole Inputs Pressure 1 - 7 bar (15 - 100 PSI) Clean and free from moisture and oil Connection Quick disconnect type for hose ø8 mm Outputs High voltage Internally generated... - Page 34 Figure 3: dimensions Cleanflex Easy Table 1: air consumption CleanflexEasy_UM_9752050810_NL_D_GB_F_V1_2...
-
Page 35: Installation
5 Installation - Disconnect the power supply before carrying out any work on the unit. - The electrical installation must be carried out by an electrical engineer with the relevant training and qualifications. - The Cleanflex Easy may only be used indoors and only for light industrial applications. - Refer to the manual for the correct power supply to be used for correct and safe gun connection. -
Page 36: Power And Compressed Air Supply
5.3 Power and compressed air supply - Make sure that the Cleanflex Easy is supplied with clean, moisture and oil-free compressed air. - Make sure that the compressed air connection and the 24V power supply are within reach of the connecting hose and connecting cable. Both the hose and the cable must not come under tension during use. -
Page 37: Commissioning And Operation
6 Commissioning and operation - Supply 24 Volt power supply and compressed air to the gun. Before first use, it is advisable to set the compressed air to, for example, 2 Bar; - The LED indicator on the gun blinks green rapidly during start-up. The gun is ready for use after approx. -
Page 38: Operational Check
7 Operational Check During use, the LED indicator lights up green continuously. If the LED indicator continues to flash (1x per 3 seconds) with the trigger pressed, the compressed air pressure is too low (<0.5 Bar). In this case you should increase the pressure. Check that there are no leakages around the compressed air connections. -
Page 39: Solving Malfunctions And Problems
9 Solving malfunctions and problems - When working on the equipment, the equipment must be voltage-free; - The electrical installation must be carried out by an electrical engineer with the relevant training and qualifications Signaling Problem What this means What to do about this LED not lit No power supply Power supply defective... -
Page 40: Disposal
11 Disposal When disposing of the appliance, follow the local environmental regulations. Do not throw the device out with the normal waste at the end of its life, but hand it in at an official collection point. In this way you help to protect the environment. Spare parts and accessories Figure 7: overview accessories Cleanflex Easy Article Number... - Page 41 Sommaire Introduction ............................42 Explication des symboles ........................42 1 Présentation ............................ 43 2 Description et fonctionnement ......................44 3 Sécurité ............................45 4 Spécifications techniques ......................... 46 Directive basse tension ..............Fout! Bladwijzer niet gedefinieerd. Norme 62368 ..................Fout! Bladwijzer niet gedefinieerd. 5 Installation ............................
-
Page 42: Introduction
Introduction Ce mode d’emploi sert à l’installation et à l’utilisation du pistolet pneumatique d’ionisation Cleanflex Easy. Il faut toujours que ce mode d’emploi soit à la disposition du personnel utilisateur. Prendre intégralement connaissance de ce mode d’emploi avant d’installer et d’utiliser ce produit. -
Page 43: Présentation
1 Présentation Le pistolet ionisant Cleanflex Easy est un pistolet pneumatique conçu pour éliminer toute charge électrostatique des surfaces ou des pièces. Le pistolet émet un flux d’air riche en ions positifs et négatifs. Lorsque ce flux d’air est dirigé vers une surface avec une charge électrostatique, un échange d’électrons s’instaure, de façon à... -
Page 44: Description Et Fonctionnement
2 Description et fonctionnement À la base du pistolet se trouvent un connecteur M12 pour l’alimentation en 24 V et un raccord pour l’air comprimé. Un voyant à LED au-dessus de la poignée du pistolet affiche le statut du pistolet. La tête du Cleanflex Easy se place facilement sur quatre positions pour adapter la position du pistolet à... -
Page 45: Sécurité
3 Sécurité Les directives qui suivent pour la sécurité doivent être respectées de façon à éviter toutes blessures et dommages aux objets ou au Cleanflex Easy. - L’installation électrique doit être réalisée par un électricien qualifié selon les réglementations nationales et locales - Il ne faut pas utiliser le Cleanflex Easy lors d’un incendie ou dans un environnement à... -
Page 46: Spécifications Techniques
4 Spécifications techniques Tension d’alimentation 24 V CC ±3 V Consommation d’énergie Max. 0,5 A Branchement M12, femelle, 5 broches Entrées Pression 1 - 7 bar (15 - 100 PSI) Propre et exempte d’humidité et d’huile Branchement Branchement de type rapide pour flexible de ø 8 mm Sorties Haute tension Générée en interne... - Page 47 Figure 3 : Dimensions Cleanflex Easy Tableau 1 : Consommation d’air CleanflexEasy_UM_9752050810_NL_D_GB_F_V1_2...
-
Page 48: Installation
5 Installation - Débrancher l’alimentation électrique avant d’effectuer toute intervention sur l’appareil. - L’installation électrique doit être effectuée par un ingénieur électricien disposant de la formation et des qualifications appropriées. - Le Cleanflex Easy ne peut être utilisé qu’à l’intérieur et uniquement pour des applications industrielles de faible ampleur. -
Page 49: Alimentation Électrique Et En Air Comprimé
5.3 Alimentation électrique et en air comprimé - Vérifier que le Cleanflex Easy est alimenté par de l’air comprimé propre, non humide et sans huile. - Vérifier que le branchement en air comprimé et l’alimentation en 24 V soient à portée du flexible et du câble pour les branchements. -
Page 50: Mise En Service Et Fonctionnement
6 Mise en service et fonctionnement - Brancher l’alimentation en 24 Volt et l’air comprimé sur le pistolet. Avant la première utilisation, il est conseillé de régler l’air comprimé sur, par exemple, 2 Bar ; - Le voyant à LED sur le pistolet clignote rapidement en vert en phase de démarrage. Le pistolet est prêt à... -
Page 51: Vérification En Service
7 Vérification en service Lors de l’utilisation, le voyant à LED s’éclaire en permanence en vert. Si le voyant continue à clignoter (1x toutes les 3 secondes) avec la gâchette enfoncée, la pression d’air comprimé est trop faible (<0.5 Bar). Dans ce cas, il faut augmenter la pression. Vérifier l’absence de fuites autour des raccords d’air comprimé. -
Page 52: Résolution Des Dysfonctionnements Et Problèmes
9 Résolution des dysfonctionnements et problèmes - Lors de toute intervention sur le matériel, il doit être hors tension ; - L’installation électrique et la maintenance doivent être réalisées par un électricien qualifié. Signalement Problème Ce que cela signifie Ce qu’il faut faire Le voyant LED Pas d’alimentation Alimentation défectueuse... -
Page 53: Mise Au Rebut
11 Mise au rebut Lors de la mise au rebut de l’appareil, suivre les réglementations locales pour l’environnement. Ne pas se débarrasser de l’appareil avec les déchets ménagers à la fin de sa vie, mais le déposer dans un point de collecte officiel. De cette façon, vous aidez à...