Publicité
Liens rapides
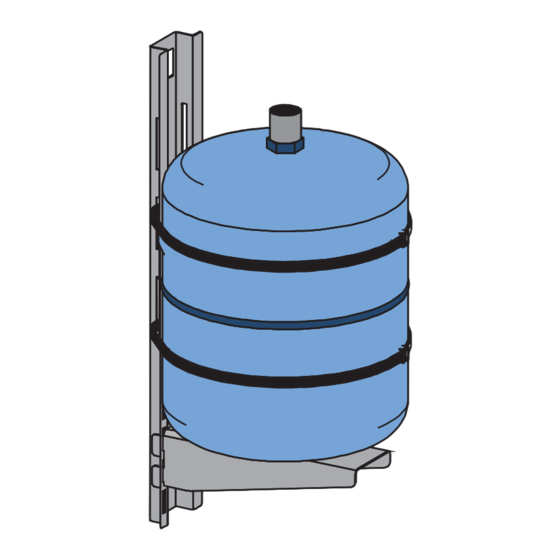
Expansion Tank Support System Installation Instructions
Always be aware of, and follow local plumbing codes. Follow all manufacturer's installation instructions for expansion tank.
Follow all safety guidelines, wear safety glasses, gloves and other appropriate protective equipment.
Failure to follow these instructions could result in personal injury or property damage.
For use with 2 or 5 gallon expansion tanks.
Wall-mount (2-pc) and heater-mount (3-pc) models available.
Includes heavy-duty mounting column with slots, a sturdy support base,
suspension beam (heater-mount only) and Nylon securing straps.
Wall-Mount
(No. 598-022)
1. Locate a safe/accessible space for installation, considering adequate
space for piping and tank placement. Secure mounting column properly,
such that the wide, flat surface is against the wall and the edges with
vertical slots are facing outward.
2. Insert the tabs of the support base (flat side up) into appropriate vertical
slots on the column edges and push down to lock in place.
3. Thread securing straps through the slots on the back of the column such
that they will wrap around expansion tank at even spacing.
4. Set the expansion tank on the support base and against the column.
Secure the tank with straps hand tight.
5. Connect and complete the installation of the expansion tank according to
local codes and tank manufacturer's installation instructions.
Heater-Mount
(No. 598-023)
1. Slide hooked suspension beam into U-shaped slot at the top of the
mounting column, with the flat side of the beam facing down.
2. Hook the beam/column around the nipple of the water heater and adjust
the column in or out, using the slot closest to the water heater side wall -
so that the mounting column hangs vertically against the water heater
side wall.
3. Insert the tabs of the support base (flat side up) into appropriate vertical
slots on the column edges and push down to lock in place.
4. Thread securing straps through the slots on the back of the column such
that they will wrap around expansion tank at even spacing.
5. Set the expansion tank on the support base and against the column.
Secure the tank with straps hand tight.
6. Connect and complete the installation of the expansion tank according to
local codes and tank manufacturer's installation instructions.
Note: 'Hurricane straps' or belts intended for water heater restraints can
slide through back side of the TankBracket mounting column if desired.
#IS-598TB
Supply
Drainage
Support
Specialties
Publicité

Sommaire des Matières pour Sioux Chief TankBracket 598-022
- Page 1 Expansion Tank Support System Installation Instructions Always be aware of, and follow local plumbing codes. Follow all manufacturer's installation instructions for expansion tank. Follow all safety guidelines, wear safety glasses, gloves and other appropriate protective equipment. Failure to follow these instructions could result in personal injury or property damage. For use with 2 or 5 gallon expansion tanks.
- Page 2 Instrucciones de Instalación - Modelos de montaje en pared (2 piezas) y montaje en calentador (3 piezas) disponibles. Para usar con tanques de expansión de 2 o 5 galones. - Incluye columna de montaje con ranuras, base de soporte, viga de suspensión (solo para montaje en calentador) y correas de seguridad de nailon. Montaje en Pared 1.