
Sommaire des Matières pour Fapim FP16
- Page 1 Manuale uso e manutenzione Use and maintenance manual Manuel d’instruction et d’entretien Manual de empleo y manutención Life in evolution FP16...
-
Page 2: Manuale Uso E Manutenzione
FP16 Manuale uso e manutenzione Catalogo ricambi Use and maintenance manual Spare parts catalogue Manuel d’instruction et d’entretien Catalogue des pièces de rechange Manual de uso y manutención Catálogo repuestos... - Page 3 FP16...
-
Page 4: Table Des Matières
FP16 Manuale uso e manutenzione Catalogo ricambi 1. DESCRIZIONE TECNICA 1.1. Caratteristiche tecniche 2. INSTALLAZIONE INIZIALE 2.1. Imballo 2.2. Controllo alla consegna 2.3. Dati e marcatura 2.4. Modifica interasse 2.4.1. Premontaggio 2.5. Preregolazione 2.6. Allacciamento alimentazione pneumatica 3. MODILITÀ DI USO DELLA MACCHINA 4. -
Page 5: Descrizione Tecnica
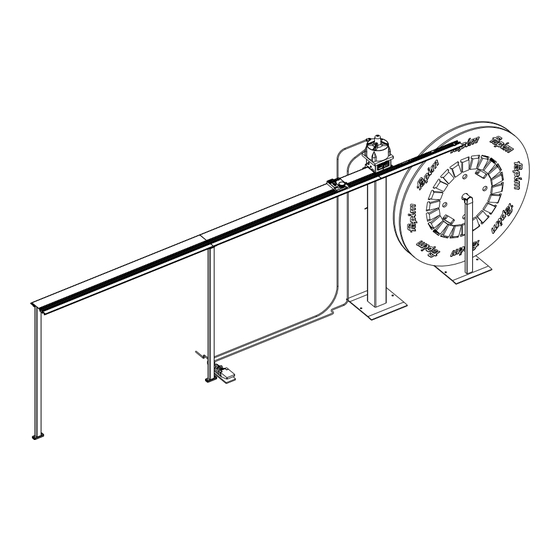
FP16 1. DESCRIZIONE TECNICA La punzonatrice FP-16 è stata progettata, realizzata e collaudata per la lavorazione delle astine di comando in poliammide dei meccanismi GALIPLUS2/GALICUBE industrial per finestre Anta-Ribalta e per aperture ad anta. Si compone di: - Un gruppo matrice, che comprende la struttura portante, la matrice ed i punzoni di lavorazione. -
Page 6: Modifica Interasse
FP16 2.4 Modifica interasse 104 --> 84 Il dispositivo di centraggio viene fornito premontato per l’interasse 104, ma è predisposto anche per l’impiego con l’interasse 84. Per l’interasse 84 è sufficiente posizionare le due spine nei fori interni. -
Page 7: Premontaggio
FP16 2.4.1 Premontaggio Togliere il corpo macchina (1a) con il suo supporto (1b). Fissare il gruppo porta profili (2) al corpo macchina (1) con la viteria in dotazione. Posizionare i supporti porta profili (3). Fissare i supporti (3). -
Page 8: Preregolazione
ATTENZIONE: Non utilizzare MAI la macchina con astine che non siano di poliammide e compatibile solo con astine Fapim (Art. 1683). -
Page 9: Lavorazioni Eseguibili
4.1 Lavorazione astine finestra Anta-Ribalta Le FP16 consentono la facile produzione delle astine di comando in poliammide per i meccanismi Galiplus 2/ Galicube. ATTENZIONE: Utilizzare solo l’astina Fapim art. 1683. Le FP16 non sono idonee per la lavorazione delle astine di forma standard. Galiplus2 Art.1683... -
Page 10: Taglio E Foratura Dell'astina Verticale
FP16 4.1.1 Taglio e foratura dell’astina verticale Posizionare il montante della finestra sul supporto porta profili appoggiando a destra sulla battuta etichettata 1471/1481. Scorrere la battuta scorrevole fino al vertice sinistro del montante e bloccarla. Inserire l’astina nella posizione indicata fino ad incontrare la battuta. -
Page 11: Taglio E Foratura Dell'astina Orizzontale
FP16 4.1.2 Taglio e foratura dell’astina orizzontale Posizionare il montante della finestra sul supporto porta profili appoggiandolo a destra sulla battuta etichettata con il numero di articolo del braccetto che si intende montare. Scorrere la battuta scorrevole fino al vertice sinistro del montante e bloccarla. -
Page 12: Foratura Centrale Dell'astina Verticale
FP16 4.1.3 Foratura centrale dell’astina verticale Posizionare il montante centrando la lavorazione della cremonese nei suddetti perni. Spostare la battuta scorrevole fino al vertice sinistro del montante e bloccarla. Inserire l’astina precedentemente tagliata nella posizione indicata fino ad incontrare la battuta. -
Page 13: Taglio E Foratura Dell'astina Per Chiusure Supplementari (Fase1)
FP16 4.1.4 Taglio e foratura dell’astina per chiusure supplementari (Fase1) Inserire l’astina da lavorare nella posizione indicata. Si ottiene la lunghezza desiderata spostando la battuta scorrevole e facendo riferimento all’asta metrica del supporto porta profili. Agire sul pedale per eseguire in cotemporanea il taglio e la foratura dell’astina. -
Page 14: Taglio E Foratura Dell'astina Per Chiusure Supplementari (Fase2)
FP16 4.1.5 Taglio e foratura dell’astina per chiusure supplementari (Fase 2). Inserire la battuta della punzonatrice Inserire l’astina da lavorare nella posizione indicata. Infilare l’astina fino a battuta. Agire sul pedale per eseguire la foratura dell’astina. -
Page 15: Foratura Intermedia Dell'astina Per Chiusure Supplementari
FP16 4.1.6 Foratura intermedia dell’astina per chiusure supplementari Inserire l’astina da lavorare nella posizione indicata. Si ottiene la lunghezza desiderata spostando la battuta scorrevole e facendo riferimento all’asta metrica del supporto porta profili. Agire sul pedale per eseguire la foratura dell’astina. -
Page 16: Lavorazioni Astine Finestre Ad Anta
FP16 4.2 Lavorazione astine finestra anta Le FP16 consentono di produrre facilmente le astine in poliammide per aperture ad anta. Art. 0787BB Art. 4082A Art. 0787Bi Art. 0540B Art. 1946A Art. 4082A... -
Page 17: Taglio E Foratura Dell'astina Verticale
FP16 4.2.1 Taglio e foratura dell’astina verticale Posizionare il montante della finestra sul supporto porta profili appoggiandolo a destra sula battuta etichetta con 0787BA/ 0787BB. Spostare la battuta scorrevole fino al vertice sinistro del montante e bloccarla. Inserire l’astina nella posizione indicata fino ad incontrare la battuta. - Page 18 FP16 4.2.2 Separazione dell’astina finestra Anta Posizionare il montante centrando la lavorazione della cremonese nei suddetti perni. Scorrere la battuta scorrevole fino al vertice sinistro del montante e bloccarla. Inserire l’astina precedentemente tagliata nella posizione indicata fino ad incontrare la battuta.
-
Page 19: Foratura Ø8 Dell'astina
FP16 4.2.3 Eventuale foratura Ø8 dell’astina Inserire l’astina da lavorare nella posizione indicata. Infilare l’astina fino a battuta. Agire sul pedale per eseguire la foratura dell’astina. 5. MANUTENZIONE È assolutamente necessario effettuare periodicamente le operazione qui raccomandate: - Controllo della pressione di alimentazione. -
Page 20: Ricambi Gruppo Matrice / Punzone
FP16 6.1 Ricambi gruppo Matrice / Punzone N° Codice Descrizione N° Codice Descrizione 1684D01 Matrice 1684D04 Punzone sagomato 1684D02 Punzone di foratura 1684D05 Punzone taglio asta 1684D03 Punzone di foratura 1684D06 Punzone di foratura 6.2 Ricambi gruppo Cilindro N° Codice... -
Page 21: Ricambi Gruppo Porta-Profilo
Manutenzione. 7.1 Attivazione della garanzia Riempire il tagliando in tutte le sue parti e spedire in busta chiusa alla Fapim S.p.a La Fapim S.p.a si riserva il diritto di apportare modifiche e miglioramenti senza al- cun preavviso, per cui le informazioni contenute nel presente manuale sono fornite a titolo indicativo e non hanno valore contrattuale. - Page 22 FP16 Use and maintenance manual Spare parts catalogue...
- Page 23 FP16...
- Page 24 FP16 Use and maintenance manual Spare parts catalogue 1. TECHNICAL DESCRIPTION 1.1. Specifications 2. INITIAL INSTALLATION 2.1. Packaging 2.2. Check upon delivery 2.3. Marking data 2.4. Modification of the centre distance 2.4.1. Pre-assembly 2.5. Pre-adjustment 2.6. Pneumatic feeding connection 3. HOW TO USE THE MACHINE 4.
-
Page 25: Technical Description
FP16 1. TECHNICAL DESCRIPTION The punching machine FP-16 has been designed, manufactured and tested for the machining of the polyamide control rods of the GALIPLUS2/GALICUBE industrial mechanisms for tilt and turn and side-hung opening windows. It is made up of: - A die unit which includes the bearing structure, the die and the machining punches. -
Page 26: Modification Of The Centre Distance
FP16 2.4 Modification of the centre distance 104 --> 84 The centring device of the 104 centre distance is supplied in the pre-assembled version and it is also pre-set for use with 84 centre distance, inserting the two pins into the inner holes. -
Page 27: Pre-Assembly
FP16 2.4.1 Pre-assembly Remove the machine body (1a) with its support (1b). Secure the profile-holder unit (2) to the machine body (1) by means of the screws supplied. Position the profile holder supports (3). Fix the supports (3). -
Page 28: Pre-Adjustment
WARNING: NEVER use the machine with non polyamide rods. The machine is compatible with Fapim rods only (Art. 1683). -
Page 29: Machining Achievable
4.1 Machining of Tilt and Turn window rods The FP16 allows easy manufacture of the polyamide control rods for the GALIPLUS2/GALICUBE mechanisms. WARNING: use Fapim rod art. 1683 only. The FP16 is not suitable for the machining of the standard rods. Galiplus2 Art.1683... -
Page 30: Cut And Punching Of The Vertical Rod
FP16 4.1.1 Cut and punching of the vertical rod Place the window-post on the profile-holder support, and lean it on the right side on the stroke labelled with 1471/1481. Run the sliding stroke up to the left top of the window-post and lock it. Insert the rod as shown to hit the stroke. -
Page 31: Cut And Punching Of The Horizontal Rod
FP16 4.1.2 Cut and punching of the horizontal rod Place the window-post on the profile-holder support, and lean it on the right side on the stroke labelled with the article number corresponding to the arm to be assembled. Shift the sliding stroke up to the left top of the window-post and lock it. Insert the rod as shown to hit the stroke. -
Page 32: Central Punching Of The Vertical Rod
FP16 4.1.3 Central punching of the vertical rod Place the window-post and ensure that the cremone machining is centred in the above pins. Run the sliding stroke up to the left top of the window-post and lock it. Insert the previously cut rod as shown to hit the stroke. -
Page 33: Cut And Punching Of The Rod For Additional Locks
FP16 4.1.4 Cut and punching of the rod for additional locks (1 stage) Insert the rod to be machined as shown. The required length is obtained by moving the sliding stroke taking the metric rod of the profile-holder support as reference. -
Page 34: Cut And Punching Of The Rod For Additional Locks
FP16 4.1.5 Cut and punching of the rod for additional locks (2 stage). Insert the stroke of the punching machine Insert the rod to be machined as shown. Inset the rod up to the stroke. Push pedal to carry out rod punching. -
Page 35: Intermediate Punching Of The Rod For Additional Locks
FP16 4.1.6 Intermediate punching of the rod for additional locks Insert the rod to be machined as shown. The required length is obtained by moving the sliding stroke taking the metric rod of the profile-holder support as reference. Push pedal to carry out rod punching. -
Page 36: Machining Of The Rods For Side-Hung Windows
FP16 4.2 Machining of the rods for side-hung windows The FP16 allows an easy manufacture of the polyamide rods for side-hung openings. Art. 0787BB Art. 4082A Art. 0787Bi Art. 0540B Art. 1946A Art. 4082A... -
Page 37: Cut And Punching Of The Vertical Rod
FP16 4.2.1 Cut and punching of the vertical rod Place the window-post on the profile-holder support, and lean it on the right side on the stroke labelled with 0787BA/ 0787BB. Shift the sliding stroke up to the left top of the window-post and lock it. - Page 38 FP16 4.2.2 Separation of the rod for side-hung window Place the window-post and ensure that the cremone machining is centred in the above pins. Run the sliding stroke up to the left top of the window-post and lock it. Insert the previously cut rod as shown to hit the stroke.
-
Page 39: Ø8 Rod Punching
- Periodical clearing of the equipment. - Protection of the parts subjected to corrosion with oil 6. SPARE PARTS The spare parts can be requested to Fapim S.p.a directly. It is imperative that the following data are reported: - Machine serial number... -
Page 40: Code Description
FP16 6.1 of the Die/punch unit spare parts Code Description Code Description N° N° 1684D01 1684D04 Shaped punch 1684D02 Drilling punch 1684D05 Rod cut punch 1684D03 Drilling punch 1684D06 Drilling punch 6.2 Cylinder unit spare parts Code Description N° 1684D07... -
Page 41: Profile-Holder Unit Spare Parts
7.1 Warranty start Fill –in all parts of the coupon and send it in an envelope to Fapim S.p.a Fapim S.p.a reserves the right to modify and improve the machine without notice, therefore the information contained in this manual are provided purely as an indication with no contract obligation. - Page 42 FP16 Manuel d’instruction et d’entretien Catalogue des pièces de rechange...
- Page 43 FP16...
- Page 44 FP16 Manuel de utilise et maintenance Catalogue des rechanges 1. DESCRIPTION TECHNIQUE 1.1. Caractéristiques techniques 2. INSTALLATION INITIALE 2.1. Emballage 2.2. Contrôle à la livraison 2.3. Donnée et marquage 2.4. Modification et entraxe 2.4.1. Pré-assemblage 2.5. Préréglage 2.6. Branchement alimentation pneumatique 3.
-
Page 45: Description Technique
FP16 1. DESCRIPTION TECHNIQUE La poinçonneuse FP-16 a été étudiée, réalisée et testée pour l’usinage des tringles de commande en polyamide des mécanismes GALIPLUS2/GALICUBE industrial aptes pour les fenêtres oscillo-battant et pour les ouvertures à la française. Elle se compose de : - Un groupe matrice, qui inclue la structure, la matrice et les poinçons d’usinage. -
Page 46: Modification Et Entraxe
FP16 2.4 Modification entraxe 104 --> 84 Le dispositif de centrage est fourni pré-monté pour l’entraxe 104, mais il est arrangé aussi pour l’utilise avec l’entraxe 84. Pour l’entraxe 84 il est suffisant positionner les deux goupilles dans les trous internes. -
Page 47: Pré-Montage
FP16 2.4.1 Pré-montage Enlever le corps machine (1a) avec le support (1b) ; monter le groupe porte profils (2) au corps machine (1) avec les vis en dotation. Positionner les supports porte profils (3). Fixer les supports (3). -
Page 48: Préréglage
ATTENTION: Ne utiliser JAMAIS la machine avec tringles qui ne soient pas en polyamide ; elle est compatible avec tringles Fapim (art.1683). -
Page 49: Usinages
FP16 4. USINAGES 4.1 usinage tringles fenêtre Oscillo-Battant Les FP16 permettent une très facile production de tringles de commande en polyamide pour les mécanismes GALIPLUS2/GALICUBE. ATTENTION : utiliser seulement la tringle Fapim art.1683. Les FP16 ne sont pas aptes pour usinages des tringles de forme standard. -
Page 50: Coupage Et Perçage Tringle Verticale
FP16 4.1.1 Coupage et perçage tringle verticale Positionner le montant de la fenêtre sur le support porte profil l’appuyant à droite de la butée étiquette 1471/1481. Faire glisser la butée glissante jusqu’à le sommet gauche du montant et la bloquer. -
Page 51: Coupage Et Perçage Tringle Horizontale
FP16 4.1.2 Coupage et perçage tringle horizontale Positionner le montant de la fenêtre sur le support profils l’appuyant à droite de la butée étiquette avec la référence d’article du campas que on veut monter. Faire glisser la butée jusqu’à le sommet gauche du montant et la bloquer. Insérer la tringle dans la position indiquée jusqu’à... -
Page 52: Perçage Central Tringle Verticale
FP16 4.1.3 Perçage central tringle verticale Positionner le montant centrant l’usinage de la crémone dans les susdits axes. Déplacer la butée glissante jusqu’à le sommet gauche du montant et la bloquer. Insérer la tringle coupée à l’avance dans la position indiquée jusqu’à rencontrer la butée. -
Page 53: Coupage Et Perçage Tringle Pour Fermetures Supplémentaires (Phase1)
FP16 4.1.4 Coupage et perçage tringle pour fermetures supplémentaires (Phase 1) Insérer la tringle à usiner dans la position indiquée. On obtient la longueur désirée déplaçant la butée glissante et faisant référence à la tringle métrique du support porte profils. -
Page 54: Coupage Et Perçage Tringle Pour Fermetures Supplémentaires (Phase 2)
FP16 4.1.5 Coupage et perçage tringle pour fermetures supplémentaires (Phase 2) Insérer la butée dans la poinçonneuse Insérer la tringle à usiner dans la position indiquée. Insérer la tringle jusqu’à la butée. Actionner la pédale pour exécuter le perçage de la tringle... - Page 55 FP16 4.1.6 Perçage intermédiaire de la tringle pour les fermetures supplémentaires Insérer la tringle à usiner dans la position indiquée. La longueur désirée est obtenue déplaçant la butée glissante et faisant référence à la tringle métrique du support porte profils.
-
Page 56: Usinage Tringle Fenêtres À La Française
FP16 4.2 Usinage tringle fenêtres à la française Les FP 16 permettent de produire facilement les tringles en polyamide pour les ouvertures à la français. Art. 0787BB Art. 4082A Art. 0787Bi Art. 0540B Art. 1946A Art. 4082A... -
Page 57: Coupage Et Perçage Tringle Verticale
FP16 4.2.1 Coupage et perçage tringle verticale Positionner le montant de la fenêtre sur le support porte profils l’appuyant à droite sur la butée étiquette avec 0787BA/ 0787BB. Déplacer la butée glissante jusqu’à le sommet gauche du montant et bloquer la butée. -
Page 58: Séparation Tringle Verticale
FP16 4.2.2 Séparation tringle verticale Positionner le montant centrant l’usinage de la crémone dans les susdites axes. Faire glisser l abutée jusqu’à le sommer gauche du montant et la bloquer. Insérer la tringle coupée à l’avance dans la position indiquée jusqu’à rencontrer la butée. -
Page 59: Perçage Ø8 De La Tringle
- Nettoyer périodiquement l’équipement - Protéger avec huile les parties sujettes à corrosion. 6. RECHANGES Il est possible obtenir les pièces de rechange faisant demande directement à Fapim SpA. Il faut absolument communiquer: - N° de série de la machine - Année de fabrication... -
Page 60: Rechanges Groupe Matrice /Poinçon
FP16 6.1 Rechanges groupe Matrice /Poinçon Code Description Code Description N° N° Matrice Poinçon façonnée 1684D01 1684D04 Poinçon de perçage Poinçon coupage tringle 1684D02 1684D05 Poinçon de perçage Poinçon de perçage 1684D03 1684D06 6.2 Rechanges groupe cylindre Code Description N°... -
Page 61: Rechanges Groupe Porte-Profil
Remplir le coupon dans chaque sa partie et l’envoyer dans une enveloppe fermée à Fapim S.p.A. Fapim SpA se réserve le droit d’apporter des modifications et améliorations sans aucun préavis, et donc les informations données dans ce manuel sont données à... - Page 62 FP16 Manual de uso y manutención Catálogo repuestos...
- Page 63 FP16...
- Page 64 FP16 Manual de uso y manutención Catalogo repuestos 1. DESCRIPCION TECNICA 1.1. Características técnicas 2. INSTALACION INICIAL 2.1. Embalaje 2.2. Control a la entrega 2.3. Datos y marcas 2.4. Modificación intereje 2.4.1. Pre montaje 2.5. Pre regulación 2.6. Conexión alimentación neumática 3.
-
Page 65: Descripcion Tecnica
FP16 1. DESCRIPCION TECNICA La punzonadora FP-16 ha sido proyectada, realizada y probada y probada para el trabajo de las varillas de poliamida de los mecanismos GALIPLUS2/GALICUBE Indu- strial para ventana Oscilo Batiente y abertura practicable . Se compone de: - Un grupo matriz que incluye la armadura , la matriz y los punzones de trabajo. -
Page 66: Modificación Intereje
FP16 2.4 Modificación interjes 104 --> 84 El dispositivo para centrar está suministrado ya montado con intereje 104, si bien hay la posibilidad de uso aun con el intereje 84, por el que se necesita colocar las dos espinas en los agujeros interiores. -
Page 67: Pre Montaje
FP16 2.4.1 Pre montaje Quitar el cuerpo de la maquina (1a) y su suporte (1b). Fijar el grupo porta perfil (2) al cuerpo de la maquina (1) por medio de los tornillos. Posicionar los suportes porta perfiles (3). Fijar los suportes (3). -
Page 68: Conexión Alimentación Neumática
; pisando el pedal de accionamiento se efectúa el trabajo , dejando el pedal la varilla se puede extraer. ATENCION: NUNCA usar la maquina con varillas que no sean de poliamida y compatible solo con varillas FAPIM (Art. 1683). - Page 69 4. TRABAJOS EJECUTABLES CON FP 16 4.1 Trabajo varillas ventana Oscilo Batiente Las FP16 permiten la fabricación rápida y fácil de las varillas de poliamida para los mecanismos O/B GALIPLUS2/GALICUBE . ATTENCION : Usar solo varilla FAPIM art. 1683. Las FP16 no están aptas para el trabajo de las varillas standards.
- Page 70 FP16 4.1.1 Corte y perforado de las varillas vertical Colocar el montante de la ventana sobre el suporte porta perfila apoyando hacia derecha sobre el tope con etiqueta 1471/1481. Deslizar el tope hasta la cumbre izquierda del montante y bloquear. Alojar la varilla en la posición indicada hasta encontrar el tope.
- Page 71 FP16 4.1.2 Corte y perforado de la varilla horizontal Colocar el montante de la ventana sobre el suporte porta perfila apoyando hacia derecha sobre el tope con la indicación del numero de compás que se monta . Deslizar el tope hasta la cumbre izquierda del montante y bloquear .Alojar la varilla en la posición indicada hasta encontrar el tope.
- Page 72 FP16 4.1.3 Perforado central de la varilla vertical Colocar el montante centrando el trabajo de la cremona en los ejes. Deslizar el tope hasta la cumbre izquierda del montante y bloquear. Alojar la varilla ya cortada en la posición indicada hasta encontrar el tope.
- Page 73 FP16 4.1.4 Corte y perforado de la varilla para cierre suplementarias (Fase1) Alojar la varilla en la posición indicada . Si obtiene la longitud deseado desplazando el tope deslizante y haciendo referen- cia al asta métrica del soporte porta perfil.
- Page 74 FP16 4.1.5 Corte y perforado de la varilla para cierre suplementarias (Fase 2). Alojar el tope de la punzonadora Alojar la varilla en la posición indicada . Alojar la varilla hasta el tope. Accionar sobre el pedal para ejecutar el perforado de la varilla.
- Page 75 FP16 4.1.6 Perforado intermedio de la varilla para cierres suplementarios Alojar la varilla en la posición indicada Si obtiene la longitud deseado desplazando el tope deslizante y haciendo referen- cia a la asta métrica del soporte porta perfil. Obrar sobre el pedal para ejecutar el perforado de la varilla.
- Page 76 FP16 4.2 Trabajo varilla para ventanas practicables Las FP16 permiten de fabricar con facilidad las varillas de poliamida para aperturas practicable Art. 0787BB Art. 4082A Art. 0787Bi Art. 0540B Art. 1946A Art. 4082A...
- Page 77 FP16 4.2.1 Corte y perforado de la varilla vertical Colocar el montante de la ventana sobre el soporte porta perfiles apoyando hacia derecha sobre el tope con la indicación 0787BA/ 0787BB. Desplazar el tope móvil hasta la cumbre izquierda del montante y bloquear.
- Page 78 FP16 4.2.2 Separación de la varilla ventana Hoja Colocar el montante centrando el trabajo de la cremona el los ejes . Desplazar el tope móvil hasta la cumbre izquierda del montante y bloquear. Alojar la varilla ya cortada en la posición indicada hasta encontrar el tope.
-
Page 79: Manutencion
- Limpiar los equipos periódicamente - Proteger con aceite las partes sujeta a corrosión 6. REPUESTOS Se pueden obtener repuestos haciendo directamente solicitud a Fapim S.p.a. En el caso se necesitan las informaciones detallada a continuación:: - N° di matricula de la maquina - Año de fabricación... -
Page 80: Repuestos Grupo Matrix /Punzón
FP16 6.1 Repuestos grupo Matriz / Punzón Código Descripción Código Descripción N° N° Matriz Punzón per lado 1684D01 1684D04 Punzón de perforado Punzón corte varilla 1684D02 1684D05 Punzón de perforado Punzón de perforado 1684D03 1684D06 6.2 Repuestos grupo Cilindro N°... -
Page 81: Repuestos Grupo Porta Perfil
. 7.1 Activación de la garantía Rellenar el cupón en todas sus partes y enviar en sobre cerrado a Fapim S.p.a La Fapim S.p.a si reserva el derecho de realizar modificaciones o mejorías sin previo aviso , por lo tanto las informaciones contenidas en el presente manual se sumini- stran a titulo indicativo y no tienen valor contractual . - Page 82 QI F16 50 02 11-18...