
Sommaire des Matières pour UBTC UGS 54509
- Page 1 GEBRAUCHSANLEITUNG INSTRUCTIONS INSTRUZIONI INSTRUCTIONS INSTRUCTIES 22515 | 022016 | Made in China...
- Page 2 GEBRAUCHSANLEITUNG Einführung • Wir danken Ihnen, dass Sie sich für unser vollauto- matisches Handgelenk-Blutdruckmessgerät entschie- den haben. • Das Gerät bestimmt den Blutdruck oszillometrisch, d.h. es misst die Schwingungen des Blutes in der Arterie und errechnet daraus den Blutdruck. Das Gerät ist einfach in der Anwendung, da mit der oszillometrischen Technik kein Stethoskop benötigt wird.
- Page 3 Warnhinweise und Symbole Warnhinweis Zwingend Verboten Typ BF-Gerät Gerätedokumentation beachten. Seriennummer Symbol für die Bezeichnung von elektri- schen und elektronischen Geräten gemäss Richtlinie 2002/96/EG. Gerät, Zubehör und Verpackung sind ordnungsgemäss zu entsorgen. Bitte lokale Vorschriften und Be- stimmungen beachten. Ihren Blutdruck an Ihren Arzt oder Ihre Ärztin. Halten Sie sich an die Anweisungen Ihrer medizi- nischen Fachperson.
- Page 4 • Das Gerät ist ausschliesslich für die Blutdruck- und Pulsmessung bei Erwachsenen konzipiert und eig- net sich nicht für Neugeborene. • In der Nähe des Geräts keine Mobilfunkgeräte ver- wenden, diese können den Betrieb beeinträchtigen. • Für grösstmögliche Zuverlässigkeit der Messdaten nicht in strahlungsintensiver Umgebung verwenden.
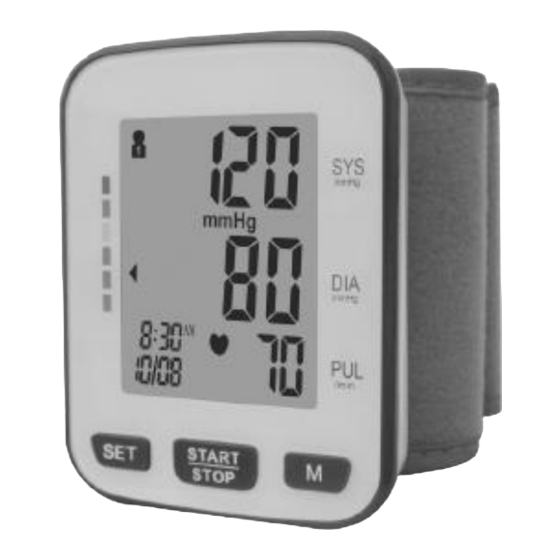
- Page 5 Display G Symbol Auf-/Abpumpen oder WHO-Symbol H Symbol unregelmässiger Herzschlag I Speicher und Messung Nr. J WHO Blutdruck Klassifi- kationsindikator K Systolischer Blutdruck L Diastolischer Blutdruck M Einheitenangabe N Pulsanzeige O Gruppen P Druchschnitt der letzten 3 Messungen Q Zeit R Datum S Batteriestandsanzeige Spannungsversorgung...
- Page 6 Einlegen/Ersetzen der Batterien 1 Abdeckung des Batteriefachs entfernen. 2 Zwei AAA- Batterien einlegen, dabei Polaritätsangaben beachten. 3 Batterieabdeckung wieder anbringen. Vorsicht • Zwei gleiche 1.5V-Alkalinbatterien des Typs AAA LR03 verwenden. • Wenn das Symbol für niedrigen Batteriestand angezeigt wird, beide Batterien ersetzen. •...
- Page 7 Richtig messen 1 Ärmel zurückschieben, damit die Manschette direkt auf der Haut liegt. 2 Manschette mit Hilfe des Klettverschlusses satt um das Handgelenk legen. 3 Handinnenfläche nach oben halten, Finger und Handgelenk natürlich strecken. 4 Den Arm mit einem weichen Gegenstand wie in der Abbildung unterhalb des Blutdruckmessgeräts abstützen.
- Page 8 Richtig messen – Position der Finger Falsch Richtig Falsch Richtig messen – Position des Handgelenks Falsch Richtig Falsch...
- Page 9 Blutdruck richtig messen 1 START/STOP-Taste drücken. Alle Symbole erscheinen auf der Anzeige. Die Man schette wird automatisch aufgepumpt. 2 Messung beginnt beim Aufpumpen. Das Herzsymbol blinkt einmal, sobald ein Puls erkannt wurde. 3 Nach Abschluss der Messung wird der Blutdruckwert und der Puls angezeigt.
- Page 10 4 Gerät über die START/STOP-Taste abschalten. Das Gerät schaltet sich nach 3 Minuten Nicht gebrauch automatisch ab. Vor der nächsten Messungen sollten Sie sich während 30 – 60 Sekunden ausruhen. Verwendung der Speicherfunktion • Nach jeder Messung speichert das Gerät die Blut- druck- und Pulswerte.
- Page 11 Lesen der Speicherwerte • Mit der «M»-Taste können Sie vergangene Werte abru- fen. Löschen der Speicherwerte Beim Lesen der Messwerte die «SET»-Taste während 3 – 4 Sekunden gedrückt halten. Wissenswertes zum Blutdruck/ Blutkreislauf Über den Blutkreislauf wird der Körper mit Sauerstoff versorgt.
- Page 12 des Herzmuskels entsteht. Systolischer Blutdruck Zusammenziehen des Herzmuskels Blut wird ausgestossen höherer Druck auf Blutgefässe höherer Druck Diastolischer Blutdruck Entspannung des Herzmuskels Blut fliesst zum Herzen zurück tieferer Druck auf Blutgefässe tieferer Druck Klassifizierung der Blutdruckwerte Nach jeder Blutdruckmessung wird auf dem Display automatisch die Einteilung in eine der sechs Kate- gorien gemäss WHO-Blutdruckskala angezeigt.
- Page 13 Read user manual " " Improper operation carefully and displayed re-test properly. Read user manual Pressurization is over carefully and 300mmHg re-test properly. Diastolischer Blutdruck (mmHg) Schwere Hypertension Blood Pressure Information Blood P Mässige Hypertension Leichte Hypertension WHO Blood Pressure Classification Indicator Health R Gelb Normaler Systolischer Wert...
- Page 14 Fehleranzeigen Die folgenden Symbole verweisen auf Probleme während der Blutdruckmessung: Symbol Grund Korrektur 1. Manschette korrekt und satt Fehler beim anlegen. Aufpumpen 2. Nach richtigem Anbringen erneut aufpumpen. 1. Arm und Körper ruhig halten, Messung nicht nicht bewegen. möglich. 2. Messung wiederholen.
- Page 15 Fehlerbehebung Problem Ursache und Behebung Kein Strom. Schwache Batterien durch neue ersetzen. Keine Anzeige Sicherstellen, ob Batterien gemäss auf Display. Polaritätsangaben eingelegt sind. Der Blutdruck variiert ständig. Zahlreiche Messwerte Faktoren wie Stress und Tageszeit, aber scheinen zu auch wie die Manschette angelegt wird, hoch oder zu beeinflussen den Blutdruck.
- Page 16 " SET " Button egulations. Wrist Cuff nit Illustration it Illustration Unit Illustration Unterhalt Contents splay Gehäuse und Manschette nicht mit Naphtalin, Verdünner oder Groups Systolic Benzin o.ä. reinigen. Blood Low Battery Indicator Pressure mmHg kPa WHO Blood Pressure 1.Monitor Unit Owner's Manual Classification Indicator Wrist-type Fully Automatic...
- Page 17 Spezifikationen Modellnr. BSP-22 Display LCD-Digitalanzeige Messtechnik Oszillometrische Messung Messort Handgelenk Weiche Manschette Handgelenksmanschette Blutdruck 0 – 300 mmHg (0 – 39.9 kPa) Messbereich Puls 30 –180 Schläge/min Blutdruck ± 3 mmHg (0.4 kPa) Genauigkeit Puls ± 5% des Messwerts Blutdruck 3 Stellen bei mmHg oder kPa) LCD-Anzeige Puls...
- Page 18 Spezifikationen Speicherfunktion Speicher für 120 Messwerte 2 AAA-Alkalinbatterien, Stromversorgung D.C.3V Automatische Abschaltung Nach 3 Minuten Bruttogewicht ca. 100g (ohne Batterien) Temperatur 10 ~ 40°C (50 ~ 104°F) Betriebs- umgebung Feuchtigkeit 15~ 90% rLF (nichtkondensierend) 105~ 80 kPa Barometrischer Druck Aufbe- Temperatur –20 ~ 40°C (–4 ~ 104°F) wahrung...
- Page 19 EN1060-3: Nichtinvasive Blutdruckmessgeräte, EN1060-4: Nichtinvasive Blutdruckmessgeräte. • Das Gerät hat die EMV-Prüfung bestanden. • Innerhalb der vom American National Standard für manuelle, elektronische oder automatische Blutdruckmessgeräte vorgegebenen Grenzen sind Blutdruckmessungen mit diesem Gerät mit den Mes- sungen vergleichbar, die geschultes Personal mit der Manschetten/Stethoskop-Methode erzielt.
- Page 20 INSTRUCTIONS Introduction • Vous venez d’acheter ce tensiomètre poignet numé- rique entièrement automatique. • Cet appareil mesure la tension artérielle selon la méthode oscillométrique, ce qui signifie que l’appareil détecte le déplacement de votre sang dans votre artère brachiale et affiche ensuite la valeur de votre pression artérielle.
- Page 21 Signe Attention et Symbole de marquage Signe Attention Obligatoire Interdit Partie appliquée de type B Consultez la documentation Numéro de série Symbole de marquage des appareils élec- triques et électroniques conformément à la directive 2002/96/CE. Cet appareil, ses accessoires et son emballage doivent être éliminés correctement après usage.
- Page 22 vues par son mode d’emploi. Ne l’utilisez à aucune autre fin que celles pour lesquelles il a été conçu. • Cet appareil est conçu pour mesurer la tension ar- térielle et le pouls des adultes, son utilisation n’est pas recommandée pour les nouveau-nés. •...
- Page 23 Affichage G Symbole gonflage/dégonflage ou indication OMS H Symbole rythme cardiaque irrégulier I Mémoire et numéro de mesure J WHO Pression artérielle Classification Indicateur K Pression artérielle systolique L Pression artérielle diastolique M Indication de l’unité N Affichage du pouls O Groupes P Moyenne des 3 dernières mesures Q Temps...
- Page 24 Mis en place/remplacement des piles 1 Retirez le couvercle du compartiment à piles. 2 Insérez deux piles AAA neuves dans le compartiment, en respectant leur polarité. 3 Replacez le couvercle du compartiment à piles. Vorsicht/Attention • Utilisez des piles alcalines 1,5 V identiques, de type AAA LR03.
- Page 25 Prise de mesures correcte 1 Découvrez entièrement votre bras pour placer le bracelet directement sur la peau. 2 Serrez fermement autour de votre poignet à l’aide de la bande velcro. 3 Tournez votre paume vers le haut, détendez vos doigts et votre poignet de manière naturelle. 4 Reposez votre bras sur quelque chose de souple, sous le tensiomètre, comme indiqué...
- Page 26 Position des doigts. Incorrecte Correcte Incorrecte Position du poignet Incorrecte Correcte Incorrecte...
- Page 27 Comment prendre une me- sure 1 Appuyez sur le bouton START/ STOP. Tous les symboles s’affichent à l’écran. Le bracelet commence automatiquement à se gonfler. 2 La prise de mesure démarre pen- dant le gonflage. Le symbole du rythme cardiaque clignote dès qu’un pouls est détecté.
- Page 28 4 Appuyez sur le bouton START/STOP pour arrêter l’appareil. Lorsque l’appareil n’est pas utilisé, il s’éteint auto- matiquement après trois minutes. Veuillez vous reposer entre 30 et 60 secondes avant de prendre la mesure suivante. Comment utiliser la fonction mémoire •...
- Page 29 Pour consulter les valeurs en mémoire • Appuyez sur b o u t o n mémoire «M» pour visuali- ser les valeurs de mesure. Pour supprimer les valeurs en mémoire Pendant la lecture des valeurs de mesure, maintenez le bouton Mémoire SET enfoncé pendant 3 – 4 secon- des.
- Page 30 lors de la phase de relaxation du muscle cardiaque. Pression artérielle systolique Contraction du muscle cardiaque Éjection du sang Pression accrue vers les vaisseaux sanguins Pression plus élevée Pression artérielle diastolique Relaxation du muscle cardiaque Le sang revient vers le cœur Diminution de la pression vers les vaisseaux sanguins Pression plus faible...
- Page 31 leading to a ri Make sure hose is Cuff fails to inflate If these measu properly fastened to properly cuff and monitor unit is working har Read user manual " " Improper operation carefully and personne tombent dans deux catégories différentes, displayed re-test properly.
- Page 32 Indicateurs d’erreur Lorsque la mesure est anormale, les symboles suivants apparaissent sur l’écran. Symbole Cause Solution 1. Placez le brace- let correctement, Un problème appa- et serrez-le. raît au cours de la 2. Procédez une nou- phase de gonflage. velle fois au gon- flage après avoir tout contrôlé.
- Page 33 Détection des problèmes Problème Causes et solutions Remplacez les piles usées par deux piles d’alimentation neuves. Aucun af fi- Contrôlez la polarité des piles pour vous chage n’ap pa- assurer qu’elles sont correctement placées. raît sur l’écran. La pression artérielle varie constamment. De nombreux facteurs tels que le stress, le Les résultats moment de la journée ou la manière dont...
- Page 34 " SET " Button regulations. Wrist Cuff Unit Illustration nit Illustration Unit Illustration • Utilisez l’appareil conformément aux instructions de Contents ce manuel. N’utilisez que les pièces et accessoires isplay prévus pour cet appareil. Maintenance Ne nettoyez pas le corps de Groups Systolic l’appareil ni le bracelet avec...
- Page 35 Spécifications Modèle N° BSP-22 Affichage Écran LCD numérique Principe de mesure Méthode oscillométrique Point de mesure Poignet Bracelet Bracelet souple pour poignet Pression 0 à 300 mmHg (0 – 39,9 kPa) Plage de mesure Pouls 30 à 180 pulsations/min Pression ±...
- Page 36 Spécifications Mémoire de 120 séries de Fonction mémoire mesures 2 piles alcalines AAA; Alimentation DC 3 V Extinction automatique Après 3 minutes Env. 100 g Poids (piles non incluses) Température 10 ~ 40°C (50 ~ 104°F) Conditions d’utilisation Humidité 15 ~ 90% HR (sans condensation) 105 ~ 80 kPa Pression atmosphérique Condi-...
- Page 37 EN1060-3: tensiomètres non invasifs; EN1060-4: tensiomètres non invasifs. • L’appareil a passé le test CEM (conformité électro- magnétique). • Les mesures de pression artérielle effectuées avec cet appareil sont équivalentes à celles obtenues par un observateur qualifié se servant de la méthode auscultatoire du brassard/stéthoscope, au sein des limites recommandées par l’American National Standard pour les sphygmomanomètres manuels,...
- Page 38 INSTRUZIONI Introduzione • Grazie per aver acquistato il misuratore di pressi- one digitale da polso completamente automatico. • L’unità misura la pressione sanguigna con il me- todo oscillometrico. Il dispositivo, infatti, rileva il movimento del sangue nell’arteria brachiale e converte la pressione arteriosa in un valore digi- tale.
- Page 39 Simbolo di attenzione Simbolo di attenzione Obbligatorio Proibito Parte applicata di tipo B Consultare la documentazione allegata. Numero di serie Simbolo che identifica i dispositivi elett- rici ed elettronici conforme alla direttiva 2002/96/CE. Terminata la vita utile, smal- tire correttamente il dispositivo, gli accessori e l’imballo.
- Page 40 è raccomandata per i neonati. • Non usare cellulari in prossimità dell’unità, perché potrebbero disturbare il corretto funzionamento. • Non utilizzare in aree con elevate radiazioni perché ciò potrebbe risultare in dati di misura incorretti. • Non smontare o tentare di riparare l’unità o i suoi componenti.
- Page 41 Display G Simbolo di gonfiatura/ sgonfiatura o indicazione dell’OMS H Simbolo del battito cardiaco irregolare I Memoria e numero di misurazione J WHO pressione sanguigna Indicatore di classificazione K Pressione sistolica L Pressione diastolica M Unità di misura N Display polso O Gruppi P Media delle ultime 3 misurazioni Q Tempo...
- Page 42 Installazione/sostituzione della batteria 1 Togliere il coperchio dal vano batterie. 2 Inserire due batterie AAA cariche nel vano e assicurarsi che siano disposte correttamente. 3 Rimontare il coperchio del vano batterie. Attenzione • Usare due batterie alcaline identiche di tipo AAA LR03 da 1,5V.
- Page 43 Modalità di misurazione corretta 1 Liberare il braccio dagli indumenti e applicare il manicotto direttamente sulla pelle. 2 Stringere bene il manicotto intorno al polso usando la chiusura di velcro. 3 Girare il palmo della mano verso l’alto, aprire la mano e il polso in modo naturale.
- Page 44 Posizione delle dita. Sbagliata Giusta Sbagliata Posizione del polso Sbagliata Giusta Sbagliata...
- Page 45 Come effettuare la misura- zione 1 Premere il pulsante di AVVIO/ ARRESTO. Sullo schermo com- paiono tutti i simboli del display. Il manicotto inizia a gonfiarsi automaticamente. 2 La misurazione inizia durante la fase di gonfiamento. Appena viene rilevato il polso il simbolo del battito cardiaco lampeggia.
- Page 46 4 Premere il tasto di AVVIO/ARRESTO per spegnere l’unità. Se l’unità non viene utilizzata per più di 3 minuti si spegne automaticamente. Prima di effettuare una nuova misurazione attendere 30 – 60 secondi. Uso della funzione di memoria • Al termine di ogni misurazione l’unità salva in memoria i valori della pressione sanguigna e del polso.
- Page 47 Come leggere i valori memorizzati • Premere il pulsante di memoria „M“. Sul display compare il valore medio della lettura. Come cancellare i valori memorizzati Durante la lettura dei valori in memoria, premere e tenere premuto il tasto di memoria „SET“, quindi pre- mere il tasto AVVIO/ARRESTO per 3 –...
- Page 48 Pressione sistolica Contrazione del muscolo cardiaco Uscita del sangue Maggiore pressione nei vasi sanguigni Pressione massima Pressione diastolica Rilassamento del muscolo cardiaco Sangue di ritorno al cuore Minore pressione nei vasi sanguigni Pressione minima Classificazione della pressione sanguigna Al termine di ogni misurazione il display LCD mostra automaticamente la posizione sui sei segmenti dell’indicatore a barre che corrisponde all’indicatore della pressione sanguigna secondo l’OMS.
- Page 49 Read user manual " " Improper operation carefully and displayed re-test properly. Read user manual Pressurization is over carefully and 300mmHg re-test properly. Pressione diastolica (mmHg) Ipertensione grave Blood Pressure Information Blood Ipertensione moderata Ipertensione leggera Rosso WHO Blood Pressure Classification Indicator Health Valore sistolico normale Giallo...
- Page 50 Indicatori di errore Se la misurazione rivela valori abnormi, sul display compaiono i seguenti simboli. Simbolo Causa Correzione 1. Applicare cor- rettamente il Errore segnalato manicotto e strin- durante la fase di gerlo bene. gonfiamento 2. Poi gonfiare di nuovo. 1.
- Page 51 Eliminazione guasti Problema Cause e soluzioni Non c’è ali- Sostituire le batterie scariche con due mentazione. batterie nuove. Sullo schermo Controllare che le batterie siano inserite non compare correttamente con la giusta polarità. nulla. La pressione sanguigna oscilla continua- mente. Molti i fattori possono influire sulla I valori di pressione sanguigna, tra cui lo stress, misura sono...
- Page 52 " SET " Button regulations. Wrist Cuff Unit Illustration nit Illustration Unit Illustration Manutenzione Contents isplay Non pulire il corpo e il manicotto con nafta, diluente o benzina, Groups ecc. Systolic Blood Low Battery Indicator Pressure mmHg kPa WHO Blood Pressure 1.Monitor Unit Owner's Manual Classification Indicator...
- Page 53 Specifiche Modello n. BSP-22 Display Display LCD digitale Principio di misurazione Metodo oscillometrico Luogo della misura Polso Manicotto Manicotto soffice da polso Pressione da 0 a 300 mmHg (0~39,9 kPa) Campo di misura Polso da 30 a 180 battiti/min Pressione ±...
- Page 54 Specifiche Memoria con 120 serie di Funzione di memoria valori di misura 2 batterie alcaline AAA; Fonte di alimentazione CC 3V Spegnimento automatico In 3 minuti Circa 100 g Peso lordo (batterie non incluse) Temperatura 10 ~ 40°C (50 ~104°F) Ambiente operativo Umidità...
- Page 55 momanometro non invasivo, EN1060-4: Sfigmo- manometro non invasivo. • L’unità ha passato il test CEM. • Le misurazioni della pressione sanguigna effettuate con il presente dispositivo sono equivalenti a quelle ottenute da osservatori addestrati nell’uso del me- todo auscultorio con manicotto/stetoscopico, entro i limiti prescritti dall’American National Standard, Manuale di elettronica o gli sfigmomanometri elett- ronici o manuali.
- Page 56 INSTRUCTIES Inleiding • Bedankt dat u de volautomatische digitale pols- bloeddrukmeter hebt gekocht. • Het apparaat gebruikt de oscillometrische methode voor het meten van de bloeddruk. Dat wil zeggen dat het apparaat de beweging van uw bloed door uw polsslagader detecteert, en uw bloeddruk om- rekent naar een digitaal resultaat.
- Page 57 Attentiesymbool Attentiesymbool Verplicht Verboden Type B wordt los gebruikt Lees de bijgeleverde documentatie. Serienummer Symbool ter markering van elektrische en elektronische apparaten volgens 2002/96/EC. Het apparaat, de toebe- horen en de verpakking dienen na beëin- diging van het gebruik correct te worden afgevoerd.
- Page 58 • Het apparaat is bedoeld voor het meten van de bloeddruk van volwassenen. Het wordt niet aange- raden voor pasgeborenen. • Gebruik geen mobiele telefoon in da buurt van het apparaat. Dat kan tot een foutieve werking leiden. • Vermijd gebruik in sterk verlichte ruimtes, daar dit tot meetfouten kan leiden.
- Page 59 Display G Oppompen/leeglopen of WHO-indicatie H onregelmatige Hartslag I Geheugen en tijd J WHO bloeddruk classifi- catie Indicator K Systolische druk L Diastolische druk M Meeteenheid, Lind lnd,ceöon N Pulsdisplay O Groepen P Gemiddelde van de laatste 3 metingen Q Tijd R Datum S Batterij zwak Voeding...
- Page 60 Batterij installeren/ vervangen 1 Haal het deksel van het batterijvak. 2 Plaats twee volle AAA-batterijen in het batterijvak en controleer van elke batterij de juiste polariteit. 3 Plaats het deksel weer op het batterijvak. Let op! • Gebruik twee identieke alkalinebatterijen van 1,5 V, type AAA L203.
- Page 61 Op de juiste manier meten 1 Verwijder alle kleding van uw arm, zodat de man- chet rechtstreeks op uw huid kan zitten. 2 Wikkel de manchet stevig om uw pols en sluit hem met het klittenband. 3 Houd uw handpalm naar boven. Houd uw ving- ers en uw pols in een gemakkelijke en natuurlijke stand.
- Page 62 Houding van de vingers Niet goed Goed Niet goed Houding van de pols Niet goed Goed Niet goed...
- Page 63 Een meting verrichten 1 Druk op de start-/stopknop. Alle symbolen verschijnen op het scherm. De manchet wordt automatisch opgeblazen. 2 Het meting begint tijdens het oppompen. Het hartslagsymbool licht op bij elke gedecteerde polsslag. 3 De bloeddruk en de polsfre- quentie worden weergegeven wanneer de meting klaar is.
- Page 64 4 Druk op STAR/STOP om het apparaat uit te schakelen. Het apparaat schakelt na 3 minuten automatisch uit indien het gedurende die tijd niet is gebruikt. Wacht 30 – 60 seconden voordat u de volgende meting doet. De geheugenfunctie gebruiken •...
- Page 65 De geheugenwaarden uitlezen • Druk op ge- heugenknop «M» om meet- waarde te zien. Geheugenwaarden wissen Houd tijdens het uitlezen van de meetwaarden de knop «SET» ingedrukt, en houd de knop START/STOP 3 tot 4 seconden ingedrukt. De bloeddruk/Bloedsomloop De bloedsomloop voorziet het lichaam van zuurstof. De bloeddruk is de druk die op de slagaderen wordt uitgeoefend.
- Page 66 Systolische bloeddruk Samentrekken van de hartspier Bloed stroomt eruit Druk in bloedvat neemt toe hogere druk Diastolische bloeddruk Ontspannen van de hartspier Bloed terug in hart Druk in bloedvat neemt af Lagere druk Classificatie van de bloeddruk Na afloop van elke meting geeft het display automa- tisch uw positie weer op de zes segmenten van het staafdiagram dat overeenkomt met de bloeddrukindi- cator van de WHO.
- Page 67 Read user manual " " Improper operation carefully and displayed re-test properly. Read user manual Pressurization is over carefully and 300mmHg Diastolische bloeddruk (mmHg) re-test properly. Zware hoge bloeddruk Blood Pressure Information Blood Matige hoge bloeddruk Licht verhoogde bloeddruk Rood WHO Blood Pressure Classification Indicator Health Geel...
- Page 68 Foutmeldingen Het volgende symbool verschijnt ingeval van een probleem. Symbool Oorzaak Correctie 1. Breng de man- chet correct en Als fout optreedt stevig aan. tijdens oppompen. 2. Pomp opnieuw op na controle. 1. Beweeg uw arm niet, blijf rustig. Als meting 2.
- Page 69 Storingen verhelpen Probleem Oorzaken en oplossingen Geen voedings- Vervang alle oude batterijen door nieuwe. spanning. Er verschijnt niets Controleer of de batterijen met de juiste polariteit op het scherm. zijn geplaatst. De bloeddruk varieert voortdurend. Veel factoren, waaronder spanningen, tijdstip van Meetwaardes de dag, hoe de manchet is aangelegd, kunnen lijken te hoog of...
- Page 70 " SET " Button regulations. Wrist Cuff nit Illustration nit Illustration Unit Illustration Onderhoud Contents isplay Reinig het apparaat en de manchet niet met nafta, thinner, Groups benzine, enz. Systolic Blood Low Battery Indicator Pressure mmHg kPa WHO Blood Pressure 1.Monitor Unit Owner's Manual Classification Indicator...
- Page 71 Specificaties Model-no. BSP-22 Display Digitaal LCD-display Meetprincipe Oscillometrische methode Meetpositie Pols Manchet Zachte polsmanchet Druk 0 – 300 mmHg (0 – 39.9 kPa) Meetbereik Polsslag 30 –180 polsen/min Druk ± 3 mmHg (0.4 kPa) Nauwkeurig- heid Polsslag ± 5% van aflezing Druk 3 cijfers in mmHg or kPa LCD-uitlezing...
- Page 72 Specificaties Geheugen voor Geheugenfunctie 120 meetwaren-paren 2 AAA aIkalinebatterijen; Power Source 3 V = Automatisch uitschakelen Na 3 minuten Circa 100 g Brutogewicht (exclusief batterijen) Temperatuur 10 ~ 40°C (50 ~ 104°F) Gebruiksom- standigheden Vochtigheid 15~ 90% RH (niet-condenserend) 105~ 80 kPa Barometrische druk Opsla- gomstan-...
- Page 73 EN60601-1-2 Medisch-elektrische apparatuur 2, EN1060-1: Non-invasieve sfygmomanometer, EN 1060-3: Non-invasieve sfygmomanometer, EN 1060-4: Non-invasieve sfygmomanometer. • Het apparaat voldoet aan de EMC-eisen. • Met dit apparaat verrichte bloeddrukmetingen zijn equivalent aan metingen door geschoolde mede- werkers met gebruikmaking van de ausculterende methode met manchet en stethoscoop, binnen de grenzen zoals voorgeschreven door American Na- tional Standard Manual, electronic, or automated...
- Page 74 INSTRUCTIONS Introduction • Thank you for purchasing the Fully Automatic Wrist Style Digital Blood Pressure Monitor • The unit uses the oscillometric method of blood pressure measurement. It means the unit detects the movement of your blood through your brachial artery, and converts your blood pressure into a di- gital reading.
- Page 75 Attention sign Attention sign Zwingend Verboten Type B applied part Consult accompany documents Seriennummer Symbol for the marking of electrical and electronics devices according to Directive 2002/96/EC. The device, accessories and the packaging have to be disposed of waste correctly at the end of the usage Please follow Local Ordinances or Regu- lations for disposal.
- Page 76 any other purpose. • The unit is intended to use on measuring blood pressure and pulse rate for adult only, not recom- mended for neonatal baby. • Do not use a cellular phone near the unit. It may result in operational failure. •...
- Page 77 Display G Inflation/Deflation Symbol or WHO Indication H irregular Heartbeat Symbol I Memory & Times J WHO Blood Pressure Classifi- cation Indicator K Systolic Blood Pressure L Diastolic Blood Pressure M Unit Indication N Pulse Display O Groups P Last 3 results average Q Time R Date S Low Battery Symbol...
- Page 78 Battery Installation/ Replacement 1 Remove the battery cover from the battery compartment. 2 Insert two AAA powerful batteries into the compartment and ensure each battery is in the proper direction. 3 Replace battery cover. Caution • Use two identical 1.5V alkaline batteries type AAA LR03.
- Page 79 Proper way of measurement 1 Remove all clothes from your arm allowing the cuff to fit directly on the skin. 2 Wrap the cuff tightly around your wrist by using the Velcro strip. 3 Turn your palm upwards, stretch your fingers and wrist naturally.
- Page 80 Proper way of measurement – Finger‘s pose Not good Good Not good Proper way of measurement – Wrist‘s pose Not good Good Not good...
- Page 81 How to take a measurement 1 Press the START/STOP button. All display symbols appear on the screen. The cuff starts to inflate automatically. 2 Measurement starts while inflating The heartbeat symbol flashes once a pulse is detected. 3 The blood pressure and pulse rate are displayed when the measurement is completed.
- Page 82 4 Press the START/STOP button to turn off the unit. The unit will automatically turn off after two minutes if it is not used in that time. Please rest for 30– 60 seconds before taking your next measurement. How to use the memory function •...
- Page 83 To read the memory values • Press the «M» button to view the last measurement value. To clean out the memory values When reading the measurement values, press and hold the memory button, then press START/STOP button for 3 – 4 seconds. About Blood Pressure/Blood Circulation The blood circulation is responsible for supplying the body with oxygen.
- Page 84 Systolic Blood Pressure Contraction of the heart muscle Extrude blood Pressure increased to the blood vessel Higher pressure Diastolic Blood Pressure Relaxation of the heart muscle Bood return heart Pressure decreased to the blood vessel Lower pressure Classification of Blood Pressure After each measurement is completed, the LCD display will show your position automatically on the six seg- ments of the bar indicator which corresponds to WHO...
- Page 85 Read user manual " " Improper operation carefully and displayed re-test properly. Read user manual Pressurization is over carefully and 300mmHg re-test properly. Diastolic Blood Pressure (mmHg) Severe hypertension Blood Pressure Information Blood Moderate hypertension Mild hypertension WHO Blood Pressure Classification Indicator Health Yellow Normal systolic value...
- Page 86 Error Indicators The following symbol will appear on the display when measuring abnormal. Symbol Cause Correction 1. Wrap the cuff correctly and The course of infla- tightly. ting appears error. 2. Inflate over again after ensuring. 1. Do not move your arm and body and keep When measurement...
- Page 87 Eliminate Faults Problem Causes and Solutions Replace all the worn batteries with two No power. new ones. No display appears on Check the battery installation for proper the display placement of the batteries polarities. screen. Blood pressure varies constantly. Many Measurement factors including stress, time of day, how values appear...
- Page 88 " SET " Button regulations. Wrist Cuff nit Illustration nit Illustration Unit Illustration Unterhalt Contents isplay Do not clean the body and cuff with naphtha, thinner or gasoline Groups etc. Systolic Blood Low Battery Indicator Pressure mmHg kPa WHO Blood Pressure 1.Monitor Unit Owner's Manual Classification Indicator...
- Page 89 Specifications Model No. BSP-22 Display LCD Digital Display Measuring Principle Oscillometric Method Measurement Localization Wrist Cuff Soft Wrist Cuff Pressure 0 – 300 mmHg (0 – 39.9 kPa) Measurement Range Pulse 30 –180 Pulses/min Pressure ± 3 mmHg (0.4 kPa) Accuracy Pulse ±...
- Page 90 Specifications Memory 120 Sets Memory Function Measurement Values 2 AAA Alkaline Batteries, Power Source D.C.3V Automatic Power-Off In 3 Minutes Approx. 100g Gross Weight (Batteries not included) Temperature 10 ~ 40°C (50 ~ 104°F) Operating Environment Humidity 15~ 90% RH (Noncondensing) 105~ 80 kPa Barometric Pressure Storage...
- Page 91 EN1060-3: Non-invasive sphygmomanometer, EN1060-4: Non-invasive sphygmomanometer. • The unit has passed the EMC Test. • Blood pressure measurements determined with this device are equivalent to those obtained by a trained observer using the cuff/stethoscope auscul- tatory method, within the limits prescribed by the American National Standard, Manual, electronic, or automated sphygmomanometers.
- Page 92 UBTC Switzerland AG – Blegistrasse 19 6340 Baar – Switzerland Importer EU: UBTC Germany GmbH Alte Provinzialstrasse 21 – 58708 Menden – Germany UBTC Switzerland AG Importer EU: UBTC Germany GmbH Blegistrasse 19 Alte Provinzialstrasse 21 6340 Baar – Switzerland 58708 Menden –...