Table des Matières
Publicité
Les langues disponibles
Les langues disponibles
Liens rapides
Publicité
Chapitres
Table des Matières

Sommaire des Matières pour ilco Silca Bravo III
- Page 3 © 2010 SILCA S.p.A - Vittorio Veneto This manual has been drawn up by SILCA S.p.A. All rights reserved. No part of this publication may be reproduced or used in any form or by any means (photocopying, microfilm or other) without the written permission of SILCA S.p.A. Edition: september 2010 Printed in Vittorio Veneto by SILCA S.p.A.
-
Page 4: Table Des Matières
CONTENTS GUIDE TO THE MANUAL ..................1 GENERAL INTRODUCTION .................2 TRANSPORT ....................4 Packing ....................4 Transport ....................4 Unpacking .....................4 Handling the machine ................5 WORKING PARTS ..................6 MACHINE DESCRIPTION ................7 Safety ....................9 Technical Data ..................9 Electric circuit ..................10 ACCESSORIES PROVIDED .................11 MACHINE INSTALLATION AND PREPARATION ........12 Checking for damage ................12 Environmental conditions ..............12 Positioning ..................12... -
Page 6: Guide To The Manual
Operating manual - English BRAVO III with EZ-Jaw GUIDE TO THE MANUAL This manual is a guide to the use of BRAVO III with EZ-Jaw key-cutting machine. Read it carefully; it is essential if you wish to operate your machine safely and efficiently. ONSULTATION The contents of the manual are divided into sections relating to: Transport and handling .................... -
Page 7: General Introduction
BRAVO III with EZ-Jaw Operating manual - English GENERAL INTRODUCTION From the design stage risks for the operator have been eliminated in all areas: transport, key-cutting, regulation and maintenance. Other risks have been eliminated by the use of protective devices for the operator. The protective devices used are designed not to provoke further risks and, above all, they cannot be ignored unless deliberately cut out. - Page 8 Operating manual - English BRAVO III with EZ-Jaw • Machine Identification The BRAVO III with EZ-Jaw key-cutting machine is provided with an identification label which shows the serial number (fig. 2). Manufacturer’s ¨ identity Type of machine Serial No. Working voltage Absorbed current CSA/UL...
-
Page 9: Transport
BRAVO III with EZ-Jaw Operating manual - English TRANSPORT The BRAVO III with EZ-Jaw key-cutting machine is easily transported and is not dangerous to handle. The machine must be placed in its packaging and carried manually by two persons. Packing The BRAVO III with EZ-Jaw is packed in a strong cardboard box, the dimensions of which are shown in fig. -
Page 10: Handling The Machine
Operating manual - English BRAVO III with EZ-Jaw Handling the machine When the BRAVO III with EZ-Jaw has been unpacked, place it directly on its workbench. This operation can be carried out by one or two persons, firmly holding the base and no other part, to lift and carry the machine (fig.4). -
Page 11: Working Parts
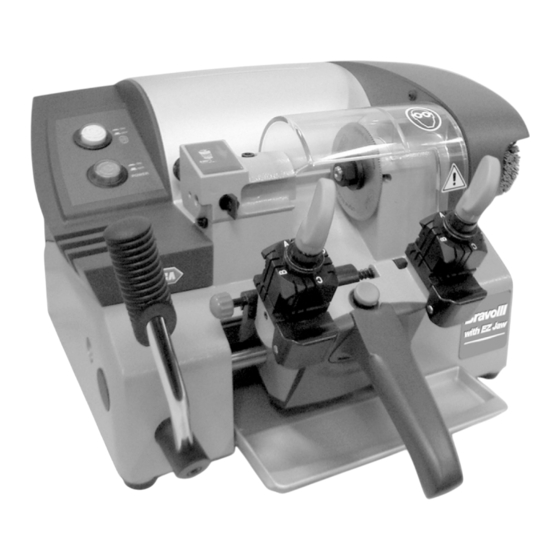
BRAVO III with EZ-Jaw Operating manual - English WORKING PARTS Fig. 5 A - cutting tool B - tracer point B1- tracer point support C - master switch D - carriage E - clamp F - clamp knob H - transparent protective shield I - brush J - tracer point locking screw J1- support/tracer point locking screw... -
Page 12: Machine Description
Operating manual - English BRAVO III with EZ-Jaw MACHINE DESCRIPTION The BRAVO III with EZ-Jaw is a professional cutting machine for flat keys used with cylinder locks for doors, cars and cruciform keys. The main parts of the machine are described below: •... - Page 13 BRAVO III with EZ-Jaw Operating manual - English Fig. 6 Copyright Silca 2010...
-
Page 14: Safety
Operating manual - English BRAVO III with EZ-Jaw Safety • Cutter motor protection ATTENTION: the cutter motor is protected from overheating by a device (inside the motor) that stops it when it reaches a dangerous temperature. This condition can occur when the machine motor is left on continuously, with high ambient temperatures or in severe working conditions. -
Page 15: Electric Circuit
BRAVO III with EZ-Jaw Operating manual - English Electric circuit The BRAVO III with EZ-Jaw key-cutting machine has a 1 speed single phase motor. The main parts of the electric circuit on the BRAVO III with EZ-Jaw are listed below: 1) Main plug with fuses 6,3 Amps rapid 2) Safe main switch 3) Brush push button... -
Page 16: Accessories Provided
Operating manual - English BRAVO III with EZ-Jaw ACCESSORIES PROVIDED To ensure trouble-free working with the BRAVO III with EZ-Jaw, it is advisable to always have certain spare parts on hand. It is good policy to have a replacement CUTTER, BRUSH and BELT in the tool box. -
Page 17: Machine Installation And Preparation
BRAVO III with EZ-Jaw Operating manual - English MACHINE INSTALLATION AND PREPARATION The BRAVO III with EZ-Jaw key-cutting machine can be installed by the purchaser and does not require any special skills. The machine is supplied ready for use and does not need to be set up. However, some checks and preparation for use need to be carried out by the operator. -
Page 18: Description Of Work Station
Operating manual - English BRAVO III with EZ-Jaw Description of work station The key-cutting machine needs only one operator, who has the following controls at his/her disposal: Control panel: placed on the left-hand side of the machine; controls the machine completely, through the following controls: •... -
Page 19: Checking And Setting
BRAVO III with EZ-Jaw Operating manual - English Checking and setting The cutting tool on the BRAVO III with EZ-Jaw is the part used to cut the key blanks and should be periodically checked and replaced, if necessary. Every time the cutting tool is changed, and during periodical operational tests, check calibration. Calibration Calibration should be carried out whenever parameters must be set on the machine. - Page 20 Operating manual - English BRAVO III with EZ-Jaw XIS CALIBRATION Axis calibration is regulation of the cutting space on the key (fig.12). Proceed as follows: 1) Turn off the master switch (C) to operate safely and prevent activation of the cutting tool. 2) Place the adjusting key in the clamps (fig.14) with the notch facing the cutting tool and tracer point and proceed as follows: a) ensure that the keys adhere to the clamp and that the callipers (K) are in full contact with...
-
Page 21: Cutting Operations
BRAVO III with EZ-Jaw Operating manual - English CUTTING OPERATIONS ATTENTION: for complete safety during the cutting operations, take the following precautions: • Always work with dry hands. • Check that the machine is properly earthed. • Wear protective goggles even if the machine has a protective shield over the cutting tool. •... -
Page 22: Cutting Pin Keys
Operating manual - English BRAVO III with EZ-Jaw SING THE PINS For keys with narrow or thin stems one pin must be used (fig. 18-1 fig. 18-2). For keys with narrow, thin stems, two pins must be used (fig. 18-3), the second one to give a secure grip on the key. -
Page 23: Cleaning And Maintenance
BRAVO III with EZ-Jaw Operating manual - English CLEANING AND MAINTENANCE Although the BRAVO III with EZ-Jaw key-cutting machine does not require special maintenance, it is advisable to check and, if necessary, replace the parts subject to wear, such as: the belt, cutting tool, brush, tracer point. -
Page 24: Replacing The Brush
Operating manual - English BRAVO III with EZ-Jaw Replacing the brush When the brush no longer cleans off the burrs it must be replaced as follows: 1) Turn the machine off and unplug it. 2) Place the locking pin into the groove in the base and into the special hole in the cutter shaft (fig.22). -
Page 25: Regulating Of Maximum Carriage Depth
BRAVO III with EZ-Jaw Operating manual - English Regulating of maximum carriage depth To prevent damage to the clamps and cutting tool, maximum cutting depth must be established. ATTENTION: the distance between the cutting tool/tracer point and clamp must be 0.1 mm. If this is not the case, proceed as follows: 1) Turn the machine off and unplug it. -
Page 26: Access To Bottom Compartment
Operating manual - English BRAVO III with EZ-Jaw Access to bottom compartment 1) Turn the machine off and unplug it. 2) Remove the swarf tray. 3) Turn the machine onto its right-hand side. 4) Loosen the 7 screws (W) and 2 feet (W1) and remove the bottom safety plate (W2) (fig.26). Fig. -
Page 27: Replacing The Condenser (Motor)
BRAVO III with EZ-Jaw Operating manual - English Replacing the condenser (motor) 1) Turn the machine off and unplug it. 2) Remove the bottom panel (see ch. 7.7). 3) Loosen the nut (Z) and remove the washer (Z1) and condenser (fig.28). 4) Fit the new condenser and fix with the washer (Z1) and nut (Z). -
Page 28: Replacing The Microswitch
Operating manual - English BRAVO III with EZ-Jaw 7.10 Replacing the microswitch 1) Turn the machine off and unplug it. 2) Release the carriage and leave it in the working position (towards the tracer point). 3) Remove the bottom panel (ch.7.7, page 21). 4) Loosen the nut (Q1) and remove the microswitch (fig.29). -
Page 29: Replacing The Switch And/Or Push Button
BRAVO III with EZ-Jaw Operating manual - English 7.11 Replacing the switch and/or push button 1) Turn the machine off and unplug it. 2) Loosen the 2 screws (H1) on the cutter cover (H) and remove (fig.30). 3) Loosen the 3 screws (T1) on the central cover, raise slightly and remove, tipping a little. 4) Loosen the 3 screws (T2) (fig.31) on the belt cover and remove (pull out towards the front of the machine). -
Page 30: Replacing And/Or Tightening The Belt
Operating manual - English BRAVO III with EZ-Jaw Fig. 32 Fig. 33 7.12 Replacing and/or tightening the belt 1) Turn the machine off and unplug it. 2) Loosen the 2 screws (H1) on the cutter cover (H) and remove (fig. 30, page 24). 3) Loosen the 3 screws (T1) on the central cover (fig.30), raise slightly and remove, tipping a little. -
Page 31: Replacing The Single Speed Motor
BRAVO III with EZ-Jaw Operating manual - English 7.13 Replacing the single speed motor 1) Turn the machine off and unplug it. 2) Remove the bottom panel (see ch. 7.7). 3) Disconnect the 4 motor wires (1, 2, 3, 4) from their connections (fig.35). -
Page 32: Replacing Carriage Spring
Operating manual - English BRAVO III with EZ-Jaw 7.14 Replacing carriage spring 1) Turn the machine off and unplug it. 2) Release the carriage and leave it in the working position (towards the tracer point). 3) Loosen the 2 screws (V1) on the carriage knob (V) (fig.38). 4) To remove the knob (V), raise a little and pull off. - Page 33 BRAVO III with EZ-Jaw Operating manual - English Fig. 40 Fig. 41 Copyright Silca 2010...
-
Page 34: Disposing Of Machine
Operating manual - English BRAVO III with EZ-Jaw DISPOSING OF MACHINE To dispose the machine, it must be rendered unusable by carrying out the operations listed below: deactivation of the electricity supply; separation of the plastic and metal parts; When these operations have been carried out, the machine can be disposed of according to the current regulations in the country of use. -
Page 35: Assistance
BRAVO III with EZ-Jaw Operating manual - English ASSISTANCE Silca provides full assistance to purchasers of the BRAVO III with EZ-Jaw key-cutting machine. To ensure complete safety for the operator, any job not specified in this manual should be carried out by the manufacturer or in the special Service Centres recommended by Silca. - Page 36 ¨ MACHINE A TAILLER LES CLES Manuel d’instructions code: D437928XA - vers. 1.0...
- Page 37 © 2010 SILCA S.p.A. - Vittorio Veneto Ce manuel a été rédigé par Silca S.p.A. Tous les droits sont réservés. Aucune partie de cette brochure ne peut être reproduite ni diffusée par quelque moyen que ce soit (photocopie, microfilm ou autre) sans l’autorisation écrite préalable de SILCA S.p.A. Édition: septembre 2010 Imprimé...
- Page 38 TABLE DES MATIERES POUR MIEUX VOUS ORIENTER ................1 REMARQUES D’ORDRE GENERAL ..............2 TRANSPORT ....................4 Emballage .....................4 Transport ....................4 Ouverture de l’emballage ..............4 Manutention de la machine ..............5 PARTIES OPERATIONNELLES ..............6 DESCRIPTION De LA MACHINE ..............7 Sécurités ....................9 Caractéristiques techniques ..............9 Circuit électrique .................10 ACCESSOIRES EN DOTATION ..............11 INSTALLATION ET PREPARATION DE LA MACHINE ......12...
-
Page 40: Pour Mieux Vous Orienter
Manuel d’instruction - Français BRAVO III with EZ-Jaw POUR MIEUX VOUS ORIENTER Cette brochure a été réalisée pour constituer un guide à l’emploi de la machine à tailler les clés BRAVO III with EZ-Jaw et sa lecture ainsi que sa consultation représentent un atout essentiel pour un emploi sûr et efficient de la machine. -
Page 41: Remarques D'ordre General
BRAVO III with EZ-Jaw Manuel d’instruction - Français REMARQUES D’ORDRE GENERAL Dès le niveau de la conception, toutes les solutions permettant d’annuler les risques pour l’opérateur dans les différentes phases d’utilisation ont été adoptées: transport, taille, réglage et maintenance. Les risques résiduels pour l’opérateur ont été éliminés grâce à des accessoires de protection spéciaux. Les protections sont telles qu’elles ne comportent aucun risque supplémentaire et, surtout, elles ne peuvent être éludées si ce n’est intentionnellement;... - Page 42 Manuel d’instruction - Français BRAVO III with EZ-Jaw • Identification de la machine La machine BRAVO III with EZ-Jaw est dotée d’une plaquette d’identité comprenant son nº de matricule (ill. 2). nom du ¨ fabricant type de machine numéro de matricule voltage d’utilisation courant absorbée...
-
Page 43: Transport
BRAVO III with EZ-Jaw Manuel d’instruction - Français TRANSPORT La machine BRAVO III with EZ-Jaw est facilement transportable et ne présente aucun risque particulier pendant sa manutention. La machine emballée doit être maniée par deux personnes. Emballage La machine BRAVO III with EZ-Jaw est livrée renfermée dans une boîte en carton solide (voir encombrement ci-dessous à... -
Page 44: Manutention De La Machine
Manuel d’instruction - Français BRAVO III with EZ-Jaw Manutention de la machine Une fois l’emballage enlevé, il faut placer la machine BRAVO III with EZ-Jaw directement sur le plan de travail. Cette opération peut être effectuée par une ou deux personnes et nous conseillons de n’utiliser que le bas de la machine comme prise pour la manutention (ill. -
Page 45: Parties Operationnelles
BRAVO III with EZ-Jaw Manuel d’instruction - Français PARTIES OPERATIONNELLES ill. 5 A - fraise B - palpeur B1- support palpeur C - interrupteur général D - bloc mobile E - étau F - manette étau H - carter fraise transparent I - brosse J - vis de serrage palpeur J1- vis de serrage support/palpeur... -
Page 46: Description De La Machine
Manuel d’instruction - Français BRAVO III with EZ-Jaw DESCRIPTION DE LA MACHINE La machine BRAVO III with EZ-Jaw est une machine à tailler professionnelle de clés plates pour serrures à cylindre de portes, voitures et de clés cruciformes. Les parties principales de la machine sont les suivantes: •... - Page 47 BRAVO III with EZ-Jaw Manuel d’instruction - Français ill. 6 Copyright Silca 2010...
-
Page 48: Sécurités
Manuel d’instruction - Français BRAVO III with EZ-Jaw Sécurités • Protection moteur fraise ATTENTION: le moteur de la fraise est protégé contre la surchauffe par une protection (dans le moteur même) qui le stoppe dès que la température atteint un niveau dangereux. Ceci pourrait par exemple se produire quand on oublie d’éteindre le moteur en continu, quand il fait très chaud ou quand l’usinage est particulièrement ardu. -
Page 49: Circuit Électrique
BRAVO III with EZ-Jaw Manuel d’instruction - Français Circuit électrique La machine BRAVO III with EZ-Jaw est équipée d’un moteur monophasé à une allure. Les parties principales du circuit électrique de la machine BRAVO III with EZ-Jaw peuvent se résumer à: 1) Prise de alimentation avec fusibles 6,3 Ampères rapides 2) Interrupteur général de sécurité... -
Page 50: Accessoires En Dotation
Manuel d’instruction - Français BRAVO III with EZ-Jaw ACCESSOIRES EN DOTATION Pour obtenir le maximum de la machine à tailler BRAVO III with EZ-Jaw, nous conseillons à l’utilisateur de pouvoir compter dès le départ sur certaines pièces de rechange. Il est en effet de bonne norme de pouvoir compter sur des outils tels la FRAISE, le BROSSE et la COURROIE. -
Page 51: Installation Et Preparation De La Machine
BRAVO III with EZ-Jaw Manuel d’instruction - Français INSTALLATION ET PREPARATION DE LA MACHINE L’installation de la machine à tailler BRAVO III with EZ-Jaw est confiée aux bons soins du client et n’exige aucune compétence particulière. La machine est livrée prête à l’emploi et aucune opération de montage n’est nécessaire; quelques opérations de contrôle et de préparation à... -
Page 52: Description Du Poste De Travail
Manuel d’instruction - Français BRAVO III with EZ-Jaw Description du poste de travail Pour faire marcher la machine il faut un seul opérateur qui puisse manoeuvrer les organes de commande suivants: Panneau de contrôle: situé sur la partie gauche, il permet de gérer complètement la machine par l’entremise des commandes suivantes: •... -
Page 53: Contrôle Et Étalonnage
BRAVO III with EZ-Jaw Manuel d’instruction - Français Contrôle et étalonnage La fraise de la machine à tailler BRAVO III with EZ-Jaw, qui constitue la partie destinée à la taille de la clé vierge, devra être contrôlée régulièrement et remplacée si nécessaire. Il faut contrôler l’étalonnage à... - Page 54 Manuel d’instruction - Français BRAVO III with EZ-Jaw TALONNAGE AXIAL Par étalonnage axial on entend la régulation de l’espace de taillage de la clé (ill. 12); pour l’effectuer, procéder comme suit: 1) Ééteindre l’interrupteur général (C) pour effectuer l’opération en toute sécurité et rendre impossible l’activation de la fraise.
-
Page 55: Taille
BRAVO III with EZ-Jaw Manuel d’instruction - Français TAILLE ATTENTION: pour travailler en toute sécurité pendant les phases de taille, il faut prendre les précautions suivantes: • travailler avec les mains bien sèches. • contrôler que la machine soit reliée à la prise de terre. •... -
Page 56: Taillage Des Clés Cruciformes
Manuel d’instruction - Français BRAVO III with EZ-Jaw TILISATION DES ÉPINGLES Quant les clés ont un canon étroit ou que leur épaisseur est minime, il faut utiliser 1 épingle (ill. 18-1 ill. 18-2). Quant les clés ont un canon étroit et que leur épaisseur est minime, il faut utiliser 2 épingles (ill. 18-3) de façon que la deuxième épingle permettre de bloquer la clé... -
Page 57: Nettoyage Et Maintenance
BRAVO III with EZ-Jaw Manuel d’instruction - Français NETTOYAGE ET MAINTENANCE La machine à tailler BRAVO III with EZ-Jaw ne requiert aucune maintenance particulière, il est toutefois opportun de contrôler et, le cas échéant, de remplacer certaines pièces sujettes à usure comme la courroie, la fraise, le brosse et le palpeur. -
Page 58: Remplacement Du Brosse
Manuel d’instruction - Français BRAVO III with EZ-Jaw Remplacement du brosse Quand le brosse n’est plus en condition d’ébarber, il faut le remplacer. Opérer comme suit: 1) Éteindre la machine et débrancher le câble d’alimentation. 2) Enfiler la tige de blocage dans la rainure du soubassement et dans le trou de l’arbre fraise (ill. 22). 3) Avec la clé... -
Page 59: Régulation De La Profondeur Maxima Du Chariot
BRAVO III with EZ-Jaw Manuel d’instruction - Français Régulation de la profondeur maxima du chariot Pour éviter d’endommager les étaux et la fraise, il faut déterminer la profondeur de taillage maximum. ATTENTION: la distance entre fraise/palpeur et étau doit être de 0.1 mm. Si ce n’était pas le cas, procéder comme suit: 1) Éteindre la machine et débrancher le câble d’alimentation. -
Page 60: Accès À La Niche Du Bas
Manuel d’instruction - Français BRAVO III with EZ-Jaw Accès à la niche du bas 1) Éteindre la machine et débrancher le câble d’alimentation. 2) Enlever la cuvette à copeaux. 3) Mettre la machine sur le côté droit. 4) Desserrer les 7 vis (W), les 2 pieds (W1) et enlever la protection basse (W2) (ill. 26). ill. -
Page 61: Remplacer Le Condensateur (Moteur)
BRAVO III with EZ-Jaw Manuel d’instruction - Français Remplacer le condensateur (moteur) 1) Éteindre la machine et débrancher le câble d’alimentation. 2) Enlever la tôle du bas (voir chapitre 7.7). 3) Desserrer l’écrou (Z) et enlever la rondelle (Z1) ainsi que le condensateur (ill. 28). 4) Introduire le nouveau condensateur et le fixer avec la rondelle (Z1) et l’écrou (Z). -
Page 62: Remplacer Le Micro-Interrupteur
Manuel d’instruction - Français BRAVO III with EZ-Jaw 7.10 Remplacer le micro-interrupteur 1) Éteindre la machine et débrancher le câble d’alimentation. 2) Débloquer le chariot et le laisser en position d’exercice (càd vers le palpeur). 3) Enlever la tôle du bas (ch. 7.7, page 21). 4) Desserrer l’écrou (Q1) et ôter le microswitch (ill. -
Page 63: Remplacer L'interrupteur Et/Ou Du Bouton
BRAVO III with EZ-Jaw Manuel d’instruction - Français 7.11 Remplacer l’interrupteur et/ou du bouton 1) Éteindre la machine et débrancher le câble d’alimentation. 2) Desserrer les 2 vis (H1) du carter fraise (H) et l’enlever (ill. 30). 3) Desserrer les 3 vis (T1) du carter central (ill. 30), le soulever légèrement et l’enlever tout en l’inclinant doucement. -
Page 64: Remplacer Et/Ou Tendre La Courroie
Manuel d’instruction - Français BRAVO III with EZ-Jaw ill. 32 ill. 33 7.12 Remplacer et/ou tendre la courroie 1) Éteindre la machine et débrancher le câble d’alimentation. 2) Desserrer les 2 vis (H1) du carter fraise (H) et l’enlever (ill. 30, page 24). 3) Desserrer les 3 vis (T1) du carter central (ill. -
Page 65: Remplacer Un Moteur À 1 Allure
BRAVO III with EZ-Jaw Manuel d’instruction - Français 7.13 Remplacer un moteur à 1 allure 1) Éteindre la machine et débrancher le câble d’alimentation. 2) Enlever la tôle du bas (ch. 7.7, page 21). 3) Débrancher les 4 câbles (1, 2, 3, 4) du moteur connecté... -
Page 66: Remplacer Le Ressort De Rappel Du Chariot
Manuel d’instruction - Français BRAVO III with EZ-Jaw 7.14 Remplacer le ressort de rappel du chariot 1) Éteindre la machine et débrancher le câble d’alimentation. 2) Débloquer le chariot et le laisser en position d’exercice (càd vers le palpeur). 3) Desserrer les 2 vis (V1) de la poignée du chariot (V) (ill. 38). 4) Pour enlever la poignée (V), la soulever légèrement pour pouvoir la désenfiler. - Page 67 BRAVO III with EZ-Jaw Manuel d’instruction - Français ill. 40 ill. 41 Copyright Silca 2010...
-
Page 68: Démantèlement
Manuel d’instruction - Français BRAVO III with EZ-Jaw DÉMANTÈLEMENT Avant de la démanteler, il faut mettre la machine hors service comme suit: désactiver l’alimentation en énergie électrique; mettre à part parties plastiques et parties métalliques; Après avoir fait ces opérations, on peut passer au traitement des déchets dans le respect des normes en vigueur dans le pays où... -
Page 69: Assistance
BRAVO III with EZ-Jaw Manuel d’instruction - Français ASSISTANCE Nos clients qui achètent une machine BRAVO III with EZ-Jaw bénéficient de l’assistance complète Silca. Pour une sécurité totale de l’opérateur et de la machine, toute intervention non précisée dans le mode d’emploi doit être confiée au fabricant ou aux Centres d’Assistance agréés par Silca. - Page 70 ¨ MAQUINA DUPLICADORA DE LLAVES Manual de instrucciones código: D437928XA - versión 1.0...
- Page 71 © 2010 SILCA S.p.A - Vittorio Veneto Este manual ha sido redactado por SILCA S.p.A. Derechos reservados en todo el mundo. Ninguna parte de esta publicación puede ser reproducida, almacenada o transmitida de manera alguna ni por ningún medio, ya sea eléctrico, químico, mecánico, óptico, de grabación o foto- copia sin permiso previo de SILCA S.p.A.
- Page 72 INDICE GUIA PARA LA CONSULTA DEL MANUAL ............1 ADVERTENCIAS GENERALES ................2 TRANSPORTE ....................4 Embalaje ....................4 Transporte ....................4 Abertura del embalaje ................4 Desplazamiento de la máquina ............5 LISTA DE PIEZAS Y MANDOS ..............6 DESCRIPCION DE LA MAQUINA ..............7 Seguridades ..................9 Datos técnicos ..................9 Circuito eléctrico .................10 ACCESORIOS EN EL EQUIPAMIENTO BASE ..........11 INSTALACION Y PREPARACION DE LA MAQUINA ........12...
-
Page 74: Guia Para La Consulta Del Manual
Manual de instrucciones - Español BRAVO III with EZ-Jaw GUIA PARA LA CONSULTA DEL MANUAL Se ha realizado este manual como guía para usar la máquina duplicadoras de llaves BRAVO III with EZ- Jaw. Léalo y consúltelo atenta y detenidamente para poder utilizar más eficaz y seguramente su aparato. ODO DE CONSULTAR EL MANUAL El contenido del manual está... -
Page 75: Advertencias Generales
BRAVO III with EZ-Jaw Manual de instrucciones - Español ADVERTENCIAS GENERALES Ya en la fase de proyecto se han adoptado soluciones que eliminan los riesgos para el operador en todas las fases de utilización, desde el transporte y la colocación hasta la duplicación, el ajuste y el mantenimiento. - Page 76 Manual de instrucciones - Español BRAVO III with EZ-Jaw • Rótulo identificador La duplicadora está provista de un rótulo identificador con especificación del número de matrícula (fig.2). nombre y dirección ¨ del constructor clase de máquina número de matrícula tensión de trabajo corriente absorbida marca CSA/UL...
-
Page 77: Transporte
BRAVO III with EZ-Jaw Manual de instrucciones - Español TRANSPORTE La duplicadora BRAVO III with EZ-Jaw se puede transportar sin ninguna dificultad; no se señalan riesgos particulares relacionados con su desplazamiento. La máquina debe ser transportada manualmente por dos personas cuando está embalada. Embalaje La duplicadora BRAVO III with EZ-Jaw se entrega al Cliente encerrada en una caja de cartón muy sólido (véanse las dimensiones en la fig. -
Page 78: Desplazamiento De La Máquina
Manual de instrucciones - Español BRAVO III with EZ-Jaw Desplazamiento de la máquina Después de sacar la duplicadora BRAVO III with EZ-Jaw del embalaje, póngala en seguida sobre la superficie de trabajo. La operación puede ser efectuada por una o dos personas; para el desplazamiento le aconsejamos que coja la máquina sólo por su propia base y no por otras partes (fig.4). -
Page 79: Lista De Piezas Y Mandos
BRAVO III with EZ-Jaw Manual de instrucciones - Español LISTA DE PIEZAS Y MANDOS Fig. 5 A - Fresa B - Palpador B1- Soporte del palpador C - Interruptor general D - Grupo móvil E - Mordaza F - Manecilla de la mordaza H - Protección transparente de la fresa I - Cepillo J - Tornillo bloqueo palpador... -
Page 80: Descripcion De La Maquina
Manual de instrucciones - Español BRAVO III with EZ-Jaw DESCRIPCION DE LA MAQUINA BRAVO III with EZ-Jaw es una duplicadora profesional de llaves planas para cerraduras de cilindro para puertas y vehículos, y de llaves en cruz. La máquina está constituida por las piezas principales que se detallan a continuación: •... - Page 81 BRAVO III with EZ-Jaw Manual de instrucciones - Español Fig. 6 Copyright Silca 2010...
-
Page 82: Seguridades
Manual de instrucciones - Español BRAVO III with EZ-Jaw Seguridades • Protección motor fresa ¡CUIDADO! el motor de la fresa está protegido contra el calentamiento excesivo por medio de una protección (dentro del motor mismo) que lo para en caso de que se llegue a una temperatura peligrosa. Esta condición podría darse en caso de que se olvide la máquina con el motor encendido en continuo, en caso de temperaturas ambientales elevadas o en condiciones de trabajo muy gravosas. -
Page 83: Circuito Eléctrico
BRAVO III with EZ-Jaw Manual de instrucciones - Español Circuito eléctrico La duplicadora BRAVO III with EZ-Jaw está dotada de motor monofásico de 1 velocidad. Las partes principales del circuito eléctrico de la duplicadora BRAVO III with EZ-Jaw son las siguientes: 1) Presa de alimentación con fusibles 6,3 amperios rápidos 2) Interruptor general de seguridad 3) Pulsador luminoso cepillo... -
Page 84: Accesorios En El Equipamiento Base
Manual de instrucciones - Español BRAVO III with EZ-Jaw ACCESORIOS EN EL EQUIPAMIENTO BASE Para una utilización óptima de la duplicadora BRAVO III with EZ-Jaw le aconsejamos que se provea ya desde el principio de unas cuantas piezas de repuesto. Conviene que en su caja de herramientas nunca falten una FRESA, un CEPILLO y una CORREA de repuesto. -
Page 85: Instalacion Y Preparacion De La Maquina
BRAVO III with EZ-Jaw Manual de instrucciones - Español INSTALACION Y PREPARACION DE LA MAQUINA La instalación de la duplicadora BRAVO III with EZ-Jaw está a cargo del Cliente y no presenta ninguna dificultad particular. La duplicadora sale de nuestras fábricas lista para el uso y no necesita ninguna operación de montaje de piezas;... -
Page 86: Descripción Del Puesto De Trabajo
Manual de instrucciones - Español BRAVO III with EZ-Jaw Descripción del puesto de trabajo Para el funcionamiento de la duplicadora hace falta solamente un operador, quien tiene a su disposición los mandos y las palancas siguientes: Tablero de mandos: colocado en el lado izquierdo; desde el tablero de mandos está Ud. en condiciones de efectuar todas las operaciones para las que la máquina está... -
Page 87: Control Y Calibrado
BRAVO III with EZ-Jaw Manual de instrucciones - Español Control y calibrado La fresa de la duplicadora BRAVO III with EZ-Jaw, eso es la pieza destinada a cifrar la llave en bruto, necesita controles periódicos frecuentes. En su caso, reemplácela por otra. Cada vez que cambie la fresa, pero también de vez en cuando al efectuar un control del funcionamiento, no se olvide controlar el ajuste Ajuste... - Page 88 Manual de instrucciones - Español BRAVO III with EZ-Jaw EGULACIÓN AXIAL Se llama regulación axial el ajuste del espacio de cifrado de la llave (fig.12). Para efectuar dicha regulación actúe de la manera siguiente: 1) apague el interruptor general (C) para efectuar la operación con toda seguridad e imposibilitar la puesta en movimiento de la fresa.
-
Page 89: Duplicacion
BRAVO III with EZ-Jaw Manual de instrucciones - Español DUPLICACION ¡CUIDADO! para realizar las distintas fases de la duplicación en condiciones de seguridad total, no se olvide las recomendaciones siguientes: • Trabaje con manos secas. • Asegúrese de que la máquina está conectada a tierra. •... -
Page 90: Cifrado De Llaves De Aguja
Manual de instrucciones - Español BRAVO III with EZ-Jaw SO DE LOS ALFILERES En el caso de que las llaves tengan caña delgada y poco espesor, hace falta que utilice 1 alfiler (fig. 18-1, fig. 18-2). En el caso de que las llaves tengan no sólo caña delgada sino también poco espesor, hace falta que utilice 2 alfileres (fig. -
Page 91: Limpieza Y Mantenimiento
BRAVO III with EZ-Jaw Manual de instrucciones - Español LIMPIEZA Y MANTENIMIENTO La duplicadora BRAVO III with EZ-Jaw no necesita una manutención particular; en todo caso es oportuno que controle y eventualmente que substituya algunas piezas a medida que se desgasten; nos referimos en particular a la correa, la fresa, el cepillo y el palpador. -
Page 92: Sustitución Del Cepillo
Manual de instrucciones - Español BRAVO III with EZ-Jaw Sustitución del cepillo Cuando el cepillo vaya perdiendo su capacidad de quitar las rebabas conviene que la reemplace por otra. El procedimiento es el siguiente: 1) Apagar la máquina y desconectar el cable de alimentación. 2) Introduzca la barra de sujeción en la cavidad de la base y en el agujero del árbol de la fresa (fig.22). -
Page 93: Regulación De La Profundidad Máxima Del Carro
BRAVO III with EZ-Jaw Manual de instrucciones - Español Regulación de la profundidad máxima del carro Para no dañar las mordazas y la fresa hace falta establecer la profundidad máxima de corte. ¡CUIDADO! la distancia entre fresa/palpador y mordaza tiene que ser de 0.1 mm. En caso de que fuera mayor o menor, obre de la manera siguiente: 1) Apagar la máquina y desconectar el cable de alimentación. -
Page 94: Acceso Al Vano Inferior
Manual de instrucciones - Español BRAVO III with EZ-Jaw Acceso al vano inferior 1) Apagar la máquina y desconectar el cable de alimentación. 2) Sacar el recipiente para recogida virutas. 3) Colocar la máquina en su lado derecho. 4) Destornillar los 7 tornillos (W), los 2 pies (W1) y quitar la protección inferior (W2) (fig.26). Fig. -
Page 95: Sustitución Del Condensador (Motor)
BRAVO III with EZ-Jaw Manual de instrucciones - Español Sustitución del condensador (motor) 1) Apagar la máquina y desconectar el cable de alimentación. 2) Quitar la chapa inferior (cap. 7.7). 3) Desenroscar la tuerca (Z) y quitar la arandela (Z1) y el condensador (fig.28). 4) Introducir el nuevo condensador, fijándolo con arandela (Z1) y tuerca (Z). -
Page 96: Sustitución Del Microinterruptor
Manual de instrucciones - Español BRAVO III with EZ-Jaw 7.10 Sustitución del microinterruptor 1) Apagar la máquina y desconectar el cable de alimentación. 2) Desbloquear el carro y dejarlo en posición de trabajo (hacia el palpador). 3) Quitar la chapa inferior (cap.7.7, pág. 21). 4) Desenroscar la tuerca (Q1) y sacar el microinterruptor (fig.29). -
Page 97: Sustitución Del Interruptor Y/O Del Pulsador
BRAVO III with EZ-Jaw Manual de instrucciones - Español 7.11 Sustitución del interruptor y/o del pulsador 1) Apagar la máquina y desconectar el cable de alimentación. 2) Destornillar los 2 tornillos (H1) del cárter fresa (H), sacándolo (fig.30). 3) Destornillar los 3 tornillos (T1) del cárter central (fig.30), levantarlo ligeramente y sacarlo inclinándolo un poco. -
Page 98: Sustitución Y/O Puesta En Tensión Correa
Manual de instrucciones - Español BRAVO III with EZ-Jaw Fig. 32 Fig. 33 7.12 Sustitución y/o puesta en tensión correa 1) Apagar la máquina y desconectar el cable de alimentación. 2) Destornillar los 2 tornillos (H1) del cárter fresa (H), sacándolo (fig.30, pág.24). 3) Destornillar los 3 tornillos (T1) del cárter central (fig.30), levantarlo ligeramente y sacarlo inclinándolo un poco. -
Page 99: Sustitución Motor 1 Velocidad
BRAVO III with EZ-Jaw Manual de instrucciones - Español 7.13 Sustitución motor 1 velocidad 1) Apagar la máquina y desconectar el cable de alimentación. 2) Quitar la chapa inferior (cap.7.7, pág. 21). 3) Desconectar los 4 cables (1, 2, 3, 4) del motor desde conexiones... -
Page 100: Sustitución Resorte Llamada Carro
Manual de instrucciones - Español BRAVO III with EZ-Jaw 7.14 Sustitución resorte llamada carro 1) Apagar la máquina y desconectar el cable de alimentación. 2) Desbloquear el carro y dejarlo en posición de trabajo (hacia el palpador). 3) Destornillar los 2 tornillos (V1) del asa carro (V) (fig.38). 4) Para quitar el asa (V) es necesario levantarla un poco para poderla extraer. - Page 101 BRAVO III with EZ-Jaw Manual de instrucciones - Español Fig. 40 Fig. 41 Copyright Silca 2010...
-
Page 102: Eliminacion De Desechos
Manual de instrucciones - Español BRAVO III with EZ-Jaw ELIMINACION DE DESECHOS Antes de efectuar la demolición de la máquina es preciso ponerla fuera de servicio; siga estos pasos: • cortar el suministro de energía eléctrica; • separación de las piezas de plástico de las piezas metálicas; Tras efectuar estas operaciones se podrán eliminar todos los desechos, en conformidad con las leyes en vigor en el País donde se utiliza la máquina. -
Page 103: Asistencia
BRAVO III with EZ-Jaw Manual de instrucciones - Español ASISTENCIA A los Clientes que compren una duplicadora BRAVO III with EZ-Jaw Silca les ofrece una asistencia completa. Para que la seguridad de la máquina y del operador sea completa, toda intervención que el manual no explique deberá... - Page 105 SILCA S.p.A. Via Podgora, 20 (Z.I.) 31029 VITTORIO VENETO (TV) Tel. 0438 9136 Fax 0438 913800 E-mail: silca@silca.it www.silca.biz In North America Kaba Ilco Corp. 400 Jeffreys Road Rocky Mount, NC 27804 Tel. 800-334-1381 Fax 252-446-4702 E-mail: info@irm.kaba.com www.kaba-ilco.com...