Publicité
Les langues disponibles
Les langues disponibles
Liens rapides
EasyTroller Standard Model—Mounting Instructions
Models #016.1 or #016.15
one half to three fourths of the prop when in the down position.
3.
Drill a 5/16" or slightly larger hole in the anti-cavitation plate through an existing hole in the mount plate. Note that the
mount plate has six holes to accommodate various anti-cavitation plate shapes. Use the forward two mounting holes and
two other holes that work best on your motor. (New holes may be drilled in the mount plate to accommodate an existing hole
pattern if they are spaced at least 1/2" from an existing hole.) Install a bolt(one washer under the bolt head and one under
the nut) to hold the mount plate in position while the next hole is drilled. After the second bolt is installed, the remaining two
holes can be drilled and the bolts installed. Be careful not to over tighten the bolts to avoid damage to the anti-cavitation
plate or inhibit the trolling plate rotation. Once installed tie off the release cord in a convenient location, leaving enough slack
so the motor can swing full left and right.
4. Special Notes for Volvo Outdrives: Longer bolts may be needed on Volvo outdrives with hollow cavitation plates. On
Volvos with rubber exhaust flaps allow enough room so that the flap can fully open when the plate is in the down position.
The EasyTroller may not work with some Volvo or Mercury Dual-Prop engines due to a lack of clearance with the props.
Stabilizer Fins Model—Mounting Instructions
Stabilizer Fins Model Mounting Hardware:
(4) 5/16" carriage bolts
1. The fins model must always be mounted on top of the cavitation plate. Position
the left fin against the mounting plate and fasten with the carriage bolts, washers and
nuts. The carriage bolts should be installed from the inside (motor side) of the mounting
plate, the washers and nuts from the outside. See the image at the right to see the proper
fin positioning.
1. Tie off the release cord near the center of the boat with enough slack for the lower unit to go into the full down
position and rotate full left and right. The EasyTroller should always be in the up position when running at speed.
2. When you want to troll, put the motor in neutral and wait for the boat to come to a complete stop. Pull the cord and the
plate will move into the down trolling position. The plate will lock into place when properly seated, slowing the boat's trolling
speed.
3.
When you are ready to move at speed, release the EasyTroller plate by pulling on the cord with the motor idling and in
forward gear. Once the plate has released, accelerate slightly and the plate should raise and lock into the up position. If
the plate does not come all the way up to the locking position you may have to increase your speed a bit more.
4. While the EasyTroller will absorb most accidental accelerations it can be bent or damaged under extreme conditions or if
kept in the down position while running at speed. Ironwood Pacific Outdoors, Inc. will not warrant the plate under these
conditions but exchange/repair options are offered at favorable prices. Contact service@ironwoodpacific.com for more de-
tails.
The EasyTroller should be set in the downward position when transporting your boat on a trailer. Ironwood Pacific Out-
doors, Inc. accepts no responsibility for damage incurred to the boat, engine, anti-cavitation plate, or propeller through
use of the EasyTroller.
IRONWOOD PACIFIC OUTDOORS, INC. | PO BOX 1568 | LAKE OSWEGO, OR 97035
Standard and Short Model Mounting Hardware:
(4) 5/16" Nylon Locknuts, (8) Flat Washers
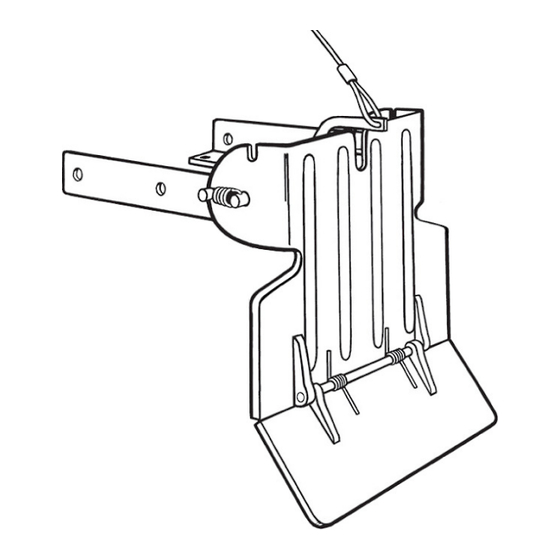
1. Pull the release cord, allowing the plate to go into the down position. Use caution as the
plate is spring-loaded and could pinch a finger. If the plate goes over center pull it back to the
vertical position. (This will not occur when released per instructions in the water.)
2. The EasyTroller may be mounted on top or on the underside of the anti-cavitation plate (most
EasyTrollers are mounted on top of the cavitation plate). Position the EasyTroller on the cavita-
tion plate so that the EasyTroller plate is at least 3 inches (4 to 6 inches is ideal) behind the prop
while in the vertical down position, being careful to ensure that the holes in the cavitation plate
are not too close to the edge of the plate. Once positioned, carefully check all clearances to
make sure that the plate rotates freely through the upward and downward positions without inter-
ference with the prop or any part of the motor. Clamp the EasyTroller mount plate to the anti-
cavitation plate using two small C clamps. Note: The EasyTroller plate typically covers only
(4) 5/16" flat washers
•
EasyTroller Operating Instructions
800-261-1330 | www.ironwoodpacific.com
(4) 5/16" nylon locknuts
•
Rev 0710
(4) 5/16" Bolts,
Models #016.2 or #016.25
Publicité

Sommaire des Matières pour Ironwood EasyTroller
- Page 1 When you are ready to move at speed, release the EasyTroller plate by pulling on the cord with the motor idling and in forward gear. Once the plate has released, accelerate slightly and the plate should raise and lock into the up position. If the plate does not come all the way up to the locking position you may have to increase your speed a bit more.
- Page 2 La plaque se soulève et se verrouille en position haute. Si la plaque ne se verrouille pas, diminuer légèrement la vi- tesse du moteur. Le EasyTroller doit être soulevé quand vous êtes au-dessus des vitesse de traîne. La plaque inférieure pliera vers le haut si le bateau accélère prématurément, empêchant d’endommager le déflecteur de traîne (trolling plate).