Table des Matières
Publicité
Les langues disponibles
Les langues disponibles
Liens rapides
Publicité
Chapitres
Table des Matières

Manuels Connexes pour Berkeley LTHH Série

Sommaire des Matières pour Berkeley LTHH Série
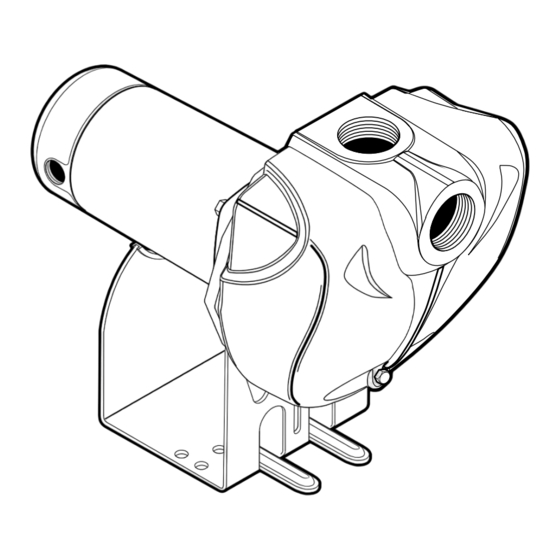
- Page 1 OWNER’S MANUAL Self-Priming Centrifugal Pump 293 Wright Street, Delavan, WI 53115 “LTHH” Series Installation/Operation/Parts For further operating, installation, or maintenance assistance: Call 1-262-728-9181 BE536 (Rev. 5/2/07) © 2007...
-
Page 2: Electrical Safety
Safety READ AND FOLLOW GENERAL SAFETY SAFETY INSTRUCTIONS! WARNING This is the safety alert symbol. When you see this symbol on your pump or in this manual, look for Hazardous pressure! Install pressure relief one of the following signal words and be alert to the valve in discharge pipe. -
Page 3: Table Des Matières
LIMITED WARRANTY Berkeley/WICOR Canada Company (WICOR), warrants to the original consumer of the products listed below, that they will be free from defects in material and workmanship for the Warranty Period from the date of original installation or manufacture as noted. -
Page 4: Warranty
Installation BEFORE YOU INSTALL YOUR PUMP Priming plug NOTICE: Well must not be more than 20' depth to water. 1. Long runs and many fittings increase friction and reduce flow. Locate Priming tee pump as close to well as possible: use as few elbows and fittings as Suction possible. -
Page 5: Pump Installation
Installation HORIZONTAL PIPING FROM WELL TO PUMP 1. Never install a suction pipe that is smaller than the suction port of the pump. 1 0 0 2. To aid priming on well point installations, install a line check valve as shown in Figure 2. -
Page 6: Electrical
Electrical Connection diagram for dual voltage, single-phase 5. Attach the ground wire to the green ground screw motors. Your dual-voltage motor’s terminal board (under 6. Reinstall the Motor end cover the motor end cover) will match one of the diagrams Go to Wiring Connections below. -
Page 7: Operation
Electrical / Operation Wiring Chart – Recommended Wire and Fuse Sizes DISTANCE IN FEET(METERS) FROM MOTOR TO SUPPLY 0 - 50 51 - 100 101 - 200 201 - 300 (0 - 15) (31 - 61) (62 - 91) (92 - 122) Max. -
Page 8: Maintenance
Maintenance 3. Fill pump and suction pipe with water. 4. Replace priming plug, using Teflon tape on thread; tighten plug. NOTICE: If a priming tee and plug have been provided for a long hori- zontal run, be sure to fill suction pipe through this tee and replace plug. - Page 9 Maintenance 4. Unscrew capacitor clamp and remove capacitor. Do not disconnect capacitor wires to motor. 5. Slide 7/16" open end wrench in behind spring loaded switch on motor end of shaft; hold motor shaft with wrench on shaft flats and unscrew impeller screw (if used) by turning clockwise (left hand thread) when looking into eye of impeller.
- Page 10 Maintenance 10. Hold motor shaft with 7/16" open end wrench on shaft flats and screw impeller onto shaft. Be sure you do not touch capacitor terminals with body or any metal object. Tightening impeller will automatically locate seal in correct position. 11.
-
Page 11: Troubleshooting
Troubleshooting SYMPTOM POSSIBLE CAUSE(S) CORRECTIVE ACTION Motor will not run Disconnect switch is off Be sure switch is on Fuse is blown Replace fuse Starting switch is defective Replace starting switch Wires at motor are loose, Refer to instructions on wiring. Check and tighten all wiring. disconnected, or wired incorrectly Capacitor voltage may be hazardous. -
Page 12: Repair Parts
Repair Parts 3621 1199SPC MODEL NUMBER 10LTHH 15LTHH 20LTHH 25LTHH 10LTHH3 15LTHH3 20LTHH3 25LTHH3 Part 10LTHH3-575T 15LTHH3-575T 20LTHH3-575T 25LTHH3-575T Description Qty. 1 HP 1-1/2 HP 2 HP 2-1/2 HP Motor, 115/230V, 1 Phase J218-596PKG J218-601PKG J218-883APKG J218-628A Motor, 230/460V, 3 Phase AP100EL AP100FL AP100GL... -
Page 13: Pompe Centrifuges A Amorçage Automatique
NOTICE D’UTILISATION Pompe centrifuges a amorçage automatique 293 Wright Street, Delavan, WI 53115 Séries “LTHH” Installation/Fonctionnement/Pièces Pour plus de renseignements concernant l’utilisation, l’installation ou l’entretien, Composer le 1 (262) 728-9181 BE536 (Rév. 2/5/07) © 2007... -
Page 14: Sécurité Générale
Safety LIRE TOUTES CES INSTRUCTIONS SÉCURITÉ GÉNÉRALE ET LES SUIVRE! AVERTISSEMENT Ce symbole indique qu'il faut être prudent. Lorsque ce symbole apparaît sur la pompe ou dans cette Notice, Pression dangereuse! rechercher une des mises en garde qui suivent, car elles Poser une soupape de sûreté... - Page 15 Le seul recours de l’acheteur et la seule responsabilité de Berkeley/WICOR est la réparation ou le remplacement des produits défectueux (au choix de Berkeley/WICOR). L’acheteur accepte de payer tous les frais de main-d’oeuvre et d’expédition associés à cette garantie et de faire une demande de répa- ration au titre de la garantie auprès du dépositaire installateur dès qu’un problème est décelé.
-
Page 16: Garantie
Installation AVANT D'INSTALLER LA POMPE Priming plug NOTICE: Pump must not be more than 20' higher than water source. Té d'amorçage 1. De grandes longueurs de tuyaux et de nombreux raccords augmentent le frot- tement, ce qui réduit le débit. Installer la pompe aussi près que possible du Tuyau d'aspiration puits : dans la mesure du possible, utiliser très peu de coudes et de raccords. -
Page 17: Diamètre Des Tuyaux De Refoulement
Installation TUYAUTERIE HORIZONTALE, DU PUITS VERS LA POMPE 1 0 0 1. Ne jamais utiliser un tuyau d'aspiration dont le diamètre est plus petit que le diamètre de l'orifice d'aspiration de la pompe. 2. Pour faciliter l'amorçage lorsque la pompe est branchée sur plusieurs pointes filtrantes, poser un clapet de non retour en ligne, comme il est illustré... -
Page 18: Électricité
Électricité Schéma de connexion des moteurs monophasés bitension. La 5. Brancher le fil de mise à la terre sur la vis verte de mise à plaquette de connexion (qui se trouve sous le couvercle d'ex- la terre. trémité du moteur) des moteurs bitension doit correspondre à 6. -
Page 19: Fonctionnement
Électricité / Fonctionnement Tableau de câblage - Câbles et diamètres des fusibles recommandés Capacité des DISTANCE EN PIEDS (MÈTRES) ENTRE LE MOTEUR Charge max. fusibles en ET LE COURANT D'ALIMENTATION Modèle Puissance en ampères Tension/ ampères* 0 - 50 51 - 100 101 - 200 201 - 300 de pompe... -
Page 20: Entretien
Entretien 3° Remplir d'eau le corps de la pompe et les tuyaux d'aspiration (Figure 7). 4° Reposer le bouchon d'amorçage en enveloppant ses filets de ruban téflon; ser- rer le bouchon. NOTA : Si, dans le cas d'une grande longueur horizontale de tuyau, un té d'amorçage et un bouchon ont été... - Page 21 Entretien 4. Dévisser le collier du condensateur, puis déposer le condensateur. Ne pas débrancher les fils du condensateur branchés sur le moteur. 5. Glisser une clé à fourche de 7/16 de pouce derrière le contacteur à ressort qui se trouve sur le côté moteur de l'arbre; immobilier le moteur de l'arbre en posant la clé...
-
Page 22: Remontage De La Pompe
Entretien 10. Immobiliser l'arbre du moteur avec une clé à fourche de 7/16 de pouce posée sur les méplats de l'arbre, puis visser l'impulseur sur l'arbre. Faire bien attention de ne pas toucher les bornes du condensateur avec son corps ou avec tout autre objet métallique. -
Page 23: Diagnostic Des Pannes
Diagnostic des pannes SYMPTÔMES CAUSES PROBABLES REMÈDES Le moteur ne Le sectionneur est ouvert S'assurer que le sectionneur est enclenché tourne pas Le fusible est sauté ou le disjoncteur Remplacer le fusible ou réenclencher le disjoncteur est désenclenché Le contacteur de démarrage est COUPER L'ARRIVÉE DE COURANT;... -
Page 24: Pièces De Rechange
Pièces de rechange 3621 1199SPC N° de Modèle 10LTHH 15LTHH 20LTHH 25LTHH 10LTHH3 15LTHH3 20LTHH3 25LTHH3 10LTHH3-575T 15LTHH3-575T 20LTHH3-575T 25LTHH3-575T Réf. Désignation Qté 1 ch 1-1/2 ch 2 ch 2-1/2 ch Moteur monophasé de 115/230 V J218-596PKG J218-601PKG J218-883APKG J218-628A Moteur, 230/460V triphasé...