Table des Matières
Publicité
Les langues disponibles
Les langues disponibles
Liens rapides
Publicité
Table des Matières

Manuels Connexes pour evatronic FSD-40A

Sommaire des Matières pour evatronic FSD-40A
- Page 1 MANUEL D’UTILISATION FR VENTILATEUR 5 PALES EN FAN 5 BLADES NL 5-BLADIGES FAN Modèle : FSD-40A REF. 001710 Photo non contractuelle Importé par : Euro-tech Distribution 37A rue César Loridan 59 910 Bondues FRANCE 1/21...
-
Page 2: Consignes Importantes De Securite
CONSIGNES IMPORTANTES DE SECURITE Lisez attentivement cette notice avant la première utilisation de cet appareil et conservez-la pour tout usage ultérieur. -Cet appareil peut être utilisé par des enfants âgés d'au moins 8 ans et par des personnes ayant des les capacités physiques, sensorielles ou mentales réduites ou dénuées d’expérience ou de connaissance, s’ils (si elles) sont correctement surveillé(e)s ou si des instructions relatives à... - Page 3 -Avant de brancher l’appareil, vérifiez que la tension du réseau électrique correspond à celle mentionnée sur la plaque signalétique de celui-ci. L’appareil ne doit être branché que sur un réseau électrique dont l’installation est conforme aux normes de sécurité. - Ne pas brancher cet appareil sur une multiprise. Si possible il faut éviter l’utilisation de rallonge.
- Page 4 -Ne pas placer le ventilateur à un endroit où des rideaux pourraient se prendre dedans. - Ne laissez jamais l’appareil sans surveillance à la portée des enfants, qu’il soit en fonctionnement ou à l’arrêt. - Avertissement ! Une fois l’installation terminée, il est strictement interdit de retirer les grilles de protection du ventilateur pour le nettoyage ou la maintenance.
-
Page 5: Description Detaillee
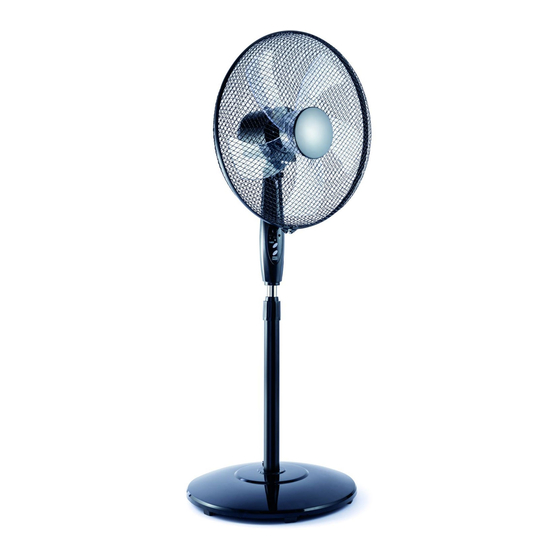
DESCRIPTION DETAILLEE 1.Grille avant 2.Cercle de fixation pour les grilles 3.Ecrou de fixation pour l’hélice 5 pales 4.Hélice 5.Ecrou de fixation pour grille arrière 6.Grille arrière 7. Sortie tige moteur 8.Axe moteur 9. Boitier contenant le moteur 5/21... -
Page 6: Assemblage Du Ventilateur
10.Bouton d’oscillation 11. Point de fixation 12. Partie principale avec panneau de contrôle 13. Ecrou de verrouillage pour fixer la partie principale 14. Molette pour régler la hauteur du tube métallique 15. Base 16. Affichage Led 17. Bouton Marche ( ON)/ Arrêt (OFF) et minuterie 18. -
Page 7: Nettoyage Et Entretien
Pour faire osciller le ventilateur de gauche à droite, appuyez sur le bouton (10). Pour stopper l’oscillation, il faut remonter le bouton. Pour régler l’orientation verticale du ventilateur, il suffit d’incliner le ventilateur vers le haut ou vers le bas jusqu’à obtention de l’orientation souhaitée. Ce ventilateur a une fonction minuterie : appuyez sur le bouton TIMER ( = Minuterie) de façon successive afin d’atteindre le temps souhaité. -
Page 8: Garantie
GARANTIE Ce produit est garanti pour une durée déterminée avec le distributeur à partir de la date d’achat contre toute défaillance résultant d’un vice de fabrication ou de matériau. Cette garantie ne couvre pas les vices ou les dommages résultant d’une mauvaise installation, d’une utilisation incorrecte ou de l’usure anormale du produit. -
Page 9: Important Safety Instructions
IMPORTANT SAFETY INSTRUCTIONS Read this manual carefully before using this product for the first time and keep it for future use. -This device may be used by children aged 8 years and over and by persons with reduced physical, sensory or mental abilities or without experience or knowledge, if they are properly supervised or if instructions on the safe use of the device have been given to them and the risks involved have been understood. - Page 10 - Do not connect this unit to a power strip. If possible, the use of extension cords should be avoided. If this is unavoidable, products that meet the applicable electrical standards should be used. - This product must not be connected to an external timer or remote control system.
- Page 11 - Always turn off and unplug your device after use and before cleaning it. - Your appliance is intended for domestic use inside your home. - Do not suspend the fan from walls or ceilings. - Place this fan at a distance from surrounding objects to ensure that the operation of the fan does not cause accidental damage.
-
Page 12: Detailed Description
DETAILED DESCRIPTION 1.Front grill cover 2.Grill ring 3.Fastener nut for Fan blade 4.Fan blade ( 5 blades) 5.Fastener nut for back grill 6.Back grill cover 7. Output motor shaft 8. Motor shaft pin 9. Cabinet with motor 10.Swing button 12/21... -
Page 13: Fan Assembly
11. Connection pole 12. Cabinet with control panel 13. Locknut for cabinet 14. Locknut for lifting 15. Base Stand 16. LED diode panel 17. Controls buttons ( ON/OFF and timer) 18. Lift tube 19. Stand post tube 20. Heavy base 21. -
Page 14: Cleaning And Maintenance
To adjust the vertical orientation of the fan, simply tilt the fan up or down until the desired orientation is achieved. This fan has a timer function: press the TIMER button ( = Timer) successively to reach the desired time. You can program the fan for up to 7 hours. The LEDs 1 2 4 light up according to the set time. -
Page 15: Belangrijke Veiligheidsinstructies
BELANGRIJKE VEILIGHEIDSINSTRUCTIES Lees deze handleiding zorgvuldig door voordat u dit product voor de eerste keer gebruikt en bewaar het voor toekomstig gebruik. -Dit apparaat mag worden gebruikt door kinderen van 8 jaar en ouder en door personen met verminderde fysieke, zintuiglijke of mentale vermogens of zonder ervaring of kennis, indien zij naar behoren worden begeleid of indien hun instructies voor het veilig gebruik van het apparaat zijn gegeven en de risico's ervan zijn... - Page 16 -Voordat u het apparaat aansluit, moet u controleren of de spanning van het elektrische netwerk overeenkomt met de spanning die op het typeplaatje van het apparaat staat aangegeven. Het apparaat mag alleen worden aangesloten op een elektrisch netwerk waarvan de installatie voldoet aan de veiligheidsnormen.
-
Page 17: Gedetailleerde Beschrijving
-Plaats de ventilator niet op een plaats waar de gordijnen erin kunnen blijven hangen. - Laat het apparaat nooit onbeheerd achter binnen het bereik van kinderen, of het nu in werking is of niet. - Waarschuwing! Zodra de installatie voltooid is, is het ten strengste verboden om de ventilatieroosters te verwijderen voor reiniging of onderhoud. - Page 18 1.Front grilldekking 2.Grill ring 3. Bevestigingsmoer voor ventilatorblad 4.Fan blad (5 bladen) 5.Fastener moer voor achtergrill 6.Back grill deksel 7.Uitgaande motoras 8. Motoraspen 9. Kast met motor 10.Swing knoop 11. Aansluitpool 12.Kast met bedieningspaneel 13.Borgmoer voor kast 14. Borgmoer voor heffen 15.
- Page 19 20. Zware basis 21. Persplaat 22.Bend bout VENTILATOR ASSEMBLIEK Pak alle onderdelen van de ventilator uit en verwijder alle onderdelen van de verpakking, waarbij u erop let dat u geen kleine onderdelen weggooit. Stap 1: Montage van de steun (voet en voet) 1.
-
Page 20: Reiniging En Onderhoud
De LED's 1 2 2 4 lichten op volgens de ingestelde tijd. Wanneer alle LED's 1 2 4 branden, bereikt u de duur van 7 uur REINIGING EN ONDERHOUD Schakel het apparaat uit en haal de stekker uit het stopcontact voor de montage of demontage. - Page 21 21/21...