Table des Matières
Publicité
Les langues disponibles
Les langues disponibles
Liens rapides
line
PRO
CR71
AM/FM ALARM CLOCK RADIO
MANUAL DE INSTRUCCIONES
Downloaded from www.vandenborre.be
RADIO REVEIL FM/PO
AM/FM KLOKRADIO
RADIO SVEGLIA AM/FM
AM-/FM-RADIOWECKER
HODINY S RÁDIEM AM/FM
AM/FM RÁDIO S HODINAMI
RADIO RELOJ
RADIO DESPERTADOR
OPERATING INSTRUCTIONS
MANUEL D'UTILISATION
HANDLEIDING
ISTRUZIONI OPERATIVE
BETRIEBSANLEITUNG
POKYNY K OBSLUZE
NÁVOD K OBSLUZE
MANUAL DE INSTRUCOES
Publicité
Table des Matières

Manuels Connexes pour Proline CR71


Sommaire des Matières pour Proline CR71
- Page 1 CR71 AM/FM ALARM CLOCK RADIO RADIO REVEIL FM/PO AM/FM KLOKRADIO RADIO SVEGLIA AM/FM AM-/FM-RADIOWECKER HODINY S RÁDIEM AM/FM AM/FM RÁDIO S HODINAMI RADIO RELOJ RADIO DESPERTADOR OPERATING INSTRUCTIONS MANUEL D'UTILISATION HANDLEIDING ISTRUZIONI OPERATIVE BETRIEBSANLEITUNG POKYNY K OBSLUZE NÁVOD K OBSLUZE...
-
Page 2: Safety Information
SAFETY INFORMATION Mains supply This equipment is designed to operate from a 230 Volt, 50Hz AC mains supply. Other power sources may damage it. Check that the rating label of the apparatus states 230V AC before you plug it in for the first time. Mains plug We have fitted this equipment with a standard mains plug. - Page 3 the risk of fire. Cleaning Disconnect the mains supply and use only a lightly dampened soft cloth. Do not use chemical solvents or strong detergents as these may damage the cosmetic finish. Do not leave any liquid drops on the screens. Battery Remove the battery when the equipment is not to be used for a long time.
-
Page 4: Memory Backup
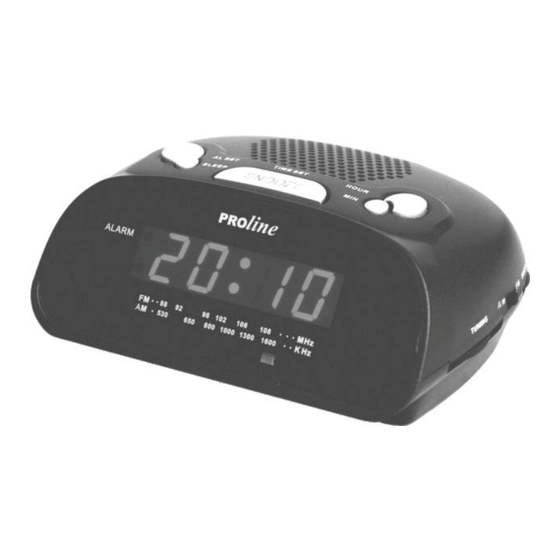
OVERVIEW Speaker Alarm Set Button Sleep Button Function Selector (On/Off/Auto) Snooze / Time Set Button Clock Display Volume Control / Alarm Mode AM/FM Band Switch Hour Set Button Minute Set Button Tuning Control Frequency Scale AC Power Cord Battery Cover (at the bottom) * Do not connect FM Antenna to external antenna. -
Page 5: Operating The Radio
repeatedly until the correct minute setting is reached. SNOOZE/TIME SET Release the button. OPERATING THE RADIO Set the function selector to the ON position to turn on the radio. Adjust volume using the volume control. Select desired band with the AM/FM Band Switch. Tune in to desired station using TUNING. -
Page 6: Setting The Sleep Timer
Note: The alarm will come on again at the set time on the following days when the function selector is set to the AUTO position. Snooze control The radio or buzzer alarm can be muted for approximately 9 minutes by pressing the Snooze button. - Page 7 Never allow any water or other liquids to get inside the unit while cleaning. IMPORTANT DISPOSAL INFORMATION As a responsible retailer we care about the environment. As such we urge you to follow the correct disposal procedure for your product, battery and packaging materials. This will help conserve natural resources and ensure that it is recycled in a manner that protects health and the environment.
-
Page 8: Informations De Sécurité
INFORMATIONS DE SÉCURITÉ Alimentation électrique Votre appareil a été conçu pour fonctionner à partir d'une prise secteur 230V, 50Hz ~ CA. Son branchement à une autre source de courant risque de l'endommager. Vérifiez que la fiche signalétique de l’appareil indique 230V CA avant de le brancher à une prise électrique la première fois. - Page 9 Aération Posez votre appareil sur une surface stable et plane, non exposée aux rayons directs du soleil et éloignée de toute source de chaleur. Pour une installation à l'intérieur d'un meuble, prévoyez un espace libre d'au-mois 10 cm tout autour de l'appareil. Veillez à ce que les ouvertures d'aération soient constamment dégagées, y compris celles se trouvant sous l'appareil.
-
Page 10: Presentation Du Produit
PRESENTATION DU PRODUIT Haut-parleur Bouton de réglage de l’alarme Sous la base Bouton d’endormissement Sélecteur de fonctions (MARCHE/ARRET/AUTO) Bouton de rappel d’alarme/ Réglage de l’heure Affichage de l’heure Contrôle du volume / Mode Alarme Interrupteur de bande AM/FM Bouton de réglage des heures Bouton de réglage des minutes Bouton de réglage des stations Echelle des fréquences... -
Page 11: Fonctionnement De La Radio
que le réglage des minutes désiré soit atteint. SNOOZE/TIME SET Relâchez le bouton FONCTIONNEMENT DE LA RADIO Placez le sélecteur de fonctions en position ON pour mettre la radio en marche. Ajustez le niveau du volume avec le bouton de contrôle du volume. Sélectionnez la bande désirée avec l’interrupteur de bande AM/FM. -
Page 12: Reglage Du Minuteur D'endormissement
2. Tournez complètement le bouton de contrôle du volume dans le sens des aiguilles d’une montre en position Buzz jusqu’à ce que le sélecteur s’enclenche. 3. Pour arrêter la sonnerie, appuyez sur le bouton AL Set ou faites glisser le sélecteur de fonctions en position OFF. -
Page 13: Importantes Instructions De Mise Au Rebut
détergents. Ne laissez jamais de l’eau ou tout autre liquide s’infiltrer dans l’appareil lors du nettoyage. IMPORTANTES INSTRUCTIONS DE MISE AU REBUT En tant que distributeurs responsables, nous sommes soucieux de l’environnement. Nous vous prions donc de bien vouloir respecter la procédure de mise au rebut de votre produit, des piles et de l’emballage, afin de contribuer à... - Page 14 VEILIGHEIDSVOORZORGEN Netvoeding Dit apparaat werd ontworpen om te werken op wisselstroom netvoeding van 230 volt, 50Hz. Andere stroombronnen kunnen dit apparaat beschadigen. Controleer of het typeplaatje van het toestel 230V AC aangeeft vooraleer het de eerste keer aan te sluiten. Netstekker.
- Page 15 Bescherm het scherm tegen vingerafdrukken en vuil. Dit apparaat werd uitsluitend ontworpen voor huishoudelijk gebruik. Iedere ander gebruiksvorm kan de garantie teniet doen en gevaarlijk zijn. Ventilatie Zet het apparaat neer op een harde, vlakke ondergrond waar het niet aan rechtstreeks zonlicht of warmtebronnen zal worden blootgesteld.
- Page 16 Dompel het toestel of het netsnoer niet onder in water of een andere vloeistof. Aan de onderzijde van het toestel bevinden zich enkele veiligheidsmededelingen. OVERZICHT Luidspreker Aan de onderzifde Alarm Set Toets Sleep Toets Functieschakelaar (ON/OFF/AUTO) Snooze / Time Set Toets Klokdisplay Volumeregelaar / Alarmmodus AM/FM Bandbreedteschakelaar...
-
Page 17: De Klok Instellen
wektijd opnieuw moeten instellen. DE KLOK INSTELLEN 1. Houd de SNOOZE/TIME SET toets ingedrukt. Druk herhaaldelijk op de Hour toets tot het juiste uur is bereikt. Houd de SNOOZE/TIME SET toets ingedrukt en druk herhaaldelijk op de Minute toets tot de juiste minuten zijn bereikt. Laat de SNOOZE/TIME SET toets los. -
Page 18: De Slaaptimer Instellen
ON stand om de radio verder te laten spelen. Om het alarm te stoppen drukt U op de AL Set toets of schuift U de functieschakelaar naar de OFF stand. De zoemwekker instellen 1. Stel de gewenste wektijd in (zie “De wektijd instellen”). 2. - Page 19 of stoffige plaatsen. Houd uw toestel uit de buurt van verwarmingselementen en bronnen met elektrische storing zoals fluorescerende lampen of motoren. Om de beste Klokdisplay te bekomen, vermijd het toestel te gebruiken onder rechtstreeks zonlicht of in kamers met een sterke verlichting. Veeg het toestel schoon met een vochtige doek.
-
Page 20: Informazioni Di Sicurezza
INFORMAZIONI DI SICUREZZA Alimentazione elettrica Questo apparecchio è progettato per funzionare con una fornitura di corrente di 230 Volt, 50Hz CA. Altre fonti di alimentazione possono danneggiarlo. Quando si collega l’apparecchio per la prima volta, controllare che la targhetta riporti l’indicazione 230V CA. Spina Questo apparecchio è... - Page 21 Proteggere lo schermo dalle impronte digitali e dalla polvere. Questo prodotto è progettato solo per uso domestico. Qualsiasi altro uso può invalidare la garanzia ed essere pericoloso. Ventilazione Posizionare l’apparecchio su una superficie solida e lontano dai raggi solari e dalle fonti di calore. Se posizionato su un mobiletto, lasciare 10cm di spazio intorno.
-
Page 22: Impostazione Dell'orologio
DESCRIZIONE Altoparlante Sul fondo Tasto impostazione sveglia Tasto “sleep” Selettore funzione (ON/OFF/AUTO) Tasto impostazione Snooze / Ora Display dell’orologio Regolazione volume / Modo sveglia Selettore di banda AM/FM Tasto impostazione ora Tasto impostazione minuti Comando di sintonia Scala delle frequenze Cavo alimentazione CA Coperchio vano batteria (sul fondo) * Non collegare l’Antenna FM Antenna all’antenna esterna. -
Page 23: Funzionamento Della Radio
Continuare a tenere premuto il tasto SNOOZE/TIME SET (impostazione snooze/ora) e premere ripetutamente il tasto Minute (minuti) fino a far comparire i minuti desiderati. SNOOZE/TIME SET Sollevare il tasto (impostazione snooze/ora). FUNZIONAMENTO DELLA RADIO Per accendere la radio, spostare il selettore di funzione su ON (acceso). Regolare il volume servendosi del comando di regolazione del volume. -
Page 24: Cura E Manutenzione
Per impostare l’allarme buzzer 1. Impostare l’orario desiderato per la sveglia (vedere “Impostazione della sveglia”). 2. Girare completamente il comando di regolazione del volume in senso orario verso la posizione Buzz (allarme buzzer) fino a udire uno scatto. 3. Per fermare l’allarme buzzer, premere il tasto AL Set (impostazione sveglia), o spostare il selettore di funzione su OFF (spento). -
Page 25: In Caso Di Cattivo Funzionamento
temperature elevate, umidità o polvere. Tenere l’apparecchio lontano da fonti di calore e da interferenze elettriche quali lampade fluorescenti, o motori. Per una maggior leggibilità del display dell’orologio, non posizionare l’apparecchio sotto i raggi diretti del sole, o in una stanza fortemente illuminata. Pulire l’apparecchio con un panno umido. -
Page 26: Sicherheitshinweise
SICHERHEITSHINWEISE Stromversorgung Dieses Gerät wurde für den Betrieb mit einer 230 Volt, 50 Hz Netzstromversorgung entwickelt. Bitte prüfen Sie, dass auf dem Typenschild des Gerätes 230V AC steht, bevor Sie das Gerät das erste Mal einstecken. Netzstecker Wir haben dieses Gerät mit einem Standard-Netzstecker ausgerüstet. •... - Page 27 Verwenden Sie dieses Gerät nicht mehr, wenn Flüssigkeiten darauf ausgeschüttet wurden, wenn es irgendwie beschädigt wurde oder wenn es nicht richtig funktioniert. Stecken Sie das Gerät unverzüglich aus und wenden Sie sich an einen Experten. Schützen Sie den Bildschirm vor Fingerabdrücken und Schmutz. Dieses Produkt wurde nur für den allgemeinen Hausgebrauch entwickelt.
- Page 28 Prüfen Sie, ob die auf dem Typenschild des Gerätes angegebene Spannung mit Ihrer Netzspannung überseinstimmt. Verwenden Sie das Gerät für keinen anderen als den vorgesehenen Zweck. Lassen Sie das Stromkabel nicht über eine Tischkante oder die Oberkante einer Theke hängen. Lassen Sie das Stromkabel nicht in Berührung mit heißen Oberflächen kommen.
-
Page 29: Einstellen Der Uhrzeit
Batterie nicht ins Feuer werfen, da Explosionsgefahr besteht. EINSCHALTEN Stellen Sie Ihren Radiowecker auf eine ebene Oberfläche. Stecken Sie das Netzkabel in die Wandsteckdose. Bitte beachten Sie, dass bei einem Stromausfall die Uhrzeitanzeige blinkt, außer Sie haben eine -9-V-Gleichstrom-„Stützbatterie” eingesetzt. In diesem Fall müssen Sie die Zeit- und Weckeinstellungen neu einstellen. - Page 30 Drücken Sie wiederholt auf HOUR (die Stundeneinstelltaste), bis die korrekte Stundeneinstellung angezeigt wird. Halten Sie weiterhin AL SET (die Weckeinstelltaste) gedrückt und drücken Sie wiederholt auf MIN (die Minuteneinstelltaste), bis die korrekte Minuteneinstellung angezeigt wird. Drücken Sie auf AL SET (die Weckeinstelltaste), um die Weckzeit zu prüfen. Wecken durch Radio einstellen Stellen Sie eine Radiostation und die Lautstärke ein (siehe „RADIOBETRIEB”).
-
Page 31: Technische Daten
TECHNISCHE DATEN LEISTUNGSANFORDERUNGEN Netz Wechselstrom 230 Volt, 50Hz~ Stützbatterie 1 x 9-V-Batterie (nicht im Lieferumfang enthalten) FREQUENZBEREICH 87,5 – 108 MHz 522 – 1620 kHz PFLEGE UND WARTUNG Trennen Sie das Gerät vor dem Reinigen vom Stromnetz ab. Tauchen Sie das Gerät nicht ins Wasser oder in eine andere Flüssigkeit. Vermeiden Sie es, das Gerät in direkter Sonnenbestrahlung bzw. - Page 32 sich im Inneren und ist leicht zugänglich. Öffnen Sie die Batterieabdeckung auf der Rückseite des Gerätes, um die Batterie zu entfernen. Die Batterie muss bei Ihrer örtlichen Recycling-Stelle entsorgt werden. Wenn etwas offensichtlich nicht funktioniert Wenn Sie Fragen zum Betrieb Ihres Gerätes haben und Sie in Großbritannien wohnen, können Sie während der normalen Geschäftszeiten bei unserem Hilfetelefon unter 0844 8009595 anrufen.
-
Page 33: Bezpečnostní Pokyny
BEZPEČNOSTNÍ POKYNY Napájení ze sítě Tento přístroj je navržen pro používání s AC (stř.) napájením 50Hz ze sítě 230 voltů. Jiné napájecí zdroje mohou tento přístroj poškodit. Dříve než zařízení zapojíte, ze všeho nejdříve ověřte, že na jeho štítku s charakteristickými údaji je označení... - Page 34 Obrazovku chraňte před otisky prstů a před špínou. Tento výrobek je určen pouze pro domácí používání, jakékoliv jiné použití může zrušit platnost záruky a může být nebezpečný. Ventilace Zařízení umístěte na tvrdou pevnou plochu mimo dosah slunečních paprsků a zdrojů tepla. Pokud je ve skříni, nechejte alespoň 10 cm mezeru ze všech stran. Neucpávejte větrací...
-
Page 35: Nastavení Budíku
Na spodní straně tohoto výrobku jsou uvedena některá varovná upozornění týkající se bezpečnosti při jeho používání. HLAVNÍ PŘÍSTROJ Reproduktor Na spodu výrobku Tlačítko Alarm Set (nastavení buzení) Tlačítko Sleep (spánek) Přepínač funkcí (ON/OFF/AUTO) Tlačítko Snooze / Time Set (nastavení režimu spánku/času) Displej hodin Ovladač... - Page 36 POUŠTĚNÍ RÁDIA Rádio zapnete tím, že funkční přepínač nastavíte do polohy ON (zapnuto). Pomocí ovladače hlasitosti nastavte hlasitost. Pomocí přepínače vlnových pásem AM/FM zvolte vlnové pásmo. Pomocí ovladače TUNING (ladění) vylaďte požadovanou stanici Při poslechu vysílání na vlnových délkách FM plně vytáhněte FM anténu, abyste dosáhli optimálního příjmu.
- Page 37 Řízení režimu spánku Stisknutím tlačítka Snooze (režim spánku) lze přibližně na 9 minut ztlumit zvuk buzení z rádia nebo bzučáku. Tato sekvence se bude opakovat, dokud během doby buzení dlouhé 1 hodinu a 59 minut nestisknete tlačítko AL Set (nastavení budíku) nebo nenastavíte funkční přepínač do polohy OFF (vypnuto).
- Page 38 DŮLEŽITÉ POKYNY K LIKVIDACI Jako zodpovědný prodejce se staráme o životní prostředí. Proto vás žádáme o dodržení správného postupu likvidace vašeho výrobku, baterií a obalových materiálů. Pomůže to zachovat přírodní zdroje a zajistit, že je vše recyklováno způsobem, který chrání zdraví a životní prostředí. Tento výrobek a jeho obalové...
-
Page 39: Bezpečnostné Informácie
BEZPEČNOSTNÉ INFORMÁCIE Napájanie Toto zariadenie je určené na prevádzku pri striedavom napájacom napätí 230 V, 50 Hz. Iné zdroje napájania môžu spôsobiť jeho poškodenie. Pred prvým používaním zariadenia skontrolujte, či sa na typovom štítku zariadenia nachádza označenie 230V AC. Napájací konektor Tento prístroj je vybavený... - Page 40 poškodené alebo ak nepracuje správne. Okamžite odpojte zariadenie od elektrickej siete a odovzdajte ho do servisu. Chráňte displej pred odtlačkami prstov a nečistotami. Toto zariadenie bolo navrhnuté iba na použitie v domácnostiach. Akékoľvek iné použitie môže spôsobiť zrušenie platnosti záruky a môže byť nebezpečné. Ventilácia Umiestnite zariadenie na tvrdý, rovný...
- Page 41 Neponárajte prístroj ani napájací kábel do vody alebo iných kvapalín. Na spodnej strane prístroja sú symbolmi označené bezpečnostné upozornenia. PREHĽAD Reproduktor V spodnej časti Tlačidlo Alarm Set (nastavenie budíka) Tlačidlo Sleep (oneskorené vypnutie) Prepínač funkcií (ON/OFF/AUTO) (ZAP/VYP/AUTO) Tlačidlo Snooze / Tlačidlo Time Set Displej Regulátor hlasitosti / režim budenia Prepínač...
-
Page 42: Nastavenie Času Budenia
NASTAVENIE AKTUÁLNEHO ČASU Stlačte a podržte tlačidlo SNOOZE/TIME SET. Opakovaným stlačením tlačidla Hour nastavte hodiny. Stlačte a podržte tlačidlo SNOOZE/TIME SET. Opakovaným stlačením tlačidla Minute nastavte minúty. Uvoľnite tlačidlo SNOOZE/TIME SET. POUŽÍVANIE RÁDIOPRIJÍMAČA Nastavením prepínača funkcií do polohy ON (ZAP) zapnite rádio. Hlasitosť... -
Page 43: Technické Údaje
Nastavenie budenia pípaním 1. Nastavte požadovaný čas budenia (pozri časť „Nastavenie času budenia“). 2. Regulátor hlasitosti otočte v smere hod. ručičiek na doraz, kým nezaregistrujete kliknutie. 3. Ak chcete vypnúť pípanie, stlačte tlačidlo AL Set alebo posuňte prepínač funkcií do polohy OFF (VYP). - Page 44 Pri čistení jednotky nedovoľte, aby prenikla dovnútra zariadenia voda ani iná tekutina. DÔLEŽITÉ UPOZORNENIA K LIKVIDÁCII Ako zodpovední predajcovia sa staráme o životné prostredie. Odporúčame vám, aby ste sa riadili správnymi postupmi pre váš produkt, batérie a obalové materiály. Toto pomôže zachovať prírodné zdroje a zabezpečí, že budú...
-
Page 45: Información Sobre Seguridad
INFORMACIÓN SOBRE SEGURIDAD Alimentación Este equipo ha sido diseñado para funcionar con una fuente de alimentación de corriente alterna de 230 Voltios, 50Hz. Otras fuentes de alimentación podrían dañarlo. Antes de enchufarlo por primera vez, compruebe que el valor de corriente del aparato indica 230V. Enchufe de corriente Este equipo lleva incorporado un enchufe eléctrico estándar. - Page 46 Este producto ha sido diseñado solo para el uso doméstico. Cualquier otro uso invalidará la garantía y podría ser peligroso. Ventilación Coloque el equipo sobre una superficie sólida y lisa, alejada de la luz solar directa y de fuentes de calor.
-
Page 47: Ajuste Del Reloj
OPERSPECTIVA Altavoz Parte inferior Botón de Ajuste de la Alarma Botón Adormecedor Selector de Función (ON/OFF/AUTO) Botón de Repetición/ Ajuste de Horario Visualizador de Reloj Control de Volumen/Modo de Alarma Interruptor de Banda AM/FM Botón de Ajuste de Horas Botón de Ajuste de Minutos Control Sintonizador Escala de Frecuencia Cable de Corriente AC... -
Page 48: Ajustar La Alarma
UTILIZAR LA RADIO Coloque el selector de función en la posición ON para encender la radio. Ajuste el volumen utilizando el control de volumen. Seleccione la banda deseada por medio del Interruptor de Banda AM/FM. Sintonice con la emisora deseada utilizando el botón TUNING. Cuando escuche emisoras FM, extienda por complete la antena FM para obtener una recepción optima. -
Page 49: Cuidados Y Mantenimiento
AJUSTE DEL TEMPORIZADOR DEL ADORMECEDOR Antes de ajustar el temporizador del adormecedor, asegúrese de que ha sintonizado con la emisora deseada (vea “UTILIZAR LA RADIO”). Deslice el selector de función hacia la posición OFF o AUTO. Pulse y mantenga presionado el botón Sleep y ajuste el tiempo adormecedor deseado pulsando repetidamente los botones Hour Set y Minute Set hasta alcanzar el tiempo que desee que la radio funcione. - Page 50 Nunca permita que el agua u otros líquidos entren en la unidad mientras la limpia. INSTRUCCIONES IMPORTANTES DE ELIMINACIÓN Como minoristas responsables, nos preocupamos por el medio ambiente. Como tales le instamos a que siga el procedimiento correcto de eliminación de su producto, baterías y materiales de embalaje. Esto ayudará...
-
Page 51: Informação De Segurança
INFORMAÇÃO DE SEGURANÇA Fonte de alimentação Este equipamento foi concebido para uma fonte de alimentação de 230 Volt, 50Hz AC Outros tipos de alimentação eléctrica podem danificá-lo Verifique a etiqueta de identificação do aparelho para ver se é 230V AC antes de ligar pela primeira vez. Ficha eléctrica Este aparelho tem uma ficha eléctrica para uma tomada normal. - Page 52 Ventilação Coloque o equipamento numa superfície resistente e plana, afastado da luz directa do sol e de fontes de calor. Se for numa estante, deixe uma margem de 10 cm em redor do aparelho Não obstrua as ranhuras de ventilação, incluindo as que se situam por baixo do aparelho, com tecidos decorativos.
-
Page 53: Visão Geral
VISÃO GERAL Alto-falante No fundo Botão do alarme Botão adormecer Selector de função (LIG/DESL/AUTO) Silenciador / Botão Horas Ecrã do relógio Controlo de volume / Modo Alarme Sintonizador banda AM/FM Botão Horas Botão minutos Controlo de sintonização Escala de frequências Fio eléctrico AC Tampa da bateria (no fundo) * Não ligue a antena FM à... -
Page 54: Configurar O Alarme
Continue a carregar no botão SILENCIADOR/BOTÃO HORAS e carregue repetidamente no botão Minutos até chegar aos minutos que quer. Solte o botão SILENCIADOR/BOTÃO HORAS. FUNCIONAR COM O RÁDIO nha o selector de funções em ON (LIGADO) para ligar o rádio. Ajuste o volume com o controle de volume. -
Page 55: Especificações
Controlo do silenciador O alarme do rádio ou a campainha podem ser postas sem com aproximadamente 9 minutos carregando em Silenciador. Pode repetir a sequência até carregar em Conf AL ou o selector de funções estar na posição OFF (DESLIGADO) durante o período de alarme de 1 hora e 59 minutos. CONFIGURAR O TEMPORIZADOR PARA DORMIR Antes de configurar o temporizador para dormir, veja se sintonizou a sua estação preferida (ver “FUNCIONAMENTO DO RÁDIO”). - Page 56 Não deixe que entre água ou líquidos dentro do aparelho enquanto limpa. INSTRUÇÕES IMPORTANTES DE COMO DEITAR AO LIXO Somos um fabricante responsável e por isso tomamos conta do ambiente. Por isso, pedimos-lhe que siga todos os procedimentos necessários para se desfazer do seu aparelho e da embalagem. Ajudará a conservar os recursos naturais e assegurará...