Table des Matières
Publicité
Les langues disponibles
Les langues disponibles
Liens rapides
Publicité
Chapitres
Table des Matières

Sommaire des Matières pour Zhendre SMC
- Page 1 USER’S D’UTILISATION MANUAL ON/OFF WARM COOL MIN. SMC / SMP Lire attentivement ces instructions Please read it before avant installation et utilisation installation and operation F R A N Ç A I S E N G L I S H...
-
Page 2: Table Des Matières
S O M M A I R E I FONCTIONS DES BOUTONS DE LA TÉLÉCOMMANDE ................II SIGNIFICATION DES PICTOGRAMMES DE L’AFFICHAGE . -
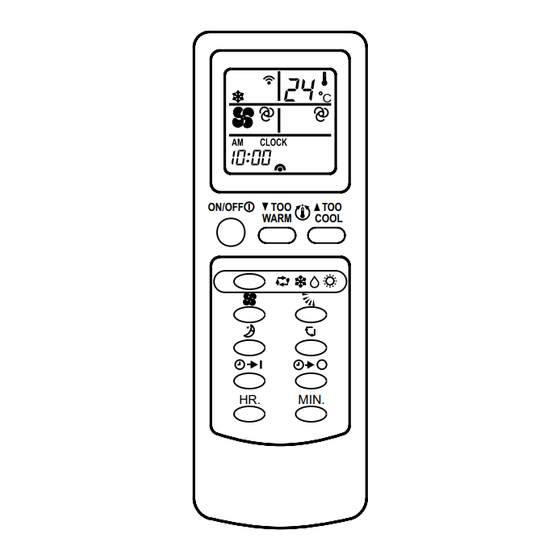
Page 3: I Fonctions De La Télécommande
I FONCTIONS DE LA TÉLÉCOMMANDE Transmetteur de signal À diriger vers la fenêtre de réception de l'unité. Affichage du mode Affichage de la température Auto Cooling de consigne Heating Sleep Affichage de la direction Affichage de la vitesse du soufflage Auto Auto airflow direction Airflow direction swing... -
Page 4: Signification Des Pictogrammes De L'affichage
II SIGNIFICATION DES PICTOGRAMMES DE L’AFFICHAGE 1 - Zone d’affichage du mode : Affiche le mode de fonctionnement sélectionne. Vous pouvez sélectionner : ➥ Auto ➥ Froid ➥ Chaud ➥ Déshumidification ➥ Sleep … 2 - Zone d’affichage de la température de consigne : Affiche la température de consigne 3 - Zone d’affichage de la vitesse de ventilation : Affiche la vitesse de ventilation. -
Page 5: Instructions D'utilisation
III INSTRUCTIONS D’UTILISATION 1 - Mise en place des piles. • Presser le bouton « RESET » après changement des piles. La télécommande sera ainsi prête à fonctionner. • Respecter la polarité + et -. Mettre correctement les pôles “+” et “-” 2 - Réglage de l’heure. -
Page 6: Modes Froid, Déshumidification Et Chaud
4 - Modes froid, déshumidification, chaud. • Pousser le bouton pour démarrer le climatiseur. • Presser le bouton de sélection du mode. À chaque pression, un mode différent est sélectionné dans l’ordre suivant : AUTO ➥ FROID ➥ DÉSHUMIDIFICATION ➥ CHAUD ➥... -
Page 7: Précautions Et Limites D'utilisation
IV PRÉCAUTIONS ET LIMITES D’UTILISATION • La distance maximale de réception est de 6 mètres sans obstacle. • L’affichage de la télécommande fait apparaître le pictogramme à chaque pression d’un bouton, l’unité intérieure indique par un « BEEP » qu’elle a reçu l’information. Si l’unité... -
Page 8: Marche Forcée
Marche forcée. • Si vous perdez la télécommande, vous pouvez mettre en marche le climatiseur à l’aide du sélecteur Marche forcée (Emergency switch). Commutateur Relever la façade • Sélecteur marche forcée (Emergency switch) • Appuyez une 1 fois sur le bouton : Mode froid (cool) •... - Page 9 C O N T E N T S I ILLUSTRATION FOR BUTTONS ON REMOTE CONTROLLER ..............II NAME AND FUNCTION OF DISPLAY AREA .
-
Page 10: I Illustration For Buttons On Remote Controller
I ILLUSTRATION FOR BUTTONS ON REMOTE CONTROLLER Signal transmitter Aim this side at he receiving signal window of indoor unit. Operation display Auto Cooling Temperature display Heating Sleep Auto airflow diretion Fan speed display Auto Auto airflow direction Airflow direction swing Middle High Airflow direction location... -
Page 11: Name And Function Of Display Area
II NAME AND FUNCTION OF DISPLAY AREA 1 - Operation display area: Show the selected operation mode. You can select: ➥ Auto ➥ Cooling ➥ Heating ➥ ➥ Sleep … 2 - Set temperature display area: Show the set temperature. 3 - Fan speed display area: Show the selected fan speed. -
Page 12: Operation Instruction
III OPERATION INSTRUCTION 1 - How to fix batteries. • Please press the reset button near the batteries after change of the batteries. Then remote controller is ready for use. • After fixing of the batteries, please press the reset button to set the remote controller ready for use. put pole "+"... -
Page 13: Cooling, Dry And Heating Operations
4 - Cooling dry and heating operation. • Push button to start air-conditioner. • Push button to select operation. Each pushing of this button changes the mode of operation ➥ ➥ ➥ ➥ ➥ in this order from AUTO AIRFLOW COOLING HEATING •... -
Page 14: Tips About Remote Controller
IV TIPS ABOUT REMOTE CONTROLLER • The reaching scope of signal is 6 metres vertical distance from indoor unit, without any obstruction. • Remote controller will show by pressing any button and at the same time, indoor unit will give out Do or Do Do sound, meaning it has received the signal. -
Page 15: Forced Operation
Forced Operation. • If you lose wireless remote controller, you can operate the unit with forced operation switch. Slide Switch Open the front panel upward • Emergency Switch • When remote control lost, you can use Emergency Switch to control air conditioner •... - Page 16 122, AVENUE DES PYRÉNÉES - BP 82 - 33883 VILLENAVE D'ORNON CEDEX - FRANCE...