Chapitres
Table des Matières
Dépannage

Sommaire des Matières pour Qubo SO-220
- Page 1 QUBO SO-220 MUSIC SYSTEM WITH DIGITAL RADIO, & ALARM FUNCTION, CD PLAYER & BLUETOOTH® Bedienungsanleitung Operating manual Mode d'emploi Bedieningshandleiding Manuale operativo...
- Page 2 © sonoro audio GmbH 2018...
- Page 3 QUBO SO-220 MUSIKSYSTEM MIT DIGITALRADIO, WECKFUNKTION, CD-PLAYER & BLUETOOTH® Bedienungsanleitung...
-
Page 4: Table Des Matières
1.1 Kontakdaten ....................6 1.2 Bestimmungsgemäße Verwendung ............7 1.3 Reinigung ...................... 7 Lieferumfang ..................... 7 2.1 QUBO ......................7 2.2 sonoroLIGHT (optional erhältlich) ............. 8 Unterstützte Formate ..................8 3.1 Unterstützte CD Formate ................8 3.2 Unterstützte Audio Formate ............... 8 Bedienelemente und Anschlüsse .............. - Page 5 Allgemeine Funktionen der Audio-Wiedergabe ........9.1 Lautstärke einstellen ................... 9.2 Wiedergabe stummschalten ..............29 9.3 Wiedergabemodus modus wählen ............29 Radiowiedergabe ..................... 30 10.1 FM-Radio ....................10.2 DAB-Radio ....................32 CD-Wiedergabe ....................35 Bluetooth-Wiedergabe ................... 37 12.1 Bluetooth Geräte koppeln ................ 37 12.2 Bluetooth Geräte verbinden ..............
-
Page 6: Einführung
Einführung Vielen Dank, dass Sie sich für den Kauf eines QUBO entschieden haben. Diese Anleitung und die Sicherheitshinweise vermitteln Ihnen alle Informationen für einen störungsfreien und sicheren Betrieb des Geräts. • Lesen Sie diese Anleitung und die Sicherheitshinweise vollständig durch, bevor Sie das Gerät verwenden. -
Page 7: Bestimmungsgemäße Verwendung
• Wischen Sie bei extremer Verschmutzung das Gerät mit einem leicht feuchten Tuch ab und trocknen Sie es mit einem trockenen, weichen Tuch ab. Lieferumfang QUBO Zum Lieferumfang des QUBO gehören zahlreiche Zusatzteile, die Sie zum Empfangen der Radiofrequenzen sowie zum Anschließen weiterer Geräte benötigen. • QUBO mit Schutzhülle •... -
Page 8: Sonorolight (Optional Erhältlich)
Um den vollen Funktionsumfang nutzen und eine angeschlossene Lampe über Bluetooth steuern zu können, benötigen Sie das Dimmermodul sonoroLIGHT. sonoroLIGHT kann mit QUBO gekoppelt werden und ist im Fachhandel erhältlich. sonoroLIGHT ist nicht Bestandteil des Lieferumfangs von QUBO. Unterstützte Formate Unterstützte CD-Formate... -
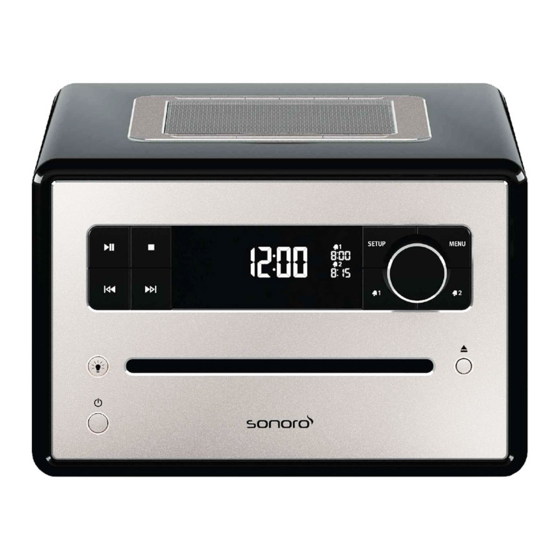
Page 9: Bedienelemente Und Anschlüsse
Bedienelemente und anschlüsse Vorderseite Abb, 2: Vorderseite Play/Pause ( Eject ( ) Stop ( ) Alarm 1 ( 1) LCD-Display CD-Schlitz SETUP Vor ( Bedienknopf Licht ( MENU Standby ( ) Alarm 2 ( 2) Zurück ( © sonoro audio GmbH 2018... - Page 10 Oberseite Abb, 3: Oberseite Speicher 1–6 SNOOZE MUTE Lautsprecher RELAX SLEEP © sonoro audio GmbH 2018...
- Page 11 Rückseite Abb, 4: Rückseite DAB/FM Netzteilanschluss Batteriefach USB-Charge & Playback Bassreflexöffnung Kopfhörer Keylock AUX IN © sonoro audio GmbH 2018...
- Page 12 Fernbedienung Abb, 5: Fernbedienung Standby ( ) Alarm 1 ( 1) Licht ( SLEEP MUTE/ SNOOZE Zurück ( ) VOL ( Bluetooth ( ) BASS TREBLE VOL( RELAX Vor ( ) OK, Play/Pause ( Alarm 2 ( 2) DAB ( Speicher 1–6 SETUP ©...
-
Page 13: Anzeige
Anzeige Abb, 6: Anzeige Pos. Symbol Funktion (Abb. 7) Kopfhörer Kopfhörer ist angeschlossen. Sleep Sleeptimer ist aktiv. Repeat CD: Wiederholung aller Titel der CD. Relax Relax-Modus ist aktiv. Shuffle CD: Zufällige Abspielreihenfolge der einzelnen Titel FM/CD/DAB/ AUX/USB Zeigt den gewählten Betriebsmodus an. Zusatz zur Uhrzeit bei der 12-Stunden-Einstellung. -
Page 14: Gerät Auspacken Und In Betrieb Nehmen
Gerät auspacken und in Betrieb nehmen Es dürfen nur Anschlusskabel und externe Geräte verwendet werden, die sicherheitstechnisch und hinsichtlich elektromagnetischer Verträglichkeit und Abschirmqualität dem vorliegenden Gerät entsprechen. Gerät auspacken Alle Teile des Geräts werden in einem Karton geliefert. 1. Packen Sie das Gerät und alle Zubehörteile aus und überprüfen Sie den Inhalt auf Vollständigkeit und Unversehrtheit. -
Page 15: Antenne Anschließen
DC-Anschluss, 15.5 V, 2.9 A. 3. Stecken Sie den Netzstecker in die Steckdose. Antenne anschließen 1. Verschrauben Sie die Stabantenne auf der Rückseite von QUBO mit dem FM / DAB-Antenne-Anschluss. 2. Wenn Sie die Stabantenne verwenden, ziehen Sie die Arme der Stabantenne auseinander und richten Sie die Antenne so aus, dass Sie den bestmöglichen... -
Page 16: Sonorolight Koppeln
Beachten Sie auch die Bedienungsanleitung von sonoroLIGHT. 1. Stecken Sie sonoroLIGHT in eine Steckdose. 2. Stellen Sie sicher, dass sonoroLIGHT und QUBO nicht weiter als 10 m auseinander stehen. Andernfalls kann keine Verbindung hergestellt werden. 3. Drücken Sie den Taster auf Ihrem sonoroLIGHT. -
Page 17: Standby-Modus
Im FM/DAB-Modus stellen sich die Uhrzeit und das Datum automatisch ein, solange dies nicht deaktiviert wurde. Standby-Modus Im Standby-Modus lassen sich folgende Einstellungen vornehmen: • Uhrzeit manuell einstellen. • Datum manuell einstellen. • Wecklicht einstellen (nur mit sonoroLIGHT). W Siehe bitte Kapitel 7.3 „Grundeinstellungen vornehmen“ auf Seite 18 Der Vorgang zum Einstellen der einzelnen Funktionen ist identisch. -
Page 18: Grundeinstellungen Vornehmen
Datum manuell einstellen Abb, 11: Datum einstellen 1. Drücken Sie im Standby-Modus die [SETUP]- Taste des Geräts oder der Fernbedienung. W Das Display zeigt [Zeit einstellen] an. (Abb. 10). 2. Drücken Sie die [Vor]-Taste. W Das Display zeigt das Menü [Datum einstellen] an. (Abb. 11). 3. - Page 19 • Demo Musik aktivieren/deaktivieren. • Gerät auf Werkseinstellungen zurücksetzen. Um die Einstellungen vornehmen zu können, gehen Sie wie folgt vor: 1. Drücken Sie die [SETUP]-Taste auf der Vorderseite des Geräts oder der Fernbedienung, um in das jeweilige Untermenü zu gelangen. 2.
- Page 20 Displaydimmer einstellen Abb, 14: Displaydimmer einstellen Das Display wird in Abhängigkeit der Umgebungshelligkeit hell oder dunkel geschaltet. Die Umgebungshelligkeit wird durch einen Sensor neben dem Display erfasst. Sie können die jeweilige Helligkeitsstufe einstellen. • Display hell: Stufe 08 bis 15 (Abb. 14/A) •...
-
Page 21: Klang Einstellen
Displaysprache einstellen Abb, 17: Sprache einstellen Sie können die Sprache des Menüs sowie der Wiedergabeanzeige einstellen. Zur Auswahl stehen die Sprachen: • English • Deutsch • Französisch Demo Musik ein-/ausschalten Abb, 18: Demo Musik ein-/ausschalten Sie können die Demo Musik-Funktion ein- oder ausschalten. (Abb.18) Gerät auf Werkszustand zurücksetzen Abb, 19: Auf Werkszustand zurücksetzen Bei Bedarf können Sie alle vorgenommenen Einstellungen, wie Sprach- und... -
Page 22: Sleeptimer Einstellen
Alternativ können Sie auch die [Vor]- bzw. [Zurück]-Taste verwenden, um die Werte einzustellen. 2. Um die Bässe einzustellen, wählen Sie [Bass] (Abb. 20/A) und drehen am Bedienknopf. Um die Höhen einzustellen, wählen Sie [Höhen] (Abb.20/B) und drehen am Bedienknopf. 3. Drücken Sie den Bedienknopf, um die Einstellungen zu übernehmen, oder warten Sie 10 Sekunden. -
Page 23: Licht Ein-Und Ausschalten
2. Drehen Sie den Bedienknopf, um die gewünschte Länge des Zeitintervalls auszuwählen. Das maximale Zeitintervall beträgt 120 Minuten. Alternativ können Sie auch die [Vor]- bzw. [Zurück]-Taste verwenden, um die Werte einzustellen. 3. Drücken Sie den Bedienknopf, um die Eingabe zu bestätigen. Wenn die Zeit abgelaufen ist, wird die Wiedergabe langsam ausgeblendet. -
Page 24: Weckfunktion
Abb, 24: Helligkeit einstellen 3. Drehen Sie den Bedienknopf innerhalb von 4 Sekunden, um die Helligkeit des Lichts einzustellen. (Stufe 00 bis 32, Abb. 24). Wenn das Gerät ausgeschaltet ist, können Sie sich auch länger Zeit lassen. 4. Drücken Sie die [Licht]-Taste erneut, um das Licht auszuschalten. Wenn das Gerät ausgeschaltet ist, können Sie direkt den Bedienknopf drehen, um das Licht einzuschalten und die Helligkeit einzustellen. -
Page 25: Alarmquelle Einstellen
5. Drücken Sie den Bedienknopf, um die Eingabe zu bestätigen. Mit der [Vor]- oder [Zurück]-Taste können Sie zwischen der Stunden- und Minutenanzeige wechseln. W Die Alarmzeit ist eingestellt. Alarmquelle einstellen Nachdem Sie die Weckzeit eingestellt und bestätigt haben, können Sie die Quelle für den Alarm einstellen. -
Page 26: Weckwiederholung Einstellen
Abb, 27: Wecklautstärke einstellen 1. Drehen Sie den Bedienknopf, um die gewünschte Lautstärke auszuwählen 2. Drücken Sie den Bedienknopf oder die [OK]- Taste auf der Fernbedienung, um die Einstellung zu bestätigen. (Abb. 27) W Die Wecklautstärke ist eingestellt. Die Alarm-Audio-Wiedergabe beginnt immer in minimaler Lautstärke und wird bis auf die eingestellte Lautstärke langsam gesteigert. -
Page 27: Wecker Ein-Und Ausschalten
Abb, 29: Wecklicht einstellen 2. Drehen Sie den Bedienknopf, um das Wecklicht ein- oder auszuschalten (Abb. 29) 3. Drücken Sie den Bedienknopf oder die [OK]- Taste auf der Fernbedienung, um die Einstellung zu bestätigen. W Das Wecklicht ist programmiert. Wenn Sie zusätzlich durch Wecklicht geweckt werden möchten, wird das Licht jeweils um die von Ihnen eingestellte Zeit vor dem Alarm eingeschaltet, sodass es die vorgegebene Helligkeit bei Auslösen des Alarms erreicht hat. -
Page 28: Snooze Einstellen
• [Standby] W Der Alarm bleibt für den nächsten Tag aktiviert. Ausnahme ist die einmalige Weckeinstellung. Das Wecklicht bleibt eingeschaltet und behält die aktuelle Helligkeit bei. Nach 60 min schaltet der Alarm automatisch ab. 2. Um das Wecklicht auszuschalten, drücken Sie die [Licht]-Taste. 3. -
Page 29: Wiedergabemodus Modus Wählen
1. Drehen Sie den Bedienknopf (Abb. 31), um die Lautstärke zu erhöhen oder zu verringern. W Das Display zeigt einen Lautstärkeregler. Lautstärke einstellen Stummschalten Abb, 32: Stummschalten 1.Drücken Sie im Wiedergabe-Modus kurz die [MUTE]-Taste auf der Oberseite des Geräts, um den Ton während der Wiedergabe abzuschalten. Alternativ können Sie auch die [MUTE]-Taste auf der Fernbedienung drücken. -
Page 30: Radiowiedergabe
Radiowiedergabe Nachdem Sie die Radiowiedergabe über [FM] (UKW- Rundfunk) oder [DAB] (Digitalradio) gewählt haben, zeigt das Display das FM- oder DAB-Symbol sowie fol- gende Informationen an: • Modus: FM oder DAB. • Gespeicherter Programmplatz, sofern der Sender im Programmspeicher gespeichert ist. •... - Page 31 4. Drücken Sie den Bedienknopf erneut. W Der automatische Suchlauf wird gestartet. Nach Abschluss der Suche springt das Gerät zum ersten Sender der Liste. Automatische Sendersuche Voraussetzung: • Die Antenne ist angeschlossen. Abb, 35: Automatische Sendersuche 1. Drücken und halten Sie im FM-Wiedergabe- modus die [Vor]- oder [Zurück]-Taste. W Das Display zeigt den Text [Auto.
- Page 32 2. Drücken und halten Sie eine der Senderspeichertasten auf der Geräteoberseite oder der Fernbedienung. W Das Display zeigt den Senderspeicherplatz an. Sie können bis zu 6 FM-Sender als Favorit ablegen. Als Favorit gespeicherten FM-Sender aufrufen 1. Drücken Sie kurz eine der SSenderspeichertasten 1 – 6 auf der Geräteoberseite oder der Fernbedienung.
- Page 33 W Das Display zeigt den Text [man. DAB Suche] an. (Abb. 39) 3. Drücken Sie den Bedienknopf am Gerät oder die [OK]-Taste auf der Fernbedienung. 4. Drehen Sie den Bedienknopf oder drücken Sie die [Vor]- oder [Zurück]-Taste, um die verschiedenen Sender einzustellen. 5.
- Page 34 DAB-Info abrufen Im DAB-Wiedergabemodus können Sie Informationen zu Sender, Programm o. Ä. abrufen. Die Informationen werden in folgender Reihenfolge angezeigt: • Sendername (Ausgangspunkt) • Senderkette • DLS (“Dynamic Label Service”, programmbegleitende Informationen wie z. B. Interpret, Titel usw.) • Programmtyp (z. B. Sport) •...
-
Page 35: Cd-Wiedergabe
Abb, 42: DRC Einstellung 2. Drücken Sie die [Vor]-Taste, bis das Display den Text [DRC Einstellung] zeigt. 3. Drücken Sie den Bedienknopf oder die [OK]- Taste auf der Fernbedienung. 4. Nehmen Sie mit Hilfe der [Vor]- oder [Zurück]- Taste die gewünschte Einstellung vor. - Page 36 5. Titelnummer 6. Wiedergabestatus (Play/Pause) Weitere Funktionen • Um die Wiedergabe der CD zu unterbrechen (Pause), drücken Sie die [Play/ Pause]-Taste oder den Bedienknopf. • Um die CD weiter abzuspielen, drücken Sie die [Play/Pause]-Taste oder den Bedienknopf. • Um einen Titel schnell vorwärts zu durchlaufen, halten Sie die [Vor]-Taste gedrückt.
-
Page 37: Bluetooth-Wiedergabe
W Das Bluetooth-Symbol blinkt und das Display zeigt den Text [Suchen] an. (Abb. 44) 3. Schalten Sie die Bluetooth-Funktion Ihres Mobiltelefons bzw. Geräts ein und wählen Sie in der Liste der gefunden Bluetooth-Geräte “QUBO” aus. © sonoro audio GmbH 2018... -
Page 38: Bluetooth Geräte Verbinden
W Die beiden Geräte werden gekoppelt. Das Radio koppelt bis zu 8 Mobiltelefone bzw. Geräte und verbindet sich automatisch mit bereits eingestellten Geräten, wenn Bluetooth aktiviert ist. 12.2 Bluetooth-Geräte verbinden Gespeicherte Bluetooth-Geräte werden automatisch verbunden. 1. Aktivieren Sie den Bluetooth-Modus. W Das Bluetooth-Symbol blinkt und das Display zeigt den Text [Suchen] an. -
Page 39: Usb-Wiedergabe
3. Verbinden Sie das externe Gerät über ein Kabel mit dem AUX-Anschluss. 4. Schalten Sie das externe Gerät ein und starten Sie die Wiedergabe am externen Gerät. Die Bedienung eines externen Geräts über die Tasten des Radios ist nicht möglich. 14. -
Page 40: Relax- Und Meditationsmusik
„ W Titel W Artist W Album W verstrichene Zeit“ • Um in den nächsten MP3-Ordner zu springen, drücken Sie die [Speicher 2]-Taste. • Um in den vorherigen MP3-Ordner zu springen, drücken Sie die [Speicher 1]-Taste. 15. Relax- und Meditationsmusik Das Gerät verfügt über sprachabhängige Relax- und Meditationsmusik, die in verschiedenen Ordnern sortiert ist. - Page 41 Entspannungsmusik 5 6 – Naturklänge Brandung Walgesänge Vögel Regen Windspiel Kaminfeuer Sprache Ordner Titel Name Englisch 1 – Kurzentspannung Quick Relaxation Exercise: Relaxing by feeling your pulse Quick Relaxation Exercise: Relaxing by letting go off stress 2 – Meditative Entspannung Relaxing by meditating on our breath 3 –...
- Page 42 Sprache Ordner Titel Name Französisch 1 – Kurzentspannung Relaxation courte: Relaxation à travers le ressenti de votre pouls Relaxation courte: Relaxation par évacuation du stress 2 – Meditative Relaxation méditative par la respiration Entspannung 3 – Fantasiereisen Voyage imaginaire "plage et chaleur" 4 –...
- Page 43 1. Schalten Sie das Gerät ein. 2. Drücken Sie die [RELAX]-Taste auf der Oberseite des Geräts oder auf der Fernbedienung. W Das Display zeigt das [RELAX]-Symbol an. 3. Drücken Sie die [SETUP]-Taste. Abb, 48: Sprachmenü auswählen 4. Drehen Sie den Bedienknopf, bis das Display [Med. Sprache] anzeigt. (Abb. 48) 5.
-
Page 44: Demo Musik-Wiedergabe
9. Drücken Sie die [Vor]- oder [Zurück]-Taste, um einen Titel innerhalb des Ordners auszuwählen. W Das Display zeigt kurz die Nummer und dann den Namen des Titels an. 16. Demo Musik-Wiedergabe Im Standby-Modus lässt sich Demo Musik wiedergeben, um das Gerät beispielsweise im Geschäft vorzuführen. -
Page 45: Fehlerbehebung
17. Fehlerbehebung Bei allen elektrischen Geräten können Störungen auftreten. Dabei muss es sich nicht immer um einen Defekt am Gerät handeln. Prüfen Sie deshalb anhand nachfolgender Tabelle, ob Sie die Störung selbst beseitigen können Störung Mögliche Ursache Behebung Gerät schaltet nicht ein Netzteil mit Schließen Sie das Netzteil mit Uni- Universaladapter ist nicht... - Page 46 Störung Mögliche Ursache Behebung Gerät reagiert nicht Fehler im Gerät Schalten Sie das Gerät aus und wieder an. Schlechte FM/DAB- FM/DAB-Antenne ist nicht Ändern Sie die Stellung der FM/ Empfangsqualität richtig ausgerichtet DAB-Antenne. Fernbedienung Abstand ist zu groß Verringern Sie den Abstand zwi- funktioniert nicht oder schen der Fernbedienung und dem nur fehlerhaft...
-
Page 47: Reinigung
18. Reinigung HINWEIS! Sachschaden durch unsachgemäße Reinigung! Reinigen Sie das Gerät nur von außen, mit einem trockenen, weichen Tuch. Verwenden Sie keine scharfen lösemittelhaltigen Reinigungsmittel, da diese die Oberfläche des Geräts angreifen. 19. Technische Daten Angabe Wert Abmessungen (BxT×H) ca. 210 x 257 x 140 mm Gewicht ca. -
Page 48: Garantie
20. Garantie Für die Geltendmachung von Garantieansprüchen gilt– ohne, dass dadurch Ihre gesetzlichen Rechte eingeschränkt werden – Folgendes: • Garantieansprüche können nur innerhalb eines Zeitraumes von max. 2 Jahren (1 Jahr in Nordamerika und Australien), gerechnet ab Kaufdatum, geltend gemacht werden. - Page 49 © sonoro audio GmbH 2018...
- Page 50 © sonoro audio GmbH 2018...
- Page 51 QUBO SO-220 MUSIC SYSTEM WITH DIGITAL RADIO, ALARM FUNCTION, CD PLAYER & BLUETOOTH® Operating Manual...
- Page 52 1.1 Contact data ....................54 1.2 Intended use ....................1.3 Cleaning ....................... Scope of delivery ..................... 55 2.1 QUBO ......................55 2.2 sonoroLIGHT (available as an option) ............56 Compatible formats ..................3.1 Compatible CD formats ................56 3.2 Compatible audio formats .................
- Page 53 General audio playback functions ............... 9.1 Setting the volume ..................9.2 Muting the audio playback ................. 76 9.3 Selecting a playback mode ................ 77 Radio playback ....................77 10.1 FM-Radio ....................10.2 DAB-Radio ....................79 CD playback ...................... 82 Bluetooth playback ..................85 12.1 Connecting bluetooth devices ..............
-
Page 54: Introduction
Introduction Thank you for purchasing QUBO. This operating manual and the safety manual provide all the information required for trouble-free and safe operation of QUBO. • Read the operating manual and the safety manual in their entirety before using QUBO. -
Page 55: Intended Use
• If the device is extremely dirty, wipe it with a slightly damp cloth and dry it with a soft, dry cloth. Scope of delivery QUBO Many additional components that you need to receive radio frequencies and connect additional devices are part of QUBO’s scope of delivery. • QUBO with protective cover • Remote control •... -
Page 56: Sonorolight (Available As An Option)
To use the full scope of functions and be able to control a lamp that is connected via Bluetooth, you need the sonoroLIGHT dimmer module. sonoroLIGHT can be connected to QUBO and it is available from specialist shops. sonoroLIGHT is not part of the scope of supply of QUBO. -
Page 57: Controls And Parts
Controls and ports Front View Fig, 2: Front view Play/Pause ( Eject ( ) Stop ( ) Alarm 1 ( 1) LC Display CD-Slot SETUP Next ( Click Wheel Light ( MENU Standby ( ) Alarm 2 ( 2) Previous ( ©... - Page 58 Top View Fig, 3: Top view Memory 1–6 SNOOZE MUTE Speaker RELAX SLEEP © sonoro audio GmbH 2018...
- Page 59 Rear View Fig, 4: Rear view DAB/FM socket AC adapter port Battery compartment USB-Charge & Playback Bass Reflex Headphones Keylock AUX IN © sonoro audio GmbH 2018...
- Page 60 Remote Control Fig, 5: Remote control Standby ( ) Alarm 1 ( 1) Light ( SLEEP MUTE/ SNOOZE Previous ( ) VOL ( Bluetooth ( ) BASS TREBLE VOL( RELAX Next ( ) OK, Play/Pause ( Alarm 2 ( 2) DAB ( Memory 1–6 SETUP...
-
Page 61: Display
Display Fig, 6: Display Item Symbol Function Headphones Headphones are connected. Sleep The Sleep Timer is on. Repeat CD: repeat all tracks on the CD. Relax The Relax mode is on. Shuffle CD: Random play order of individual tracks FM/CD/DAB/ AUX/USB Displays the selected operating mode. -
Page 62: Unpacking The Device And Commencing Operation
Unpacking the device and commencing operation Only use connection cables and external devices that comply with the electromagnetic compatibility and insulation quality of this device. Unpacking the device All parts of the device are delivered in a single cardboard box. 1. -
Page 63: Connecting The Antenna
3. Insert the mains plug into the socket.. Connecting the antenna 1. Screw the rod antenna located on the back of QUBO to the FM/DAB antenna socket. 2. If you are using the rod antenna, pull the arms of the rod antenna apart and align the antenna so that you have the best possible reception. -
Page 64: Connecting Sonorolight
Follow the sonoroLIGHT operating instructions. 1. Plug sonoroLIGHT into a socket. 2. Ensure that sonoroLIGHT and QUBO are no more than 10m away from one another. Otherwise, no connection can be established. 3. Press the button on your sonoroLIGHT. -
Page 65: Setting The Basic Functions
Setting the basic functions The individual menus let you select the functions and settings of the device. Switching on the device for the first time After you have switched the device on for the first time, the LCD display shows the clock display and the message [Tune to FM RDS station to set time &... -
Page 66: Making The Basic Settings
Use the [Next ] or [Previous] button to switch between the hours and minutes display. After 10 seconds of inactivity, the device automatically goes into Standby mode without saving the settings. Setting the date manually Fig, 11: Setting the date 1. - Page 67 • Setting display dimmer. • Setting alarm light (only with sonoroLIGHT). • Set the automatic time/date update function. • Set the display language. • Activate/deactivate Demo Sound. Reset the device to the factory settings. To adjust the settings, proceed as follows: 1.
- Page 68 You can set three different date formats (Fig. 14/A, B and C) as well as the current day. The configuration options are: A: Current day, month, year. • B: Current month, day, year. • C: Current month (in words), day, year. •...
-
Page 69: Setting The Sound
You can select the automatic update function in the [Set Time] submenu. Switching on this function automatically synchronizes the time and date in the FM radio and DAB radio operating modes. (Fig. 17) Setting the display language Fig, 18: Setting the language You can set the language for the menu and the playback display (Fig. -
Page 70: Setting The Sleeptimer
1. Go to the corresponding submenu or press the corresponding button on the remote control. 2. To adjust the bass, select [Bass] (Fig. 21/A) and turn the click wheel. To adjust the treble, select [Treble] (Fig. 21/B) and turn the click wheel. Alternatively, you can also use the [Next] or [Previous] buttons to adjust the values. -
Page 71: Switching The Light On And Off
Alternatively, you can also use the [Next] or [Previous] buttons to adjust the values. 3. Press the click wheel to confirm the entry. When the specified time expires, playback gradually fades out. Dimming light (sunset) In addition to a Sleep Timer, you can also dim or switch off a connected lamp (only in conjunction with sonoroLIGHT). -
Page 72: Alarm Function
If the device is turned off, you can wait longer. 4. Press the [Light] button again to switch the light off. If the device is turned off, you can turn the click wheel directly to switch the light on and set the brightness. Alarm function You can use the device to wake up with FM/DAB radio, CD, Relax Music or alarm ringtones. -
Page 73: Setting The Alarm Source
Setting the alarm source After you have set and confirmed the alarm time, you can set the source for the alarm. Fig, 27: Setting the alarm source 1. Turn the click wheel to select the medium you want to use: (Fig. 27) Select an FM station preset from the station memory that you wish to start the device with and wake up to. -
Page 74: Setting The Alarm Repetition
The alarm audio playback always starts with the minimum volume and gradually increases to the specified volume level. Setting the alarm repetition After you have set and confirmed the alarm volume, you can set the alarm repetition. Fig, 29: Setting the alarm repetition 1. -
Page 75: Switching The Alarm Clock On/Off
Example Settings made: • Alarm time: 07:00 a.m. • Brightness: 15 • Timeframe: 30 min At 06:30 a.m., the alarm light is switched on and the brightness is increased gradually from level 0 to level 15 by 07:00 a.m. Switching the alarm clock on/off Switching on the alarm clock 1. -
Page 76: Setting The Snooze Function
Setting the Snooze function Fig, 31: Setting the snooze function 1. Briefly press the [SNOOZE] button on the remote control in Standby mode. If the device is switched on, press and hold the [SNOOZE] button on the remote control until the Snooze sub-menu appears (Fig. 31). W The display shows the [Snooze] symbol. -
Page 77: Selecting A Playback Mode
Switching on the sound 2. To turn the sound back on, press the [MUTE] button on the device or the remote control again. W The initial screen is displayed. Selecting a playback mode Select the desired mode to playback audio from different media or external devices. Fig, 34: Selecting a playback mode 1. -
Page 78: Fm-Radio
10.1 FM-Radio Finding FM stations Automatic full scan The automatic full scan function automatically creates and saves a station list with up to 30 stations. The stations are sorted according to the strongest reception. Prerequisite: • The antenna is connected. Fig, 35: FM station list 1. -
Page 79: Dab-Radio
Manual tuning Prerequisite: • The antenna is connected. Fig, 37: Manual tuning 1. Press and hold the click wheel to activate the manual station search function. W The display shows the [Manual Tune] text (Fig. 37) 2. Turn the click wheel or press the [Next] or [Previous] buttons to change the frequency range. - Page 80 1. Press the [SETUP] button in DAB playback mode W The display shows the [DAB Full Scan] text. (Fig. 39). 2. Press the click wheel on the device or the [OK] button on the remote control to activate. W The device will search for available radio stations and play back the first available station.
- Page 81 Fig, 42: Pruning 3. Press the click wheel to confirm your selection. W Inactive DAB stations are deleted. In the meantime, [Pruning] is displayed. Storing DAB stations as favourites 1. To store a DAB station as a favourite, proceed as described in chapter 10.1 ‘FM radio’...
-
Page 82: Cd Playback
3 different settings are available: • DRC HIGH: high degree of compression • DRC LOW: low degree of compression • DRC OFF: no compression Prerequisite: • The device is in DAB mode. 1. Press the [SETUP] button. W The display shows the [DAB Full Scan] text. Fig, 43: Setting the DRC 2. - Page 83 1. Playback sequence (Repeat, Shuffle, CD Resume) 2. CD mode 3. Time 4. Elapsed time in minutes 5. Track number 6. Playback status (Play/Pause) Other functions • To interrupt (pause) CD playback, press the [Play/Pause] button or the click wheel. •...
- Page 84 Adjusting CD playback You can choose different playback sequences to play tracks on a CD. 1. Press the [SETUP] button to open the CD menu. This includes the following functions: • Repeating a single track • Repeat all tracks on the CD •...
-
Page 85: Bluetooth Playback
(Fig. 45). 3. Switch on the Bluetooth function of your mobile phone or device and select “QUBO” from the list of Bluetooth devices found. W The two devices are connected. The radio can connect to up to 8 devices and connects automatically to previously configured devices if Bluetooth is enabled. -
Page 86: Playing Music Via Bluetooth
12.3 Playing music via Bluetooth • To start playback, press the [Play/Pause] button or the click wheel. • To interrupt (pause) playback, press the [Play/Pause] button or the click wheel. 13. AUX playback You can connect and play additional audio devices via the AUX port on the back of the device. -
Page 87: Relaxation And Meditation Music
W The display shows the [USB] symbol. (Fig. 48). 3. Connect an external USB device. W The display shows the text [ Reading]. 4. Press the [Play/Pause] button to commence playback. Other functions • To interrupt (pause) playback, press the [Play/Pause] button or the click wheel. •... - Page 88 3 – Progressive Muskelent- Einleitung spannung 2 - Progressive Muskelentspannung 4 – Fantasiereisen Einleitung Fantasiereise Strand & Wärme Fantasiereise Universum 5 – Entspannungsmusik Einleitung Musik Entspannungsmusik 1 Entspannungsmusik 2 Entspannungsmusik 3 Entspannungsmusik 4 Entspannungsmusik 5 6 – Naturklänge Brandung Walgesänge Vögel Regen Windspiel...
- Page 89 Relax Music 4 Relax Music 5 6 – Sounds of nature Ocean Surf Whales Birds Rain Wind Chimes Fireplace Language Folder Track Name French 1 – Courte relaxation Relaxation courte: Relaxation à travers le ressenti de votre pouls Relaxation courte: Relaxation par évacuation du stress 2 –...
- Page 90 1. Switch on the device. 2. Hold down the [RELAX] button on the top of the device or the remote control. W The display shows the [RELAX] symbol. 3. Press the [SETUP] button. Fig, 49: Selecting the language menu 4. Turn the click wheel until the display shows [Music Content]. 5.
-
Page 91: Demo Sound Playback
16. Demo Sound playback Demo Sound can be played in Standby mode to demonstrate the device in a shop, for example. Activating Demo Sound mode 1. Press and hold the click wheel for approx. 3 seconds. W Demo Sound mode is activated. 2. -
Page 92: Troubleshooting
17. Troubleshooting Malfunctions may occur with any electrical equipment. This is not necessarily due to a device defect. As such, you should check the following table to see if you can eliminate the problem yourself. Malfunction Possible cause Elimination Device does not turn AC adapter with universal Properly connect the AC adapter with adapter is not properly... - Page 93 Malfunction Possible cause Elimination Remote control does Distance too great Reduce the distance between the not work, or only works remote control and the device. sporadically Battery empty Replace the battery in the remote control (Please see chapter 6.5 ‘Preparing the remote control’ on page 63).
-
Page 94: Cleaning
18. Cleaning NOTICE! Material damage from improper cleaning! Only clean the device from the outside using a dry, soft cloth. Never use abrasive or solvent- based cleaning agents as these may damage the surface of the device. 19. Technical data Specification Value Dimensions (W x D x H) -
Page 95: Warranty
20. Warranty When submitting warranty claims, the following applies without restricting your legal rights: • Warranty claims can only be asserted within a period of max. 2 years (1 year in North America and Australia), calculated from the date of purchase. •... - Page 96 © sonoro audio GmbH 2018...
- Page 97 QUBO SO-220 SYSTÈME AUDIO AVEC RADIO NUMÉRIQUE, RÉVEIL, LECTEUR CD & BLUETOOTH® Mode d’emploi...
- Page 98 1.2 Utilisation conforme ..................101 1.3 Nettoyage ..................... 101 Contenu de la livraison ................... 101 2.1 QUBO ......................101 2.2 sonoroLIGHT (disponible en option) ............Formats pris en charge ..................102 3.1 Formats de CD pris en charge ..............102 3.2 Formats audio pris en charge ..............
- Page 99 Fonctions générales de la lecture audio ............. 123 9.1 Réglage du volume sonore ................ 123 9.2 Mise en mode muet de la lecture .............. 124 9.3 Sélection du mode de lecture ..............124 Lecture radio ..................... 10.1 Radio FM ....................10.2 Radio DAB ....................
-
Page 100: Introduction
Introduction Merci d’avoir choisi un appareil QUBO. Le présent manuel et les consignes de sécurité vous apportent toutes les informations permettant un fonctionnement sûr et sans pannes de l’appareil. • Lisez le présent manuel et les consignes de sécurité dans leur intégralité avant d’utiliser l’appareil. -
Page 101: Utilisation Conforme
Contenu de la livraison QUBO De nombreuses pièces supplémentaires nécessaires à la réception des fréquences radio et au raccordement d’autres appareils sont livrées avec le QUBO. • QUBO avec enveloppe de protection •... -
Page 102: Sonorolight (Disponible En Option)
Pour pouvoir utiliser la fonctionnalité complète et contrôler une lampe raccordée via Bluetooth, vous avez besoin du module variateur sonoroLIGHT. sonoroLIGHT peut être couplé avec QUBO et est disponible chez les revendeurs spécialisés. sonoroLIGHT n’est pas fourni à la livraison de QUBO. -
Page 103: Éléments De Commande Et Raccordements
Éléments de commande et raccordements Face avant Fig, 2: Face avant Play/Pause ( Eject ( ) Stop ( ) Alarm 1 ( 1) Écran LC Fente CD SETUP Avance rapide ( Bouton de commande Lumière ( MENU Mode veille ( ) Alarm 2 ( 2) Retour rapide ( ©... - Page 104 Face supérieure Fig, 3: Face supérieure Emplacements mémoire 1–6 SNOOZE MUTE Haut-parleur RELAX SLEEP © sonoro audio GmbH 2018...
- Page 105 Face arrière Fig, 4: Face arrière DAB/FM Chargement USB et play- back Compartiment des piles Casque Ouverture bass-reflex AUX IN Cadenas Raccordement du bloc d’alimentation © sonoro audio GmbH 2018...
- Page 106 Télécommande Fig, 5: Télécommande Mode veille ( ) Alarme 1 ( 1) Lumière ( SLEEP MUTE/ SNOOZE Retour rapide ( ) VOL ( Bluetooth ( ) BASS TREBLE VOL ( RELAX Avance rapide ( ) OK, Play/Pause ( Alarme 2 ( 2) DAB ( Emplacements mémoire 1–6 SETUP...
-
Page 107: Affichage
Affichage Fig, 6: Affichage Pos. Symbole Fonction Casque audio Un casque audio est raccordé. Sleep La fonction sleep timer est activée. Repeat CD : répétition de tous les titres du CD. Relax Le mode relax est activé. Shuffle CD : Lecture des différents titres dans un ordre aléatoire. FM/CD/DAB/ AUX/USB Indique le mode de fonctionnement sélectionné. -
Page 108: Déballage Et Mise En Marche De L'appareil
Déballage et mise en marche de l’appareil Seuls doivent être utilisés des câbles de raccordement et des périphériques externes correspondant au présent appareil en termes de sécurité technique, de compatibilité électromagnétique et de qualité de déparasitage. Déballage de l’appareil Toutes les pièces de l’appareil sont livrées dans un carton. 1. -
Page 109: Raccordement De L'antenne
3. Enfichez la fiche secteur dans la prise secteur. Raccordement de l’antenne 1. Vissez l’antenne tige située à l’arrière de QUBO sur la prise d’antenne FM / DAB. 2. Si vous utilisez l’antenne tige, tirez sur les bras de l’antenne tige et alignez l’antenne de façon à... -
Page 110: Couplage De Sonorolight
Tenez également compte du manuel d’utilisation de sonoroLIGHT. 1. Branchez sonoroLIGHT dans une prise. 2. Assurez-vous que sonoroLIGHT et QUBO ne sont pas à une distance supérieure à 10 m l’un de l’autre. Dans le cas contraire, aucune connexion ne peut être établie. -
Page 111: Réglage Des Fonctions Principales
Réglage des fonctions principales Les fonctions et les réglages de l’appareil sont effectués dans les différents menus. Première mise en marche de l’appareil Après la première mise en marche, l’écran LCD affiche l’heure et le message [Sélectionner une station RDS pour régler l’heure et la date]. En mode FM/DAB, l’heure et la date se règlent automatiquement si cela n’a pas été... - Page 112 À l’aide des touches [Avance rapide] ou [Retour rapide], vous pouvez passer de l’affichage des heures et celui des minutes. Au bout de 10 secondes d’inactivité, l’appareil repasse automatiquement en mode de veille, sans mémoriser les réglages. Réglage manuel de la date Fig, 11: Réglage de la date 1.
-
Page 113: Procéder Aux Réglages De Base
Procéder aux réglages de base Lorsque l’appareil est allumé, il est possible de procéder aux configurations suivantes dans le menu [Valeurs de réglage] : • Régler le format de l’heure. • Régler le format de la date. • Régler le variateur de l’écran. •... - Page 114 Réglage du format de la date Fig, 14: Réglage du format de la date Vous pouvez régler trois formats différents pour la date (Voir la Fig. 14/A, B et C) ainsi que le jour actuel. Les possibilités de réglage sont: A: jour actuel, jour, mois, année •...
- Page 115 Pour ce faire, vous pouvez régler comme suit la luminosité maximale souhaitée pour le réveil lumineux et l’intervalle de temps dans lequel le réveil lumineux doit atteindre cette luminosité : • Luminosité : 01 à 32, (Voir la Fig. 16/A). •...
-
Page 116: Réglage Du Son
Rétablissement des réglages par défaut de l’appareil Fig, 20: Rétablissement des réglages par défaut En cas de besoin, vous pouvez rétablir les réglages par défaut pour tous les réglages effectués, comme les formats de langue ou d’heure et les stations mémorisées, (Voir la Fig. - Page 117 Désactivation de la fonction sleep timer 2. Pour désactiver la fonction sleep timer, appuyez de nouveau sur la touche [SLEEP]. W Le symbole disparaît de l’affichage. Si l’appareil a été éteint par la fonction sleep timer, il démarre dans le dernier mode écouté...
-
Page 118: Activation Et Désactivation De La Lumière
Si vous appuyez sur la touche [Mode veille] pendant le sleep timer, la lumière reste allumée. Si vous appuyez sur la touche [Lumière] pendant la diminution de la lumière, celle-ci s’éteint aussitôt. Activation et désactivation de la lumière Vous pouvez allumer et éteindre une lampe raccordée (uniquement avec sonoroLIGHT). -
Page 119: Fonction Réveil
Fonction réveil Avec l’appareil, vous pouvez vous faire réveiller par la radio FM/DAB, un CD, de la musique de relaxation ou des sonorités de réveil. Il est également possible de régler les fonctions de réveil en mode de veille de l’appareil. Le menu de réglage de l’alarme est structuré... -
Page 120: Réglage Du Volume Sonore Du Réveil
Fig, 27: Réglage de la source d’alarme 1. Tournez le bouton de commande pour sélectionner le support souhaité, (Voir la Fig. 27): Sélectionnez parmi les stations mémorisées l'emplacement de station FM par lequel l'appareil doit démarrer lors du réveil. Sélectionnez parmi les stations mémorisées l'emplacement de station DAB par lequel l'appareil doit démarrer lors du réveil. -
Page 121: Réglage De La Répétition Du Réveil
La lecture audio de l’alarme commence toujours à un volume sonore minimal et augmente lentement pour atteindre le volume sonore réglé. Réglage de la répétition du réveil Une fois que vous avez réglé le volume sonore du réveil et que vous l’avez confirmé, vous pouvez régler la répétition du réveil. -
Page 122: Activation Et Désactivation Du Réveil
Si vous voulez en outre être réveillé par le réveil lumineux, la lumière est allumée avant l’alarme, pendant le temps que vous définissez, de sorte qu’elle atteint la luminosité prédéterminée lorsque l’alarme se déclenche. Pour régler le réveil lumineux, voir la section “Réglage du réveil lumineux » à la page 121. -
Page 123: Réglage De La Fonction Snooze
Vous pouvez également, lorsque l’alarme retentit, tourner le bouton de commande afin de régler l’horaire de répétition souhaité pour le réveil et confirmer cet horaire en appuyant sur le bouton de commande. W La durée restante jusqu’à la répétition du réveil s’affiche. Après la durée réglée,l’alarme retentit de nouveau. -
Page 124: Mise En Mode Muet De La Lecture
Mise en mode muet de la lecture Mise en mode muet Fig, 32: Mise en mode muet 1. En mode de lecture, appuyez brièvement sur la touche [MUTE] sur le dessus de l’appareil afin de désactiver le son pendant la lecture. Vous pouvez également appuyer sur la touche [MUTE] de la télécommande. -
Page 125: Lecture Radio
10. Lecture radio Une fois que vous avez sélectionné la lecture radio par [FM] (radio FM) ou [DAB] (radio numérique), le symbole FM ou DAB s’affiche ainsi que les informations suivantes: • Mode : FM ou DAB. • Emplacement de station mémorisé, si la station est enregistrée dans la mémoire des stations. - Page 126 3. Appuyez sur le bouton de commande. W Le texte [Rche. auto OUI] s’affiche. 4. Appuyez de nouveau sur le bouton de commande. W La recherche automatique démarre. Une fois que la recherche est terminée, l’appareil passe à la première station de la liste. Recherche automatique de stations Condition requise: •...
-
Page 127: Radio Dab
Mémorisation d’une station FM dans les favoris Fig, 37: Mémorisation d’une station FM 1. Réglez la station souhaitée. 2. Appuyez sur une des touches des stations mémorisées sur le dessus de l’appareil ou sur la télécommande et maintenez-la enfoncée. W L’emplacement mémoire de la station s’affiche. Vous pouvez mémoriser jusqu’à... - Page 128 Fig, 39: Recherche manuelle de stations DAB 1. En mode de lecture DAB, appuyez sur la touche [SETUP]. 2. Appuyez sur la touche [Avance rapide]. W Le texte [DAB manuelle] s’affiche. (Voir la Fig. 39). 3. Appuyez sur le bouton de commande de l’appareil ou sur la touche [OK] de la télécommande.
- Page 129 Vous pouvez mémoriser jusqu’à 6 stations DAB dans les favoris. Appel d’une station DAB mémorisée dans les favoris 1. Pour appeler une station DAB mémorisée dans les favoris, procédez comme décrit au dans le chapître 10.1 « Radio FM » à la page 125. W La station sélectionnée est lue.
-
Page 130: Lecture De Cd
Il existe 3 possibilités différentes de réglage : • DRC High : forte compression • DRC Low : faible compression • DRC Off : pas de compression Condition requise: • L’appareil est en mode DAB. 1. Appuyez sur la touche [SETUP]. W Le texte [Scan DAB complet] s’affiche. - Page 131 En mode CD, l’affichage indique les informations suivantes: Fig, 43: Affichage en mode CD 1. Ordre de lecture (Repeat, Shuffle, reprise de la lecture du CD) 2. Mode CD 3. Heure 4. Durée de lecture écoulée en minutes 5. Numéro du titre 6.
- Page 132 • Pour sélectionner le dossier MP3 suivant, appuyez sur la touche [Emplacement mémoire 2] (uniquement CD MP3). • Pour sélectionner le dossier MP3 précédent, appuyez sur la touche [Emplace- ment mémoire 1] (uniquement CD MP3). Modification de la lecture du CD Pour la lecture des titres d’un CD, vous pouvez sélectionner différents ordres de lecture.
-
Page 133: Lecture Bluetooth
44). 3. Activez la fonction Bluetooth de votre téléphone mobile ou périphérique et, dans la liste des appareils Bluetooth trouvés, sélectionnez « QUBO ». W Les deux appareils sont couplés. La radio couple jusqu’à 8 téléphones mobiles et périphériques et se connecte automatiquement avec des appareils déjà... -
Page 134: Lecture De Musique Par Bluetooth
12.3 Lecture de musique par Bluetooth • Pour démarrer la lecture, appuyez sur la touche [Play/Pause] ou sur le bouton de commande. • Pour interrompre la lecture (pause), appuyez sur la touche [Play/Pause] ou sur le bouton de commande. 13. Lecture AUX Grâce à... - Page 135 2. Appuyez sur la touche [MENU] et sélectionnez le mode [USB] ou appuyez sur la touche [USB] de la télécommande. W Le symbole [USB] s’affiche. (Voir la Fig. 47). 3. Branchez un périphérique USB. W Le texte [Recherche] s’affiche. 4. Appuyez sur la touche [Play/Pause] pour démarrer la lecture. Autres fonctions •...
-
Page 136: Musique De Relaxation Et De Méditation
15. Musique de relaxation et de méditation L’appareil dispose de musiques de relaxation et de méditation, selon les langues, et classée dans des dossiers différents. Langue Dossier Titre Nom Allemand 1 – Relaxation courte Einleitung Kurzentspannung Entspannung durch längeres Ausatmen Entspannung durch Spüren der Gegensätze Entspannung durch Da-Sein... - Page 137 6 – Sons de la nature Brandung Walgesänge Vögel Regen Windspiel Kaminfeuer Langue Dossier Titre Nom Anglais 1 – Relaxation courte Quick Relaxation Exercise: Relaxing by feeling your pulse Quick Relaxation Exercise: Relaxing by letting go off stress 2 – Relaxation et méditation Relaxing by meditating on our breath 3 –...
- Page 138 Langue Dossier Titre Nom Français 1 – Relaxation courte Relaxation courte: Relaxation à travers le ressenti de votre pouls Relaxation courte: Relaxation par évacuation du stress 2 – Relaxation et méditation Relaxation méditative par la respiration 3 – Voyages imaginaires Voyage imaginaire "plage et chaleur"...
- Page 139 1. Allumez l’appareil. 2. Appuyez sur la touche [QUBO] sur le dessus de l’appareil ou sur la télécommande. W Le symbole [QUBO] s’affiche. 3. Appuyez sur la touche [SETUP]. Fig, 48: Sélection du menu des langues 4. Tournez le bouton de commande jusqu’à ce que [Contenu musical] s’affiche.
-
Page 140: Lecture De Musique De Démonstration
8. Appuyez sur l’une des touches de mémorisation 1–6 pour sélectionner le dossier souhaité. W La lecture du premier titre de ce dossier commence. Fig, 50: Nom du titre 9. Appuyez sur la touche [Avance rapide] ou [Retour rapide] pour sélectionner un titre dans le dossier. -
Page 141: Dépannage
17. Dépannage Des pannes peuvent survenir sur tous les appareils électriques. Il ne s’agit pas forcément d’un défaut de l’appareil. Vérifiez donc d’abord à l’aide du tableau ci- dessous si vous pouvez remédier vous-même au dysfonctionnement. Dysfonctionnement Cause possible Remède L’appareil ne s’allume Le bloc d’alimentation et Raccordez correctement le bloc... - Page 142 Störung Mögliche Ursache Behebung L'appareil ne réagit Erreur de l'appareil Éteignez l'appareil et rallumez-le. Mauvaise qualité de L'antenne FM/DAB n'est pas Modifiez la position de l'antenne FM/ réception FM/ DAB. orientée correctement DAB. La télécommande ne La distance est trop grande Diminuez la distance entre la télé- fonctionne pas ou mal commande et l'appareil.
-
Page 143: Nettoyage
18. Nettoyage REMARQUE! Dommages matériels en cas de nettoyage non conforme! Nettoyez l’appareil uniquement de l’extérieur, avec un chiffon sec et doux. N’utilisez en aucun cas des produits de nettoyage agressifs ou contenant des solvants, car ceux-ci attaquent la surface de l’appareil. 19. -
Page 144: Garantie
20. Garantie Les points suivants s’appliquent à la revendication des droits à la garantie, sans que vos droits légaux ne soient limités de ce fait : • Il n’est possible de faire valoir des droits à la garantie que dans un délai de 2 ans maximum (1 an en Amérique du Nord et en Australie) à... - Page 145 © sonoro audio GmbH 2018...
- Page 146 © sonoro audio GmbH 2018...
- Page 147 © sonoro audio GmbH 2018...
- Page 148 © sonoro audio GmbH 2018...
- Page 149 QUBO SO-220 MUZIEKSYSTEEM MET DIGITALE RADIO, ALARMFUNCTIE, CD-SPELER & BLUETOOTH® Bedieningshandleiding...
- Page 150 Inleiding ......................152 1.1 Contactgegevens ..................1.2 Reglementair gebruik ................. 1.3 Reiniging ....................... 153 Leveromvang ....................2.1 QUBO ......................153 2.2 sonoroLIGHT (optioneel verkrijgbaar) ............154 Ondersteunde formaten ................. 154 3.1 Ondersteunde cd-formaten ............... 154 3.2 Ondersteunde audioformaten ..............154 Bedienelementen en aansluitingen .............
- Page 151 Algemene functies van de audioweergave ..........175 9.1 Volume instellen ..................9.2 Weergave op stil zetten ................9.3 Weergavemodus selecteren ..............Radioweergave ....................177 10.1 FM-radio ..................... 177 10.2 DAB-radio ....................179 Cd-weergave ..................... 182 Bluetooth-weergave ..................185 12.1 Bluetooth-apparaten koppelen ............... 185 12.2 Bluetooth-apparaten verbinden ..............
-
Page 152: Inleiding
Inleiding Hartelijk dank dat u heeft gekozen voor de aankoop van een QUBO. Lees de bedieningshandleiding en de veiligheidshandleiding volledig door voordat u QUBO gebruikt. • Lees de gebruiksaanwijzing en de veiligheidshandleiding in hun geheel door voordat u het apparaat in gebruik neemt QUBO. -
Page 153: Reglementair Gebruik
Wis bij extreme vervuiling het apparaat met een licht vochtige doek af en toe af, en droog het dan met een droge, zachte doek. Leveromvang QUBO Tot de leveromvang van QUBO behoren talrijke extra onderdelen die u nodig heeft voor het ontvangen van radiofrequenties en het aansluiten van apparaten. • QUBO met beschermhoes •... -
Page 154: Sonorolight (Optioneel Verkrijgbaar)
Om alle functies te kunnen gebruiken en een aangesloten lamp via Bluetooth te kunnen besturen, hebt u de dimmermodule sonoroLIGHT nodig. sonoroLIGHT kan worden aangesloten op QUBO en is in de vakhandel verkrijgbaar. sonoroLIGHT maakt geen deel uit van de leveromvang van QUBO. -
Page 155: Bedienelementen En Aansluitingen
Bedienelementen en aansluitingen Voorzijde Afb. 3: Voorzijde Afspelen/Pauze ( Eject ( ) Stop ( ) Alarm 1 ( 1) LC-display Cd-sleuf SETUP Vooruit ( Bedienknop Licht ( MENU Stand-by ( ) Alarm 2 ( 2) Achteruit ( © sonoro audio GmbH 2018... - Page 156 Bovenzijde Afb. 4: Bovenzijde Geheugen 1–6 SNOOZE MUTE Luidspreker RELAX SLEEP © sonoro audio GmbH 2018...
- Page 157 Achterzijde Afb. 5: Achterzijde DAB/FM ANTENNA USB-Charge & Playback Batterijvak Koptelefoon Basreflexopening AUX IN Keylock Aansluitingnetvoeding © sonoro audio GmbH 2018...
- Page 158 Afstandsbediening Afb. 6: Afstandsbediening Stand-by ( ) Alarm 1 ( 1) Licht ( SLEEP MUTE/ SNOOZE Achteruit ( ) VOL ( Bluetooth ( ) BASS TREBLE VOL ( RELAX Vooruit ( ) OK, Afspelen/Pauze ( Alarm 2 ( 2) DAB ( Geheugen 1–6 SETUP ©...
-
Page 159: Weergave
Weergave Afb. 7: Weergave Pos. Symbole Fonction Koptelefoon Koptelefoon is aangesloten. Sleep Sleeptimer is actief. Herhalen CD: herhaling van alle nummers op de cd. Relax Relaxmodus is actief. Shuffle CD: toevallige afspeelvolgorde van de nummers. FM/CD/DAB/ AUX/USB Toont de geselecteerde bedrijfsmodus. Extra bij de 12-uursinstelling. -
Page 160: Apparaat Uitpakken En In Bedrijfstellen
Apparaat uitpakken en in bedrijfstellen Er mogen alleen aansluitkabels en externe apparaten worden gebruikt die veiligheidstechnisch en qua elektromagnetische verdraagzaamheid en afschermkwaliteit overeenkomen met het beschreven apparaat. Apparaat uitpakken Alle delen van apparaat worden in een doos geleverd. 1. Pak het apparaat en alle bijbehorende onderdelen uit en controleer de inhoud op volledigheid en intacte toestand. -
Page 161: Antenne Aansluiten
3. Steek de netstekker in de contactdoos. Antenne aansluiten 1. Schroef de staafantenne op de achterkant van de QUBO op de FM / DAB- antenneaansluiting. 2. Als u de staafantenne gebruikt, trekt u de armen van de staafantenne uit elkaar en lijnt u de antenne uit zodat u de best mogelijke ontvangst hebt. -
Page 162: Sonorolight Aansluiten
Zie ook de bedieningshandleiding van sonoro-LIGHT. 1. Sluit sonoroLIGHT op een contactdoos aan. 2. Zorg dat sonoroLIGHT en QUBO niet meer dan 10 m uit elkaar staan. Anders kan geen verbinding worden gemaakt. 3. Druk op de toets op uw sonoroLIGHT. -
Page 163: Basisfuncties Instellen
Basisfuncties instellen In de afzonderlijke menu’s kunnen functies en instellingen van het apparaat worden uitgevoerd. Apparaat de voor eerste keer inschakelen Na de eerste keer inschakelen toont het LC-display detijd en de melding [Tune to FM RDS station to set time & date (Voor auto tijd/datum RDS-zender selecteren)]. - Page 164 Met de[Vooruit]- of [Achteruit]-toets kunt u tussen de uren- en minutenweergave wisselen. Na 10 seconden zonder invoer gaat het apparaat automatisch naar de stand- bymodus zonder de instellingen op te slaan. Datum handmatig instellen Afb. 13: Datum instellen 1. Druk in de stand-bymodus op de [SETUP]-toets van het apparaat of van de afstandsbediening.
-
Page 165: Basisinstellingen Uitvoeren
Basisinstellingen uitvoeren Bij ingeschakeld apparaat kunnen in het menu [Settings (Instelwaarden)] de volgende configuraties worden uitgevoerd: • Tijdformaat instellen. • Datumformaat instellen. • Displaydimmer instellen. • Weklicht instellen (alleen met sonoroLIGHT). • Automatisch actualiseren van tijd/datum instellen. • Displaytaal instellen. •... - Page 166 Datumformaat instellen Afb. 16: Datumformaat instellen U kunt drie verschillende datumformaten (Afb. 16/A, B en C) en de actuele dag instellen. De instelmogelijkheden zijn: A: actuele dag, dag, maand, jaar. • B: actuele dag, maand, dag, jaar. • C: actuele dag, maand (in woorden), dag, jaar. •...
- Page 167 Hiervoor kunt u de maximaal gewenste lichtsterkte van het weklicht en de tijdsduur waarin het weklicht deze lichtsterkte moet bereiken, als volgt instellen: • Lichtsterkte: 01 tot 32 (Afb. 18/A) • Weklicht: 0 tot 60 min. (Afb. 18/B) Automatisch actualiseren tijd/datum instellen Afb.
-
Page 168: Klank Instellen
Apparaat naar fabriekstoestand terugzetten Afb. 22: Naar fabriekstoestand terugzetten Indien nodig kunnen alle uitgevoerde instellingen zoals taal- en tijdformaten en opgeslagen zenders naar de fabrieksinstellingen worden teruggezet (Afb. 22). Klank instellen U kunt de klank van de audioweergave via de instellingen van bas en hoogte aanpassen. - Page 169 Sleeptimer uitschakelen 2. Om de sleeptimer uit te schakelen, drukt u opnieuw op de toets [SLEEP]. W Het symbool op het display verdwijnt. Als het apparaat met de sleeptimer werd uitgeschakeld, start het bij de volgende keer inschakelen in de laatst gehoorde modus. Tijdinterval voor sleeptimer instellen Afb.
-
Page 170: Licht In- En Uitschakelen
Als u tijdens de sleeptimer op de [Stand-by]toets drukt, blijft het licht ingeschakeld. Als u tijdens het dimmen van het licht op de [Licht]-toets drukt, wordt het licht direct uitgeschakeld. Licht in- en uitschakelen U kunt een aangesloten lamp in- en uitschakelen (alleen in combinatie met sonoroLIGHT). -
Page 171: Wekfunctie
Wekfunctie Met het apparaat de radio kunt u zich door de FM/ DAB-radio, cd, door relaxmuziek of door wektonen laten wekken. De wekfuncties kunnen ook in de stand-bymodus van het apparaat worden ingesteld. Het alarmsetupmenu is als volgt opgebouwd: W Wektijd instellen W Alarmbron instellen W Wekvolume instellen W Wekherhaling instellen... -
Page 172: Wekvolume Instellen
Afb. 29: Alarmbron instellen 1. Draai aan de bedienknop om het gewenste medium te selecteren (Afb. 29): Selecteer een FM-programmaplaats uit het zendergeheugen waarmee de radio bij het wekken moet starten. Selecteer een DAB-programmaplaats uit het zendergeheugen waarmee de radio bij het wekken moet starten. -
Page 173: Wekherhaling Instellen
De alarm-audioweergave begint altijd zeer zacht en wordt dan steeds harder tot het ingestelde volume is bereikt. Wekherhaling instellen Nadat u het wekvolume heeft ingesteld en bevestigd, kunt u de wekherhaling instellen. Afb. 31: Wekherhaling instellen 1. Draai aan de bedienknop om de gewenste herhaling te stellen (Afb. 31). U kunt kiezen tussen volgende instellingen: •... -
Page 174: Wekker In- En Uitschakelen
Als u daarnaast door weklicht gewekt wilt worden, wordt het licht telkens met de door u ingestelde tijd vóór het alarm ingeschakeld, zodat de ingestelde lichtsterkte is bereikt als het alarm geactiveerd wordt. Voor het instellen van het weklicht „Weklicht instellen“... -
Page 175: Snooze Instellen
Alternatief kunt u ook bij klinken van het alarm de bedienknop draaien om de gewenste wekherhalingstijd in te stellen en deze door indrukken van de bedienknop te bevestigen. W Op het display wordt de resterende tijd voor de wekherhaling weergegeven. Na de ingestelde tijd klinkt het alarm opnieuw. Snooze instellen Afb. -
Page 176: Weergave Op Stil Zetten
Weergave op stil zetten Op stil zetten Afb. 35: Op stil zetten 1. Druk in de weergavemodus kort op de [MUTE]- toets op de bovenzijde van het apparaat om het geluid tijdens weergave uit te schakelen. Alternatief kunt u ook de [MUTE]-toets op de afstandsbediening indrukken. -
Page 177: Radioweergave
10. Radioweergave Nadat u de radioweergave via [FM] (VHF-radio) of [DAB] (digitale radio) heeft geselecteerd, toont het display het symbool FM of DAB alsmede de volgende informatie: • Modus: FM of DAB. • Opgeslagen programmaplaats, indien de zender in het programmageheugen is opgeslagen. - Page 178 3. Druk op de bedienknop. W Het display toont de tekst [Auto Search YES (Automatisch zoeken JA)]. 4. Druk opnieuw op de bedienknop. W Automatisch zoeken wordt gestart. Na voltooien van het zoeken springt het apparaat naar de eerste zender van de lijst. Automatisch instellen Voorwaarde: •...
-
Page 179: Dab-Radio
FM-zenders als favoriet opslaan Afb. 40: FM-zender opslaan 1. Stel de gewenste zender in. 2. Houd een van de zendergeheugentoetsen op de bovenzijde van het apparaat of op de afstandsbediening ingedrukt. W Het display toont de zendergeheugenplaats. U kunt maximaal 6 FM-zenders als favorietopslaan. Als favoriet opgeslagen FM-zenders oproepen 1. - Page 180 Afb. 42: DAB-zenders handmatig zoeken 1. Druk in de DAB-weergavemodus op de [SETUP]-toets. 2. Druk op de [Vooruit]-toets. W Het display toont de tekst [DAB Manual Tune (DAB handmatig instellen)] (Afb. 42). 3. Druk op de bedienknop van het apparaat of op de [OK]-toets op de afstandsbediening.
- Page 181 U kunt maximaal 6 DAB-zenders als favorietopslaan. Als favoriet opgeslagen DAB-zenders oproepen 1. Voor het oproepen van een als favoriet opgeslagen DAB-zender gaat u te werk zoals beschreven in Hoofdstuk 10.1 „FMradio“ op pagina 177. W De geselecteerde zender wordt weergegeven. DAB-informatie oproepen In de DAB-weergavemodus kunt u informatie over zender, programma etc.
-
Page 182: Cd-Weergave
Er zijn 3 verschillende instelmogelijkheden: • DRC High: sterke compressie • DRC Low: zwakke compressie • DRC Off: geen compressie Voorwaarde: • Het apparaat is in DAB-modus. 1. Druk op de [SETUP]-toets. W Het display toont de tekst [DAB Auto Search (automatisch zoeken DAB)]. Afb. - Page 183 In de cd-modus toont het display de volgende informatie: Afb. 46: Weergave in de cd-modus 1. Afspeelvolgorde (Repeat, Shuffle, cd voortzetten) 2. Cd-modus 3. Tijd 4. Verstreken speeltijd in minuten 5. Titelnummer 6. Weergavestatus (afspelen/pauze) Overige functies • Om de weergave van de cd te onderbreken (pauze), drukt u op de [Afspelen/ Pauze]-toets of op de bedienknop.
- Page 184 • Om naar de volgende map te gaan, drukt u op de [Memory 2 (Geheugen 2)]-toets (alleen MP3-cd). • Om naar de vorige map te gaan, drukt u op de [Memory 1 (Geheugen 1)]-toets (alleen MP3-cd). Cd-weergave aanpassen Voor de weergave van de nummers op een cd kunnen verschillende volgordes worden gekozen.
-
Page 185: Bluetooth-Weergave
W Het Bluetooth-symbool knippert en het display toont de tekst [Searching (Zoekt)](Afb. 47). 3. Schakel de Bluetooth-functie van uw mobiele telefoon of apparaat in en selecteer in de lijst met gevonden Bluetooth-apparaten “QUBO”. W De apparaten worden gekoppeld. De radio koppelt maximaal 8 mobiele telefoons of apparaten en maakt automatisch een verbinding met reeds ingestelde apparaten, indien Bluetooth geactiveerd is. -
Page 186: Muziek Via Bluetooth Afspelen
12.3 Muziek via Bluetooth afspelen • Om de weergave te starten, drukt u op de [Afspelen/Pauze]-toets of op de bedien- knop. • Om de weergave te onderbreken (pauze), drukt u op de [Afspelen/Pauze]-toets of op de bedienknop. 13. AUX-weergave Via de AUX-aansluiting aan de achterzijde van het apparaat kunt u andere audioapparaten aansluiten en afspelen. - Page 187 2. Druk op de [MENU]-toets en selecteer de [USB]-modus of druk op de [USB]-toets op de afstandsbediening. W Het display toont de tekst [Searching (Zoekt)]. 3. Sluit een extern USB-apparaat aan. W Le texte [Recherche] s’affiche. 4. Druk op de toets [Afspelen/Pauze] om de weergave te starten. Overige functies •...
-
Page 188: Relax- En Meditatiemuziek
15. Relax- en meditatiemuziek Het apparaat beschikt over taalafhankelijke relax- en meditatiemuziek, die in verschillende mappen is gesorteerd. Taal Nummer Naam Duits 1 – Korte ontspanning Einleitung Kurzentspannung (Inleiding korteontspanning) Entspannung durch längeres Ausatmen (Ontspannen door ademhaling) Entspannung durch Spüren der Gegensätze (Ontspannen door tegenstellingen te voelen) Entspannung durch Da-Sein... - Page 189 Entspannungsmusik 3 (Relaxmuziek 3) Entspannungsmusik 4 (Relaxmuziek 4) Entspannungsmusik 5 (Relaxmuziek 5) 6 – Natuurklanken Brandung (Branding) Walgesänge (Walvissen) Vögel (Vogels) Regen (Regen) Windspiel (Windklokkenspel) Kaminfeuer (Openhaard) Taal Nummer Naam Engels 1 – Korte ontspanning Quick Relaxation Exercise: Relaxing by feeling your pulse Quick Relaxation Exercise: Relaxing by letting go off stress...
- Page 190 Taal Nummer Nom Frans 1 – Korte ontspanning Relaxation courte: Relaxation à travers le ressenti de votre pouls Relaxation courte: Relaxation par évacuation du stress 2 – Meditatieve ontspanning Relaxation méditative par la respiration 3 – Fantasiereizen Voyage imaginaire "plage et chaleur" 4 –...
- Page 191 1. Schakel het apparaat in. 2. Druk op de [RELAX]-toets aan de bovenzijde van het apparaat of op de afstandsbediening. W Het display toont het [Relax]-symbool. 3. Druk op de [SETUP]-toets. Afb. 51: Taalmenu selecteren 4. Draai aan de bedienknop tot het display [Music Content (Inhoud muziek)] toont. 5.
-
Page 192: Demomuziek-Weergave
8. Druk op een van de geheugentoetsen 1–6, om de gewenste map te selecteren. W De weergave van het eerste nummer in deze map begint. Afb. 53: Naam van het nummer 9. Druk op de [Vooruit]- of [Achteruit]-toets om een nummer in een map te selecteren. -
Page 193: Storingen Verhelpen
17. Storingen verhelpen Bij alle elektrische apparaten kunnen storingen optreden. Hierbij gaat het niet altijd om een defect van het apparaat. Controleer daarom aan de hand van de volgende tabel of u de storing zelf kunt oplossen. Storing Mogelijke oorzaak Oplossing Apparaat schakelt Netvoeding met universele... - Page 194 Storing Mogelijke oorzaak Oplossing Apparaat reageert niet Storing in het apparaat Schakel het apparaat uit en weer in. Slechte FM/DAB- FM/DAB-antenne is niet Wijzig de richting van de FM/ ontvangstkwaliteit correct gericht DABantenne. Afstandsbediening Afstand is te groot Verklein de afstand tussen de werkt niet of gebrekkig afstandsbediening en het apparaat.
-
Page 195: Reiniging
18. Reiniging AANWIJZING! Materiële schade door onjuiste reiniging! Reinig het apparaat alleen van buiten met een droge, zachte doek. Gebruik in geen geval scherpe of oplosmiddelhoudende reinigingsproducten omdat deze het oppervlak van het apparaat aantasten. 19. Technische gegevens Specificatie Waarde Afmetingen (B x D x H) ong. -
Page 196: Garantie
20. Garantie Voor het geldend maken van aanspraak op garantie geldt – zonder dat hierdoor uw wettelijke rechten worden beperkt – het volgende: • Aanspraak op garantie kan alleen binnen een periode van max. 2 jaar (1 jaar in Noord-Amerika en Australië) vanaf datum van aankoop geldend worden gemaakt. - Page 197 © sonoro audio GmbH 2018...
- Page 198 © sonoro audio GmbH 2018...
- Page 199 © sonoro audio GmbH 2018...
- Page 200 © sonoro audio GmbH 2018...
- Page 201 QUBO SO-220 SISTEMA MUSICALE CON RADIO DIGITALE, FUNZIONE DI ALLARME, LETTORE CD E BLUETOOTH® Manuale operativo...
- Page 202 1.1 Contactgegevens ..................1.2 Utilizzo conforme alla destinazione d’uso ..........205 1.3 Pulizia ......................205 Dotazione ......................205 2.1 QUBO ......................205 2.2 sonoroLIGHT (disponibile come opzione) ..........206 Formati supportati ................... 3.1 Formati CD supportati ................. 206 3.2 Formati audio supportati ................206 Comandi e collegamenti ................
- Page 203 Funzioni generali della riproduzione audio ..........227 9.1 Impostazione del volume ................227 9.2 Disattivazione della riproduzione audio ........... 228 9.3 Selezione della modalità di riproduzione ..........228 Riproduzione radio ..................229 10.1 Radio FM ..................... 229 10.2 Radio DAB ....................231 Riproduzione di CD ..................
-
Page 204: Introduzione
Introduzione Grazie per aver acquistato QUBO. Grazie per aver acquistato QUBO. Questo manuale operativo e il manuale di sicurezza fornire tutte le informazioni necessarie per un funzionamento sicuro e senza problemi di QUBO.Lees de gebruiksaanwijzing en de veiligheidshandleiding in hun geheel door voordat u het apparaat in gebruik neemt QUBO. -
Page 205: Utilizzo Conforme Alla Destinazione D'uso
In caso di sporco eccessivo pulire l’apparecchio con un panno leggermente umido e asciugarlo con un panno asciutto e morbido. Dotazione QUBO QUBO fornisce in dotazione anche numerosi accessori necessari per la ricezione delle frequenze radio e per il collegamento di altri apparecchi. • QUBO mcon custodia •... -
Page 206: Sonorolight (Disponibile Come Opzione)
Per utilizzare l’intera dotazione di funzioni e controllare una lampada collegata tramite Bluetooth, è necessario il modulo dimmer sonoroLIGHT. sonoroLIGHT può essere abbinato con QUBO ed è disponibile presso le rivendite specializzate. sonoro-LIGHT non è compreso nella dotazione di QUBO. -
Page 207: Comandi E Collegamenti
Comandi e collegamenti Lato frontale Fig. 3: Lato frontale Play/Pause ( Eject ( ) Stop ( ) Allarme 1 ( 1) Display LCD Fessura per CD SETUP Avanti ( Manopola Luce ( MENU Standby ( ) Allarme 2 ( 2) Indietro ( ©... -
Page 208: Lato Superiore
Lato superiore Fig. 4: Lato superiore Tasti di memoria 1–6 SNOOZE MUTE Altoparlante RELAX SLEEP © sonoro audio GmbH 2018... - Page 209 Lato posteriore Fig. 5: Lato posteriore ANTENNA FM/DAB Vano batterie Apertura bass reflex Keylock Attacco dell’alimentatore Ingresso di carica e riproduzione USB Cuffie AUX IN © sonoro audio GmbH 2018...
- Page 210 Telecomando Fig. 6: Telecomando Stand-by ( ) Allarme 1 ( 1) Luce ( SLEEP MUTE/ SNOOZE Indietro ( ) VOL ( Bluetooth ( ) BASS TREBLE VOL ( RELAX Avanti ( ) OK, Play/Pause ( Allarme 2 ( 2) DAB ( Tasti di memoria 1–6 SETUP ©...
-
Page 211: Display
Display Fig. 7: Display Pos. Simbolo Funzione Cuffie Cuffie collegate. Sleep La modalità Sleep Timer è attiva. Repeat CD: ripetizione di tutti i brani presenti sul CD. Relax La modalità relax è attiva. Shuffle CD: Riproduzione dei singoli brani in ordine casuale. FM/CD/DAB/ AUX/USB Indicazione della modalità... -
Page 212: Apertura Della Confezione E Messa Infunzione
Apertura della confezione e messa infunzione È ammesso esclusivamente l’utilizzo di cavi e dispositivi esterni che corrispondano dal punto di vista tecnico, per la compatibilità elettromagnetica e la qualità di schermatura alle caratteristiche dell’apparecchio stesso. Apertura della confezione Tutti i pezzi dell’apparecchio vengono consegnati all’interno di una scatola. 1. -
Page 213: Collegamento Dell'antenna
3. Inserire la spina in una presa elettrica. Collegamento dell’antenna 1. Avvitare l’antenna ad asta situata sul retro di QUBO alla presa dell’antenna FM / DAB. 2. Se si utilizza l’antenna ad asta, separare i bracci dell’antenna e allineare l’antenna in modo da ottenere la migliore ricezione possibile. -
Page 214: Abbinamento A Sonorolight
Osservare il manuale operativo di sonoroLIGHT. 1. Inserire sonoroLIGHT in una presa elettrica. 2. Accertarsi che sonoroLIGHT e QUBO non siano distanti tra loro più di 10 m. In caso contrario è impossibile stabilire una connessione. 3. Premere il pulsante su sonoroLIGHT. -
Page 215: Impostazione Delle Funzioni Di Base
Impostazione delle funzioni di base Nei singoli menu è possibile impostare le funzioni e regolare le impostazioni dell’apparecchio. Prima accensione dell’apparecchio Dopo la prima accensione, il display LCD visualizza l’ora e il messaggio [Tune to FM RDS station to set time & date]. Nella modalità... - Page 216 Con il tasto [Avanti] o [Indietro] è possibile passare tra la visualizzazione delle ore e dei minuti. Dopo 10 secondi di inattività, l’apparecchio passa direttamente alla modalità Standby, senza salvare le impostazioni. Impostazione manuale della data Fig. 13: Impostazione della data 1.
-
Page 217: Impostazioni Di Base
Impostazioni di base Con l’apparecchio attivato, nel menu [Settings] è possibile effettuare le seguenti configurazioni: • Impostazione del formato dell’ora. • Impostazione del formato della data. • Impostazione del dimmer per il display. • Impostazione della luce sveglia (solo con sonoro-LIGHT). •... - Page 218 Impostazione del formato della data Fig. 16: Impostazione del formato della data È possibile impostare tre diversi formati di data (Fig. 16/A, B e C) e il giorno attuale. Le possibili impostazioni sono: A: giorno attuale, giorno, mese, anno. • B: giorno attuale, mese, giorno, anno.
- Page 219 È possibile impostare la luminosità massima desiderata della luce sveglia e l’intervallo di tempo in cui la luce sveglia deve raggiungere tale luminosità. A questo scopo, procedere come segue: • Light Level (luminosità): 01 – 32 (Fig. 18/A) • Sunrise (luce sveglia): 0 – 60 min (Fig. 18/B) Impostazione dell’aggiornamento automatico di ora e data Fig.
-
Page 220: Regolazione Dell'audio
Ripristino delle impostazioni di fabbrica dell’apparecchio Fig. 22: Ripristino delle impostazioni di fabbrica Se necessario, è possibile ripristinare allo stato di fabbrica tutte le impostazioni effettuate, come lingua, formato data ed emittenti memorizzate (Fig. 22). Regolazione dell’audio L’audio della riproduzione può essere regolato impostando i bassi e gli alti. Fig. - Page 221 Disattivazione dello sleep timer 2. Per disattivare lo sleep timer, premere nuovamente il tasto [SLEEP]. W Il simbolo scompare dal display. Se l’apparecchio è stato spento mediante lo sleeptimer, al prossimo avvio si accenderà nell’ultima modalità ascoltata. Impostazione dell’intervallo di tempo per lo sleeptimer Fig.
-
Page 222: Accensione/Spegnimento Della Luce
Se durante l’intervallo dello sleep timer viene premuto il tasto [Standby], la luce rimane accesa. Se durante l’abbassamento della luce viene premuto il tasto [Luce], la luce viene spenta immediatamente. Accensione/spegnimento della luce È possibile accendere e spegnere una lampada collegata (solo in combinazione con sonoroLIGHT). -
Page 223: Sveglia
Sveglia È possibile programmare la sveglia su un’emittente radio FM/DAB, su un CD, sulla musica relax oppure su una suoneria. È possibile impostare la sveglia anche quando l’apparecchio è in modalità Standby. Il menu delle impostazioni dell’allarme è strutturato come segue: W Impostazione dell’orario della sveglia W Selezione del suono della sveglia W Impostazione del volume della sveglia... -
Page 224: Impostazione Del Volume Della Sveglia
Fig. 29: Impostazione del suono della sveglia 1. Ruotare la manopola per selezionare il segnale desiderato (Fig. 29): Scegliere un canale FM tra quelli memorizzati con cui deve avviarsi l’apparecchio al momento della sveglia. Scegliere un canale DAB tra quelli memorizzati con cui deve avviarsi l’apparecchio al momento della sveglia. -
Page 225: Impostazione Della Ripetizione Della Sveglia
Il suono dell’allarme inizia sempre a volume minimo e aumenta progressivamente fino al volume impostato. Impostazione della ripetizione della sveglia Dopo aver impostato il volume della sveglia e aver confermato, è possibile impostarne la ripetizione. Fig. 31: Impostazione della ripetizione della sveglia 1. -
Page 226: Attivazione/Disattivazione Della Sveglia
Se si desidera anche la luce sveglia in aggiunta alla suoneria, la luce viene accesa nel tempo impostato prima dell’allarme, in modo che abbia raggiunto la luminosità predefinita al rilascio dell’allarme. Per l’impostazione della luce sveglia »Impostazione della luce sveglia« a pag. 225. Esempio Impostazioni effettuate: •... -
Page 227: Impostazione Della Funzione Snooze
In alternativa, è possibile anche ruotare la manopola al suono dell’allarme per impostare il tempo restante prima che la sveglia suoni nuovamente e confermarlo premendo la manopola. W Sul display appare il tempo restante prima che la sveglia suoni nuovamente. Al termine del tempo impostato l’allarme suona nuovamente. Impostazione della funzione snooze Fig. -
Page 228: Selezione Della Modalità Di Riproduzione
Disattivazione della riproduzione audio Disattivazione dell’audio Fig. 35: Disattivazione dell’audio 1. Per disattivare l’audio durante la modalità di riproduzione, premere brevemente il tasto [MUTE] sul lato superiore dell’apparecchio. In alternativa è possibile anche premere il tasto [MUTE] sul telecomando. W Sul display lampeggia il testo [Volume Mute] (Fig. 35). Attivazione dell’audio 2. -
Page 229: Riproduzione Radio
10. Riproduzione radio Dopo aver selezionato la riproduzione radio via [FM] (radio VHF) o [DAB] (radio digitale), sul display appare il simbolo FM o DAB e le seguenti informazioni: • Modalità: FM o DAB. • Canale memorizzato, se l’emittente è salvata nella memoria. •... - Page 230 3. Premere la manopola. W Sul display compare il testo [Auto Search YES]. 4. Premere nuovamente la manopola. W Viene attivata la funzione di ricerca automatica. Terminata la ricerca, l’apparecchio passa alla prima emittente dell’elenco. Ricerca automatica di emittenti Presupposti: •...
-
Page 231: Radio Dab
Memorizzazione di emittenti FM tra i preferiti Fig. 40: Memorizzazione di emittenti FM 1. Impostare l’emittente desiderata. 2. Premere e tenere premuto uno dei tasti di memoria delle emittenti sul lato superiore dell’apparecchio o sul telecomando. W Sul display compare lo spazio per la memorizzazione di emittenti. È... - Page 232 Fig. 42: Ricerca manuale di emittenti DAB 1. Premere il tasto [SETUP] nella modalità di riproduzione DAB. 2. Premere il tasto [Avanti]. W Sul display compare il testo [DAB Manual Tune] (Fig. 42). 3. Premere la manopola sull’apparecchio o il tasto [OK] sul telecomando. 4.
- Page 233 È possibile memorizzare fino a 6 emittenti DAB tra i preferiti. Come richiamare un’emittente DAB memorizzata tra i preferiti 1. Per richiamare un’emittente DAB memorizzata tra i preferiti procedere come descritto in Ä Capitolo 10.1 »Radio FM« a pag. 229. W L’emittente selezionata viene riprodotta.
-
Page 234: Riproduzione Di Cd
Ci sono 3 diverse possibili impostazioni: • DRC High (alta): compressione forte • DRC Low (bassa): compressione debole • DRC Off (spenta): compressione assente Presupposti: • L’apparecchio è in modalità DAB. 1. Premere il tasto [SETUP]. W Sul display compare il testo [DAB Preset List]. Fig. - Page 235 Nella modalità CD il display visualizza le seguenti informazioni: Fig. 46: Display nella modalità CD 1. Sequenza di riproduzione (ripetizione, casuale, continuare riproduzione CD) 2. Modalità CD 3. Ora 4. Minuti di riproduzione trascorsi 5. Numero del brano (Track) 6. Stato di riproduzione (Play/Pause) Altre funzioni •...
- Page 236 • Per passare alla cartella successiva, premere il tasto [Memoria 2] (solo MP3-CD). • Per passare alla cartella precedente, premere il tasto [Memoria 1] (solo MP3-CD). Come modificare la riproduzione del CD Per riprodurre i brani di un CD sono disponibili diverse sequenze di riproduzione 1.
-
Page 237: Riproduzione Via Bluetooth
(Fig. 47). 3. Attivare la funzione Bluetooth del telefono cellulare o dell’apparecchio e selezion- are “QUBO” nell’elenco degli apparecchi Bluetooth trovati. W I due apparecchi vengono abbinati. La radio abbina fino a 8 telefoni cellulari o apparecchi e si collega automaticamente agli apparecchi già... -
Page 238: Riproduzione Di Musica Mediante Bluetooth
12.3 Riproduzione di musica mediante Bluetooth • Premere il tasto [Play/Pause] o la manopola per avviare la riproduzione. • Per interrompere la riproduzione (Pause), premere il tasto [Play/Pause] o la manop- ola. 13. Riproduzione tramite collegamento AUX È possibile collegare e riprodurre altri dispositivi audio attraverso l’ingresso AUX presente sul lato posteriore dell’apparecchio. - Page 239 2. Preme il tasto [MENU] e selezionare la modalità [USB Device] o premere il tasto [USB] sul telecomando. W Sul display appare il simbolo [USB] (Fig. 50). 3. Collegare un dispositivo USB esterno. W Sul display compare il testo [Searching]. 4.
-
Page 240: Musica Relax E Per Meditazione
15. Musica relax e per meditazione L’apparecchio dispone di musica relax e per meditazione in funzione della lingua, suddivisa in diverse cartelle. Lingua Cartella Brano Nome Tedesco 1 – Rilassamento rapido Einleitung Kurzentspannung Entspannung durch längeres Ausatmen Entspannung durch Spüren der Gegensätze Entspannung durch Da-Sein Entspannung durch Stressabgeben... - Page 241 Entspannungsmusik 3 Entspannungsmusik 4 Entspannungsmusik 5 6 – Natuurklanken Brandung Walgesänge Vögel Regen Windspiel Kaminfeuer Lingua Cartella Brano Nome Inglese 1 – Rilassamento rapido Quick Relaxation Exercise: Relaxing by feeling your pulse Quick Relaxation Exercise: Relaxing by letting go off stress 2 –...
- Page 242 Lingua Cartella Brano Nome Francese 1 – Rilassamento rapido Relaxation courte: Relaxation à travers le ressenti de votre pouls Relaxation courte: Relaxation par évacuation du stress 2 – Rilassamento meditativo Relaxation méditative par la respiration 3 – Viaggi fantastici Voyage imaginaire "plage et chaleur" 4 –...
- Page 243 1. Accendere l’apparecchio. 2. Premere il tasto [RELAX] sul lato superiore dell’apparecchio o sul telecomando. W Sul display appare il simbolo [Relax]. 3. Premere il tasto [SETUP]. Fig. 51: Selezione del menu lingua 4. Ruotare la manopola finché sul display non appare [Music Content]. 5.
-
Page 244: Riproduzione Di Musica Demo
8. Premere uno dei tasti di memoria 1–6 per selezionare la cartella desiderata. W La riproduzione del primo brano di questa cartella si avvia. Fig. 53: Nome del brano 9. Premere il tasto [Avanti] o [Indietro] per selezionare un brano nella cartella. W Sul display compare brevemente il numero e poi il nome del brano. -
Page 245: Risoluzione Dei Problemi
17. Risoluzione dei problemi In tutti gli apparecchi elettrici possono verificarsi dei problemi. Questo non vuol sempre dire che l’apparecchio sia difettoso. Controllare pertanto sulla base della seguente tabella se sia possibile eliminare autonomamente il problema. Problema Possibile causa Risoluzione L’apparecchio non si L’alimentatore con Collegare correttamente... - Page 246 Storing Mogelijke oorzaak Oplossing L’apparecchio non Problema all’apparecchio Spegnere e riaccendere reagisce l’apparecchio. Cattiva ricezione FM/ L’antenna FM/DAB non è Modificare la posizione dell’antenna orientata correttamente FM/DAB. Il telecomando La distanza è troppo grande Ridurre la distanza tra il telecomando non funziona o e l’apparecchio.
-
Page 247: Pulizia
18. Pulizia NOTA! Danni materiali dovuti a pulizia impropria! Pulire l’apparecchio solo esternamente con un panno asciutto e morbido. Non utilizzare detergenti aggressivi o contenenti solventi, poiché possono danneggiare la superficie dell’apparecchio. 19. Dati tecnici Specifica Valore Dimensioni (LxPxH) appross. 210 x 257 x 140 mm Peso appross. -
Page 248: Garanzia
20. Garanzia Per quanto riguarda il diritto a usufruire interamente e senza alcuna limitazione della garanzia, sono valide le seguenti condizioni: • È possibile usufruire del diritto di garanzia entro 2 anni dalla data dell’acquisto (1 anno per l’America Settentrionale e l’Australia). •... - Page 249 © sonoro audio GmbH 2018...
- Page 250 © sonoro audio GmbH 2018...
- Page 251 © sonoro audio GmbH 2018...
- Page 252 WIR DANKEN IHNEN FÜR IHR VERTRAUEN Bei der Entwicklung und Produktion unserer Musiksysteme legen wir größten Wert auf Qualität und höchstmögliche Sorgfalt. Dazu gehört auch, dass jedes einzelne Musiksystem vor dem Verlassen des Werkes auf Herz und Nieren geprüft wird. Es ist uns daher besonders wichtig, dass Sie nach dem Kauf noch lange Freude an Ihrem sonoro Musiksystem haben.